Overview #
The Advanced Date & Time Picker is an addon block in Optiontics that lets customers pick a date, a time, or both directly from the product page — perfect for reservations, pickups, rentals, and appointment-based products. Configure the format, set minimum and maximum bounds, disable specific dates or weekdays, and optionally charge per day for a selected range.
Requirements #
Make sure WooCommerce and Optiontics are both installed and active, with at least one published product to attach the addon to. The Date & Time Picker ships in the Free plugin (only the Sales Price column on each option row is Pro-gated).
When to use the Date & Time Picker block #
Reach for this block whenever a customer’s choice depends on when they want the order fulfilled or how long they want it for. Common scenarios:
- Table reservations — pick a date + time for a restaurant booking.
- Cafe pickup orders — choose a pickup slot for the same day or a future day.
- Equipment rentals — select a start and end date (range mode) and charge per day.
- Delivery scheduling — let customers nominate a delivery date that fits their week.
- Event registration — pick an event date from a fixed list (use disable rules to lock to specific days).
- Appointment slots — pick a time within business hours using the Time Range setting.
Step 1: Add the block to your addon form #
- Open the Optiontics dashboard from your WordPress admin sidebar.
- Open the option set attached to your product (or create a new one with Add Options).
- Click Add Elements on the canvas.
- Switch to the Custom category in the insertion modal.
- Drag Date & Time Picker into the form.
The block appears on the canvas with a default label of “Date & Time Field”. Click the block to surface its controls in the right sidebar.
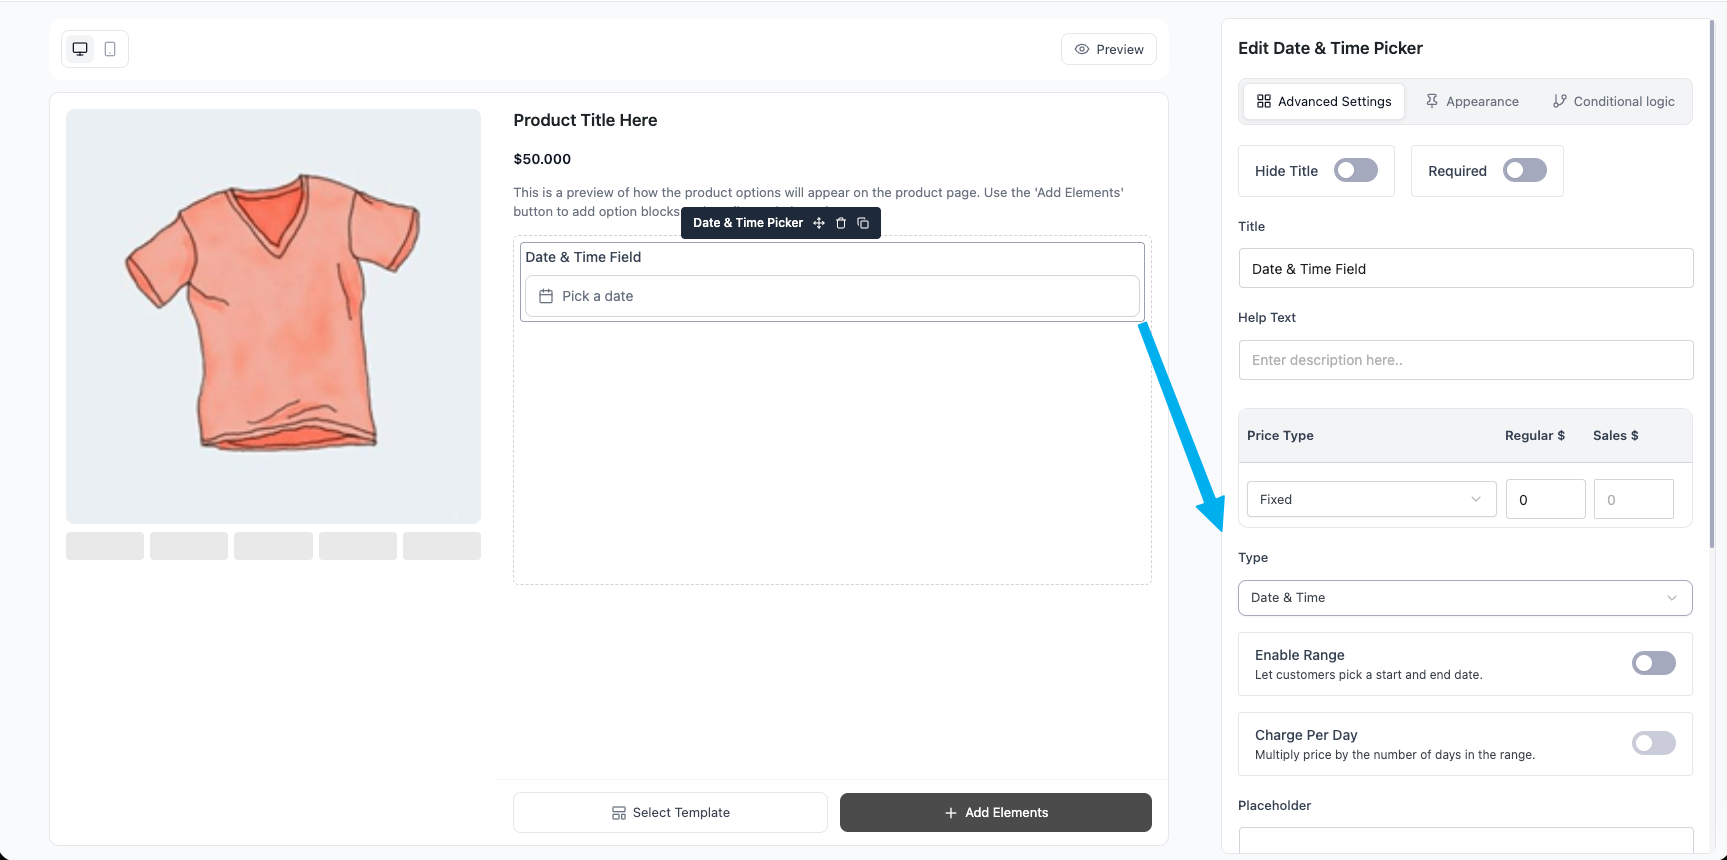
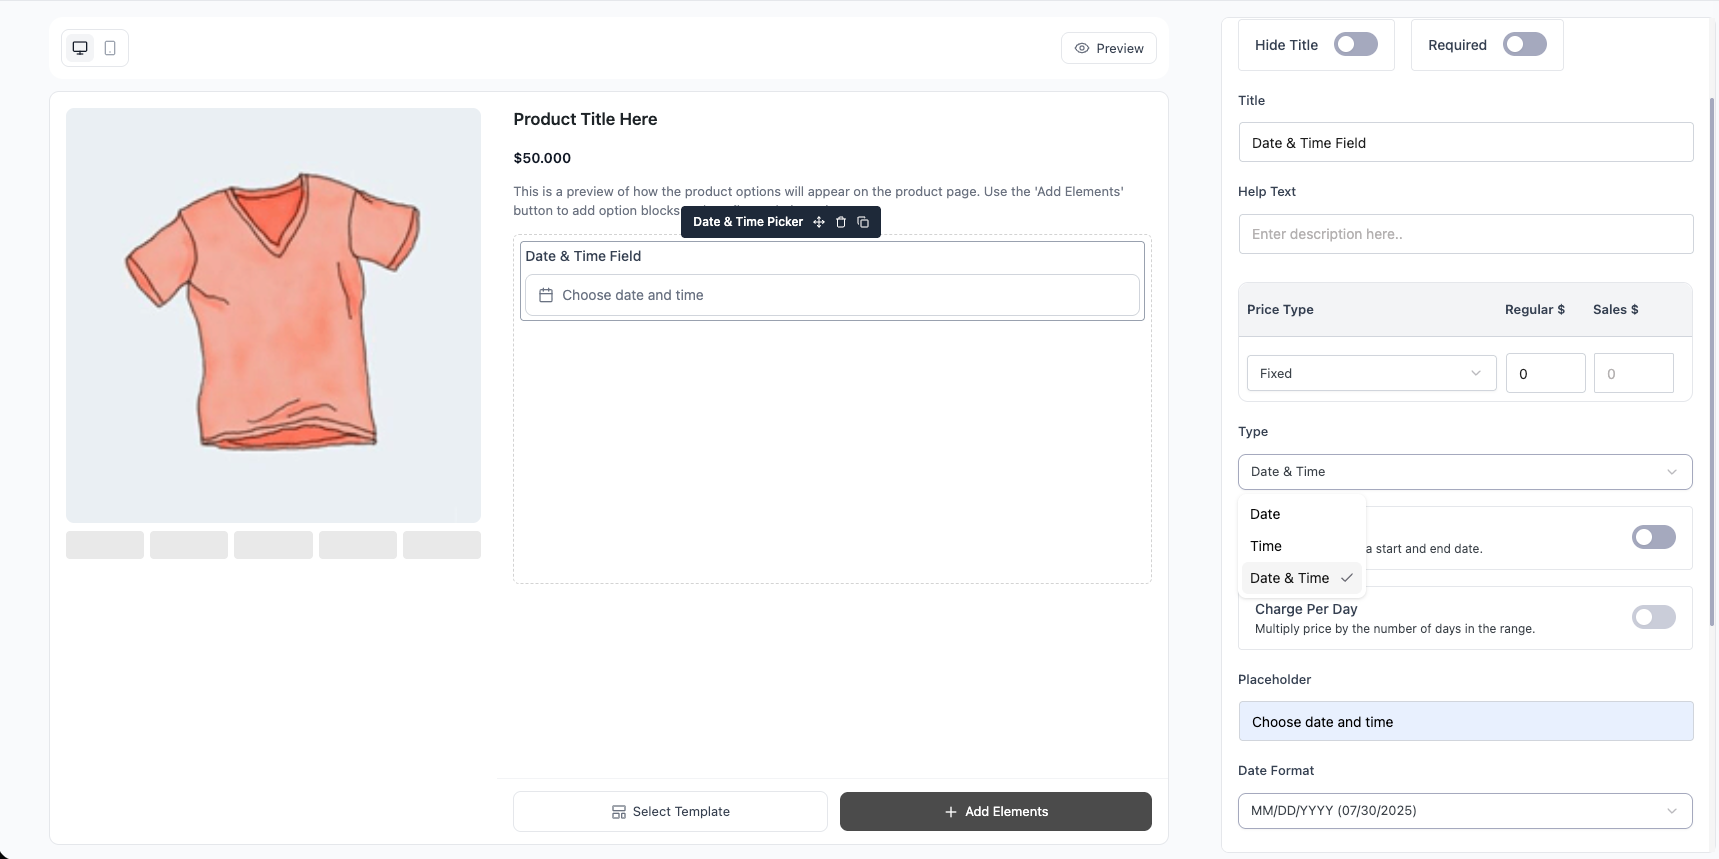
Step 2: Choose the Type #
The Type dropdown in the right sidebar selects how the picker is displayed.
| Type | What customers see |
| Date | Calendar only, no time roll |
| Time | Time picker only, no calendar |
| Date & Time | Calendar + time picker (default) |
Tip: The Type setting controls what’s selectable, not what’s stored. Internally Optiontics always uses ISO 8601 (YYYY-MM-DD or YYYY-MM-DDTHH:MM) so reporting and exports stay clean regardless of how the field is displayed. |
Step 3: Enable range selection (optional) #
Toggle Enable Range on for booking-style flows that need a start and an end.
When range is on, the customer sees two separate fields side-by-side — a From picker and a To picker — with a → arrow between them. Each field opens its own calendar. The To picker automatically locks to dates on or after the From selection.
To charge based on the length of the range, also toggle Charge Per Day on. With this combination, the customer is charged unit price × number of days in the range. Example: a $5 fixed price across a 3-day range bills as $15.
| Tip: Range mode is unavailable when Type is set to Time — a “time range” without dates has no useful UX. |
Step 4: Set the pricing #
Use the existing Price Type control above the block-specific settings.
- Fixed — flat amount added when the customer picks any date / range.
- Percentage — percentage of the product price.
- No Cost — block is informational; nothing is added to the cart.
Pair the price with Charge Per Day for booking products. For one-time appointment products, leave Charge Per Day off and use a flat Fixed price.
Step 5: Pick a Date Format and Time Format #
The vendor’s chosen format is the single source of truth — the same string appears on the product page, in the cart, on the checkout review, and in the order admin, so customers, staff, and reports stay aligned.
Date Format (dropdown):
MM/DD/YYYY— 07/30/2025DD/MM/YYYY— 30/07/2025YYYY-MM-DD— 2025-07-30Month D, YYYY— July 30, 2025D Mon YYYY— 30 Jul 2025
Time Format:
- 12 hour (AM/PM) — 2:30 PM
- 24 hour — 14:30
The Time Format setting only appears when Type is set to Time or Date & Time.
Step 6: Set Min Date and Max Date #
Each bound has three options:
- None — no lower or upper bound.
- Today — locked to the current day at the moment the customer loads the page (resolved in JavaScript, so page caching stays safe).
- Custom — pick a specific date from a calendar popover.
Use Today as the Min Date to block past dates for any forward-looking booking. Use Custom as the Max Date to cap booking windows (e.g. “reservations only available in the next 30 days”).
Step 7: Add Disable Rules #
Open the Disable Rules accordion in the right sidebar to combine up to four blocking strategies:
- Disable Today — toggle to block the current day as a selectable date (use when bookings need lead time).
- Disable Specific Dates — click “Add date…” and pick individual dates from the popover; each one appears as a removable chip.
- Disable Weekdays — click the Sun / Mon / Tue / Wed / Thu / Fri / Sat chips to toggle them (e.g. block Tuesdays for a venue’s closed day).
- Disable Monthly Days — toggle 1–31 chips to block specific days of the month (e.g. always block the 1st and 15th).
The rules combine with OR logic — any rule that matches grays out the date in the calendar. Both the customer-side picker and the server enforce them, so a manually-typed value won’t slip through.
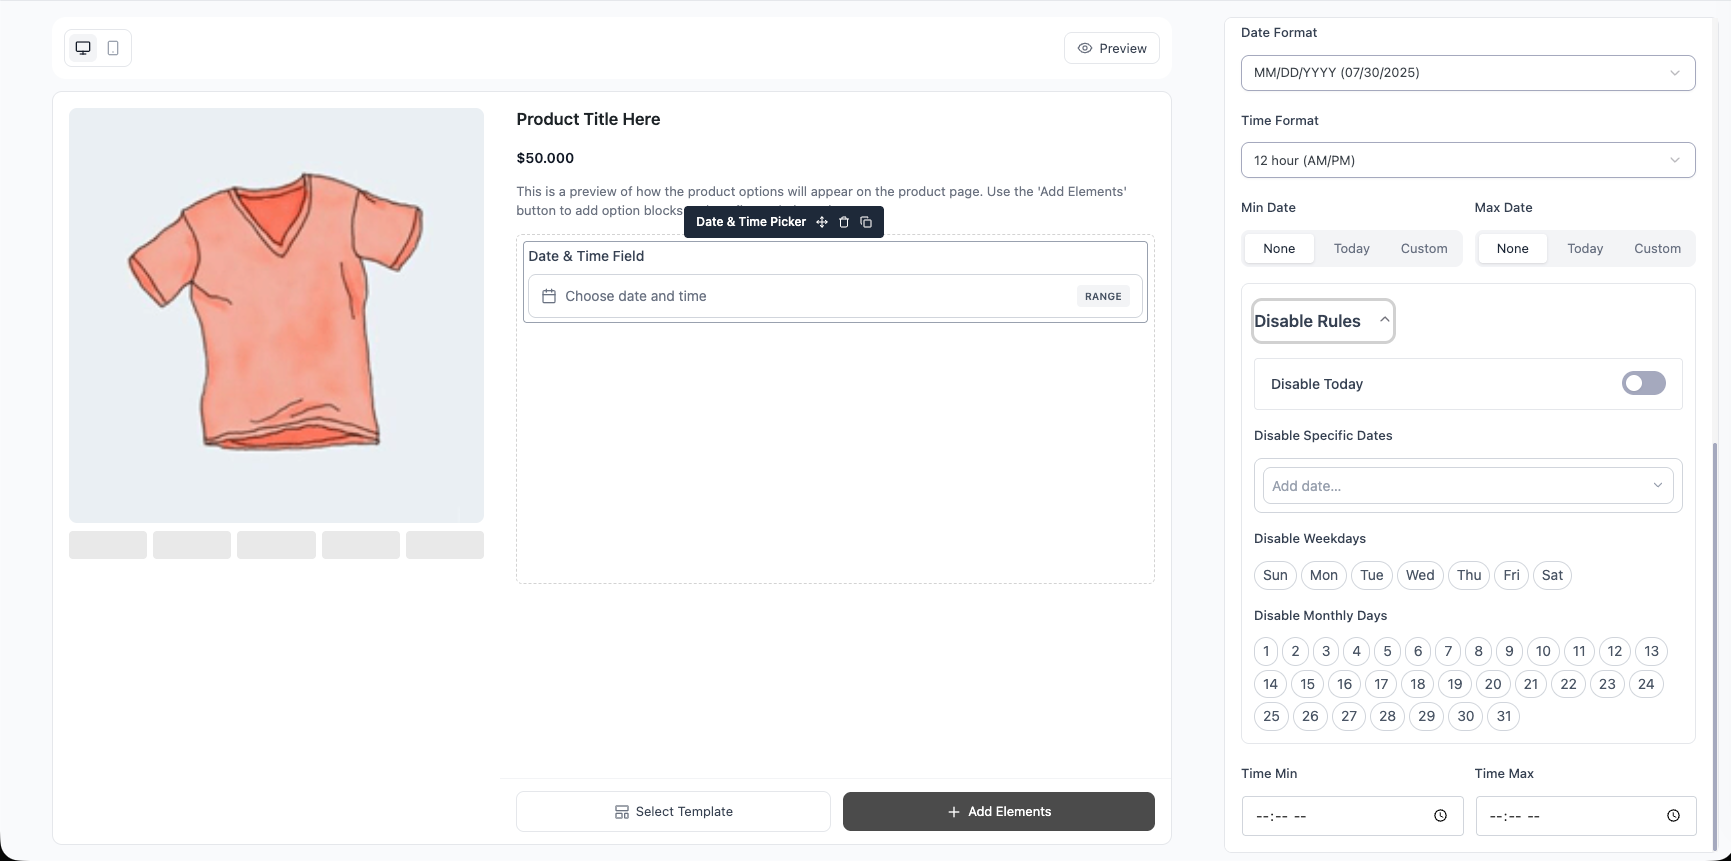
Step 8: Set the Time Range (optional) #
When Type is Time or Date & Time, two HH:MM inputs labelled Time Min and Time Max appear. Use them to constrain the selectable time window — for example, restrict bookings to business hours.
Time Min: 09:00andTime Max: 17:00→ only times between 9 AM and 5 PM are selectable.- Leave both empty for no time-of-day restriction.
The format of these inputs is browser-controlled (your browser locale decides whether it shows 09:00 or 9:00 AM), but the stored value is always 24-hour and applied consistently against any time the customer picks.
Step 10: Save and verify on the product page #
Save the option set and visit the product page. The block renders as one of:
- Single mode — one input with a calendar (and time roll, when applicable). Click to open the popover.
- Range mode — two inputs side-by-side, with a → arrow between them and an independent picker on each.
Pick a value:
- The selected date renders in the customer’s chosen format (matching the vendor’s Date Format / Time Format settings).
- The live cart total updates immediately.
- Disabled dates appear grayed out and cannot be picked.
- Required fields block submission until a value is chosen.
- Tampered values (e.g. an out-of-range date pasted in) are re-validated server-side at add-to-cart and rejected.
Frequently Asked Questions (FAQ) #
| Q1: Can the customer pick a range that spans a disabled date or weekday? No. Disable rules are enforced on both ends of the range — if the customer’s chosen start or end falls on a disabled date / weekday / monthly day, the picker won’t accept it. Mid-range dates aren’t constrained because the picker only stores the two endpoints, not every day in between. |
| Q2: I set Time Format to 24 hour but the admin Time Min input still shows AM/PM. Is that a bug? That’s expected. The admin’s Time Min / Time Max inputs are native HTML <input type="time"> controls, which render according to your browser locale, not the block setting. The stored value is always 24-hour internally, and the Time Format setting controls what the customer sees on the product page (the Flatpickr widget honours 12h / 24h faithfully). |
Conclusion #
The Advanced Date & Time Picker turns Optiontics into a booking-ready addon system. Configure it once, and the same formatted value flows from the product page through to the order email no extra plugins, no per-page formatting.


