
Overview #
WP Cafe works with WPML and WooCommerce Multilingual (WCML) to run your restaurant site in more than one language. Menus, food-order shortcodes, Elementor widgets, cart, checkout, tipping, and reservations all follow the visitor’s language, and your reservations, receipts, and QR codes stay as one shared record across languages.
This guide takes you from the first setup to publishing a translated product and a translated menu shortcode, and it covers translating the static text you see in the admin and on the front end. Follow the steps in order the first time.
Requirements #
- WPML Multilingual CMS: the core translation plugin.
- WPML String Translation: translates buttons and labels (static text).
- WooCommerce Multilingual & Multicurrency (WCML): translates products, cart, and checkout.
- WooCommerce active, with WP Cafe and WP Cafe Pro.
- At least two languages configured in WPML.
Step 1: Set up your languages in WPML #
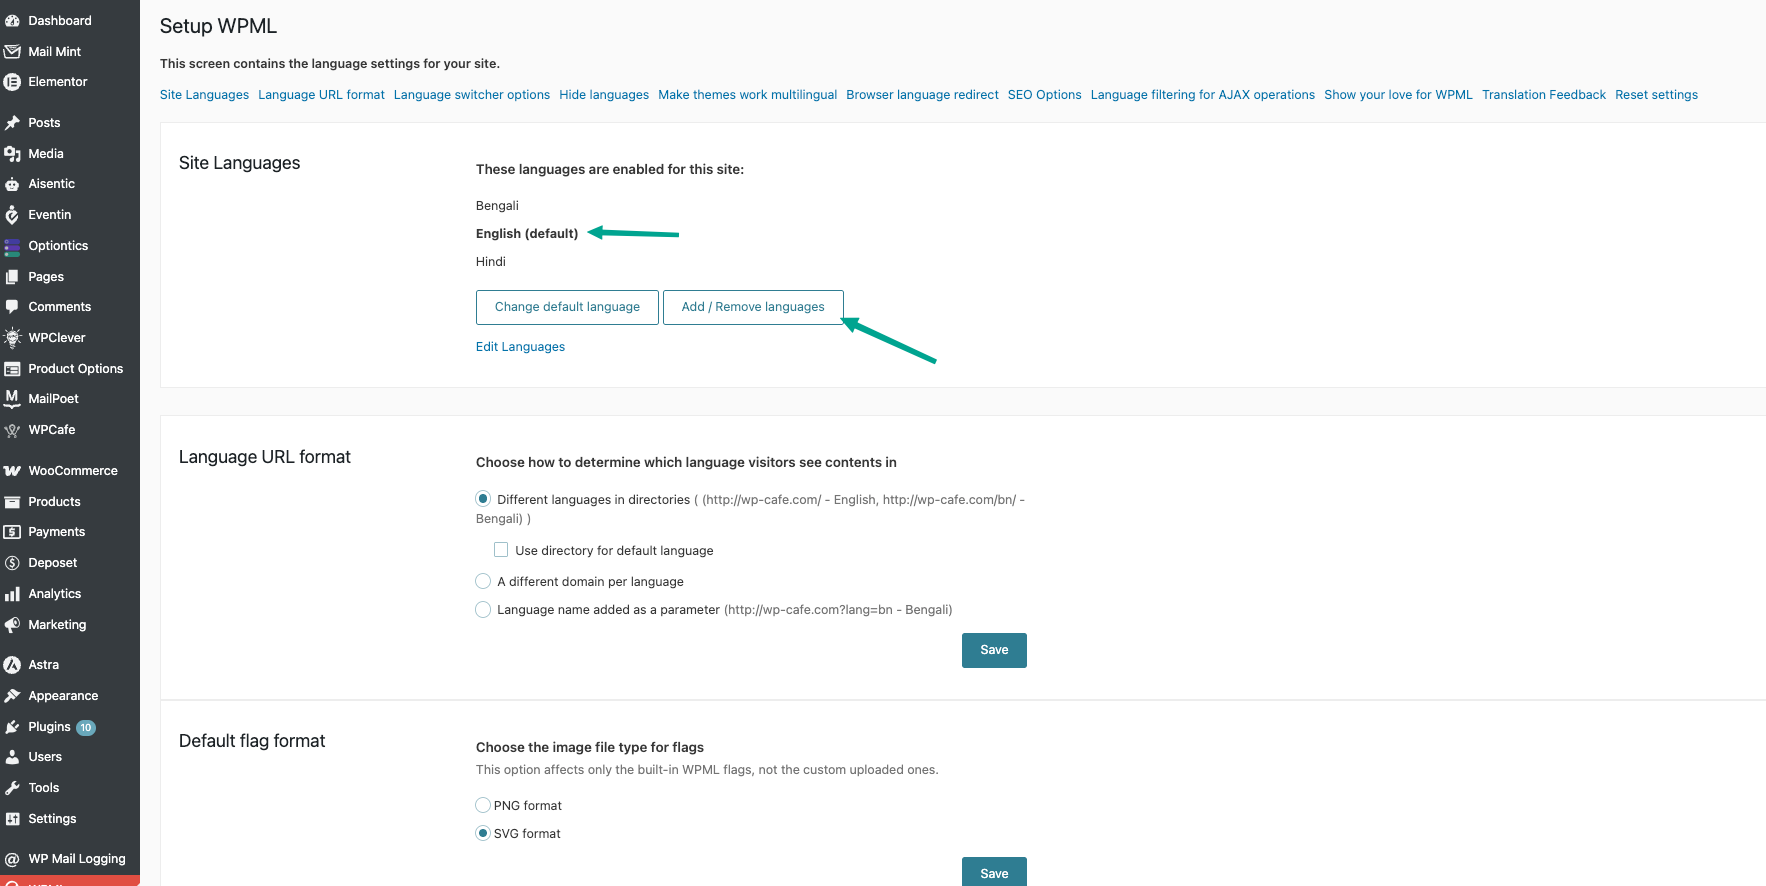
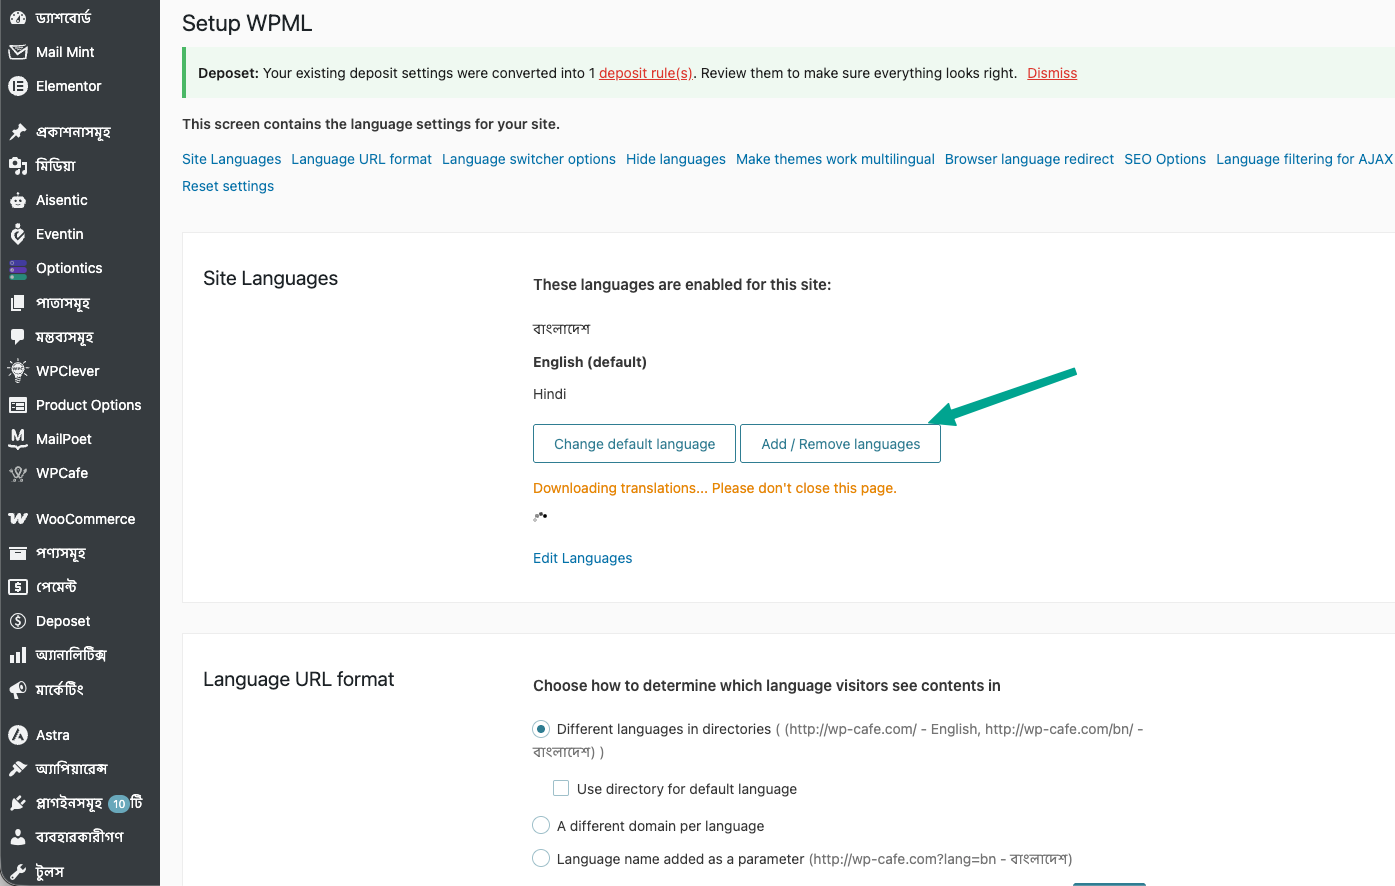
- Go to WPML → Languages.
- Add your default language and one or more secondary languages (for example English default, Bengali secondary).
- Pick a language switcher option so visitors can change language.
Step 2: Check WP Cafe post types are locked to “Not translatable” #
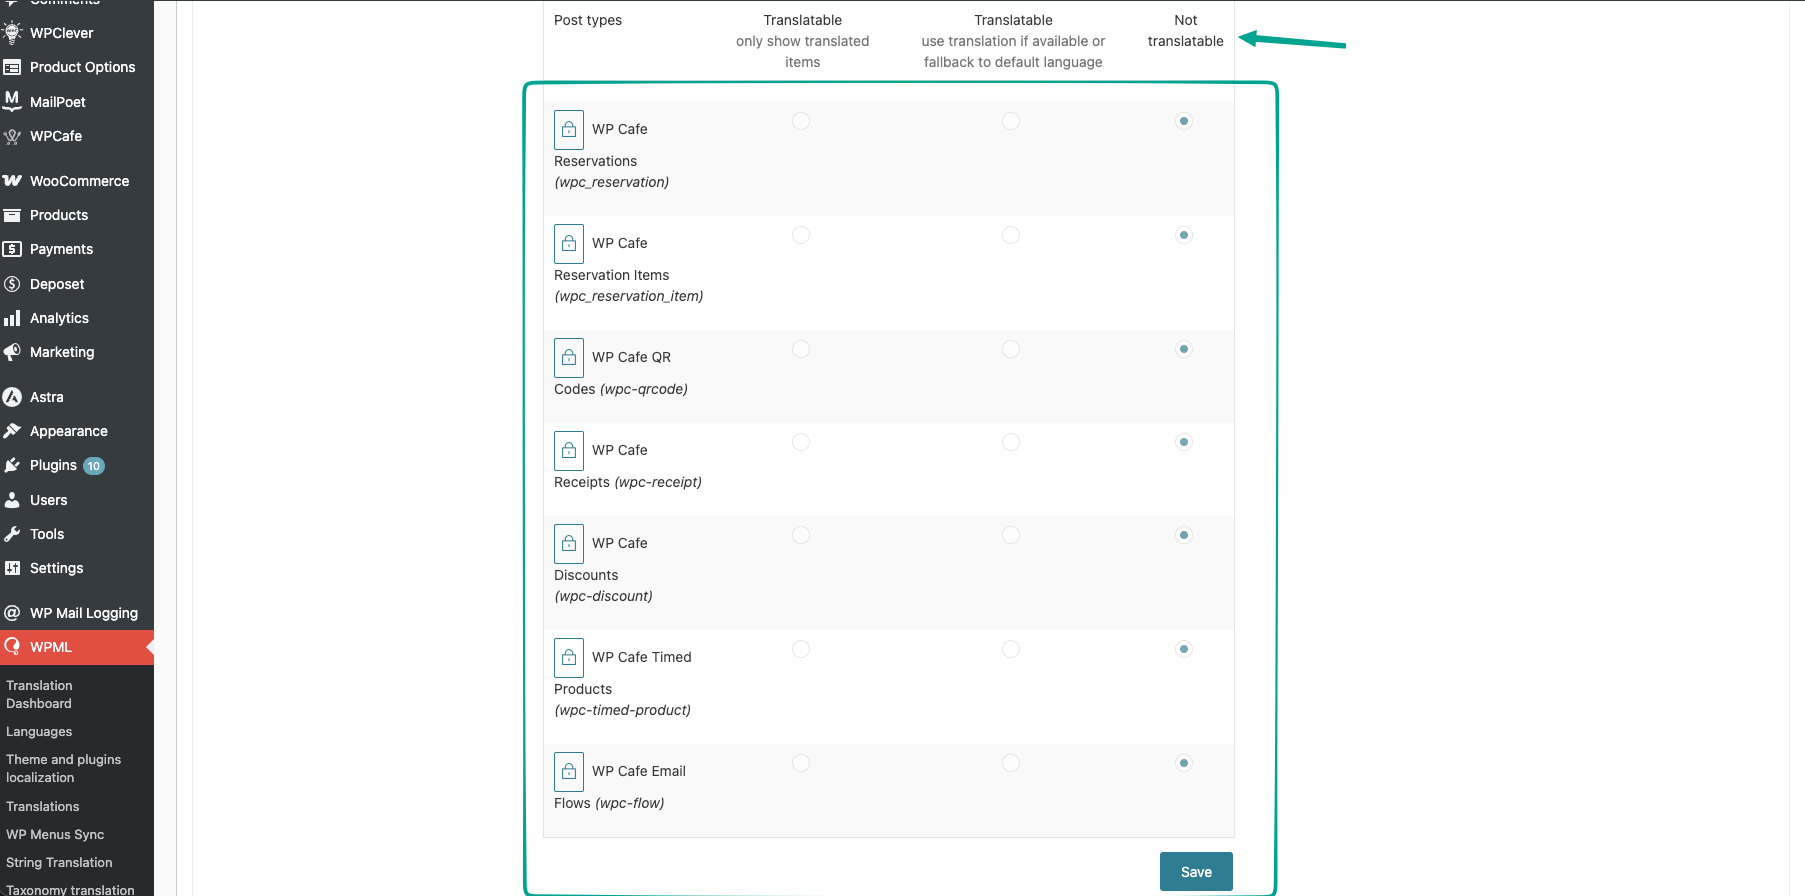
WP Cafe ships a WPML config file, so its data types are pre-set for you. You do not change these, just confirm them.
- Go to WPML → Settings.
- Open Post Types Translation. Confirm these all show Not translatable with a lock: Reservations, Reservation Items, QR Codes, Receipts, Receipt Layouts, Discounts, Timed Products, Email Flows.
- Open Taxonomies Translation. Confirm Food Locations is Not translatable (one shared location list) and Product Labels is Translatable (so label text like “Spicy” shows per language).
These are locked on purpose. A reservation or an order is the same record no matter which language the customer used, so it should never be duplicated per language.
Step 3: Register custom taxonomy terms with WPML (one time) #
If you already created products, tags, or Product Labels before turning on WPML, some of those terms have no language attached yet. WPML cannot translate a term it does not know about, so those terms would go missing on translated products. Run this one-time repair first.
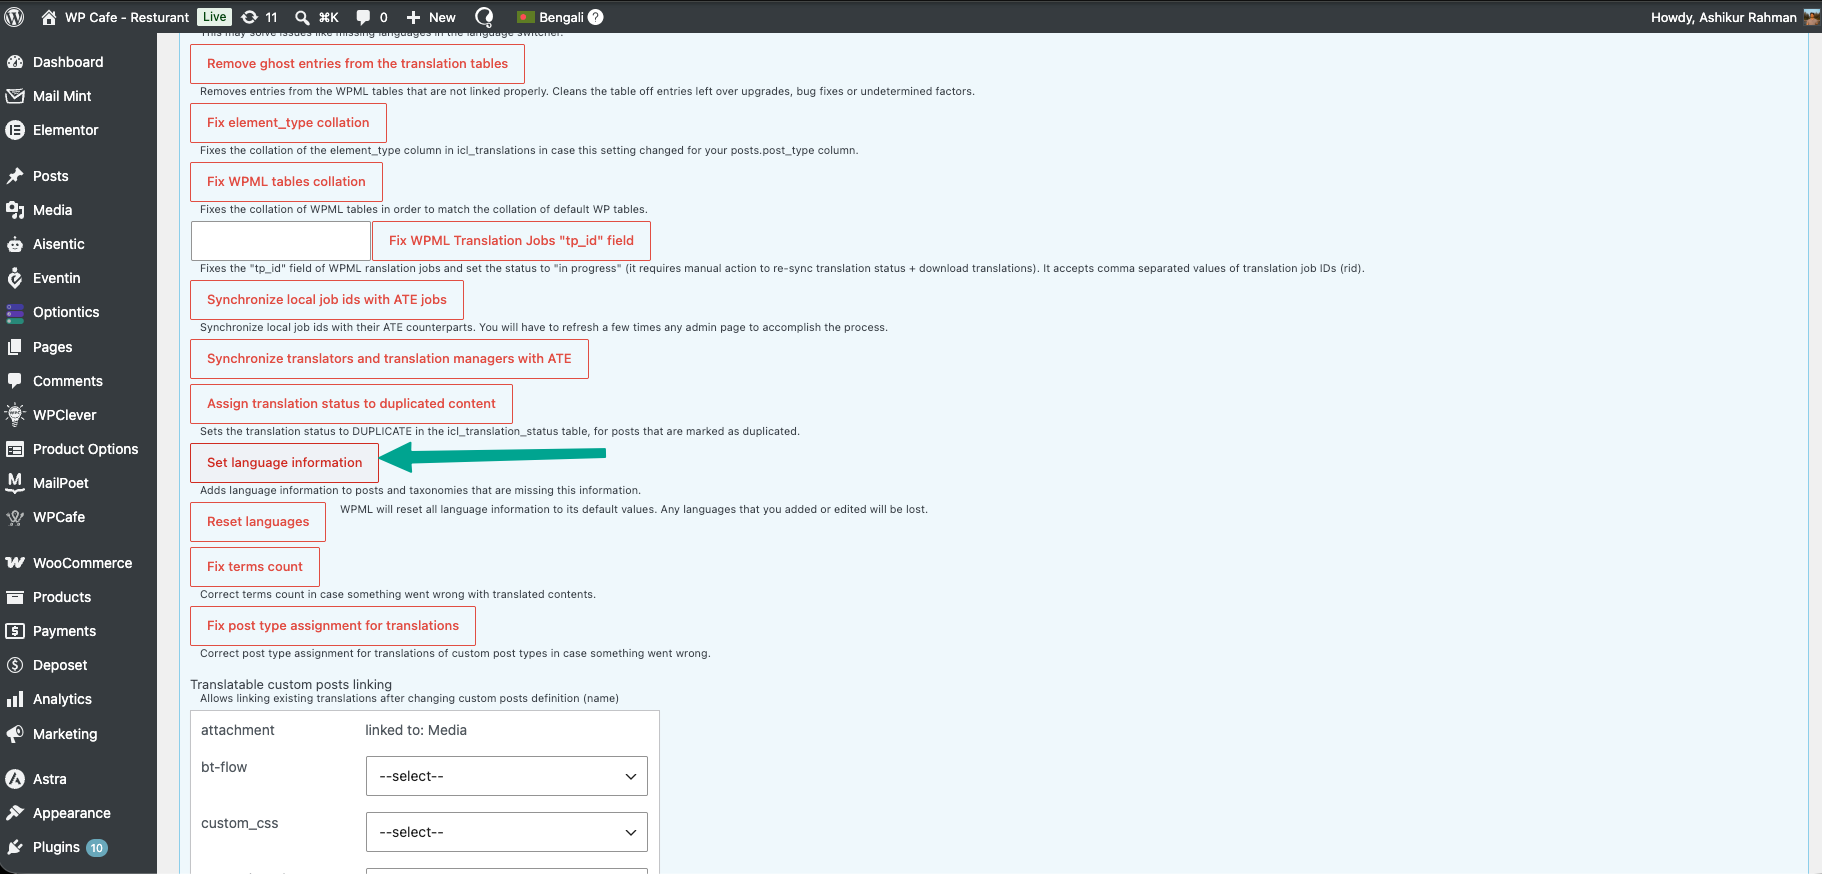
- Go to WPML → Support → Troubleshooting.
- Find Set language information and click it. This adds language data to posts and taxonomy terms that are missing it.
- Wait for it to finish. Your Product Labels and other custom terms will now appear on the Taxonomy Translation screen.
| Tip: The sign you skipped this step is the Product Labels list showing “No Product Labels found” even though your products clearly have labels. If you see that, run Set language information and check again. |
Step 4: Translate the static text (admin and front end) #
Static text is the fixed wording that comes from WP Cafe’s code, not from your products. On the front end that is text like “Add to cart”, “You pay”, “Delivery”, “Pickup”, “Dine in”, and the location picker labels. In the admin it is the same idea for any WP Cafe interface text. WPML String Translation handles all of it.
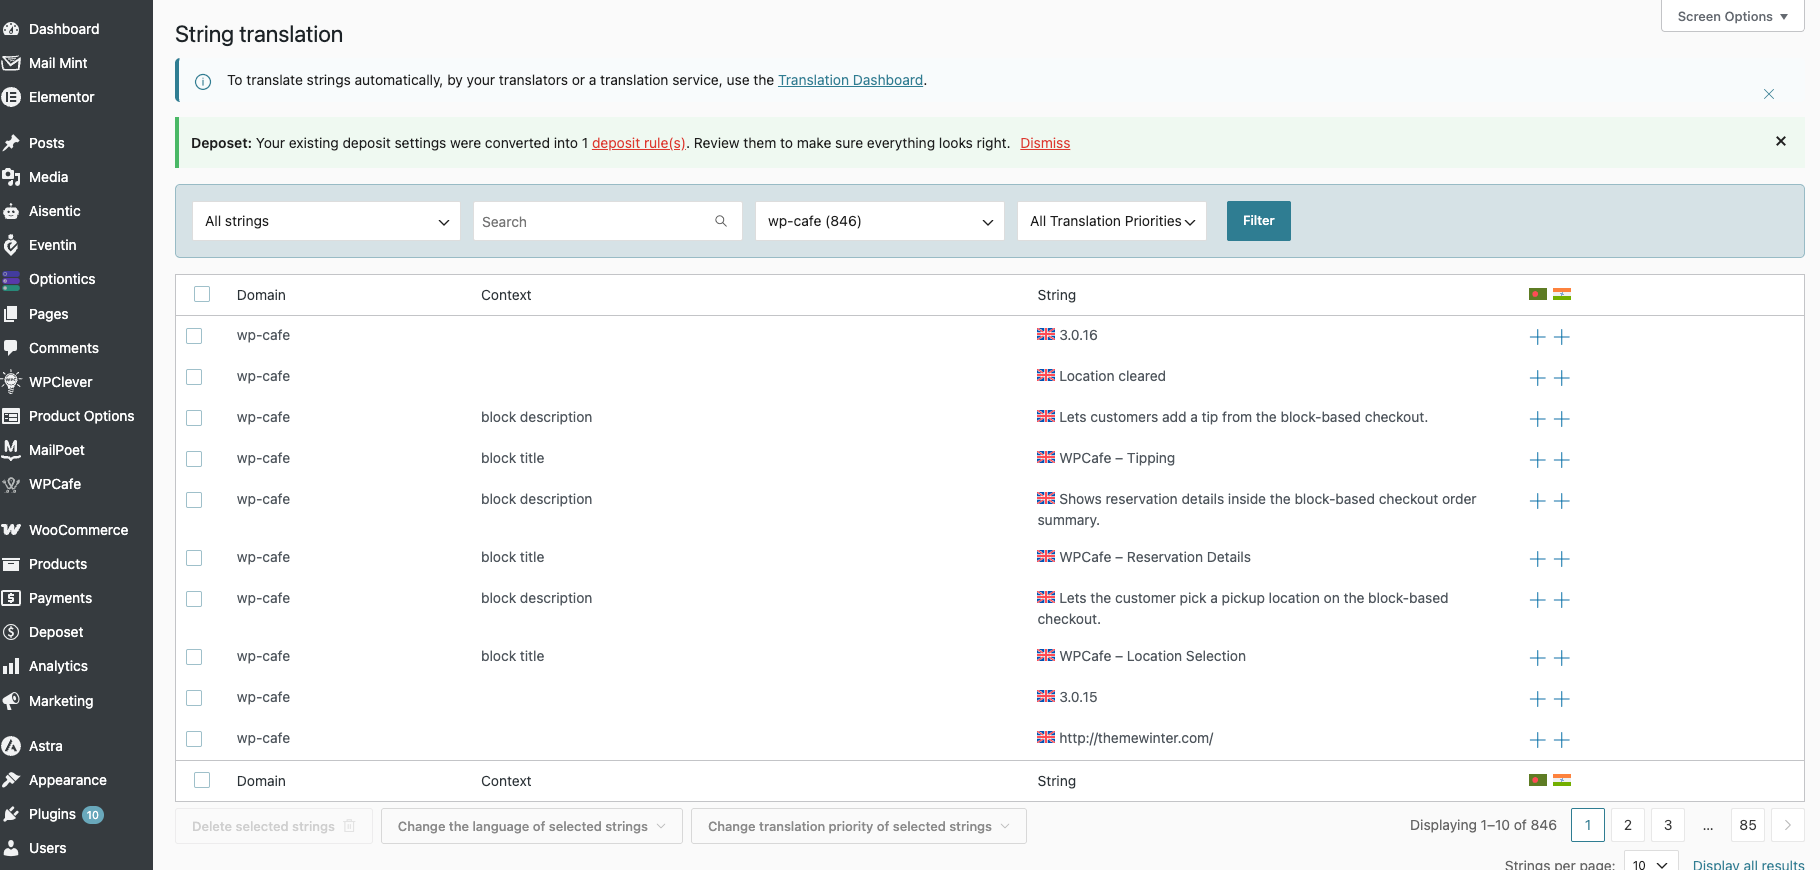
- Go to WPML → String Translation.
- In the domain filter, choose
wp-cafeandwpcafe-pro. - Search for the text you want, add the translation for each language, and save.
- If a string is not listed yet, open the page or screen that shows it once (front end or admin) so WPML registers it, then search again.
WP Cafe wraps its alll static text for translation too, so once a string is translated in String Translation it shows in the correct language on both the admin dashboard and the front end.
Step 5: Translate a product with WCML #
Your dishes are standard WooCommerce products, so WCML translates them. Open a product and use the Language box on the right.
- Edit a product in the default language. In the Language box, click the + next to your secondary language (for example Bengali).
- Enter the translated title, description, and short description.
- Click Publish. WCML links the new product to the original as a translation.
| Note: The translated product is a child of the original. A blue banner at the top lists the fields WP Cafe copies from the original on save: price, SKU, stock, preparation time, delivery time, nutrition, and allergens. Those fields are locked on the translation and marked “Copied From the Original”, so only the title and descriptions differ per language. A sale of the translated dish counts as the same dish as the original in the Top Sales report. |
Step 6: Translate the categories, tags, and labels #
A translated product only shows a category, tag, or label if that term itself has a translation. If you skip this, the translated product looks bare: no tags, no labels, and it can drop out of category-filtered menus.
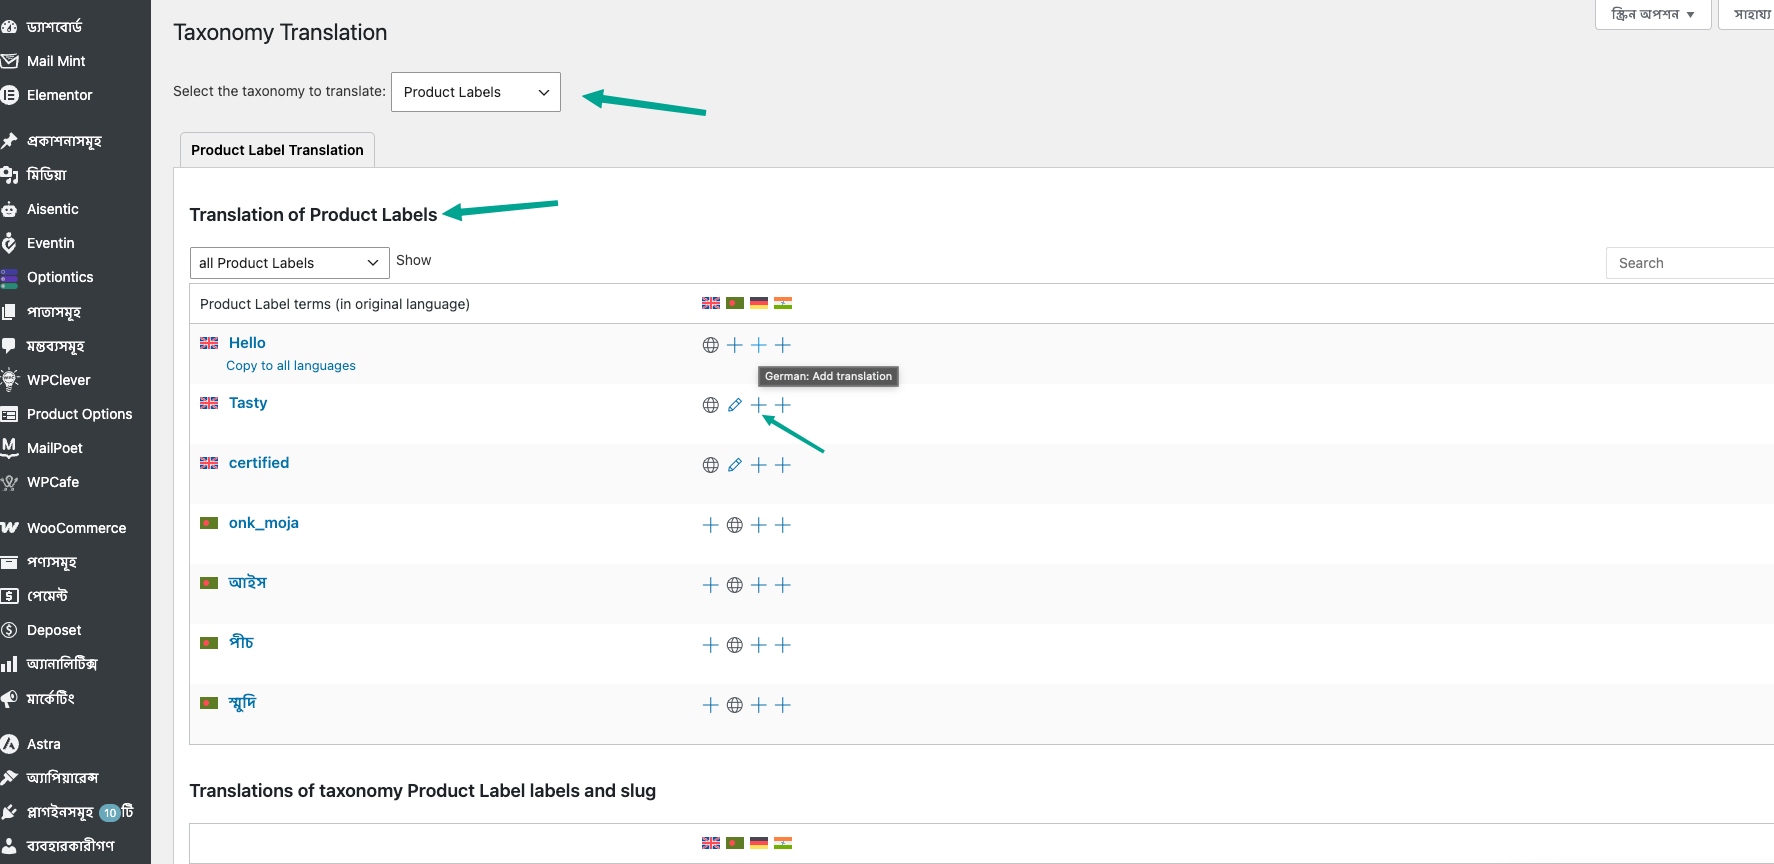
- Go to WPML → Taxonomy Translation.
- In Select the taxonomy to translate, choose Product categories. Click the + in your language column for each category you use, enter the translation, and save.
- Repeat for Product tags and Product Labels.
- Open the translated product again and confirm the translated category, tags, and labels are attached. If a box is empty, type the translated term names into it and update the product.
Food Locations are set to not translatable, so they are shared across languages. You assign a location once on the original product and it applies in every language. You do not translate locations.
Step 7: Publish menu pages and shortcodes #
You do not need separate shortcodes per language. Use the same WP Cafe shortcode, Elementor widget, or block, and WP Cafe shows the current language’s products automatically.
- Add your food menu shortcode or widget to a page as usual, filtered by category if you want.
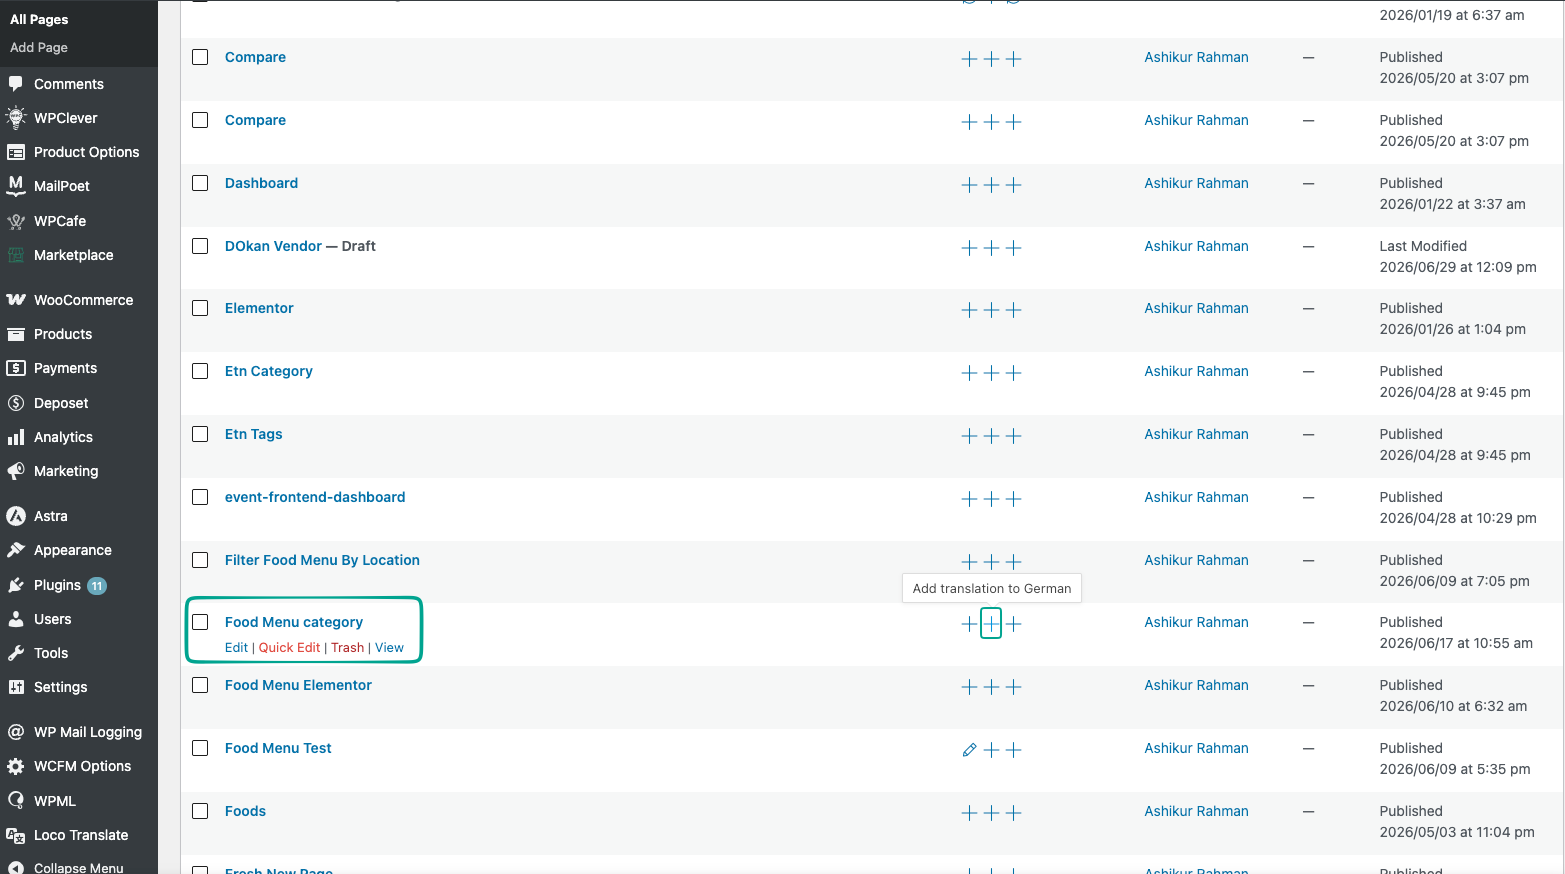
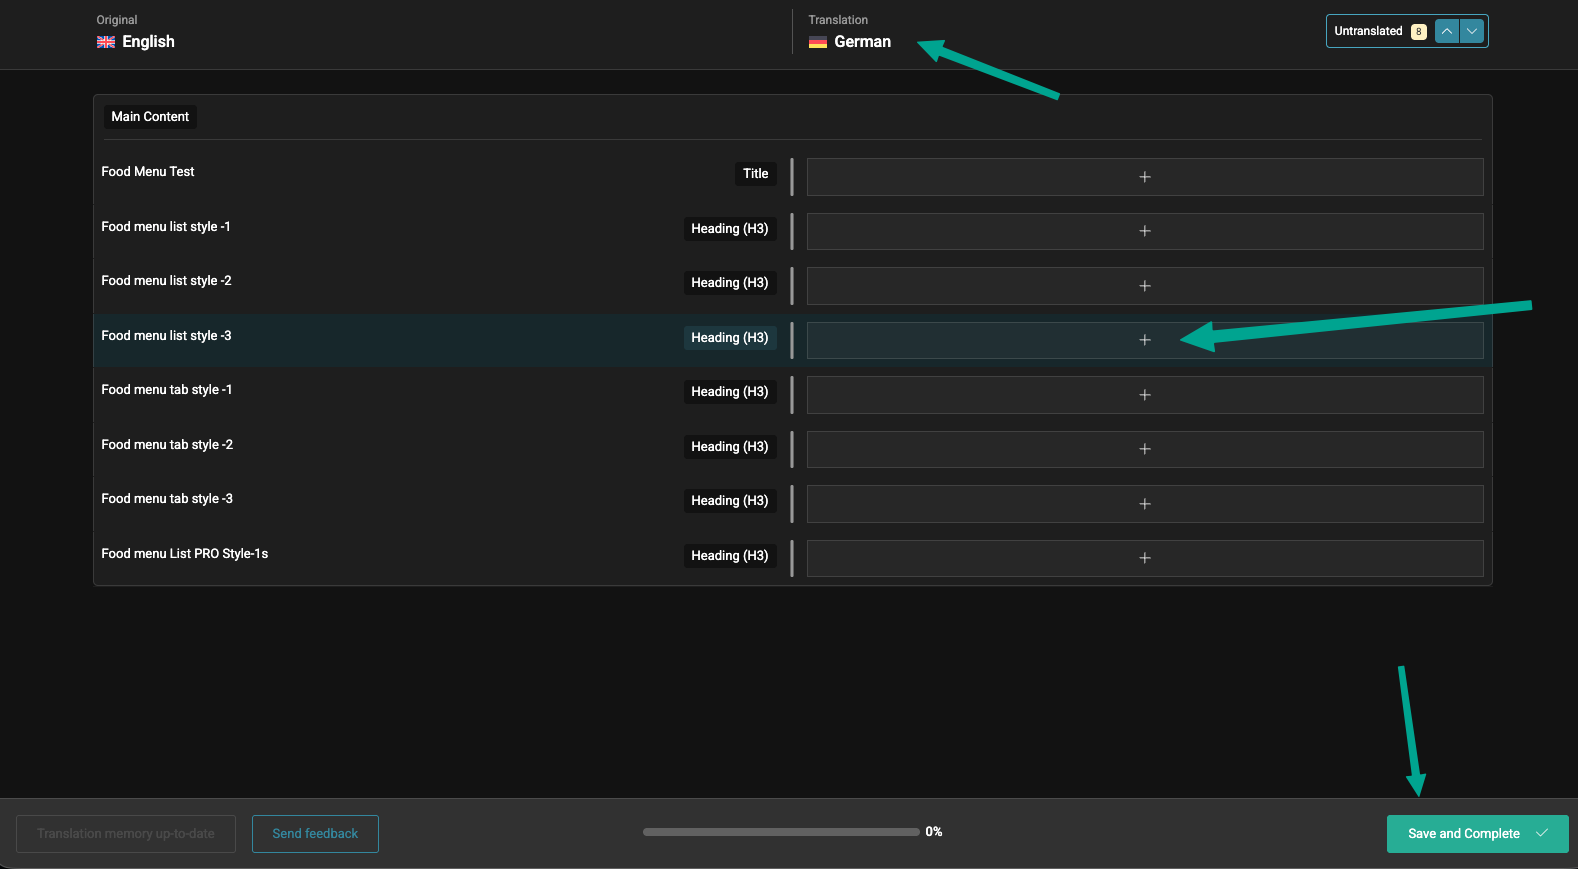
- WPML creates the translated version of that page. Just simply click on the plus button and add translation of strings and publish it.
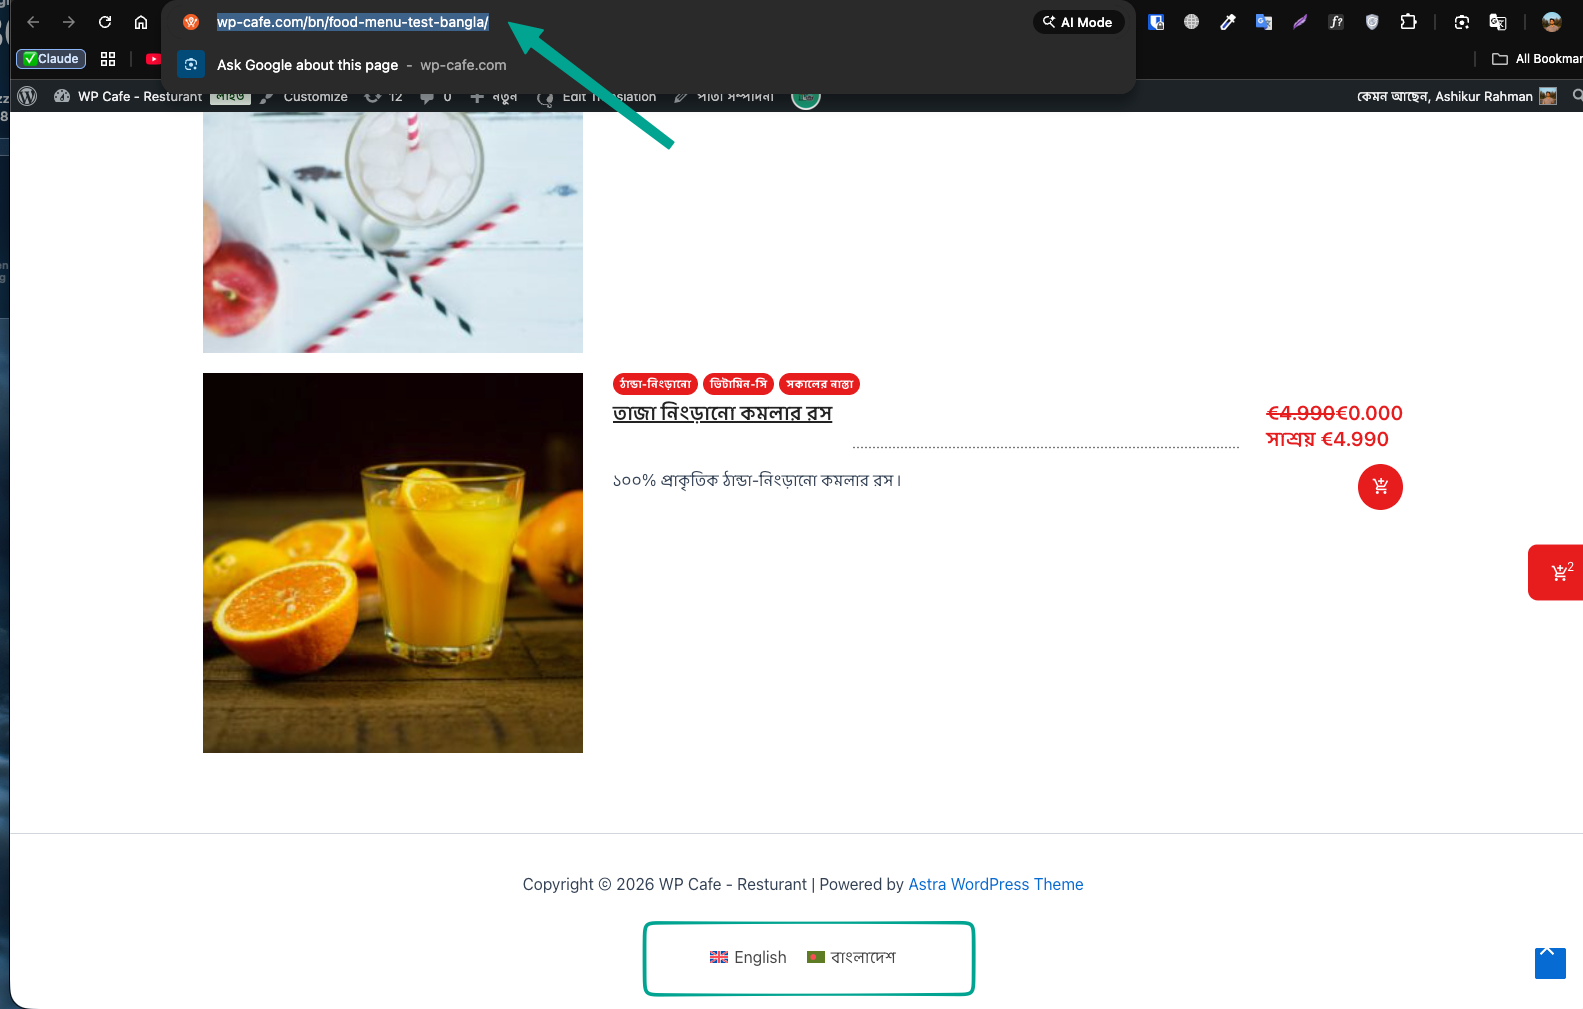
- Open the translated URL (for example
/bn/menu/). The same menu now shows the translated dishes, not English and not empty.
Step 8: Preview and test the full flow #
- Open the product on the default-language URL and note the price, category, tags, and labels.
- Open the same product on the secondary-language URL. Title and descriptions should be translated, price and SKU identical, and the translated category, tags, and labels should show.
- Add the translated dish to the cart, add a tip, and go to checkout. The cart is shared across languages, so both languages show the same items with translated names and labels.
- Create a reservation with food from the translated site. It saves as one record in the admin reservation list.
- Deactivate WPML once to confirm the single-language site behaves exactly as before, then reactivate.
Frequently Asked Questions (FAQ) #
| Q1: I translated a product but its tags and Product Labels are empty. Why? A translated product only inherits a tag or label whose term is also translated. Go to WPML → Taxonomy Translation, translate each Product tag and Product Label, then reopen the product. If a box is still empty, type the translated term names into it and update. Category behaves the same way. |
| Q2: Taxonomy Translation says “No Product Labels found”, but my products have labels. What happened? Those label terms were created before WPML was active, so they have no language attached and WPML cannot list them. Go to WPML → Support → Troubleshooting and click Set language information. The labels appear afterward and you can translate them. Do this once, as covered in Step 3. |
| Q3: Some text like “You pay” or “Dine in” is still in English. Why? That text comes from WP Cafe’s code and is handled by WPML String Translation, not WCML. Go to WPML → String Translation, filter by the wp-cafe and wpcafe-pro domains, and add the missing translations. Load the page once first if the string does not appear yet. |
| Q4: Do I have to re-enter the price on each translation, and is the cart separate per language? No to both. Price, SKU, stock, prep time, nutrition, and allergens copy from the original and stay locked, so you set them once. The cart is one shared WooCommerce session, so both languages show the same items with translated names and labels. |
Conclusion #
With WPML, WCML, and String Translation set up, WP Cafe runs your menus, products, cart, checkout, and reservations correctly in every language. Start by running Set language information once, translate two or three products and their tags and labels, then open the translated menu URL to confirm.


