
- What is the Setup Wizard?
- Why Do You Need It?
- Prerequisites
- Where to find it
- Step-by-Step Instructions
- Step 1: Confirm Your Email on the Welcome Screen
- Step 2: Choose Your Setup Mode
- Step 3 (AI path): Describe Your Store
- Step 4 (AI path): Wait While the Plan Is Generated
- Step 5 (AI path): Review and Approve the Plan
- Step 6 (Manual path): Read the Overview
- Step 7 (Manual path): Set Your Point Earning Rules
- Step 8 (Manual path): Configure Your First Reward
- Step 9 (Manual path): Configure Your VIP Level
- Step 10 (Manual path): Set Your Branding
- Step 11: Finish
- Key Functionality
- Settings the Wizard Writes
- Validation Rules
- Limitations
- Troubleshooting
- Notes
What is the Setup Wizard? #
The Setup Wizard is the guided first-run experience that turns a freshly activated Pointics plugin into a working loyalty program. It opens automatically the first time you activate Pointics and walks you through naming your program, deciding how customers earn points, what they can redeem, what VIP levels exist, and how the customer-facing widget looks.
There are two paths through the wizard:
- AI Assistant — you describe your store in plain English, the assistant proposes a full program (earning rules, rewards, levels), and you review and approve it before anything is saved.
- Onboarding Myself — you fill in each step by hand.
You can switch from the AI path to the manual path at any time, and you can skip out of the wizard entirely from any screen.
Why Do You Need It? #
- Removes the empty-admin problem: Setting up a loyalty program from a blank screen is the single biggest drop-off point for loyalty plugins.
- Live in minutes: Within a few minutes your store has real earning rules, at least one reward, a starter VIP tier and a branded customer-facing widget.
- Nothing is guessed: On the AI path you review and approve every proposed item before it is written to your site.
Prerequisites #
- An Administrator account
- WooCommerce installed and active — optional, but without an integration the Earning step has no triggers to offer and says so
- An internet connection — only for the AI path, which calls the hosted assistant service
- An email address — collected on the Welcome step; it doubles as consent and registration for the free AI tier
No manual configuration is required before running the wizard.
Where to find it #
Go to Pointics → Ask AI, then the URL hash #/onboarding. The direct URL is /wp-admin/admin.php?page=pointics#/onboarding.
The wizard also opens automatically once, right after first activation. It does not open automatically when:
- You activated several plugins at once — the bulk activation results screen is left alone.
- Your user account is not an Administrator.
- Onboarding was already completed.
Step-by-Step Instructions #
Step 1: Confirm Your Email on the Welcome Screen #
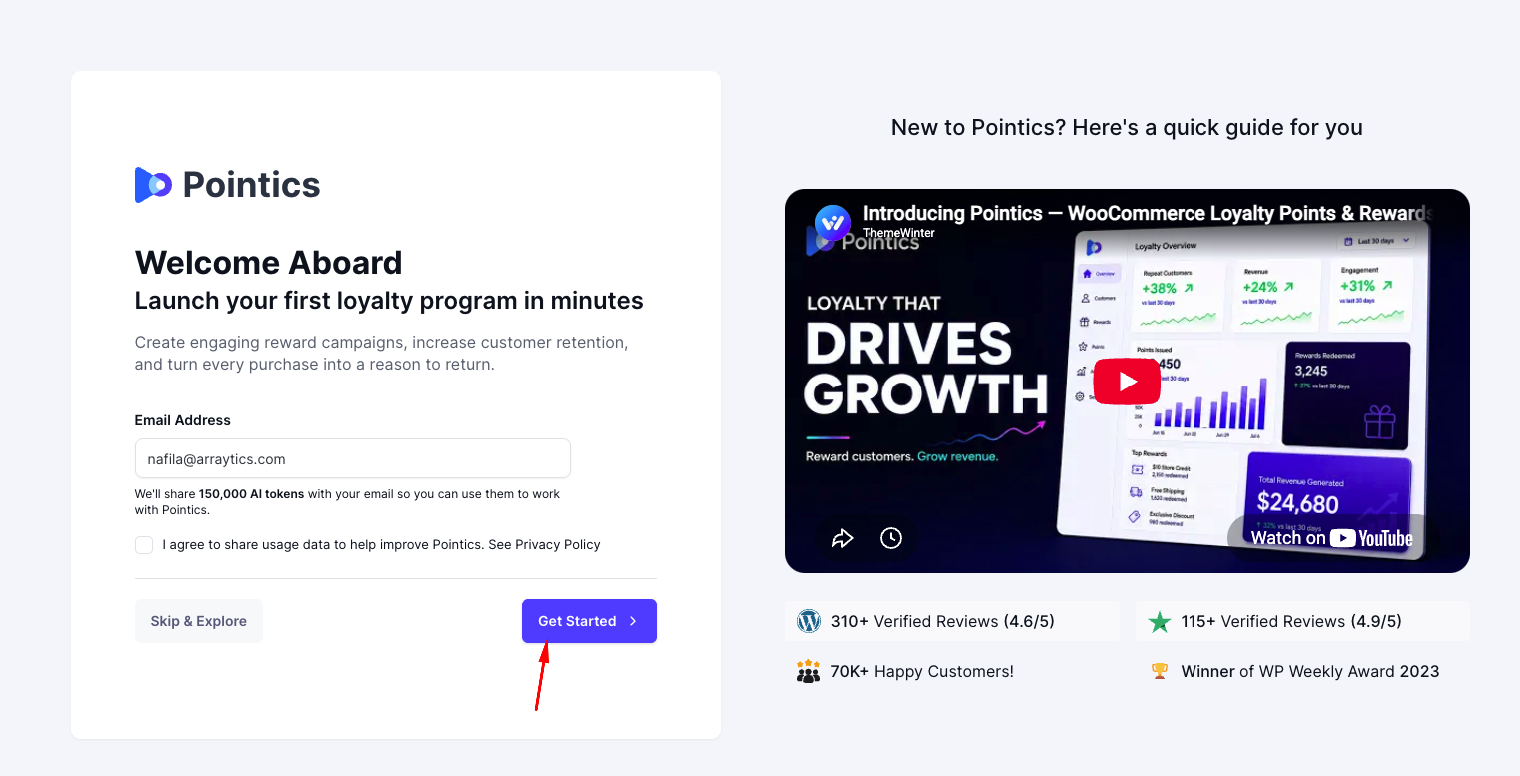
Enter (or accept) your email address and choose whether to share anonymous usage data. The email field is pre-filled with the site administrator’s address.
This step never blocks you — an empty address or withdrawn consent still lets you continue. The only error you can see here is a save failure: “Couldn’t save your email. Try again.”
The page also shows social-proof badges and an embedded walkthrough video.
Step 2: Choose Your Setup Mode #
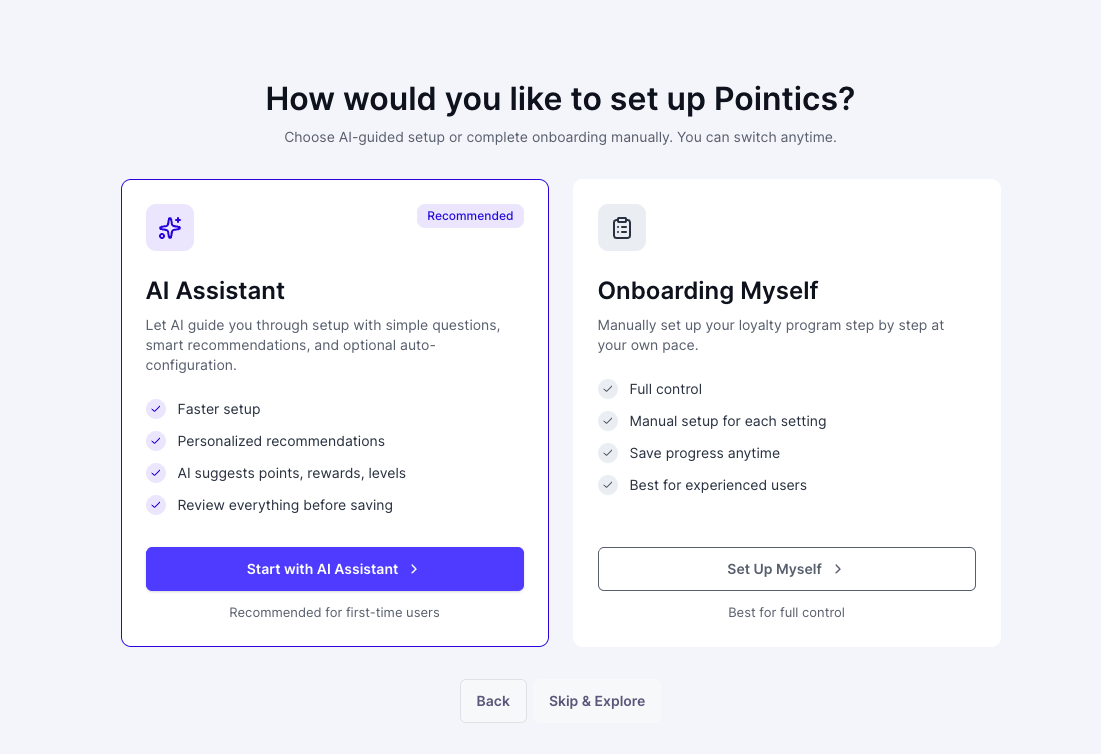
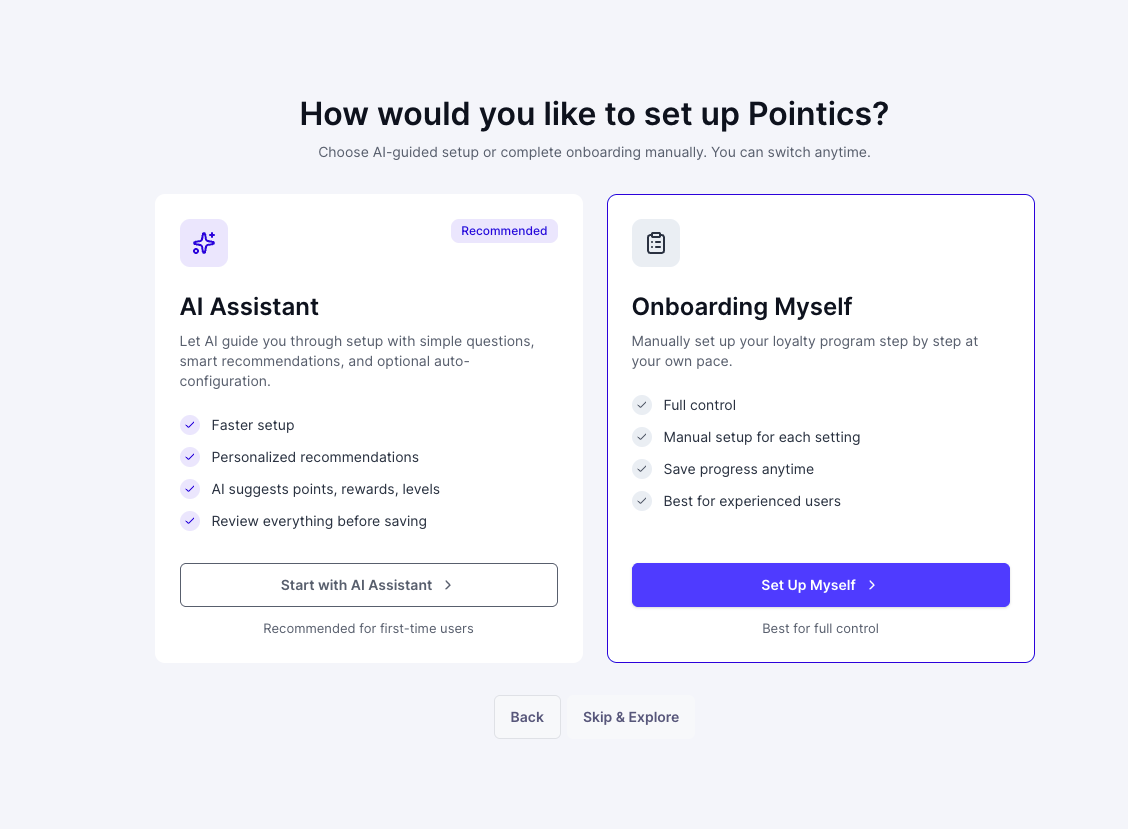
Pick your path.
| Card | What it does | Caption |
|---|---|---|
| AI Assistant (Recommended) | Branch to the AI interview | “Recommended for first-time users” |
| Onboarding Myself | Branch to the manual steps | “Best for full control” |
Choosing a mode saves nothing — it only decides which steps exist from here on. A Skip to end button sits below both cards.
Step 3 (AI path): Describe Your Store #
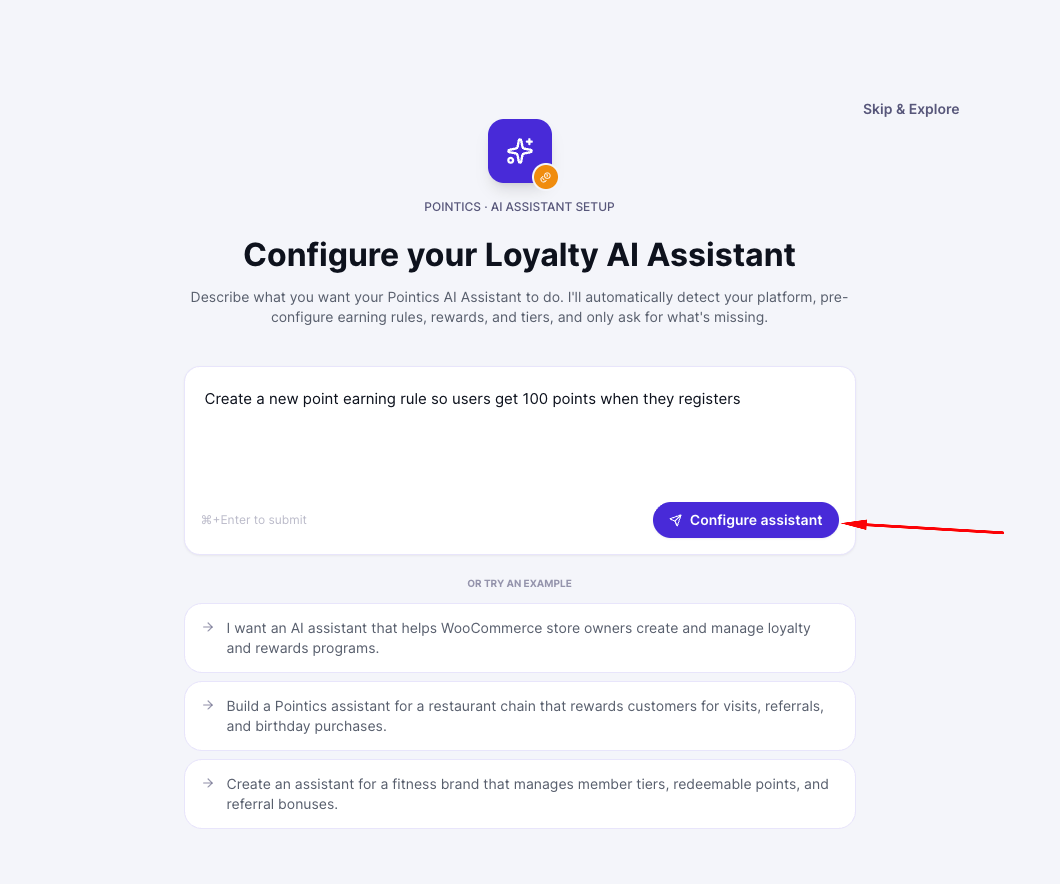
Type what you want your program to do, for example:
“I run a coffee subscription store. Reward repeat orders and referrals.”
Three canned example prompts are offered under “Or try an example” — clicking one fills the composer. Press Configure assistant to send it.
Your description can be up to 4,000 characters. Leaving it empty is allowed — the assistant then starts from a general opening question.
Step 4 (AI path): Wait While the Plan Is Generated #
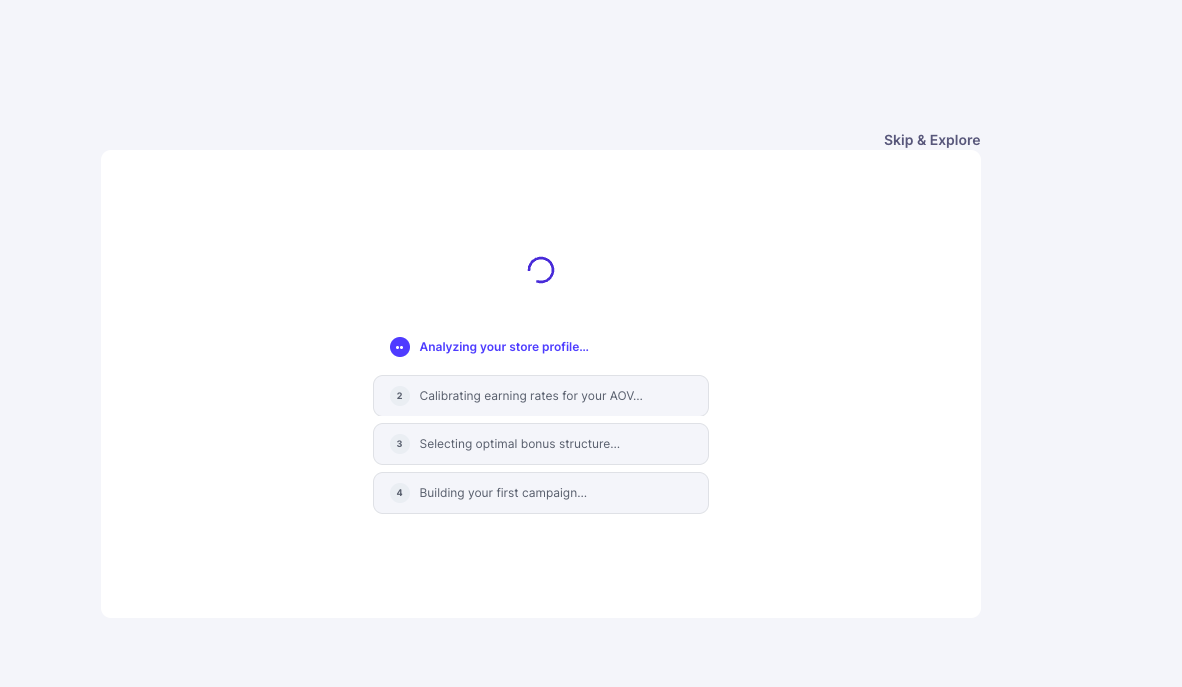
A progress list paces the wait:
- Analyzing your store profile…
- Calibrating earning rates for your AOV…
- Selecting optimal bonus structure…
- Building your first campaign…
If the assistant fails, an error notice appears with two buttons: Retry and Continue manually.
Step 5 (AI path): Review and Approve the Plan #
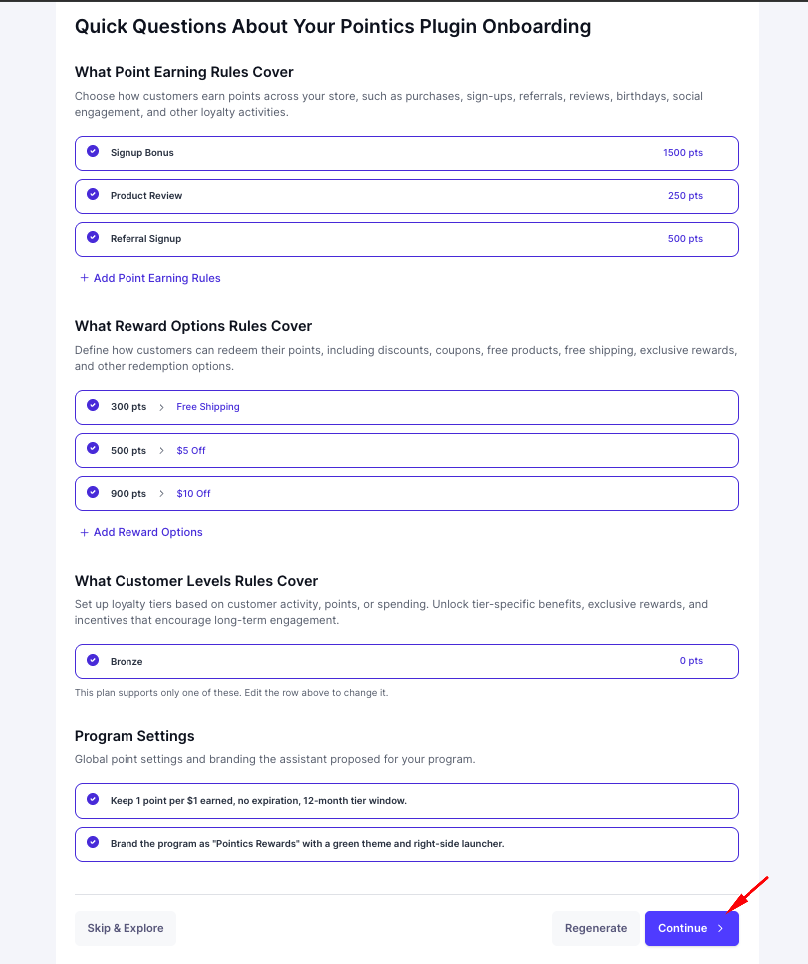
The assistant’s proposal is shown in three editable sections:
| Section | Covers | Row layout |
|---|---|---|
| What Point Earning Rules Cover | purchases, sign-ups, referrals, reviews, birthdays, social engagement | Name first |
| What Reward Options Rules Cover | discounts, coupons, free products, free shipping | Points first |
| What Customer Levels Rules Cover | loyalty tiers by points/spend, with tier benefits | Name first, joined by “Unlocks at” |
On each row you can:
- Untick it — that item is not created.
- Rename it.
- Change its points number — earning amount, redemption cost, or tier threshold.
- Add a new row — this is sent back to the assistant as a change request, and it re-proposes the complete plan including your addition.
Buttons: Regenerate re-asks the assistant; approving applies the plan.
Nothing is written to your site until you approve.
Step 6 (Manual path): Read the Overview #
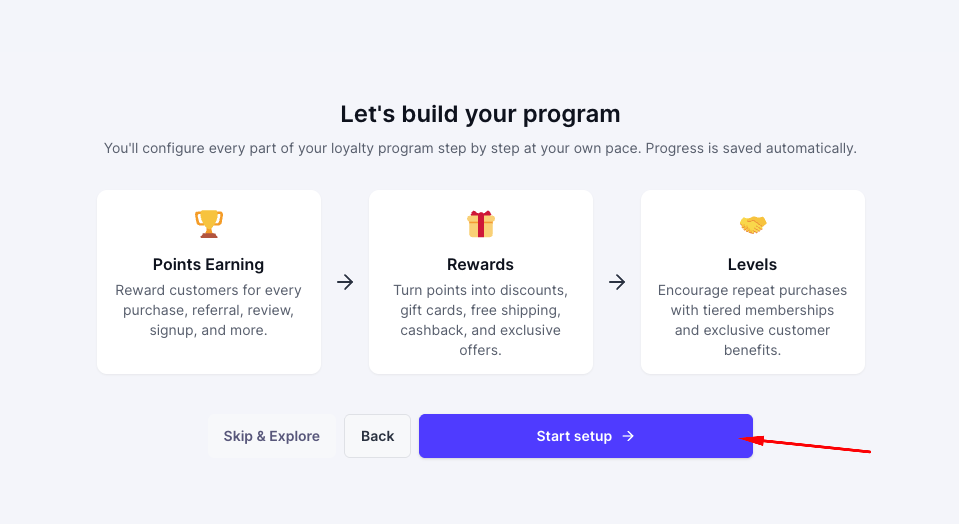
A read-only introduction naming the three pillars — Points Earning, Rewards, Levels. Buttons: Back, Start setup.
Step 7 (Manual path): Set Your Point Earning Rules #
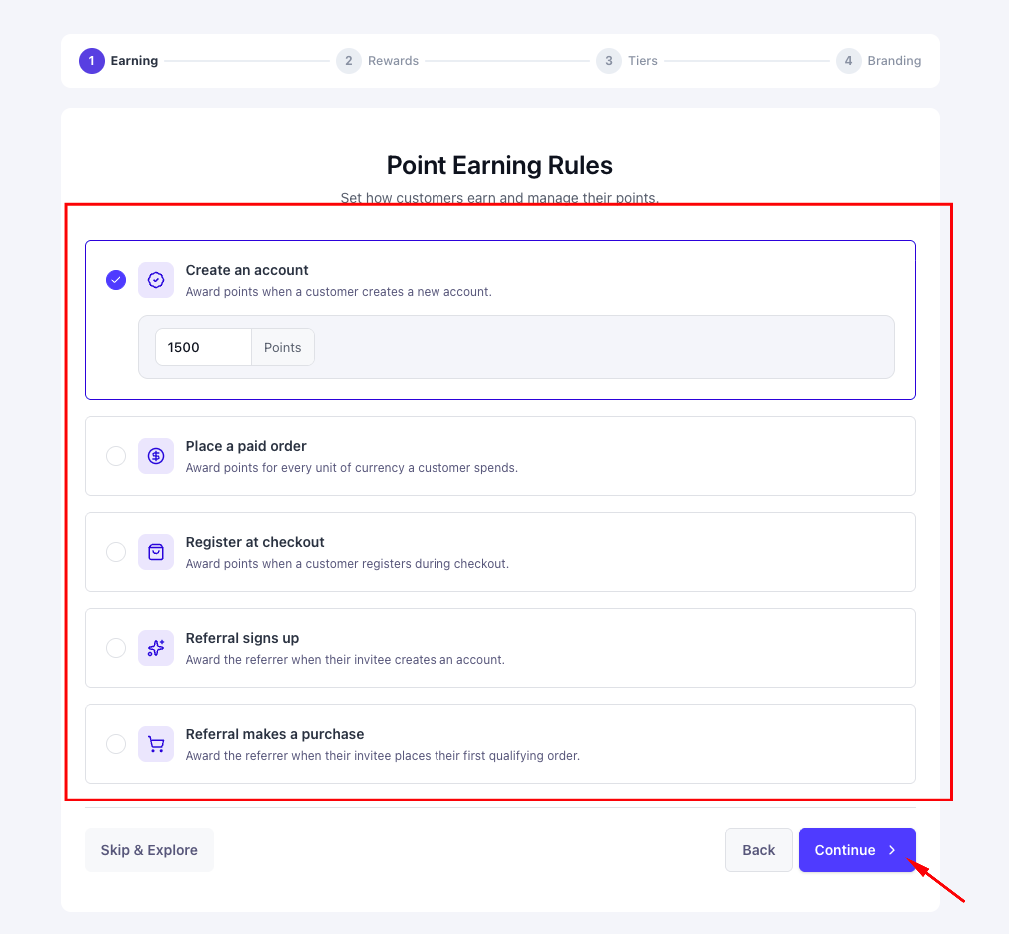
Each available trigger is shown as a card with a toggle and a points field. Triggers marked recommended are pre-enabled.
- A money-based trigger such as “Place an order” shows the unit “Points per unit” and awards points against the amount spent.
- A non-money trigger such as “Sign up” awards a flat amount.
Pressing Next creates one earning rule per enabled trigger. If that save fails you stay on the step — the wizard never advances past unsaved data.
If no integration provides triggers you will see: “No earning rules are available yet. Activate an integration such as WooCommerce to add some.”
Step 8 (Manual path): Configure Your First Reward #
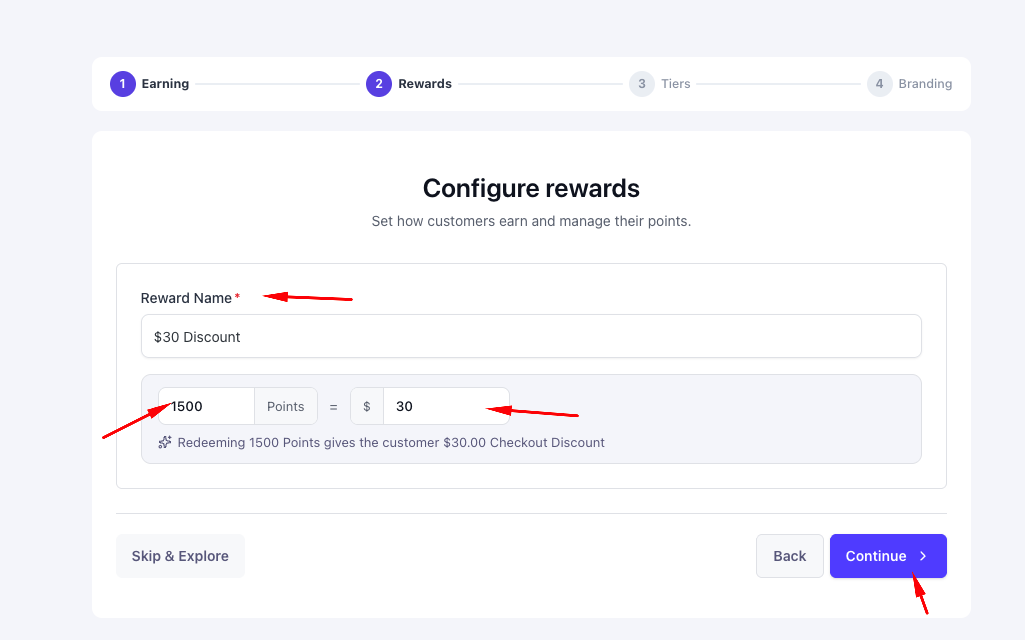
One reward is created here.
| Field | Default |
|---|---|
| Reward Name | $30 Discount |
| Points required | 1500 |
| Discount value | 30 |
Step 9 (Manual path): Configure Your VIP Level #
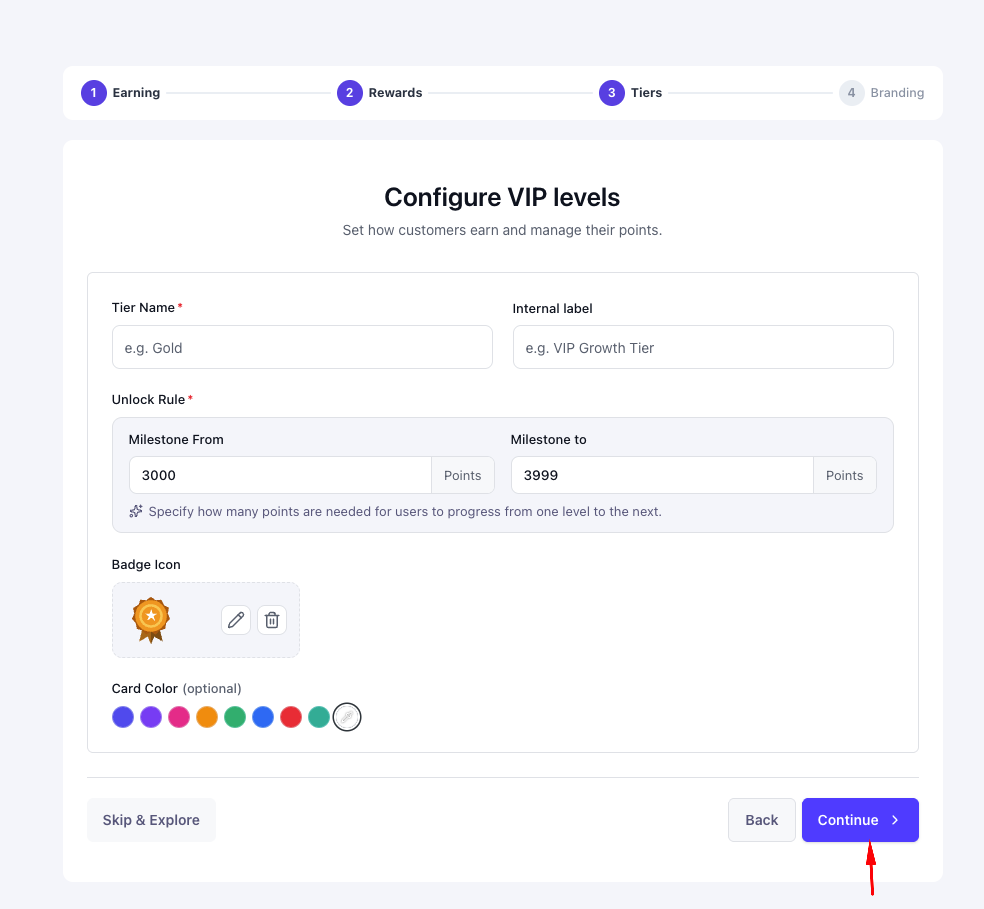
Creates the starter level, published immediately.
Step 10 (Manual path): Set Your Branding #
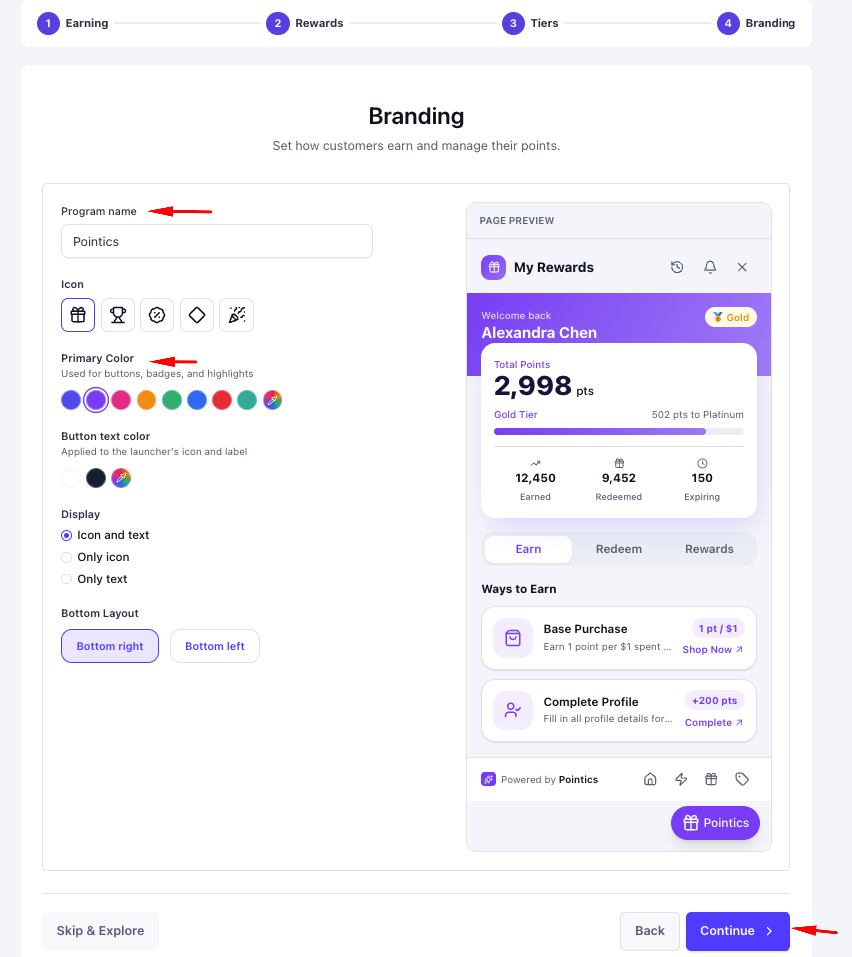
Sets the customer-facing widget name, icon, colour, text colour, display mode and placement. Saving this step also marks onboarding as completed.
Step 11: Finish #
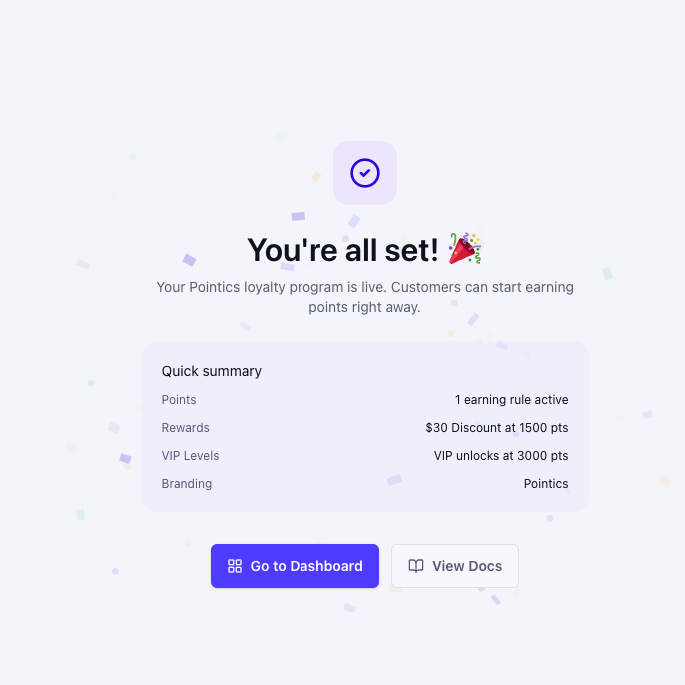
The final screen shows “You’re all set! 🎉”, a confetti burst, and a Quick summary recap of what was created. Buttons: Go to Dashboard, View Docs.
Key Functionality #
Every exit from the wizard — including Skip to end — records completion. Leaving without that would re-open the wizard on the next activation, which reads as the skip not having worked.
The AI path and the manual path are not isolated. Pressing Continue manually after an AI failure fills the manual steps from what is already on your site, so anything the assistant already applied shows up prefilled and you edit it rather than duplicating it.
Additions on the review screen cannot be created directly. The assistant has to re-propose the plan with your addition included, which is why adding a row redraws the whole plan.
Settings the Wizard Writes #
| Setting | Description | Default |
|---|---|---|
| Owner email | Store owner contact; also the identity used to activate the free AI tier | Site admin email |
| Usage tracking consent | Whether you opted into anonymous usage reporting | On |
| Onboarding completed | Set once the wizard has been finished or skipped | Off |
| Widget name | Label on the customer-facing launcher | Pointic |
| Widget icon | Gift, trophy, percent, diamond or party | Gift |
| Widget colour | Launcher background colour | #8b5cf6 |
| Widget font colour | Launcher text and icon colour | #ffffff |
| Widget display | Icon and text, icon only, or text only | Icon and text |
| Widget placement | Right or left | Right |
Validation Rules #
- Your store description — up to 4,000 characters.
- Follow-up messages to the assistant — must not be empty, up to 4,000 characters.
- Feedback when rejecting a plan — up to 4,000 characters.
- AI request limit — 30 AI requests per user per minute, shared across every AI feature.
- Welcome step — no field validation at all; the step is deliberately non-blocking.
Limitations #
- The generating progress list is cosmetic, not real progress.
- You cannot add an item directly on the review screen. Additions are sent back through the assistant, which costs one more AI request.
- Once a plan is approved the plan is cleared. If you reload the browser between approving and reaching the Done screen you lose the summary — the created records themselves are safe.
- Only one reward and one starter level are created on the manual path. Everything else is added later from the main screens.
- The AI path requires an internet connection. There is no offline mode.
- Your position in the wizard is not saved on the server. Closing the tab mid-wizard loses your place, but not data already saved by a completed step.
Troubleshooting #
| Problem | Solution |
|---|---|
| Wizard did not open after activation | You may have activated several plugins at once, or onboarding was already completed. Go to #/onboarding manually. |
| “Too many AI requests. Please wait a moment and try again.” | You hit the per-minute AI limit. Wait 60 seconds. |
| “AI is not enabled yet.” | The free AI access was never activated. Go back to Welcome and save a valid email — the wizard activates it and retries automatically. |
| “There is no pending action to decide on.” | The plan was already decided in another tab. Reload the wizard. |
| “This action has already been decided.” | The same plan was approved twice. Reload. |
| “Approve or reject the pending action before sending a new message.” | A plan is awaiting your decision; resolve it before chatting further. |
| “Some items in the plan could not be applied…” | Only part of the plan was applied. The assistant has been told; read its reply and approve again. Already-applied items are not duplicated. |
| “Onboarding conversation not found.” | The conversation is stale or belongs to another user. Start over. |
| “No earning rules are available yet…” | Activate WooCommerce or another integration and reload the step. |
| “Couldn’t save your email. Try again.” | The save failed — check for another plugin blocking settings updates. |
| Wizard keeps reappearing after skipping | Every exit path records completion. If it still reappears, the settings save is failing. |
Notes #
- The Welcome step’s email doubles as consent for AI access. If the AI service reports that it isn’t set up on the first attempt, the wizard activates free access with that address and retries once, so you never see the gap.
- Retrying after a partial apply re-proposes the whole program, and the results are merged onto what already landed rather than replacing it. Nothing is duplicated.
- Skipping is a real skip: it records completion so the wizard does not return.
Was this article helpful?
Related articles


