- Overview
- Requirements
- When to use the Font Picker block
- Step 1: Upload fonts to the Custom Fonts library
- Step 2: Add the Font Picker block
- Step 3: Add font options
- Step 4: Choose Render As -- Dropdown or Radio
- Step 5: Configure the common controls
- Step 6: Set up conditional logic
- Step 7: Save and verify on the product page
- Frequently Asked Questions (FAQ)
Overview #
The Font Picker block lets customers choose a font for their product on the WooCommerce product page — perfect for engravings, custom stationery, monograms, signage, and any product where typography is part of what the customer is paying for. Fonts are managed centrally in the Custom Fonts library, then surfaced as either a dropdown or a radio list per block.
Requirements #
Make sure WooCommerce and Optiontics are both installed and active, with at least one product to attach the addon to and at least one font uploaded to the Custom Fonts library (covered in Step 1).
When to use the Font Picker block #
Reach for this block whenever the customer’s font choice is part of the product itself, not just a UI preference. Common scenarios:
- Engraved jewellery — pick a script for a name engraved on a pendant.
- Personalised stationery — choose a typeface for printed cards or invitations.
- Custom signage — pick a display font for a wooden sign or acrylic plate.
- Monogrammed bags or apparel — choose between a serif, script, or block style.
- Vinyl decals — pick the font that will be cut into the vinyl.
- Trophies and plaques — choose an engraving font, often with a price step between simple and ornate styles.
Step 1: Upload fonts to the Custom Fonts library #
Before adding the block, upload at least one font to the central library.
- Open the Optiontics dashboard from your WordPress admin sidebar.
- Click Custom Fonts in the Optiontics submenu.
- Click Add New Font.
- Upload a
.woff2,.woff, or.ttffile via the WP Media Library. - Give the font a Title (e.g. “Playfair Display”).
- Optionally set a Font Family override; leave blank to auto-slug the title.
- Save.
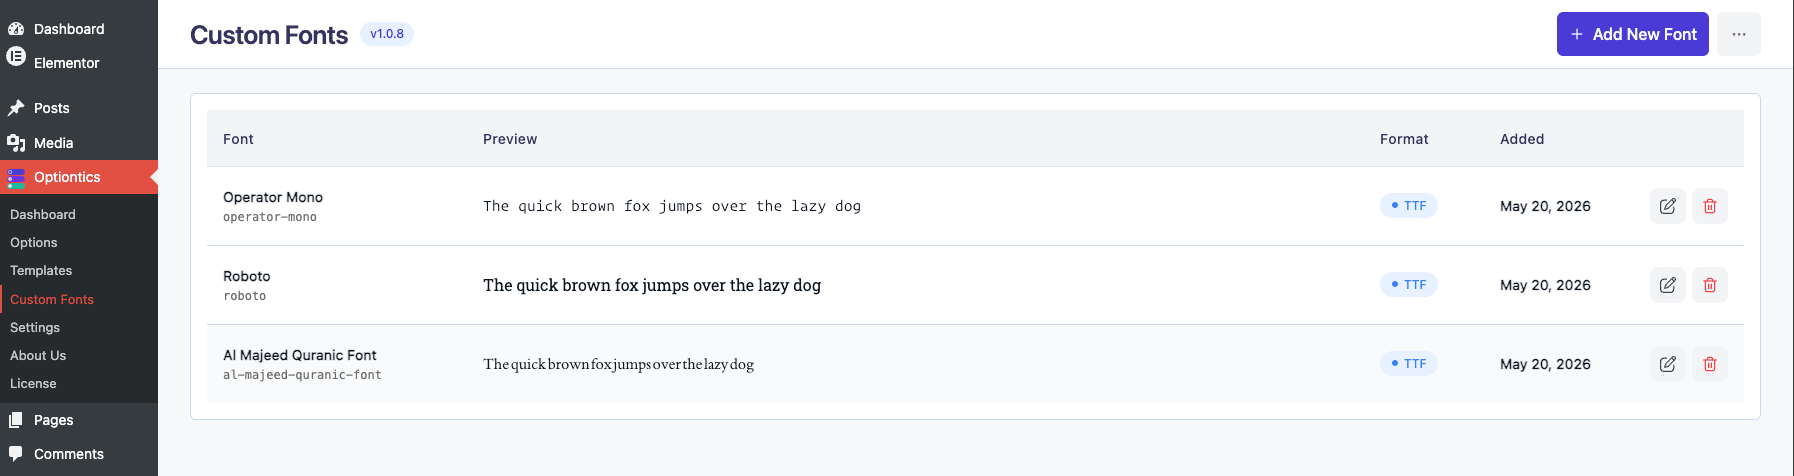
Each row in the table previews the font live, so you can see exactly how it will render on the product page.
Tip: Fonts you upload are stored as their own custom post type (optiontics-font) — uploading once means you can reuse the same font across every block on every product without re-uploading. |
Step 2: Add the Font Picker block #
- Open the option set attached to your product (or create a new one with Add Options).
- Click Add Elements on the canvas.
- Switch to the Choices category in the insertion modal.
- Drag Font Picker into the form.
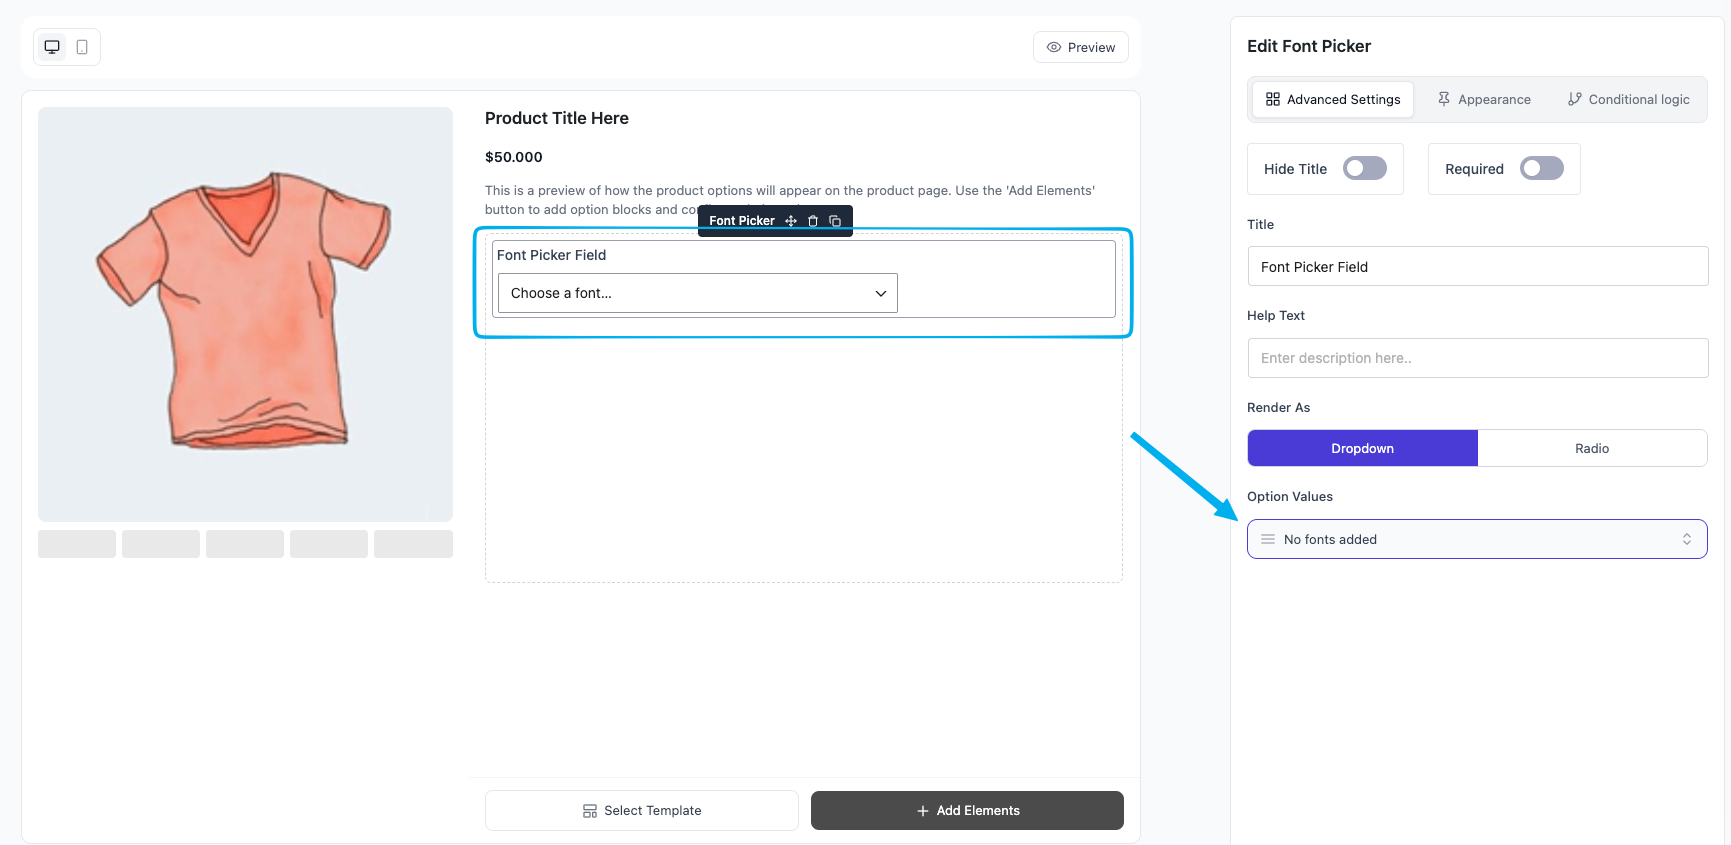
The block lands on the canvas with a default label of “Font Picker Field”. Click it to surface controls in the right sidebar.
Step 3: Add font options #
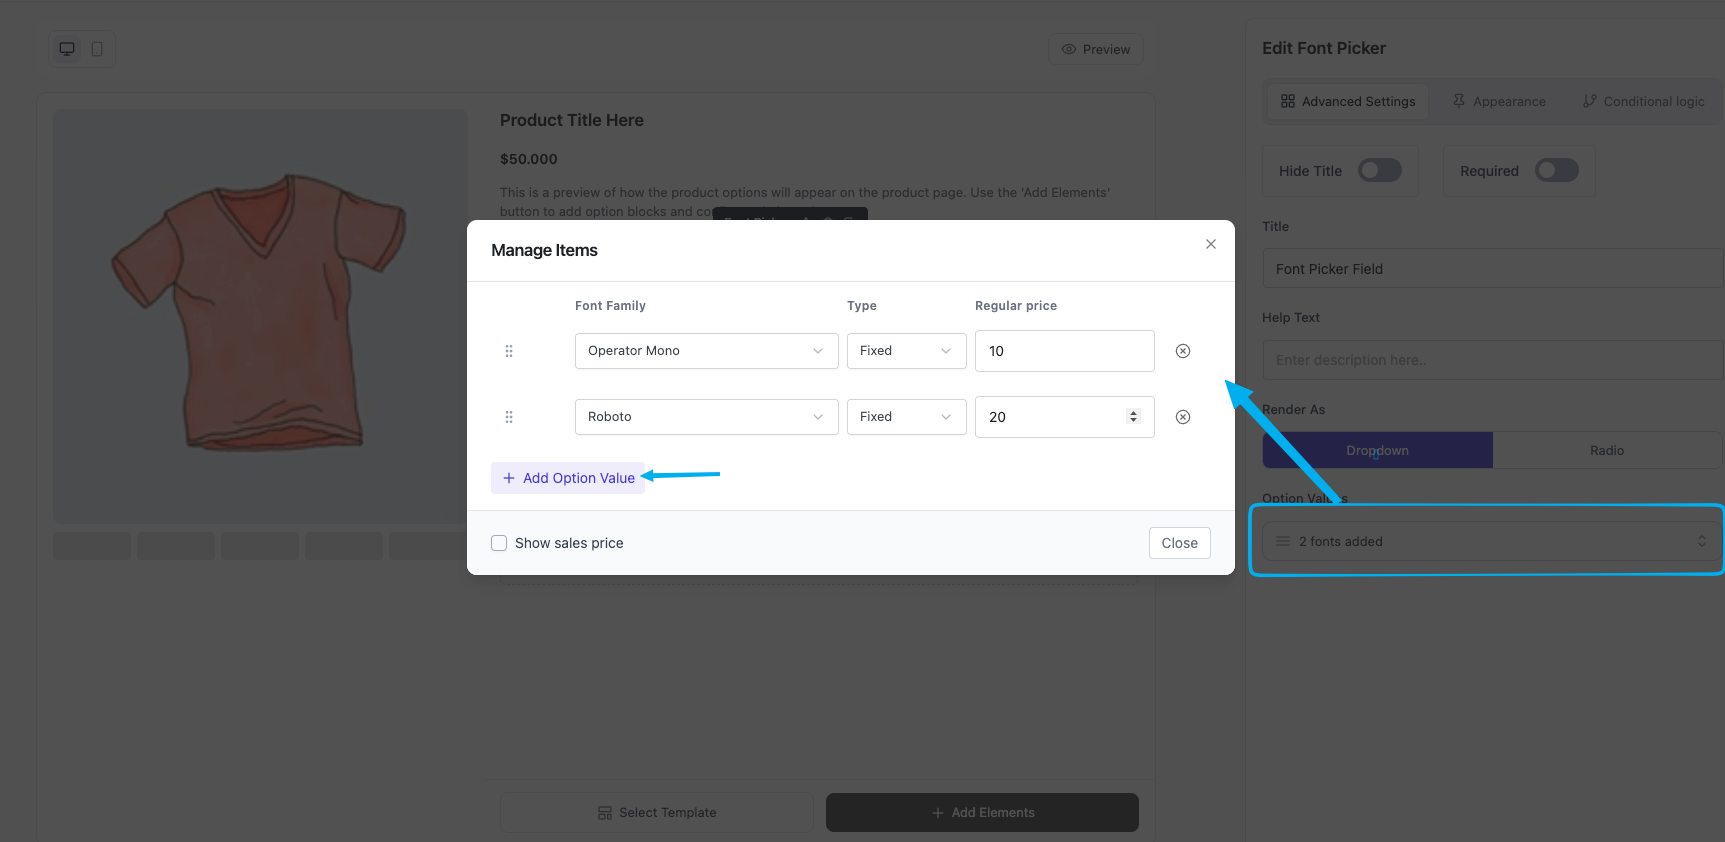
In the right sidebar, click Manage Items under Option Values. A modal opens with a row per font option.
Each row contains:
| Cell | Purpose |
| Font | Dropdown listing every font in your Custom Fonts library |
| Price Type | Fixed / Percentage / No Cost |
| Regular Price | The amount added when this font is picked |
| Sales Price (Pro) | Optional discounted price |
| Active | Toggle to show or hide the option without deleting it |
Pick a font from the dropdown — Optiontics auto-fills the option’s value, font family, and title. Set the price type and amount. Toggle the active switch on. Repeat for each font you want to expose.
Step 4: Choose Render As — Dropdown or Radio #
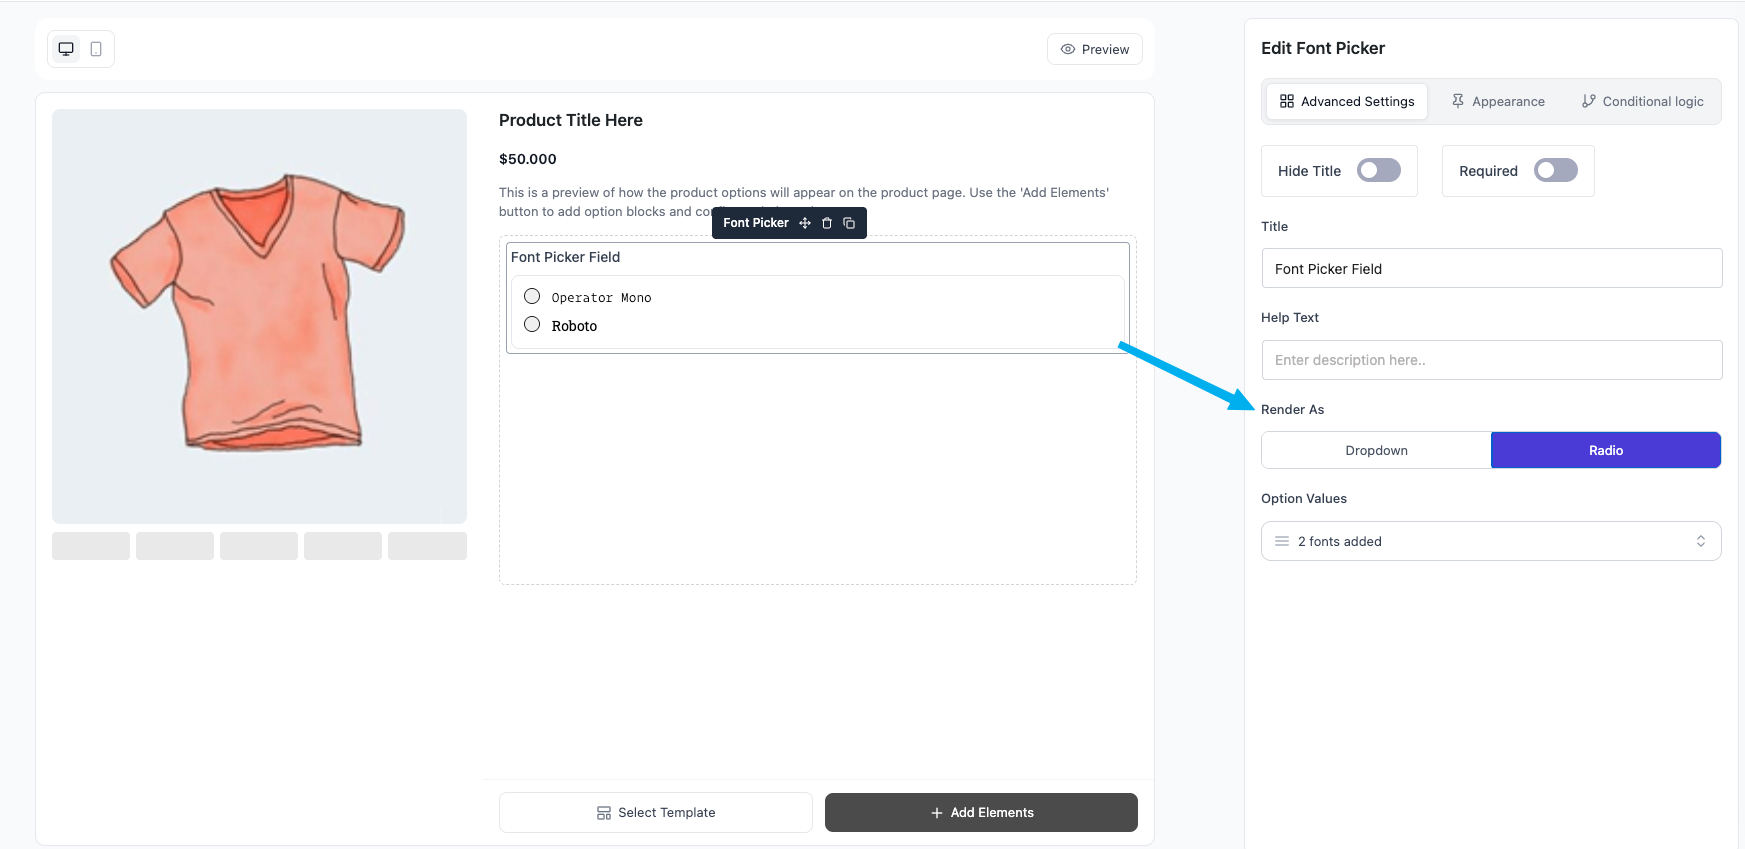
The Render As control (segmented “Dropdown / Radio”) decides how the customer sees the picker on the product page.
- Dropdown — a
listing each font. Each option is styled in its own font so the customer can read the name in the typeface they’re choosing. - Radio — a stacked list of radio buttons, each label styled in its own font. Easier to skim for small option sets; takes more vertical space.
Switch between the two without rebuilding the option list — the same data renders either way.
Step 5: Configure the common controls #
Use the standard block controls in the right sidebar:
- Hide Title — suppress the field label (the picker itself still renders).
- Required — block add-to-cart until the customer picks a font.
- Title — the field label customers see.
- Help Text — short instruction shown below the label (e.g. “Choose the typeface for your engraving”).
The Sales Price column inside Manage Items is Pro-gated. In Free, that column is hidden and any sale prices saved on the option rows are stripped at save time.
Step 6: Set up conditional logic #
Conditional logic on the Font Picker works the same way as other option-list blocks (radio, dropdown).
- As a target — show or hide the picker based on another field.
- As a source — match on the picked font’s value (e.g. “show an
Italic accentupcharge only ifPlayfair Displayis selected”).
Open the Conditional Logic tab in the right sidebar to add rules.
Step 7: Save and verify on the product page #
Save the option set and visit the product page.
- Each option label is styled in its own font, so the customer can read “Playfair Display” rendered in Playfair Display.
- Picking an option updates the running total immediately.
- The selected font’s title appears on the cart row, checkout review, and order admin item meta.
- The font’s
@font-facedeclaration is auto-injected into the page CSS, so the typography is consistent everywhere.
Frequently Asked Questions (FAQ) #
| Q1: What font formats are supported, and which one should I upload? WOFF2, WOFF, and TTF are accepted. WOFF2 is the best default for the web — smallest file size, broadest modern-browser support. Upload TTF only if WOFF2 isn’t available; the file is heavier and renders identically. |
| Q2: If I delete a font from Custom Fonts, what happens to blocks already using it? The option label stays in the block (the option’s value, font family, and title are stored on the block itself, not as a foreign key). Past orders also retain the font name on the line item. The customer-facing styling disappears because the @font-face declaration is no longer emitted — the picker label renders in the theme’s default font. To swap a font instead of deleting it, upload the new one with the same Font Family slug. |
| Q3: Can I charge different prices for different fonts? Yes. Each option row has its own Price Type and Regular Price. A common pattern is to set simple sans-serif fonts as No Cost and ornate or licensed scripts as Fixed with a small upcharge. Active fonts contribute to the addon total just like any other choice-based block. |
Conclusion #
The Font Picker block turns the Custom Fonts library into a customer-facing selector — upload once, reuse across every personalisation product, and let typography choices drive both the order’s look and its price.


