1. Introduction #
The FunnelKit Automations integration for Eventin sends purchaser and attendee contact data to a FunnelKit Automations webhook the moment an order is created. Use it to add ticket buyers (and optional individual attendees) to your FunnelKit contact lists and automation flows — no manual imports. Requires Eventin Pro.
Prerequisites #
- Eventin (this plugin).
- Eventin Pro — the FunnelKit Automations integration is a Pro-only feature.
- FunnelKit Automations Pro — installed and active on the same WordPress site. Incoming webhooks are a FunnelKit Automations Pro feature; the free version of FunnelKit Automations does not expose the “Webhook Received” trigger.
- A FunnelKit Automations webhook URL — created inside FunnelKit and pointed at the automation you want to trigger. See FunnelKit’s incoming-webhooks guide for setup steps.
Step 1 — Enable the FunnelKit Automations integration #
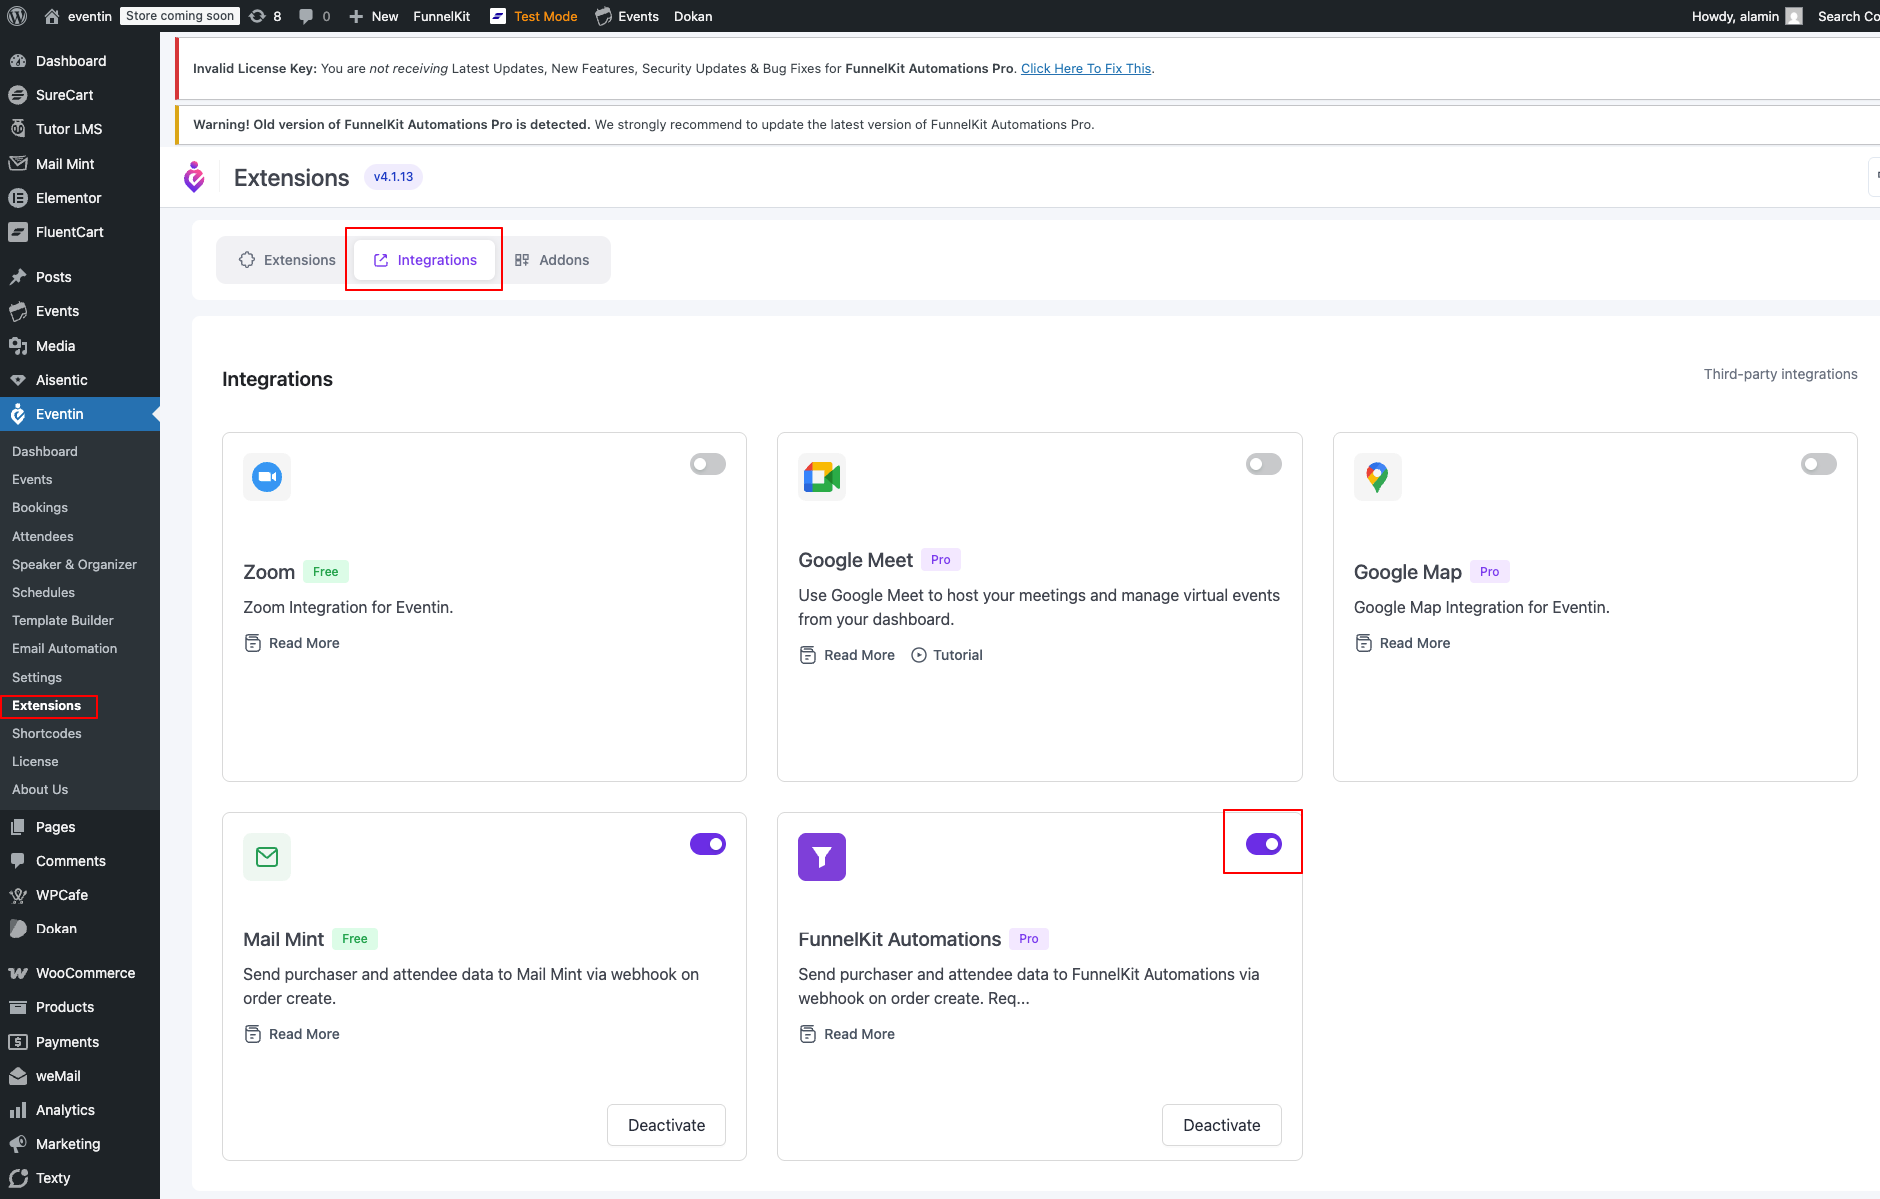
- Go to Eventin → Extensions → Integrations tab.
- Find the “FunnelKit Automations” card (marked Pro) and toggle it ON.
Note: Eventin Pro must be active to interact with this toggle. Without Pro, the toggle is replaced by a “Get Pro” button. - If FunnelKit Automations is not yet installed, Eventin shows the notice “NB: Requires Eventin Pro and the FunnelKit Automations plugin”. Install and activate FunnelKit Automations from the WordPress Plugins page, then return and toggle the integration ON.
Step 2 — Configure FunnelKit Automations per event #
The webhook and recipient settings are configured on each event individually, so different events can trigger different FunnelKit automations.
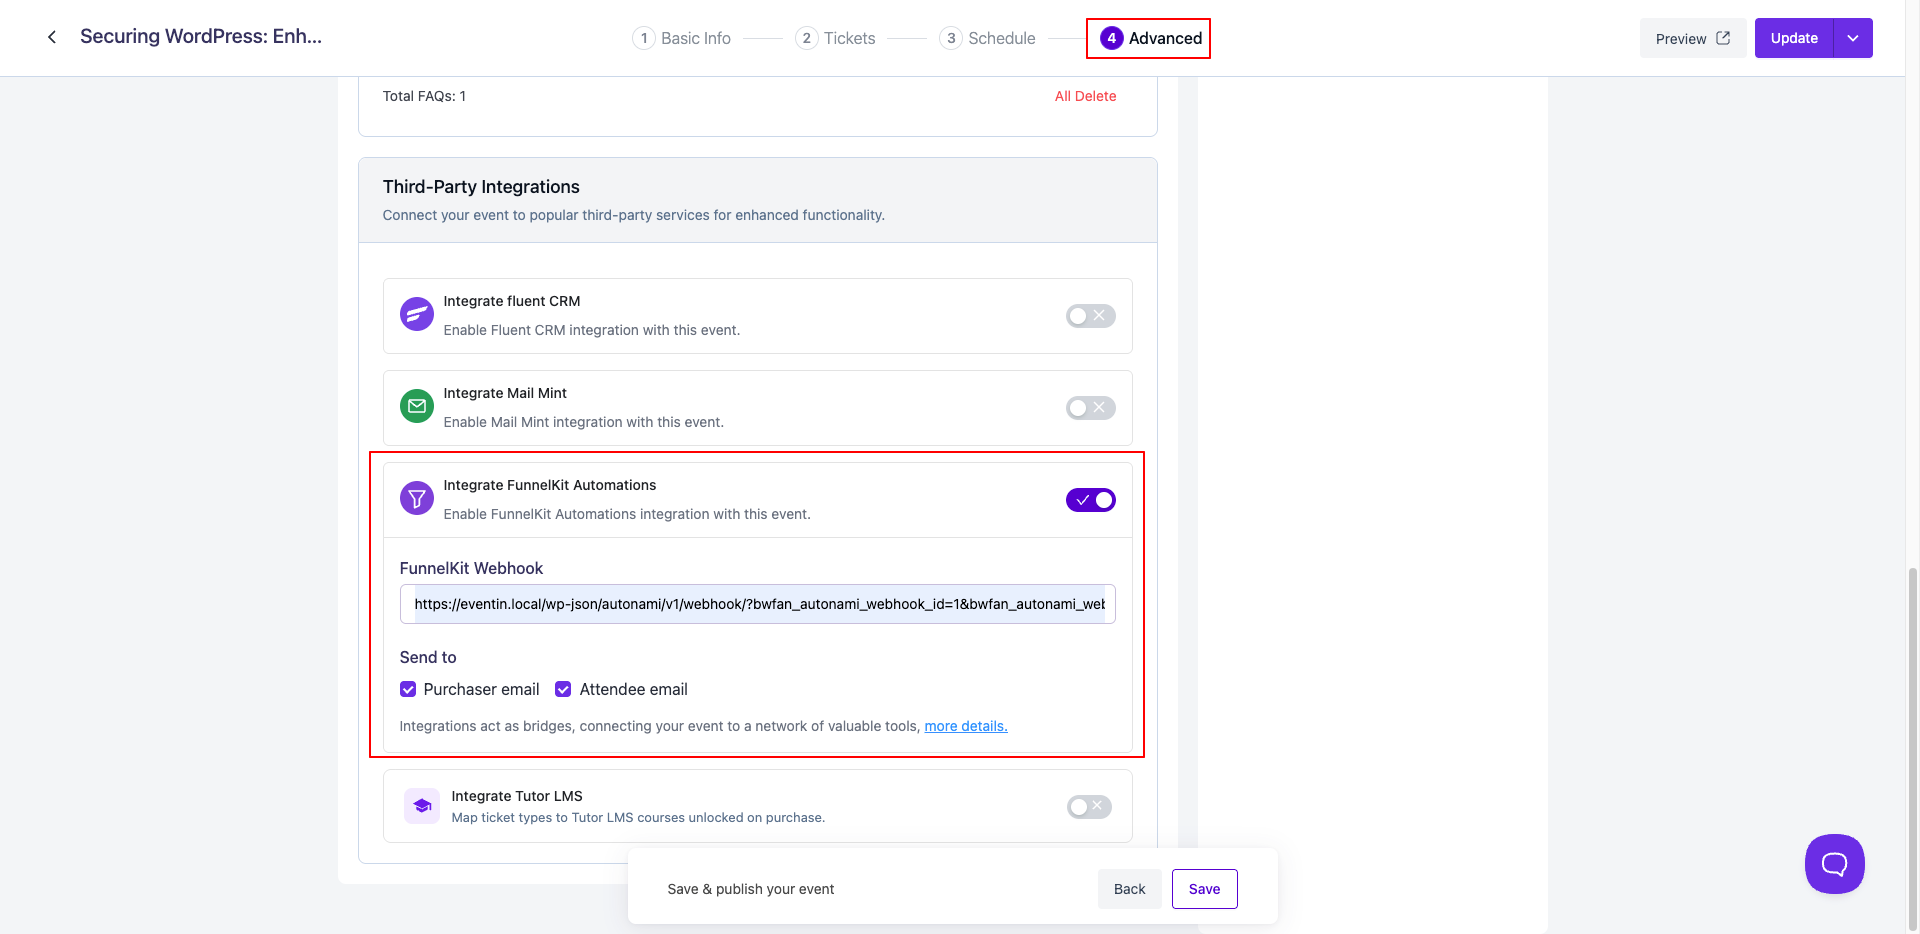
- Open the event in Eventin and switch to the Advanced tab.
- Scroll to the Third-Party Integrations card.
- Toggle “Integrate FunnelKit Automations” ON. The panel expands.
Note: Requires Eventin Pro. Without it, the toggle shows a “Get Pro” button and the panel cannot be expanded. - Paste your FunnelKit webhook URL into the FunnelKit Webhook field. Eventin validates the URL format. If you don’t have a webhook yet, follow FunnelKit’s incoming-webhooks guide to create one.
- Under Send to, choose who gets sent to FunnelKit:
- Purchaser email — the buyer who paid.
- Attendee email — every individual attendee on the order (only fires if Attendee Registration is on).
- Click “Update” at the top of the event page to save.
If the “Integrate FunnelKit Automations” row is not visible on the Advanced tab, the global toggle from Step 1 is off — turn it on first.
After purchase — data lands in FunnelKit Automations #
The moment an Eventin order is created for a FunnelKit-enabled event, Eventin POSTs the configured contacts to your webhook URL:
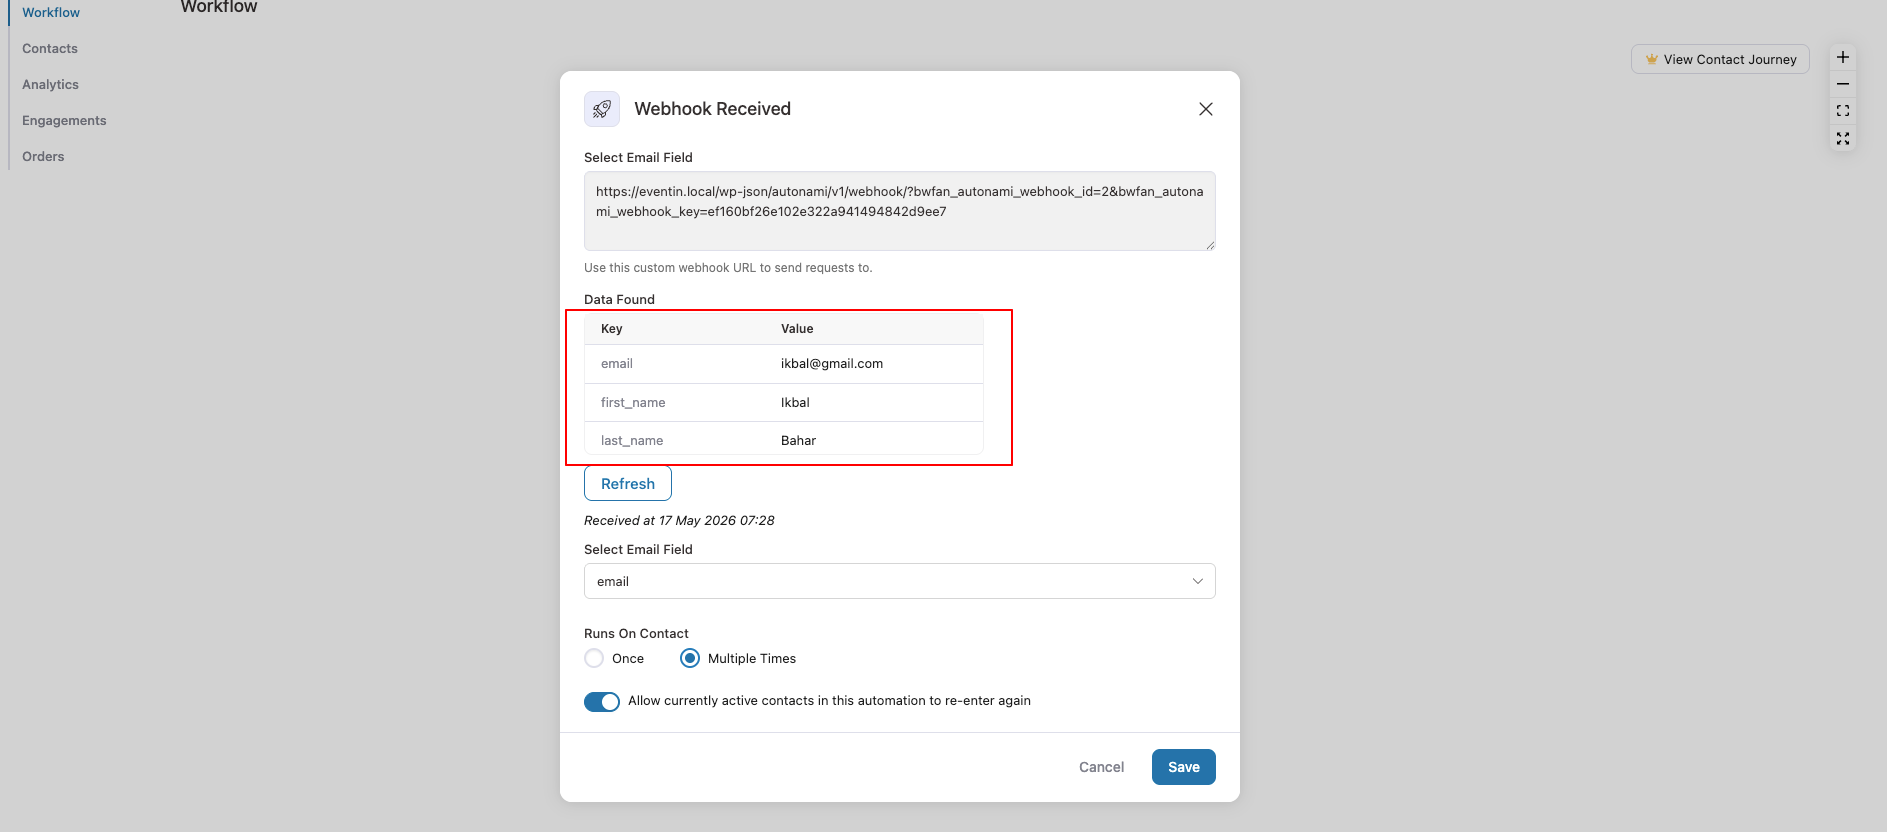
- Purchaser send — one POST with the buyer’s email, first name, and last name.
- Attendee send — one POST per attendee with that attendee’s email, first name, and last name. Eventin splits the attendee’s full name on the first space (e.g. “Carol Smith Jones” sends first_name: Carol, last_name: Smith Jones).
- The contacts appear in FunnelKit ready for any follow-up automation you’ve configured.
Verify it’s working by placing a test order, then opening FunnelKit Automations and checking the automation’s run history to confirm the webhook fired and the contact was created.
2. FAQs #
Q: Where do I get the FunnelKit Automations webhook URL? #
A: Inside FunnelKit Automations, create an automation with a “Webhook Received” trigger. Copy the webhook URL it generates and paste it into the FunnelKit Webhook field on the event’s Advanced tab. Full step-by-step instructions in FunnelKit’s own docs: Incoming webhooks (FunnelKit).
Q: Can I send only the purchaser, not the attendees? #
A: Yes. In the Send to field, check only Purchaser email and leave Attendee email unchecked. Only the buyer will be sent to FunnelKit.
Q: I don’t see “Integrate FunnelKit Automations” on the Advanced tab. Why? #
A: The per-event panel only appears when the global FunnelKit Automations integration is toggled ON in Eventin → Extensions → Integrations. Turn it on there, then refresh the event page. Also confirm Eventin Pro is active — the toggle requires Pro.
Q: Does each event need its own webhook? #
A: Not necessarily. You can reuse the same webhook URL on multiple events, or create a separate webhook per event so each one triggers a different FunnelKit automation. The choice is yours — Eventin doesn’t restrict it.
Q: What data does Eventin send to the webhook? #
A: Email, first name, and last name — for the purchaser and/or each attendee, depending on your Send to selection. For attendees, Eventin splits the full name on the first space (e.g. “Carol Smith Jones” becomes first_name: Carol, last_name: Smith Jones). The send happens once per order, immediately after checkout completes.
3. Conclusion #
Enable FunnelKit Automations once under Extensions (requires Eventin Pro), then drop a webhook URL into each event’s Advanced tab and choose who to send. From that point on, every Eventin order auto-feeds your FunnelKit automations — no manual imports.
If you have questions or need help configuring the FunnelKit Automations integration, the Eventin support team is happy to assist.


