
Table of Contents
- What Is Conversion Tracking?
- Why do you need it?
- Step-by-Step Instructions
- Key Functionality
- Events WP Cafe Sends
- Prerequisites
What Is Conversion Tracking? #
Conversion Tracking sends your reservations to Google Tag Manager and Meta Pixel, so your ad accounts can see which ads bring in bookings. It is a WP Cafe Pro feature of the Reservation module. You turn it on under Reservation on the Modules page, and set it up from the Reservations menu.
Why do you need it? #
- Know which ads fill tables: Google Ads and Meta Ads report bookings, not only clicks.
- Tell bookings from payments: every placed booking and every paid booking are sent as two separate events.
- Find where guests drop off: optional form events show how many visitors open the form, start it and reach the summary.
- Stay privacy friendly: names, emails and phone numbers are never sent as plain text, and Meta events can wait for cookie consent.
Step-by-Step Instructions #
Step 1: Turn On the Conversion Tracking Module
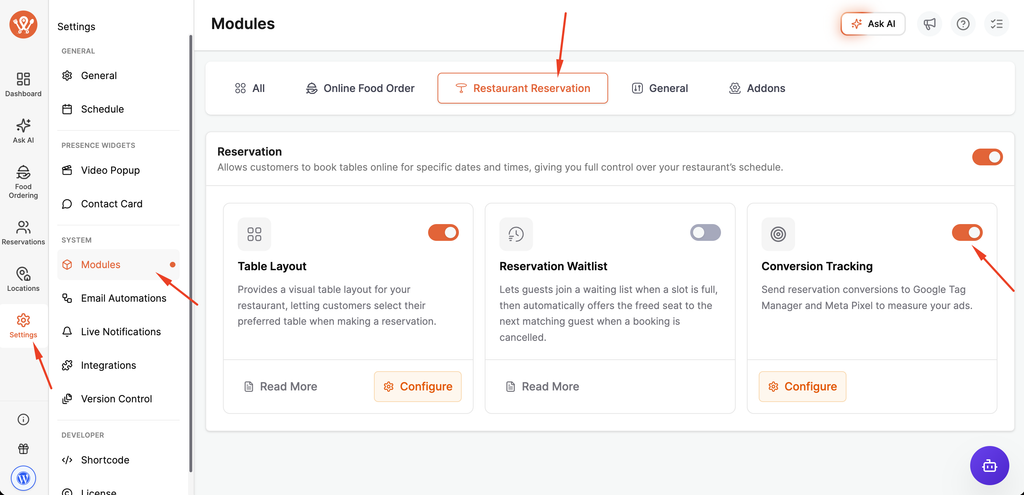
In your WordPress dashboard, navigate to WPCafe → Settings → Modules. Make sure the “Reservation” module is on. Below it, find the “Conversion Tracking” card and turn on its switch. Conversion Tracking only works while the Reservation module is on. It is not listed on the Integrations page.
Step 2: Open the Conversion Tracking Page
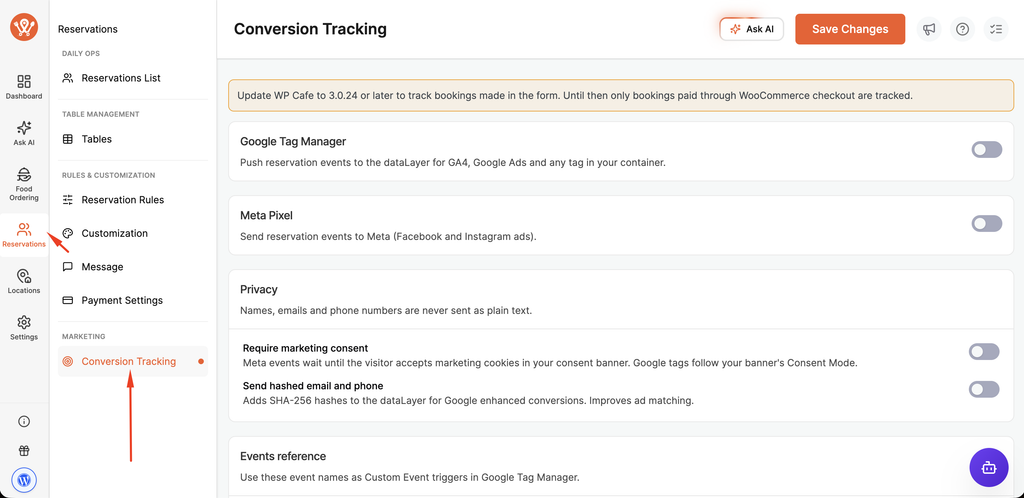
Navigate to WPCafe → Reservations → Conversion Tracking. You find it at the end of the Reservations menu, under “Marketing”. If you don’t see the Reservations menu, the Reservation module is off; turn it on in Step 1. The page has five cards: “Google Tag Manager”, “Meta Pixel”, “Privacy”, “Events reference” and “Debug mode”. You can use Google Tag Manager, Meta Pixel or both.
Step 3: Connect Google Tag Manager
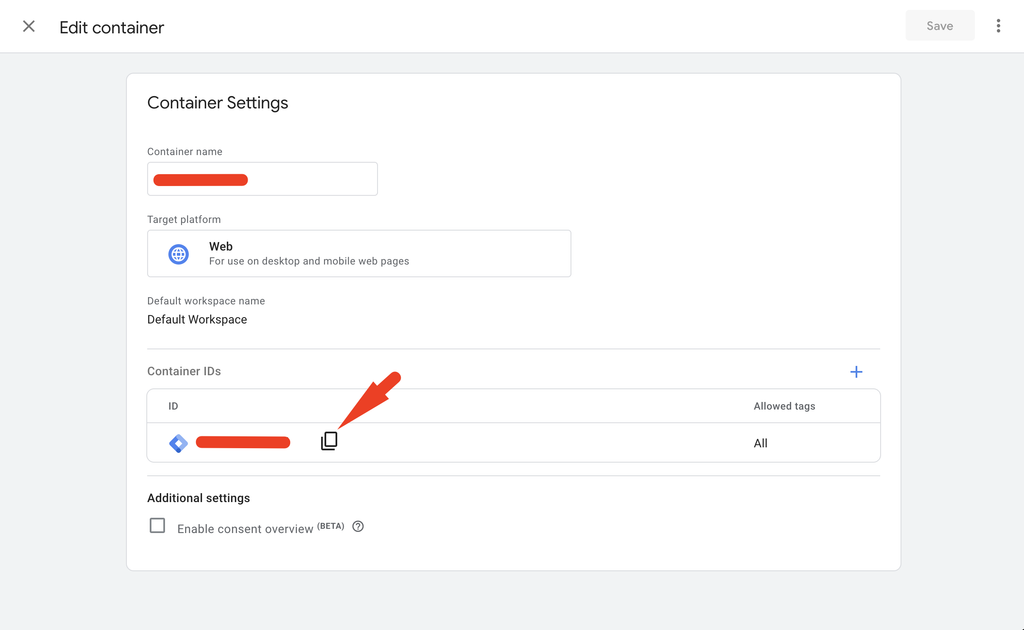
Turn on the switch on the “Google Tag Manager” card. Enter your container ID in “Container ID”. It starts with GTM- and is shown at the top of your Google Tag Manager workspace.
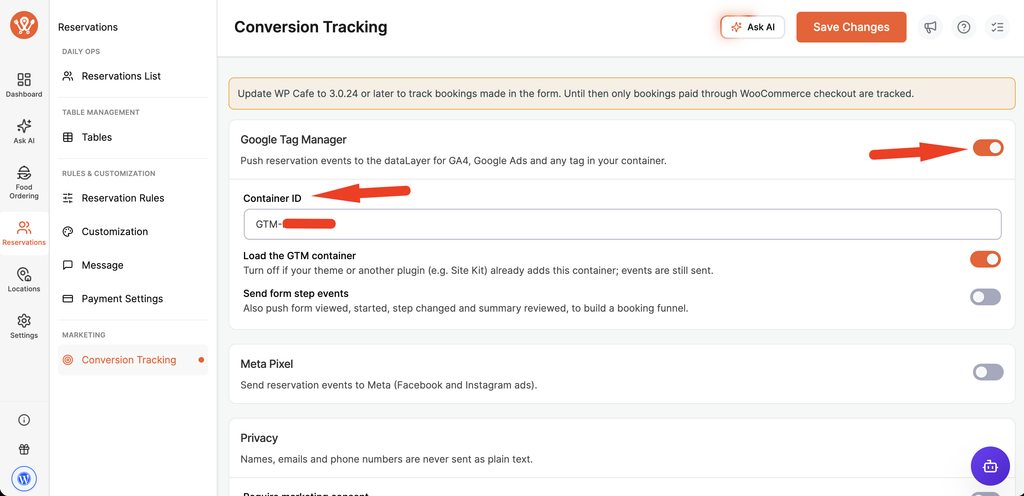
Leave “Load the GTM container” on, unless your theme or another plugin (for example Site Kit) already adds the same container. Turn on “Send form step events” if you also want form viewed, form started, step changed and summary reviewed events for a booking funnel.
Step 4: Connect Meta Pixel
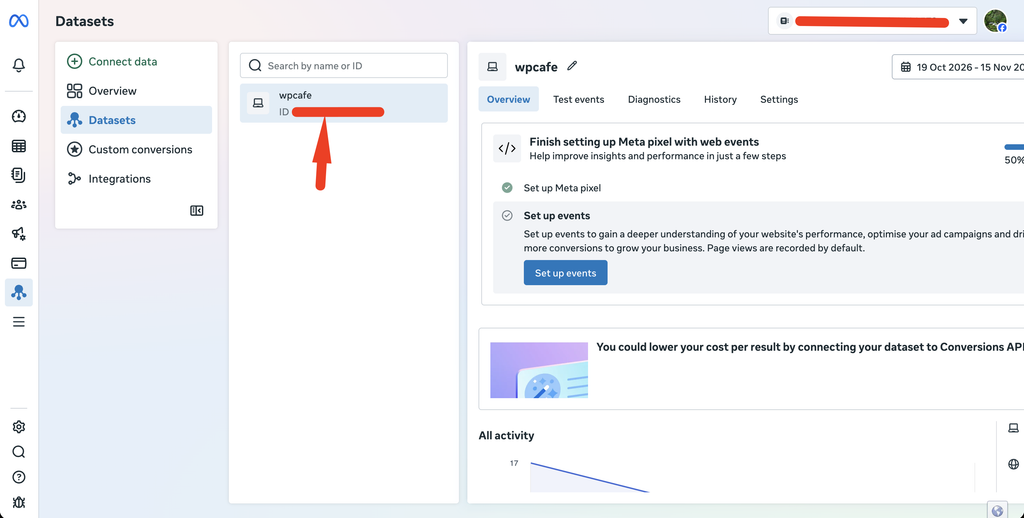
Turn on the switch on the “Meta Pixel” card and enter your “Pixel ID”. You find it in Meta Events Manager under Data sources.
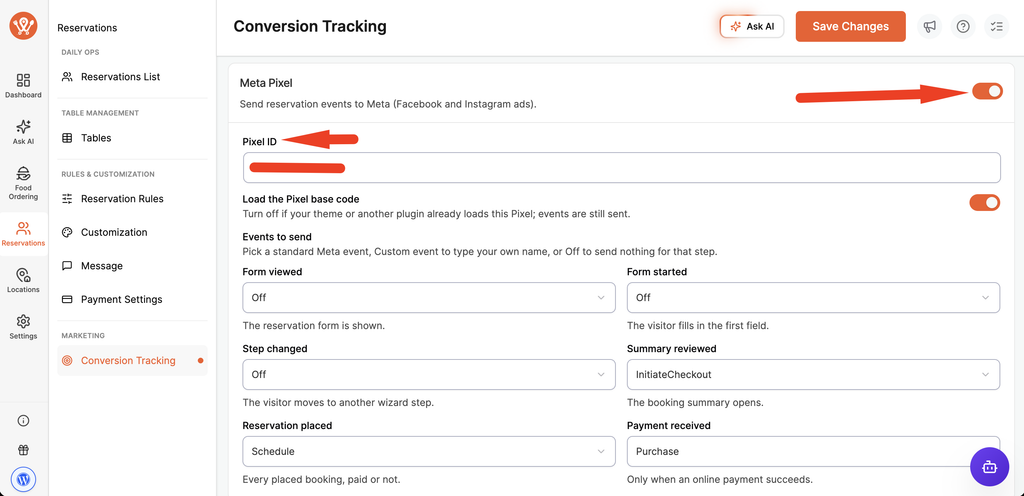
Leave “Load the Pixel base code” on, unless another plugin already loads this Pixel. Under “Events to send”, pick which Meta event each booking step sends. The defaults are “InitiateCheckout” for “Summary reviewed”, “Schedule” for “Reservation placed” and “Purchase” for “Payment received”. Choose “Off” to send nothing for a step, or “Custom event…” to type your own event name.
Step 5: Set Privacy Options
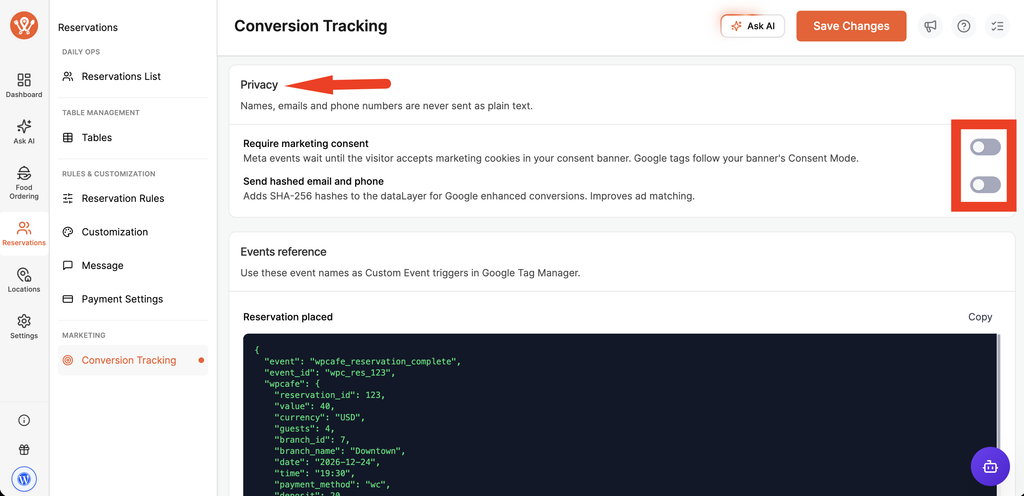
Turn on “Require marketing consent” if your visitors must accept cookies first. Meta events then wait until the visitor accepts marketing cookies in your consent banner. This needs a consent plugin that supports the WP Consent API, such as Complianz or CookieYes; without one, Meta events stay off and the card shows a warning. Turn on “Send hashed email and phone” to add encrypted (SHA-256) customer details for Google enhanced conversions.
Step 6: Save Your Settings
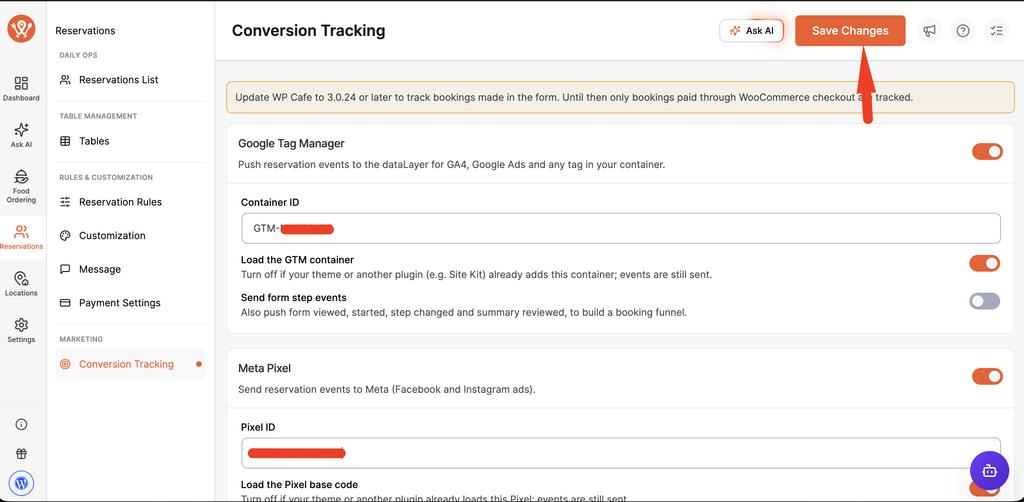
Click “Save Changes” at the top of the page. If an ID has the wrong format, the field turns red and tells you what to fix.
Step 7: Create Triggers in Google Tag Manager
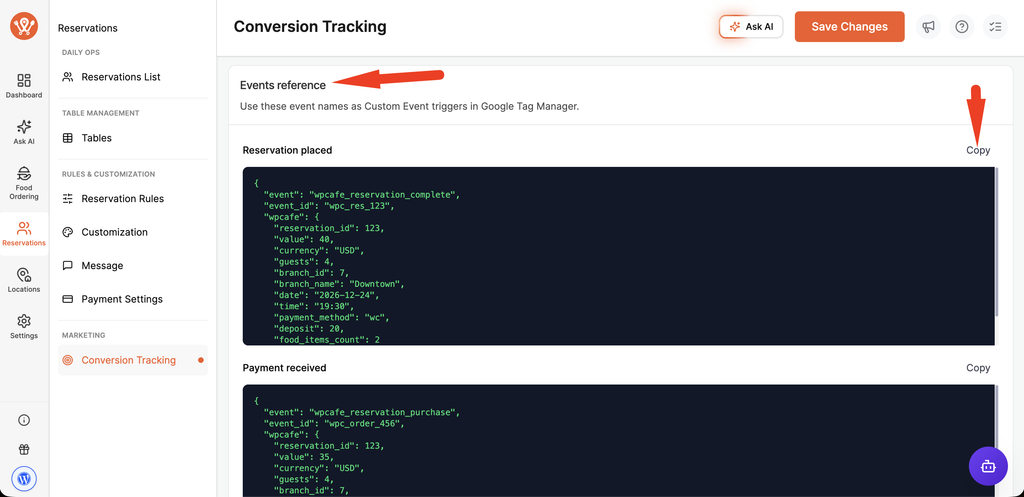
The “Events reference” card lists the event names and sample data WP Cafe sends.
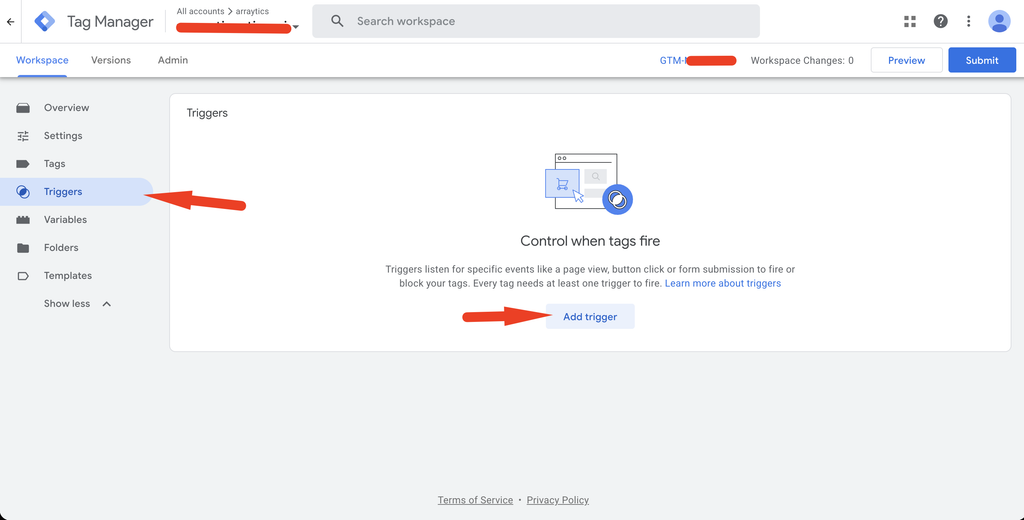
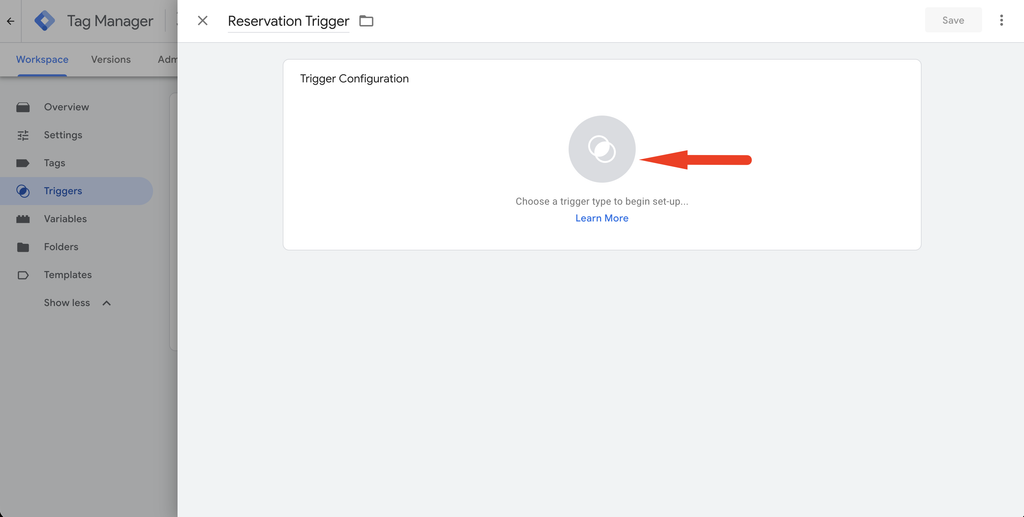
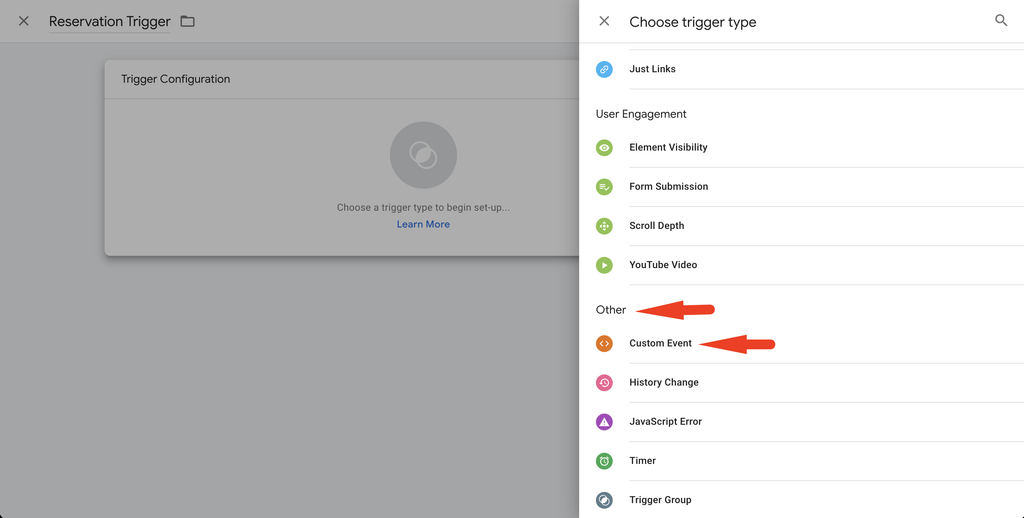
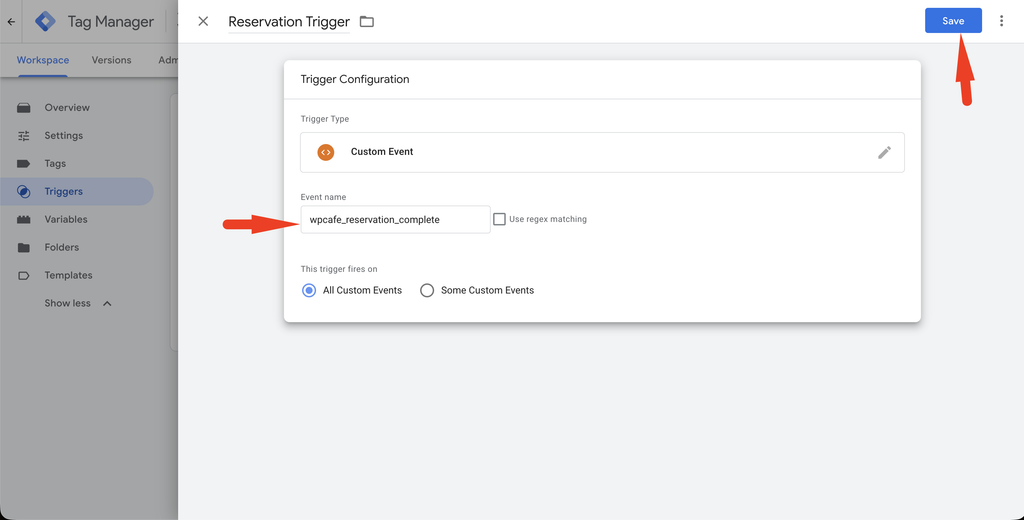
In Google Tag Manager, create a trigger of type “Custom Event” and enter wpcafe_reservation_complete for bookings or wpcafe_reservation_purchase for payments.
Step 8: Send Bookings to Google Analytics or Google Ads
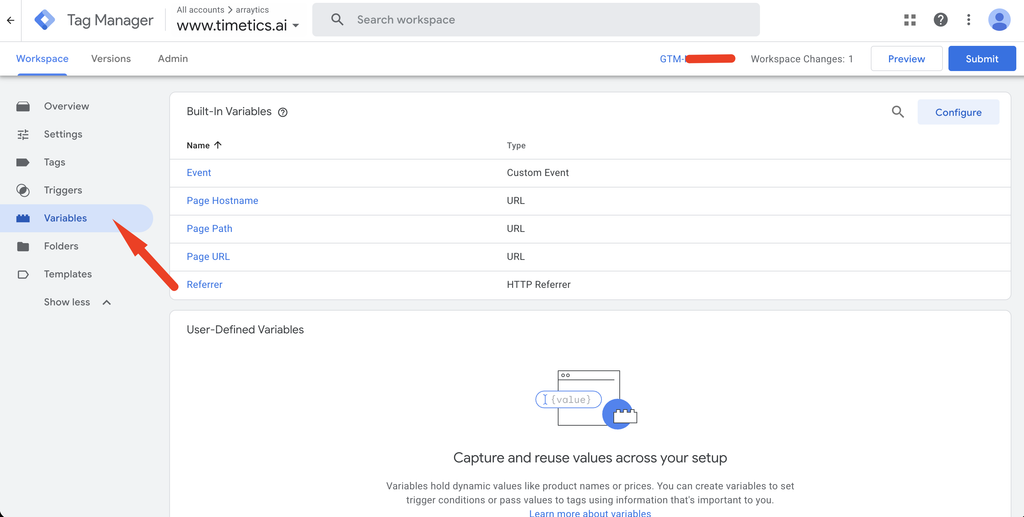
Now add the tag that sends the booking to Google Analytics 4 (GA4) or Google Ads, and connect it to the trigger from Step 7. To send the booking value too, first make a variable that reads it.
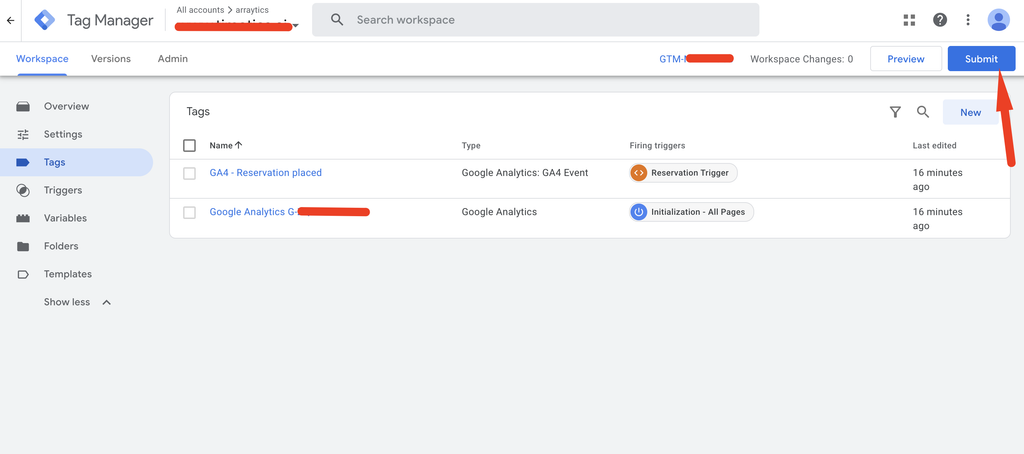
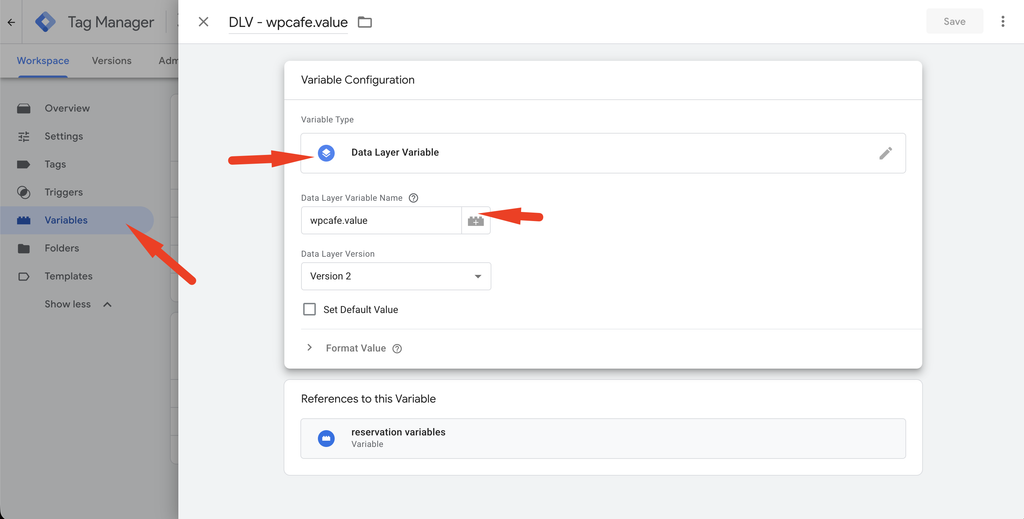
- Go to Variables → User-Defined Variables → New → “Data Layer Variable”. Enter
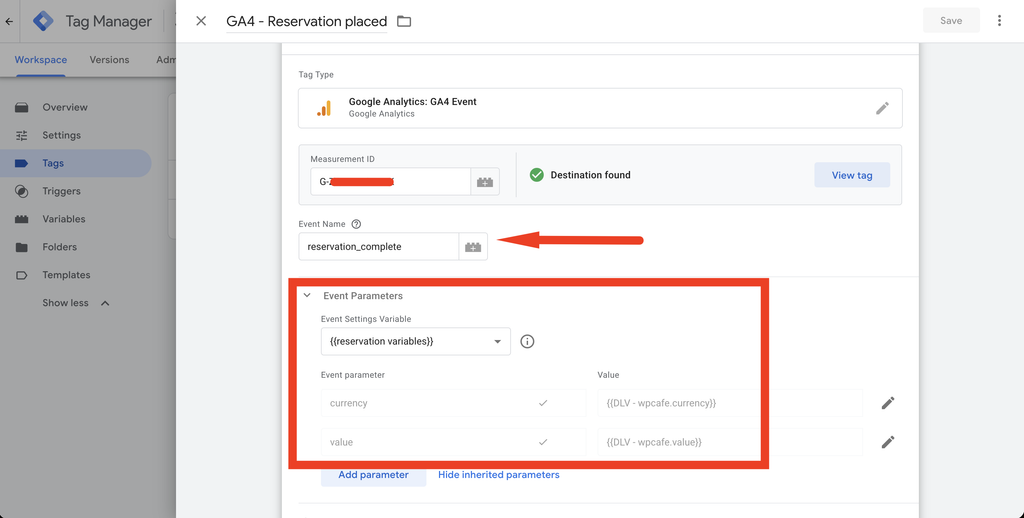
wpcafe.valueas the name and save it as “DLV – wpcafe.value”. Do the same forwpcafe.currency. Click “Copy” on a sample in the “Events reference” card to see the other values you can read, such aswpcafe.guests. - Go to Tags → New → Tag Configuration → “Google Analytics: GA4 Event”. Enter your Measurement ID (it starts with G-) and an event name, such as
reservation_complete. - Under “Event Parameters”, add
value={{DLV - wpcafe.value}}andcurrency={{DLV - wpcafe.currency}}. - Under “Triggering”, pick the trigger from Step 7 and click “Save”.
- Click “Submit”, then “Publish”, so the changes go live on your site.
For Google Ads, choose “Google Ads Conversion Tracking” as the tag type instead, enter your Conversion ID and Conversion Label, and use the same variables for “Conversion Value” and “Currency Code”.
Step 9: Test Your Setup (Optional)
Turn on “Debug mode” and save. Open your reservation page, open your browser console and make a test booking. Each event sent or skipped is logged with “[WP Cafe tracking]”. You can also check with Google Tag Manager’s “Preview” button or Meta Events Manager’s “Test events” tab. Turn “Debug mode” off again on a live site.
Key Functionality #
“Reservation placed” is sent once for every booking, paid or not. For bookings paid through WooCommerce checkout, it is sent on the order received page after checkout, not when the guest leaves the form. “Payment received” is sent only when an online payment succeeds. Cash on delivery, bank transfer and cheque orders do not count as paid. Its value is the amount charged, including food ordered with the booking. Food orders placed without a reservation are not tracked by this feature.
Each conversion is sent only once. Reloading the thank you page or the order received page does not send it again. Every conversion carries a fixed event ID (wpc_res_ plus the reservation ID, or wpc_order_ plus the order ID), so ad platforms can drop duplicates. The events also include the location ID and name, so multi-location restaurants can compare branches.
Nothing is sent from the reservation form style preview or the Elementor editor, so testing your design does not create fake bookings. The browser cannot send an event when the guest never reaches the order received page: a failed payment that returns to checkout, a closed tab, or a bank transfer paid days later.
Events WP Cafe Sends #
Each step of a booking has a Google Tag Manager event name and a default Meta event.
- Form viewed —
wpcafe_reservation_view. The reservation form is shown. Meta: Off. - Form started —
wpcafe_reservation_start. The visitor fills in the first field. Meta: Off. - Step changed —
wpcafe_reservation_step. The visitor moves to another step of a multi-step form. Meta: Off. - Summary reviewed —
wpcafe_reservation_review. The booking summary opens. Meta: InitiateCheckout. - Reservation placed —
wpcafe_reservation_complete. Every placed booking. Meta: Schedule. - Payment received —
wpcafe_reservation_purchase. An online payment succeeds; includes the GA4 ecommerce data. Meta: Purchase.
The first four reach Google Tag Manager only when “Send form step events” is on.
Prerequisites #
- WP Cafe 3.0.24 or later.
- WP Cafe Pro installed and activated with a valid license.
- The Reservation module turned on.
- A Google Tag Manager container, a Meta Pixel, or both.
- WooCommerce set up, if guests pay online.
- A consent plugin that supports the WP Consent API, if you turn on “Require marketing consent”.


