
- How Do I Configure Pointics Settings?
- What are Pointics Settings?
- Why Do You Need It?
- Prerequisites
- Step-by-Step Instructions
- Step 1: Open Settings
- Step 2: Configure General Settings
- Step 3: Configure WooCommerce
- Step 4: Configure Easy Digital Downloads
- Step 5: Choose Where Points Appear
- Step 6: Style the Widget
- Step 7: Choose Your AI Service
- Step 8: Hide Pointics Branding
- Step 9: Decide What Happens on Uninstall
- Step 10: Save Your Changes
- Complete Settings Reference
- How the Customer Account Page Is Found
- How a Save Is Checked
- Validation Rules
- Limitations
- Troubleshooting
- Notes
How Do I Configure Pointics Settings? #
What are Pointics Settings? #
Settings holds the program-wide options for Pointics. From here, you control whether the loyalty program is active, what you call your points, which order statuses award or revoke points on each connected store, where loyalty information appears on the storefront, how the customer-facing widget looks, which AI service the assistant uses, and what happens to your data when the plugin is deleted.
Why Do You Need It? #
- Give the program your own voice: Call your currency Stars, Credits, Coins, Points, or anything else that fits your brand.
- Control the accounting rules: Decide which order statuses award points and which statuses revoke them.
- Choose where points appear: Hide loyalty information from selected storefront locations without turning off the whole program.
- Use the master kill switch: Quickly disable the loyalty program if something needs to be corrected.
- Choose the AI service: Use the hosted Aisentic service or a WordPress AI provider you connect yourself.
Prerequisites #
- An Administrator account
- No additional setup is required because default settings ship with Pointics
- WooCommerce active if you want the WooCommerce settings section
- Easy Digital Downloads active if you want the EDD settings section
If both WooCommerce and Easy Digital Downloads are active, both sections appear and can be configured independently.
Where to Find It #
Go to Pointics → Settings.
The direct URL is:
/wp-admin/admin.php?page=pointics#/settings
Each settings section has its own address, such as #/settings/general or #/settings/branding. Reloading or bookmarking the page returns you to the same section. If the URL points to a section that is unavailable on the current site, Pointics falls back to General.
Step-by-Step Instructions #
Step 1: Open Settings #
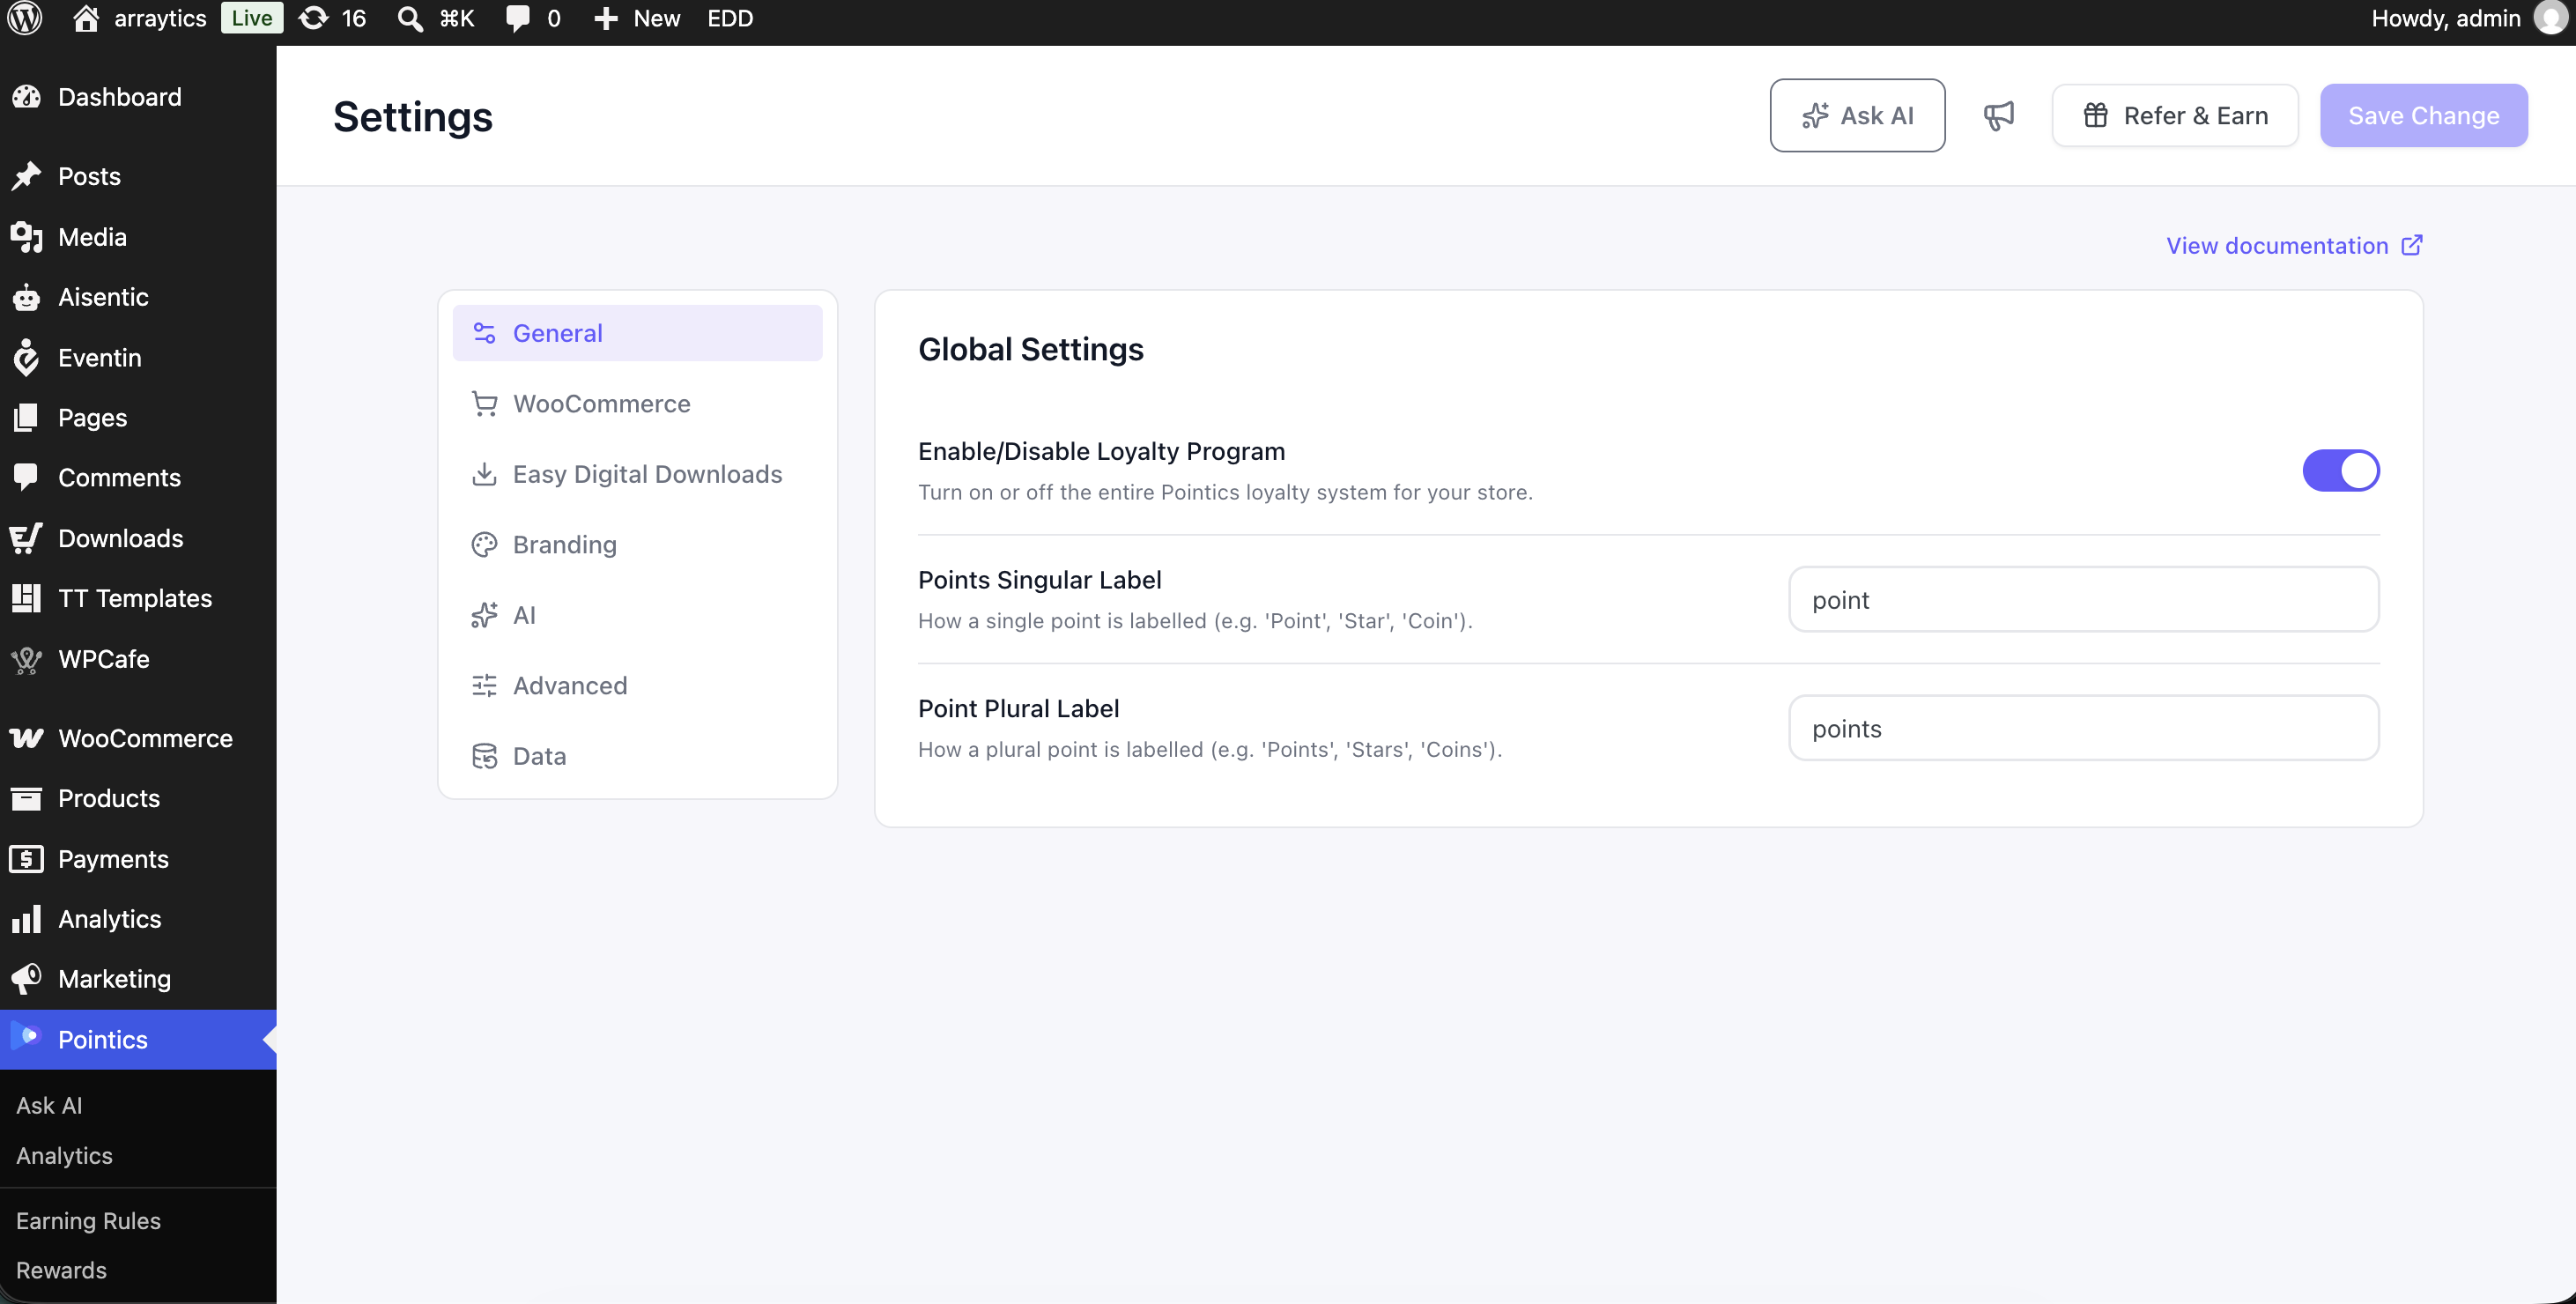
Go to Pointics → Settings.
A navigation rail appears on the left, while the selected settings section appears on the right. General opens by default.
| Section | What It Holds | When It Appears |
|---|---|---|
| General | Master switch and point labels | Always |
| WooCommerce | Order status rules and storefront point locations | Only while WooCommerce is active |
| EDD | EDD order status rules and storefront point locations | Only while Easy Digital Downloads is active |
| Branding | Storefront widget appearance | Always |
| AI | Which AI service Pointics uses | Only while the AI feature is enabled |
| Advanced | Additional widget controls such as white labelling | Always |
| Data | What happens to Pointics data when the plugin is uninstalled | Always |
WooCommerce and EDD keep separate order status rules. If both are active, you configure each host independently.
Step 2: Configure General Settings #
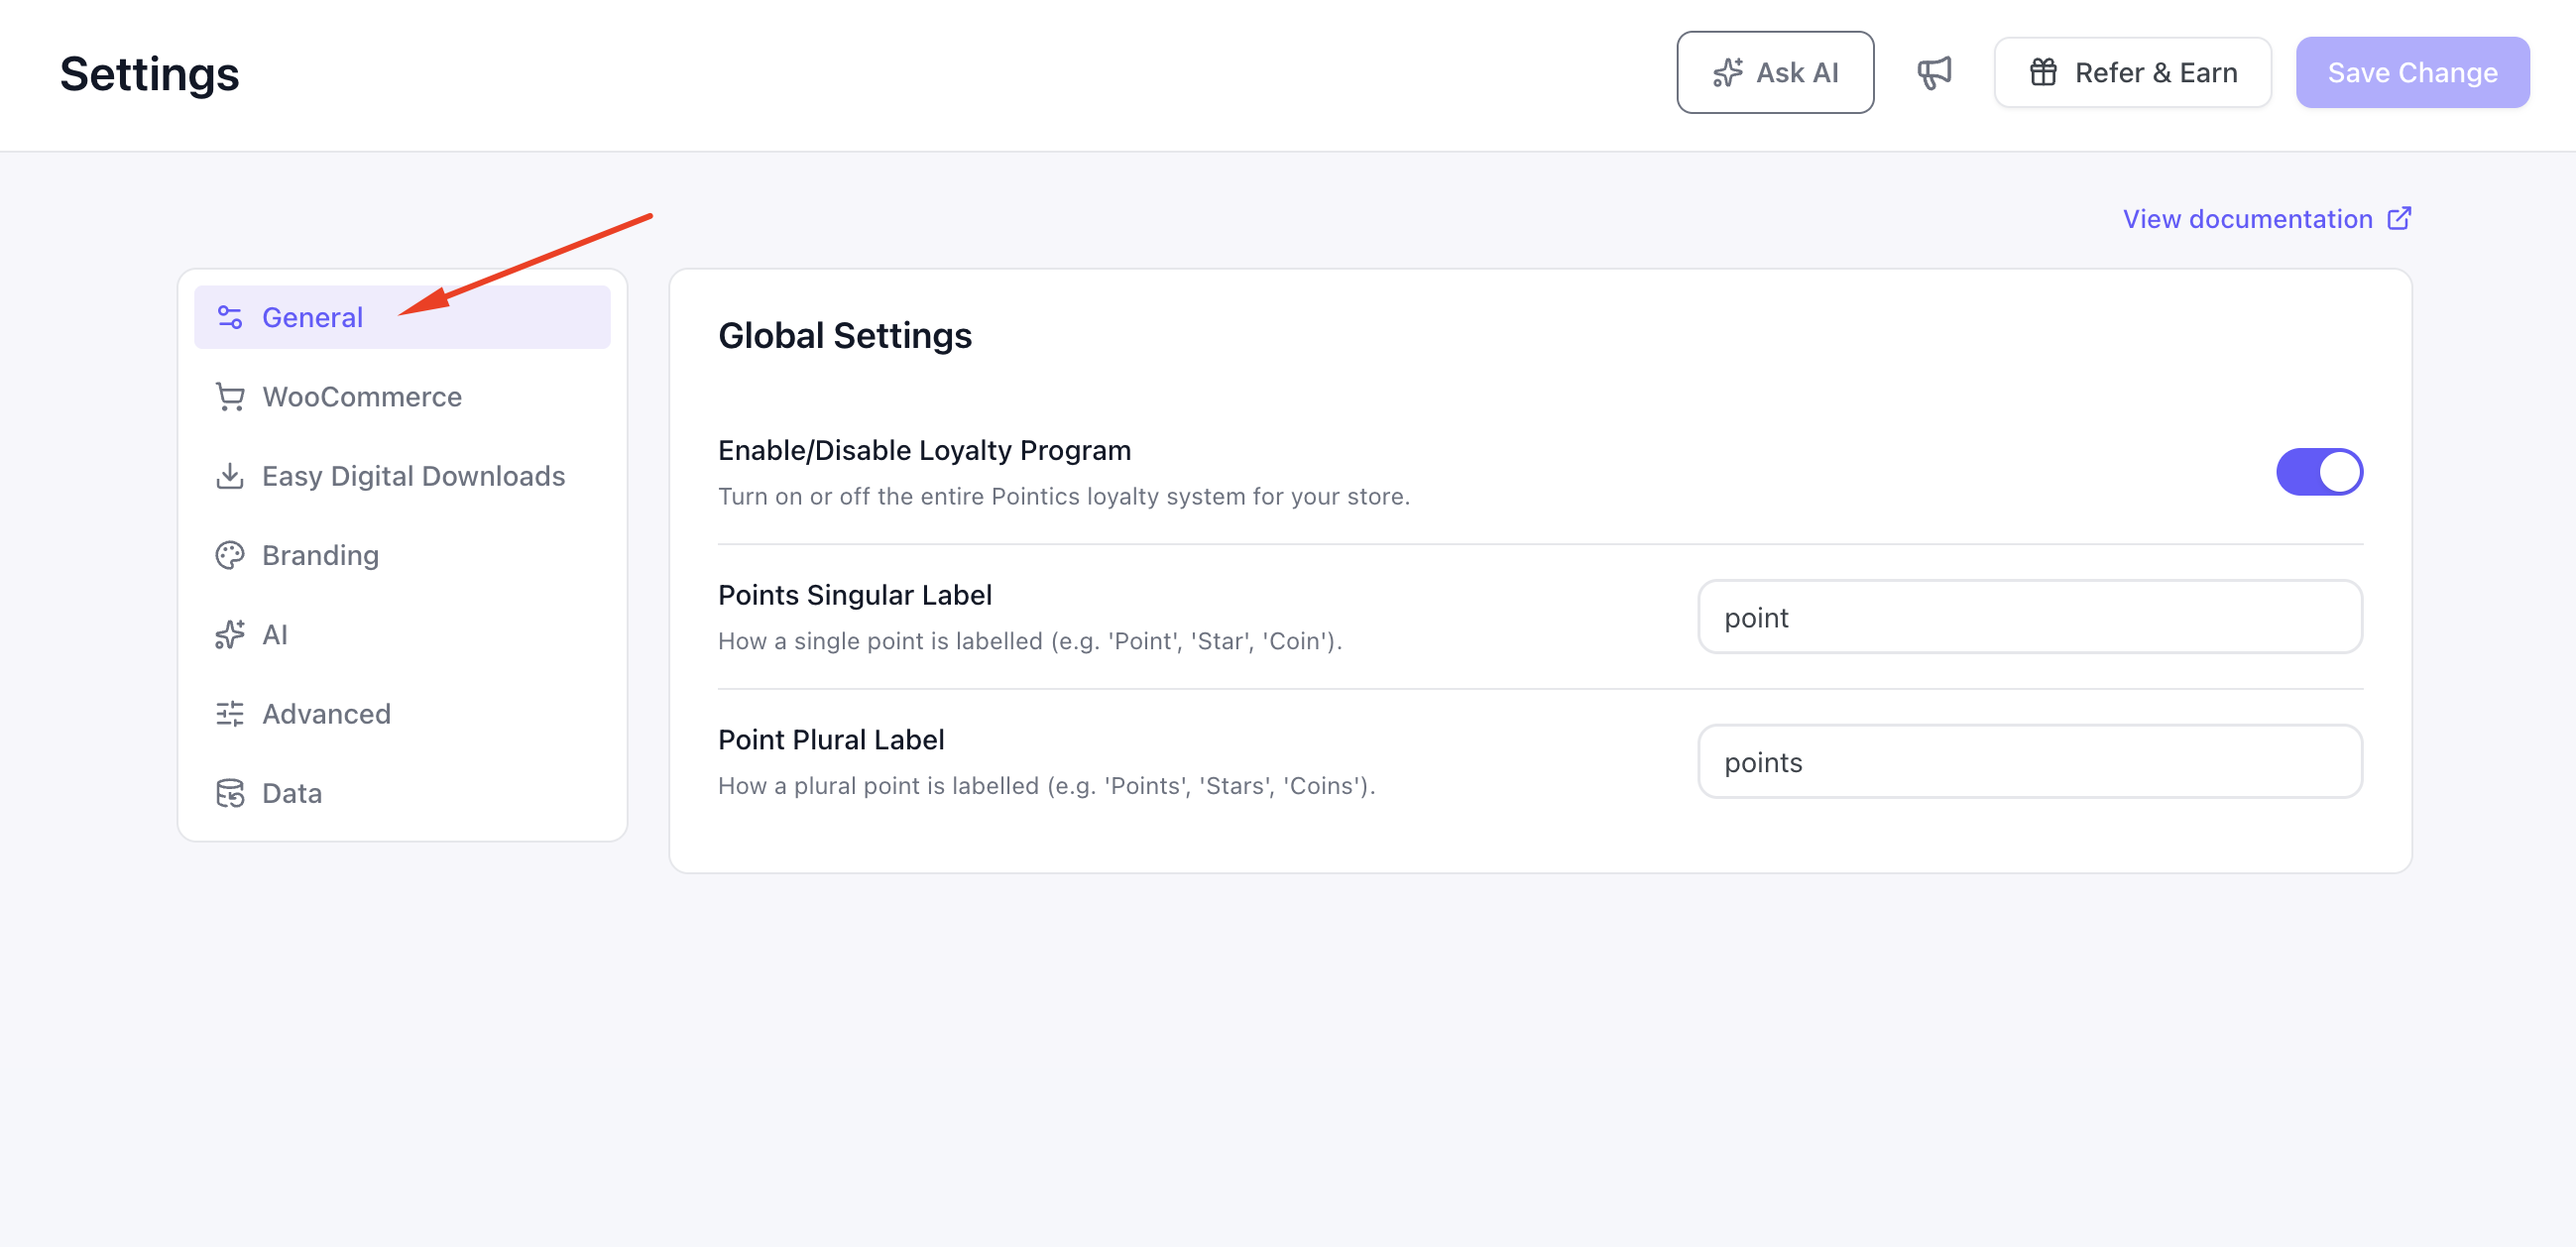
| Field | Description | Default |
|---|---|---|
| Enable/Disable Loyalty Program | Master on/off switch for the entire loyalty program | On |
| Points Singular Label | The singular word used for one point | point |
| Point Plural Label | The plural word used for multiple points | points |
When the loyalty program is turned off, the point label fields become inactive because the program itself is not running.
Step 3: Configure WooCommerce #
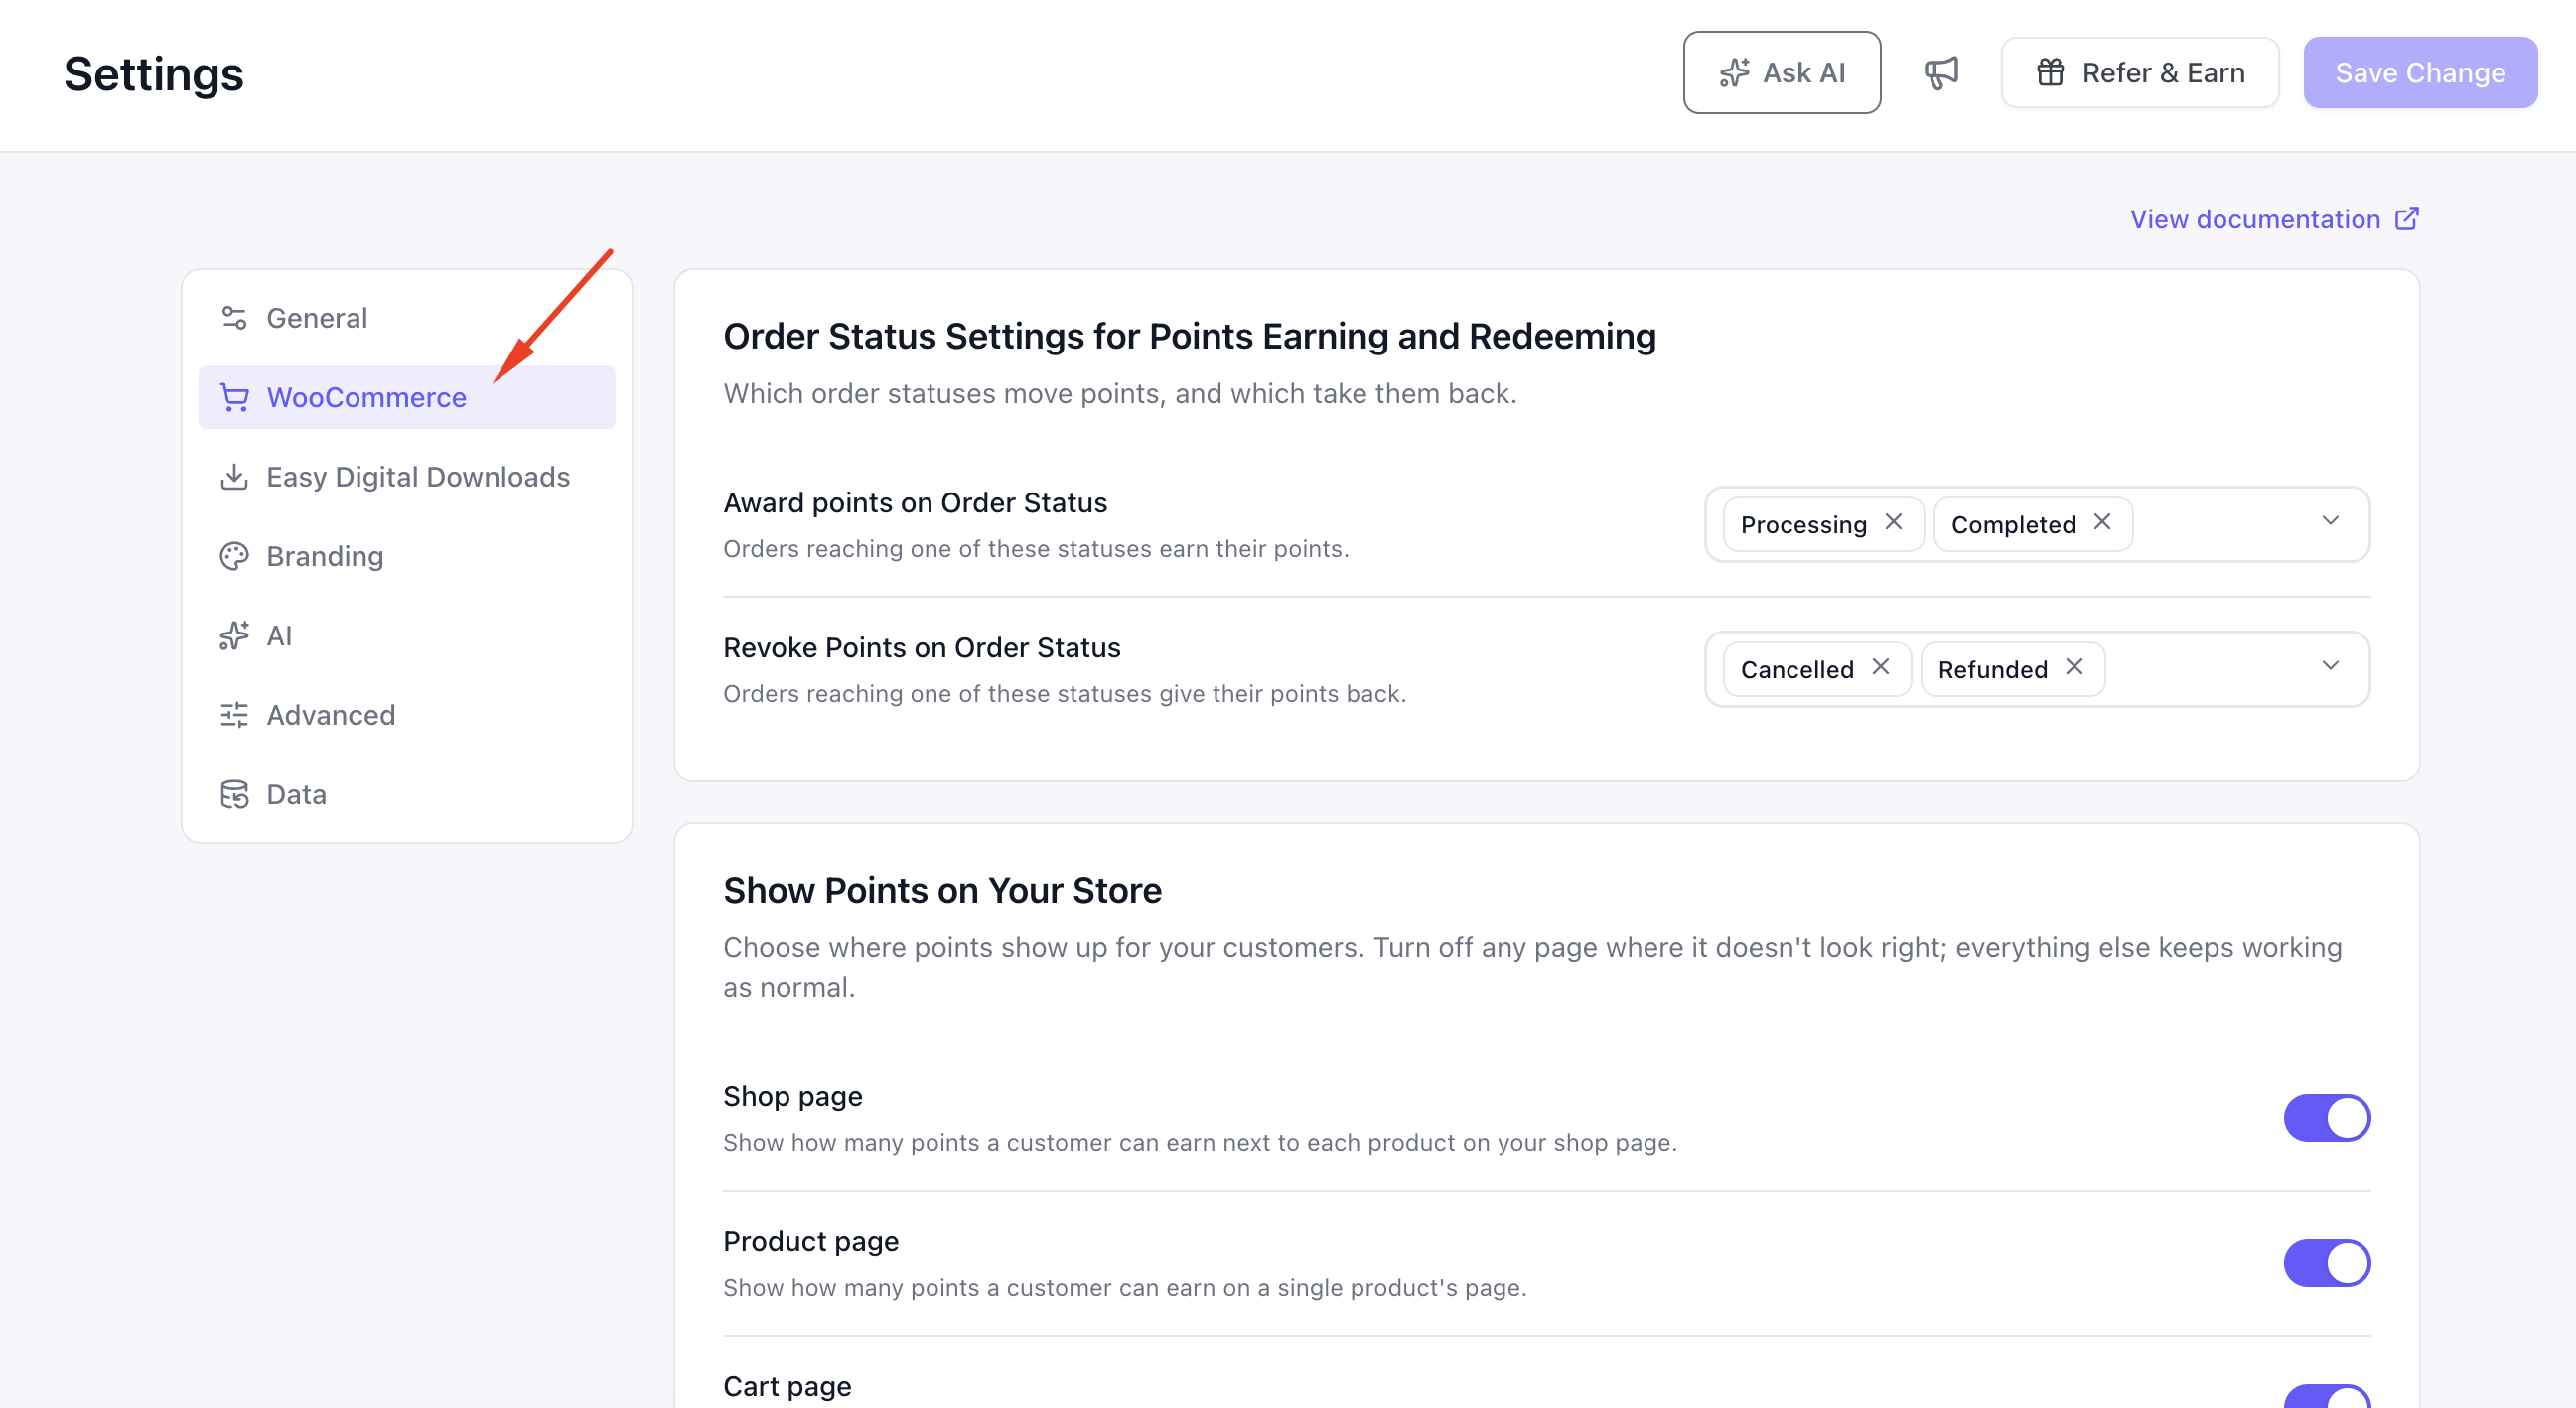
The WooCommerce section contains two main cards. Both become disabled when the loyalty program is turned off.
Order Status Settings for Points Earning and Redeeming #
| Field | Description | Default |
|---|---|---|
| Award points on Order Status | WooCommerce order statuses that award points | Processing, Completed |
| Revoke Points on Order Status | WooCommerce order statuses that remove previously awarded points | Cancelled, Refunded |
Both fields support multiple selections. Pointics reads the available statuses from WooCommerce, so registered custom order statuses also appear.
When WooCommerce is inactive, the WooCommerce section is hidden. Saved values are still validated against the standard statuses:
- Pending payment
- Processing
- On hold
- Completed
- Cancelled
- Refunded
- Failed
Show Points on Your Store #
The WooCommerce section also includes seven controls for deciding where loyalty information appears on your storefront. These controls are shared with EDD and are covered in Step 5.
Step 4: Configure Easy Digital Downloads #
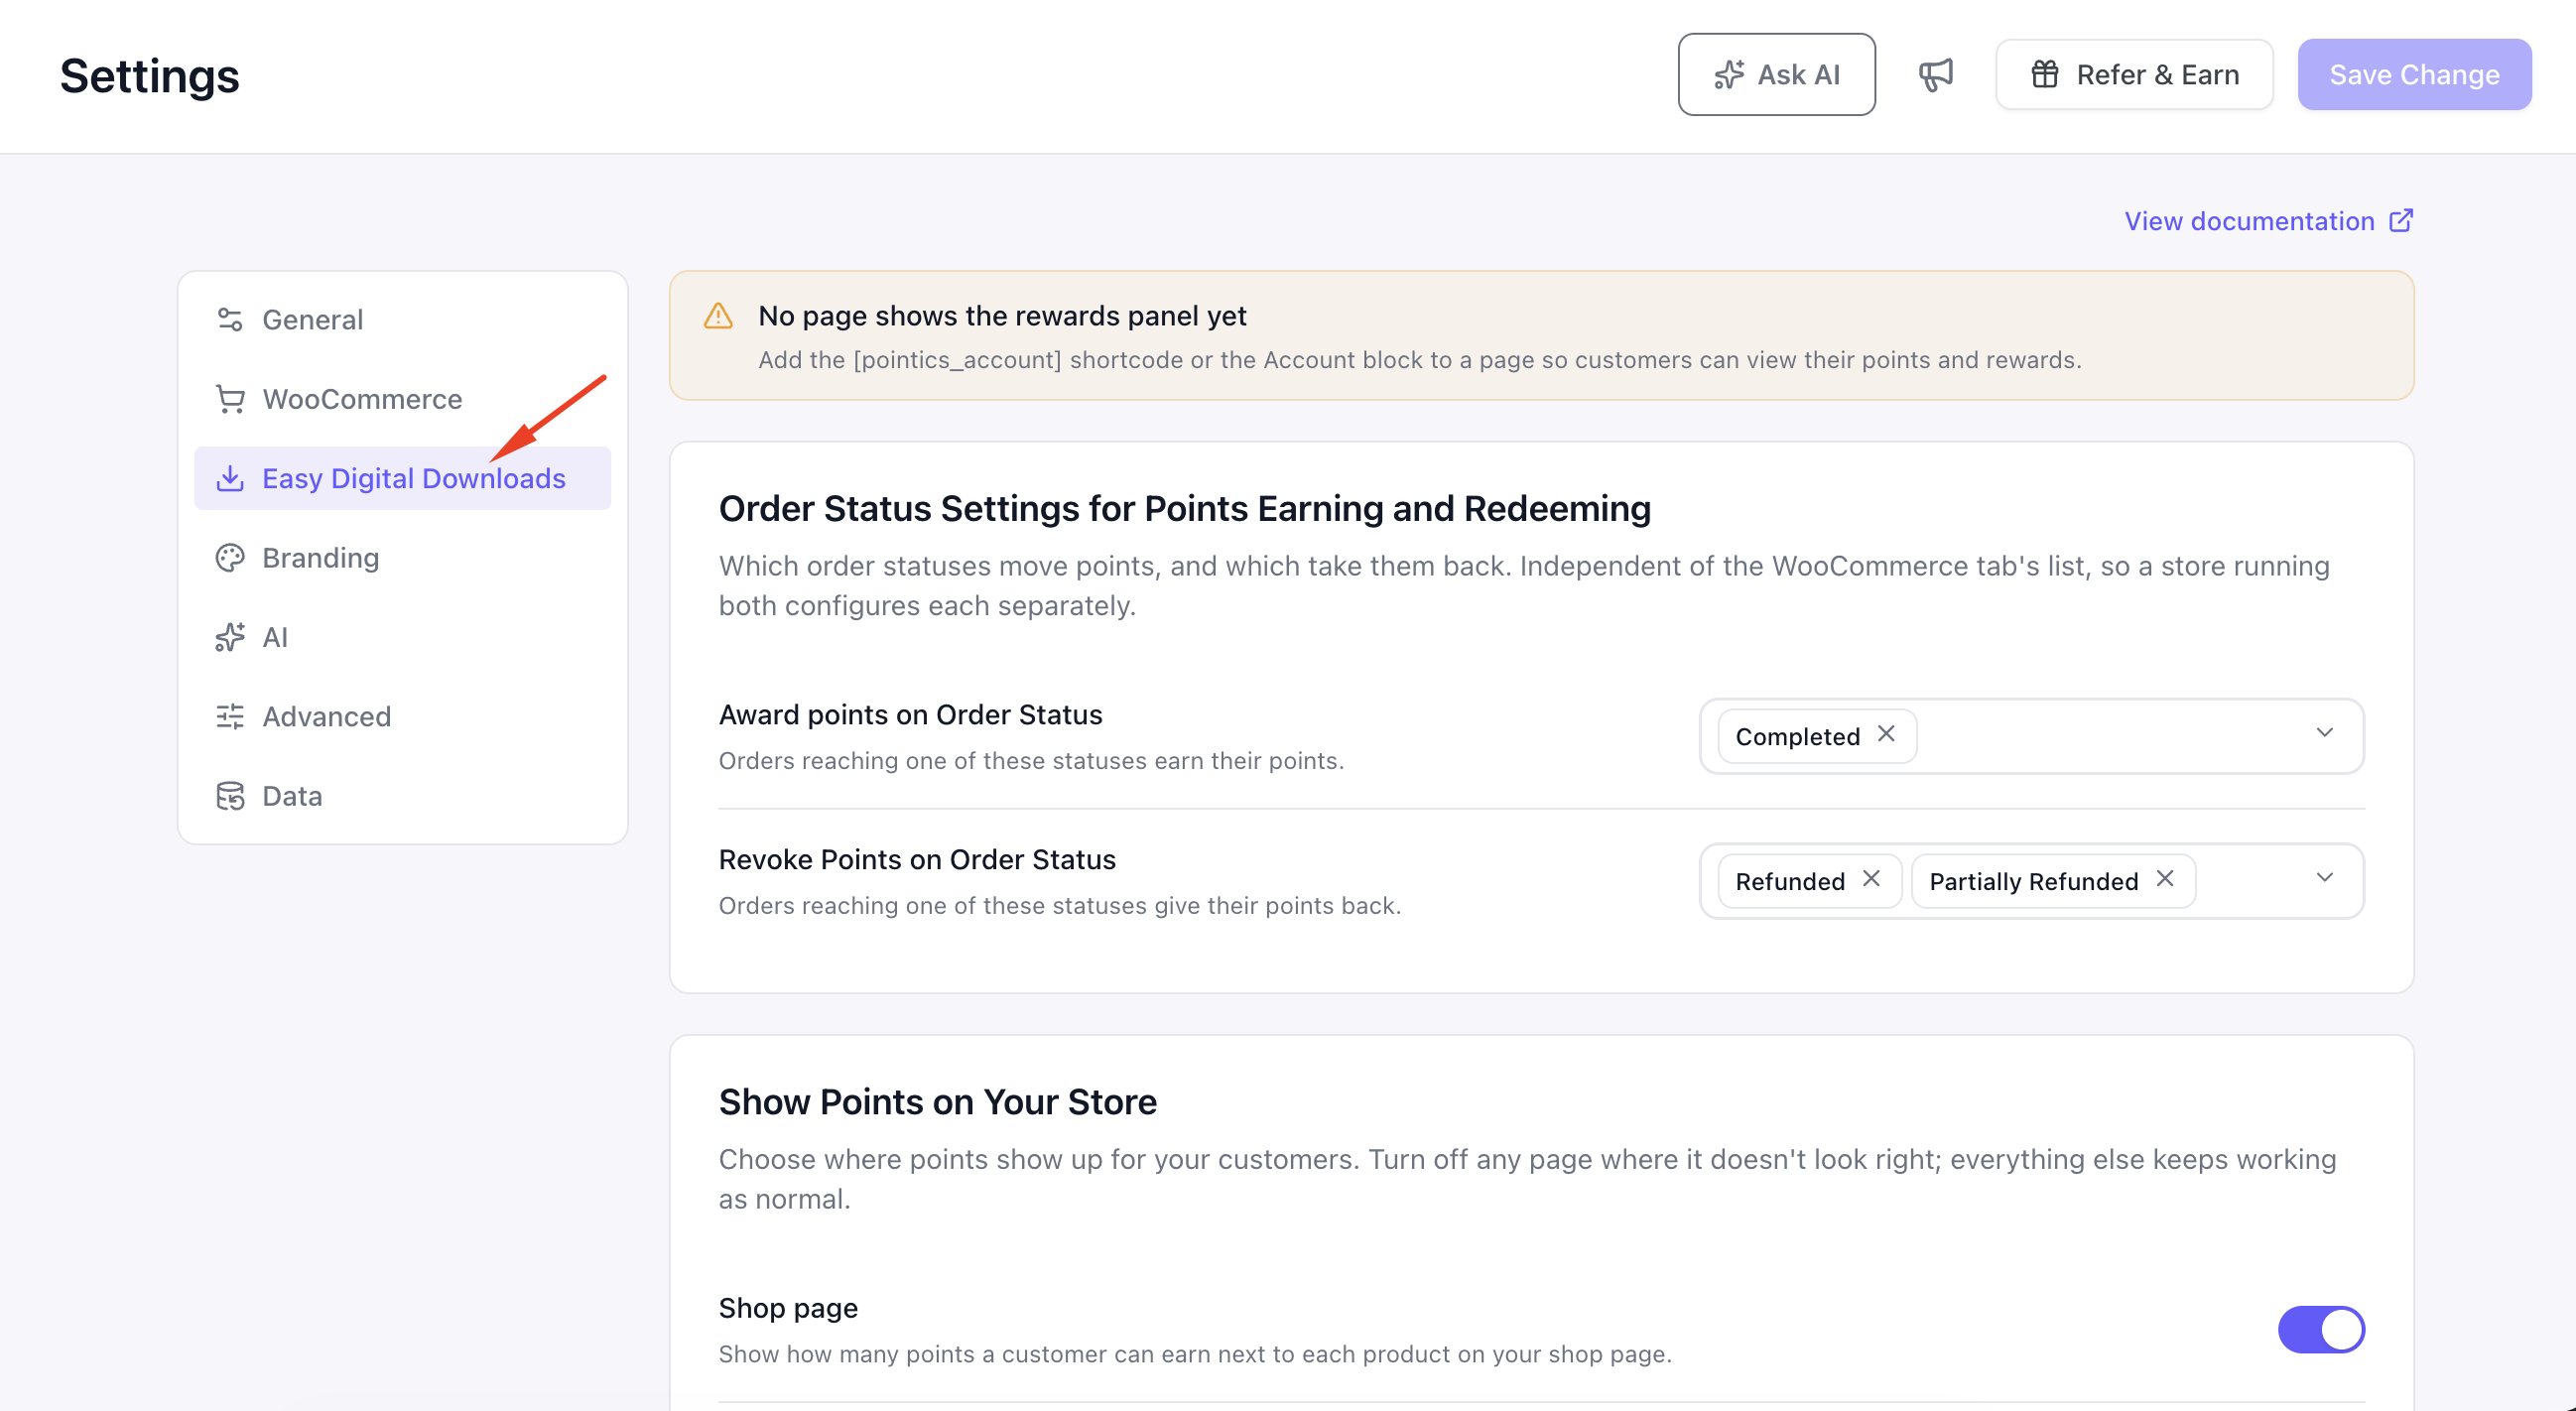
The EDD section mirrors the WooCommerce section, but keeps its own payment status rules.
Order Status Settings for Points Earning and Redeeming #
| Field | Description | Default |
|---|---|---|
| Award points on Order Status | EDD payment statuses that award points | Complete |
| Revoke Points on Order Status | EDD payment statuses that revoke points | Refunded, Partially Refunded, Revoked |
The status list comes from Easy Digital Downloads. If EDD is inactive, the section is hidden and saved values are validated against the standard status list:
- Pending
- Processing
- Complete
- Refunded
- Partially Refunded
- Revoked
- Failed
- Abandoned
- On Hold
Revoked is part of the default revoke list because EDD can move an order to Revoked when access is removed without issuing a refund.
No My Account Page Notice #
Unlike WooCommerce, Easy Digital Downloads does not provide a built-in My Account page for Pointics.
If Pointics cannot find a published page containing the [pointics_account] shortcode or the Account block, the EDD section displays a notice telling you to add one.
Add the shortcode or Account block to any published page and the warning clears automatically.
Step 5: Choose Where Points Appear #
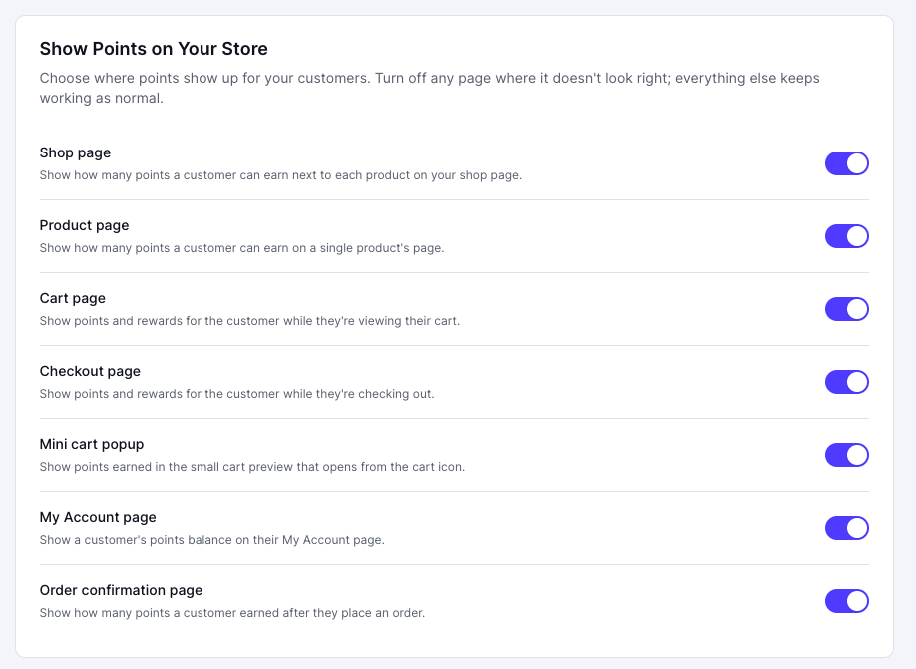
The Show Points on Your Store card contains seven controls. They appear in both the WooCommerce and EDD sections but edit the same shared settings.
Turning a setting off in either section turns it off everywhere.
| Field | Description | Default |
|---|---|---|
| Shop page | Shows how many points a customer can earn next to products on the shop page | On |
| Product page | Shows earning information on individual product pages | On |
| Cart page | Shows points and rewards while the customer views the cart | On |
| Checkout page | Shows points and rewards during checkout | On |
| Mini cart popup | Shows points information in the small cart preview | On |
| My Account page | Shows the customer’s points balance on their account page | On |
| Order confirmation page | Shows how many points the customer earned after placing an order | On |
Turning one option off only hides loyalty information from that location. Other storefront locations continue working normally.
All seven controls become inactive when the loyalty program is turned off.
Step 6: Style the Widget #
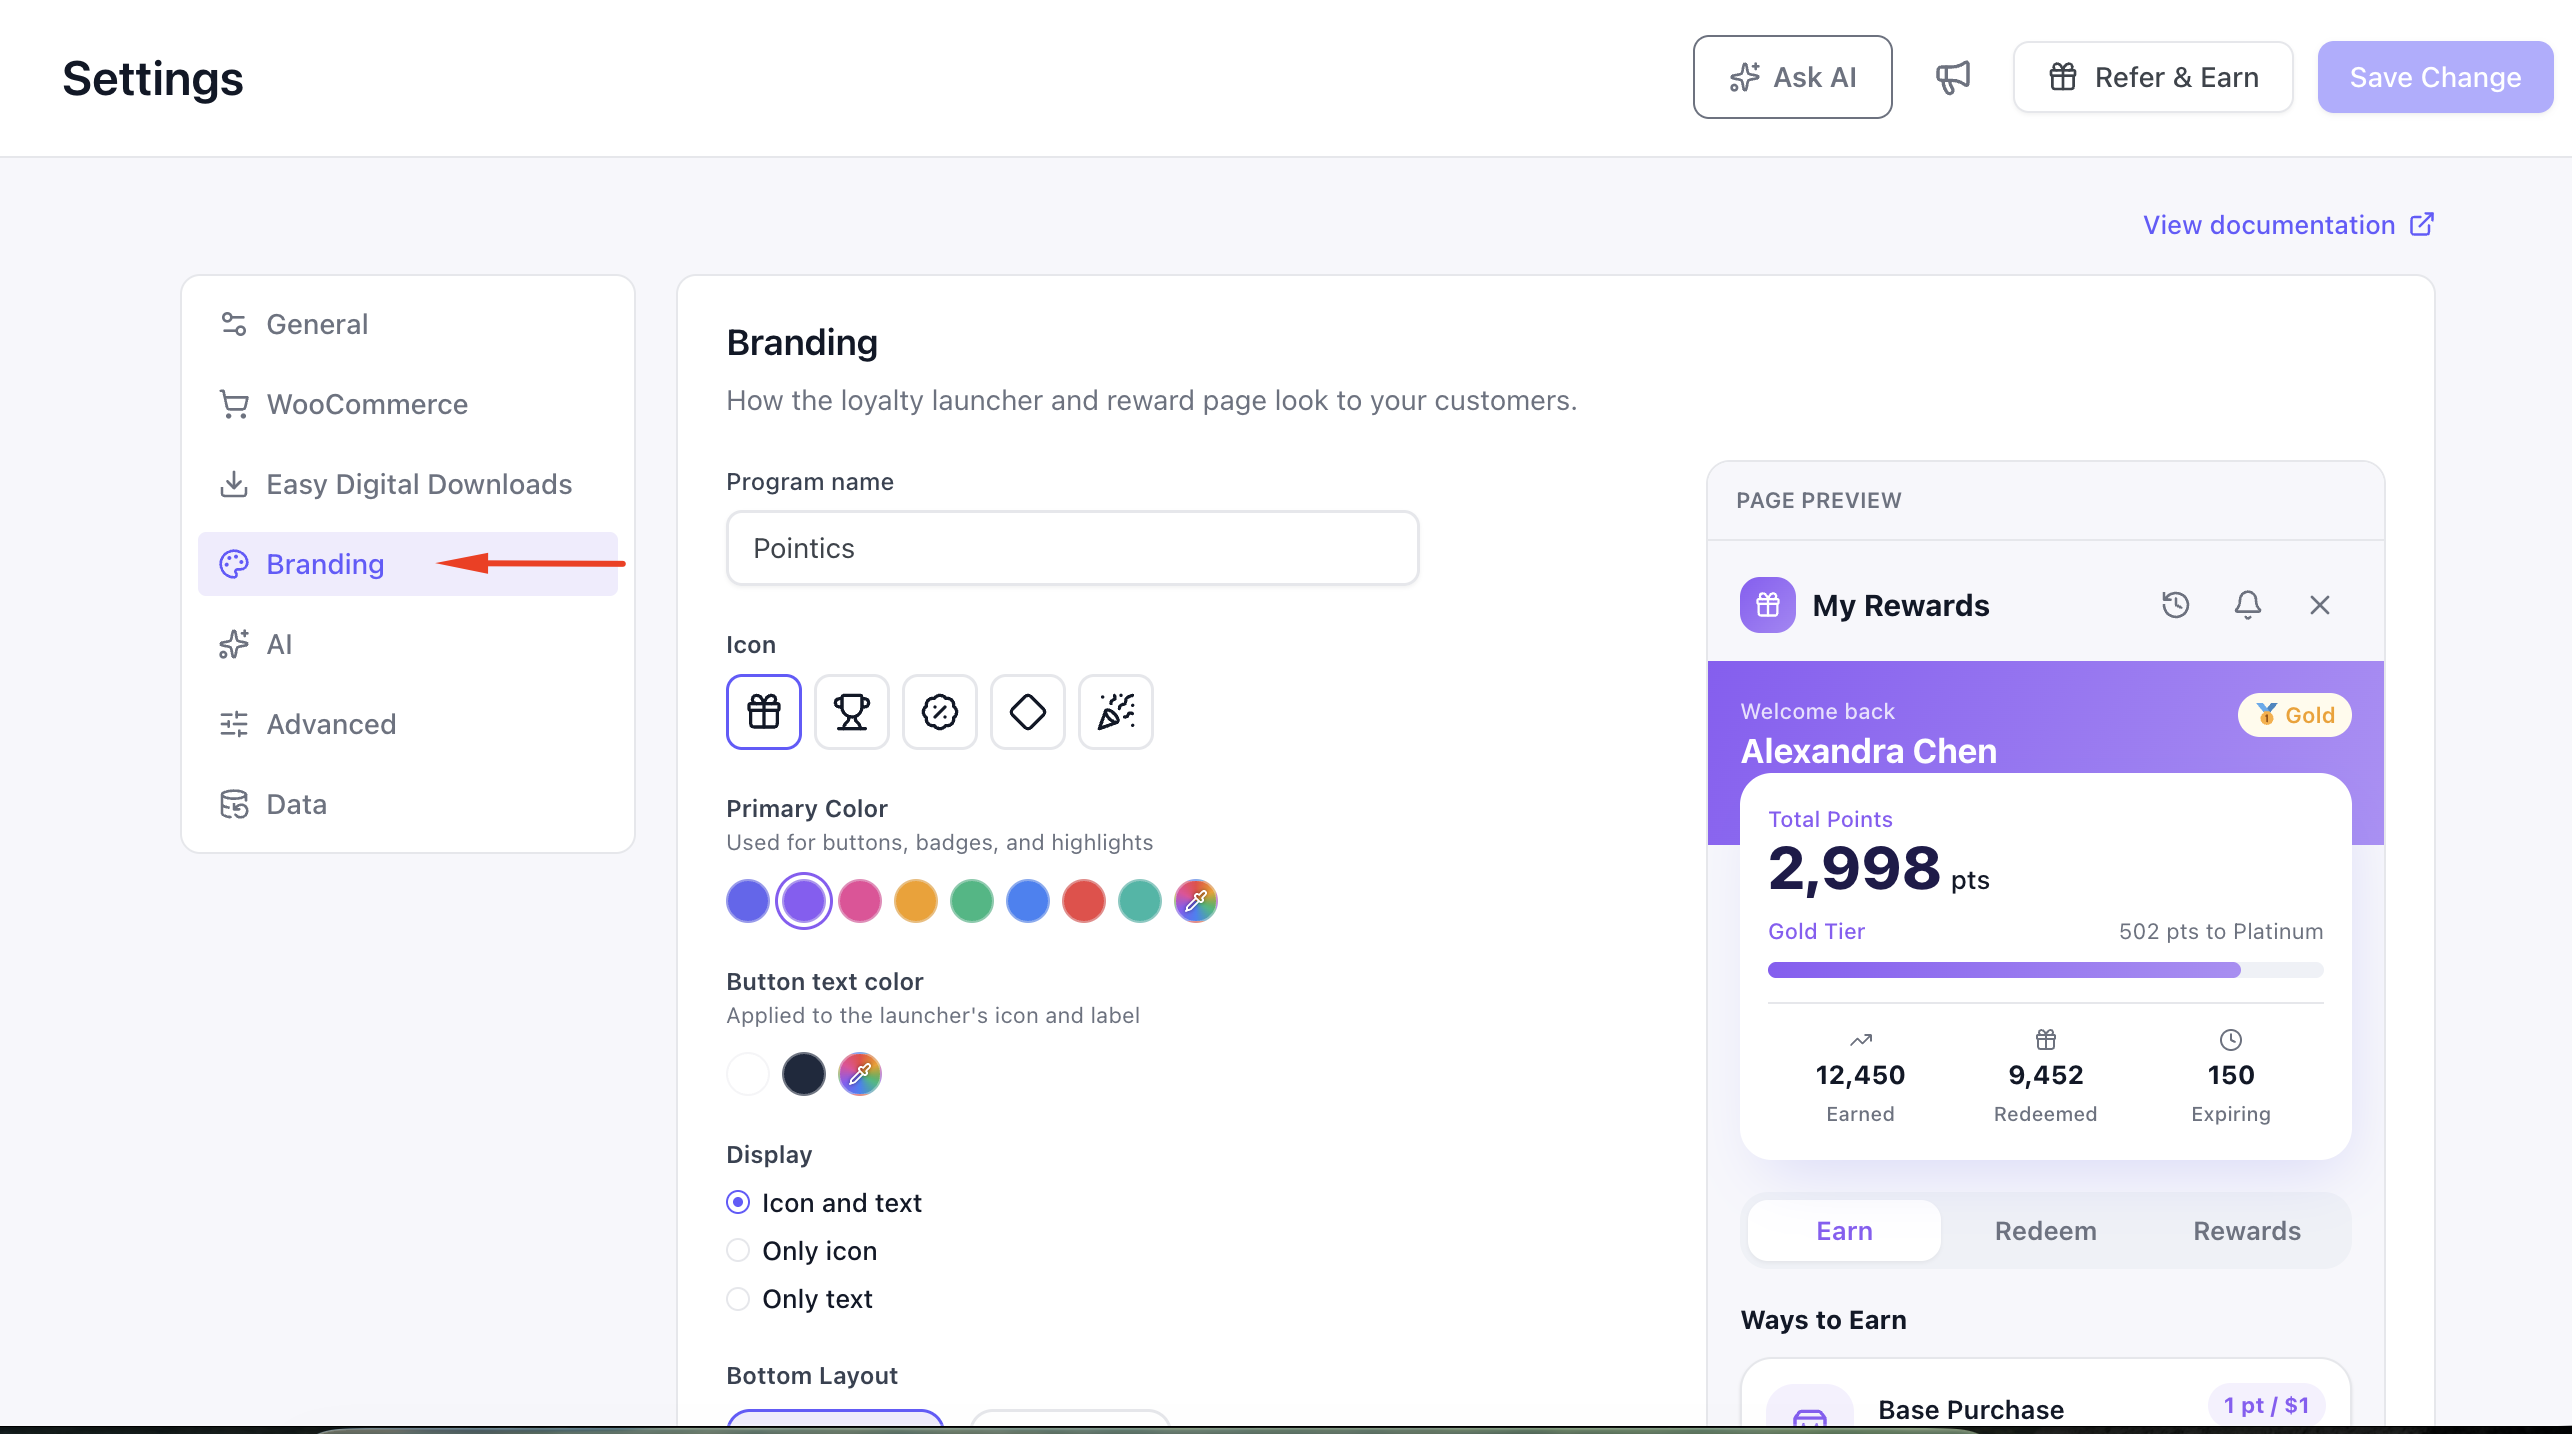
Open the Branding section to configure the customer-facing Pointics launcher. A live preview appears beside the controls.
| Field | Values | Default |
|---|---|---|
| Program name | Free text | Pointic |
| Icon | Gift, Trophy, Discount, Diamond, Celebration | Gift |
| Primary Color | Eight presets or any custom colour | #8b5cf6 |
| Button text color | White, Dark, or custom colour | #ffffff |
| Display | Icon and text, Only icon, Only text | Icon and text |
| Bottom Layout | Bottom right or Bottom left | Bottom right |
The available Primary Color presets are Indigo, Violet, Pink, Amber, Emerald, Blue, Red and Teal.
This is the same branding editor used during the setup wizard, so your onboarding choices can be updated here later.
Because logged-out visitors can see the widget, these branding values are intentionally public.
Step 7: Choose Your AI Service #
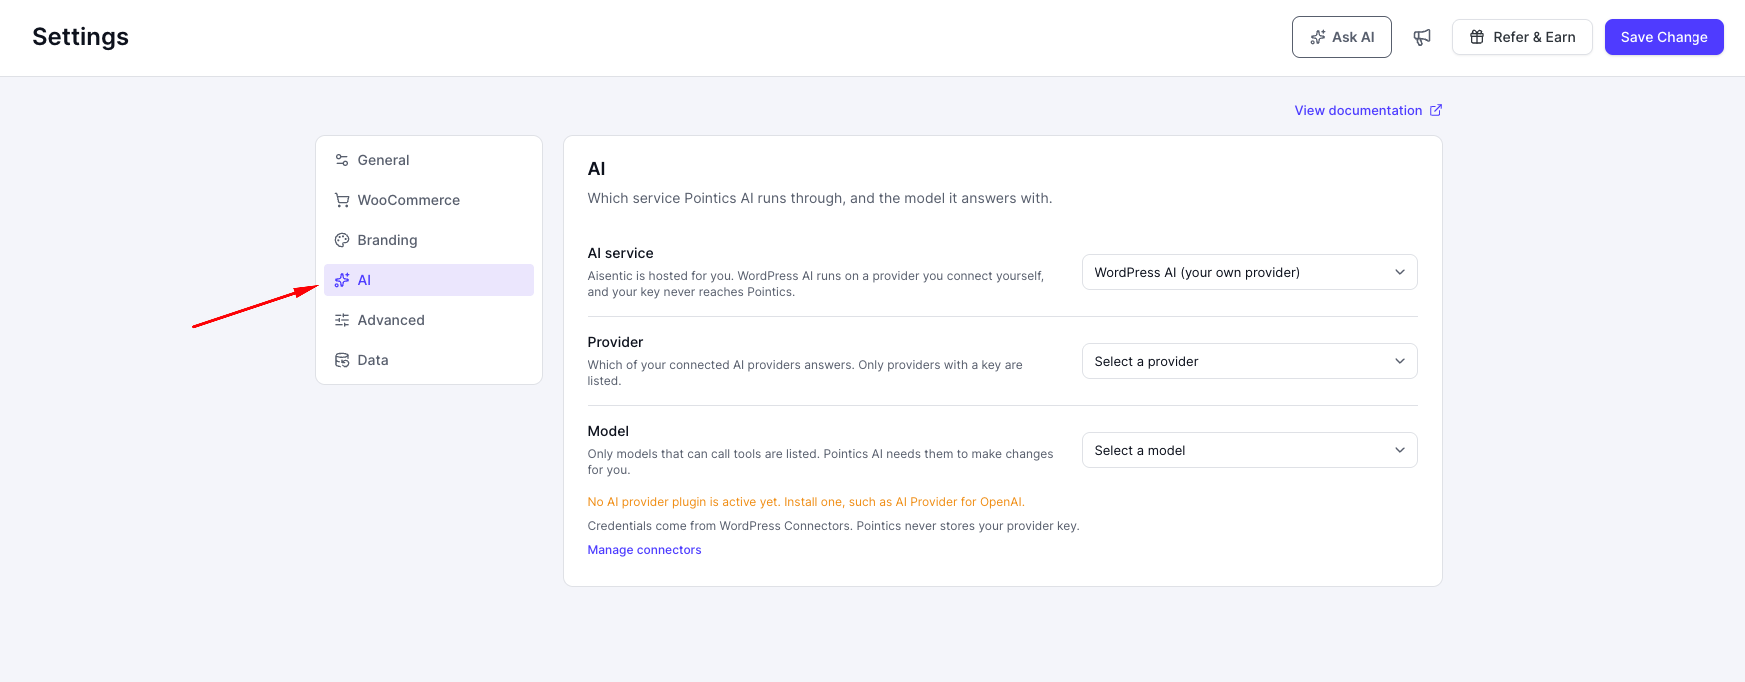
The AI section appears while the AI feature is enabled.
| Field | Description | Default |
|---|---|---|
| AI service | Aisentic hosted by Pointics, or WordPress AI using your own connected provider | Aisentic |
| Provider | The connected provider that answers AI requests | Empty |
| Model | A supported tool-calling model from the selected provider | Empty |
Provider and Model only apply when you select WordPress AI.
When Aisentic is selected, those fields remain hidden because the hosted service chooses them automatically.
Changing the provider clears the selected model because models belong to specific providers.
Provider credentials come from WordPress Connectors. Pointics does not store the provider API key.
Use the Manage connectors link to configure providers. If no provider, key or compatible environment is available, Pointics displays a notice explaining what is missing.
Step 8: Hide Pointics Branding #
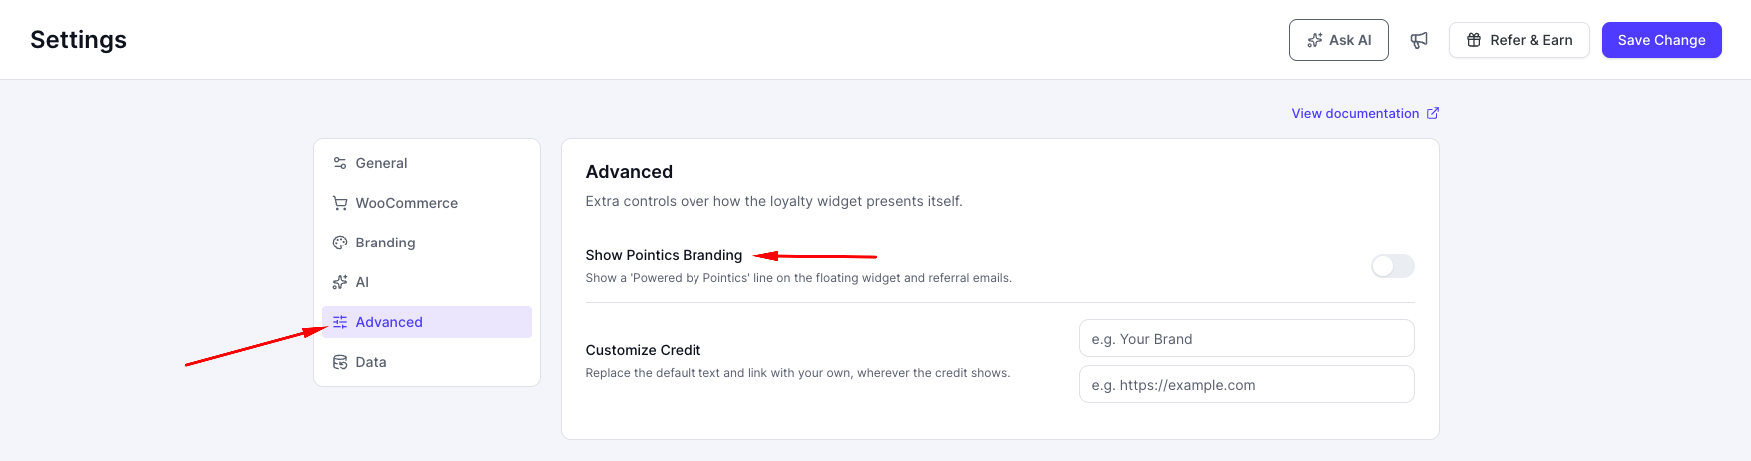
Open the Advanced section to access the white-label control.
| Field | Description | Default |
|---|---|---|
| Hide Pointics Branding | Removes the Powered by Pointics line from the floating widget | Off |
This setting requires Pointics Pro with an active licence.
Without an active Pro licence, the control is replaced by an upgrade prompt. If Pro is installed but unlicensed, the value is ignored by the server.
Step 9: Decide What Happens on Uninstall #
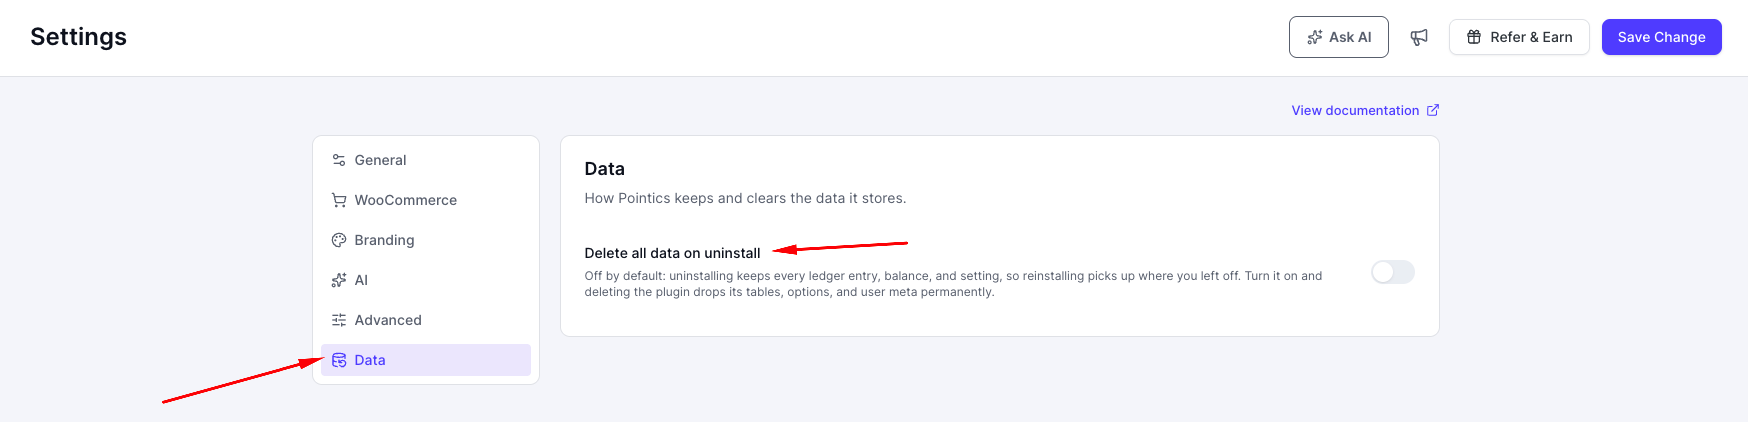
Open the Data section.
| Field | Description | Default |
|---|---|---|
| Delete all data on uninstall | Deletes Pointics tables, options and user metadata when the plugin is removed | Off |
When this option is off, uninstalling Pointics keeps your loyalty data so reinstalling can continue from where you left off.
Turning it on displays a warning because deleting the plugin will permanently remove Pointics data and cannot be undone.
Deactivating the plugin remains safe regardless of this setting.
Step 10: Save Your Changes #
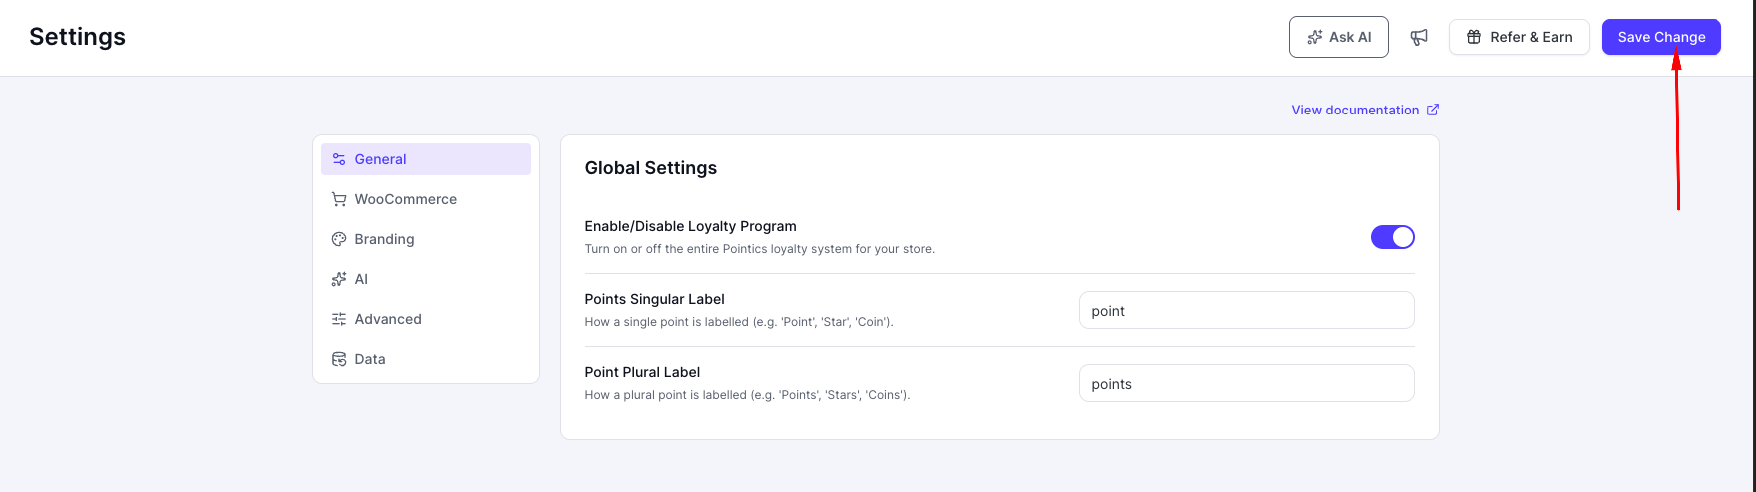
The Save Change button appears in the page header above all settings sections.
It remains disabled until you change something.
You can edit settings in several sections and save them all with one click. For example, you can change General settings, move to Branding, make another change, then save both together.
A successful save displays:
Changes saved.
Complete Settings Reference #
Not every Pointics setting is directly editable from this screen. Some are configured by the setup wizard, another screen or through the REST API.
Program Settings #
| Setting | Default | Where | Notes |
|---|---|---|---|
| Loyalty program enabled | On | General | Master switch |
| Points label singular | point | General | Shown to customers |
| Points label plural | points | General | Shown to customers |
| Internal points label | Points | Not on screen | Separate from the public labels |
| Earn ratio | 1 | Not on screen | Points per currency unit spent |
| Default earn rate | 1 | Not on screen | Fallback before rules exist |
| Default fixed award | 0 | Not on screen | Fallback for non-monetary actions |
| Redeem ratio | 100 | Not on screen | At least 1 |
| Points coupon is exclusive | Off | Not on screen | When off, a points coupon can stack with your own coupons |
| WooCommerce award statuses | Processing, Completed | WooCommerce | Must be real WooCommerce statuses |
| WooCommerce revoke statuses | Cancelled, Refunded | WooCommerce | Must be real WooCommerce statuses |
| EDD award statuses | Complete | EDD | Stored separately from WooCommerce |
| EDD revoke statuses | Refunded, Partially Refunded, Revoked | EDD | Must be real EDD statuses |
Show Points on Your Store #
| Setting | Default | Where | Notes |
|---|---|---|---|
| Shop page badge | On | WooCommerce, EDD | Shared setting |
| Product page badge | On | WooCommerce, EDD | Shared setting |
| Cart panel | On | WooCommerce, EDD | Shared setting |
| Checkout panel | On | WooCommerce, EDD | Shared setting |
| Mini cart popup | On | WooCommerce, EDD | Shared setting |
| Account balance | On | WooCommerce, EDD | Shared setting |
| Order confirmation notice | On | WooCommerce, EDD | Shared setting |
Expiry and Levels #
| Setting | Default | Where | Notes |
|---|---|---|---|
| Expiry mode | Off | Not on screen | Off, rolling or first-in-first-out |
| Expiry days | 365 | Not on screen | Minimum 1 |
| Level qualification window | 12 months | Not on screen | Minimum 1 month |
Owner and Onboarding #
| Setting | Default | Where |
|---|---|---|
| Owner email | Site administrator email | Setup Wizard |
| Usage tracking consent | On | Setup Wizard |
| Onboarding completed | Off until completed or skipped | Setup Wizard |
AI Settings #
| Setting | Default | Where |
|---|---|---|
| AI service | Aisentic | AI |
| WordPress AI provider | Empty | AI |
| WordPress AI model | Empty | AI |
Aisentic connection details such as endpoint, key, email, registration state and monthly limit belong to the AI connection flow. The Settings screen cannot read or write them.
Storefront and Data #
| Setting | Default | Where | Notes |
|---|---|---|---|
| Storefront surfaces enabled | On | Not on screen | Master control above the seven individual storefront toggles |
| Delete all data on uninstall | Off | Data | The only switch that lets Pointics delete its data |
How the Customer Account Page Is Found #
WooCommerce and Easy Digital Downloads resolve the customer loyalty account page differently.
WooCommerce: Uses the WooCommerce My Account page.
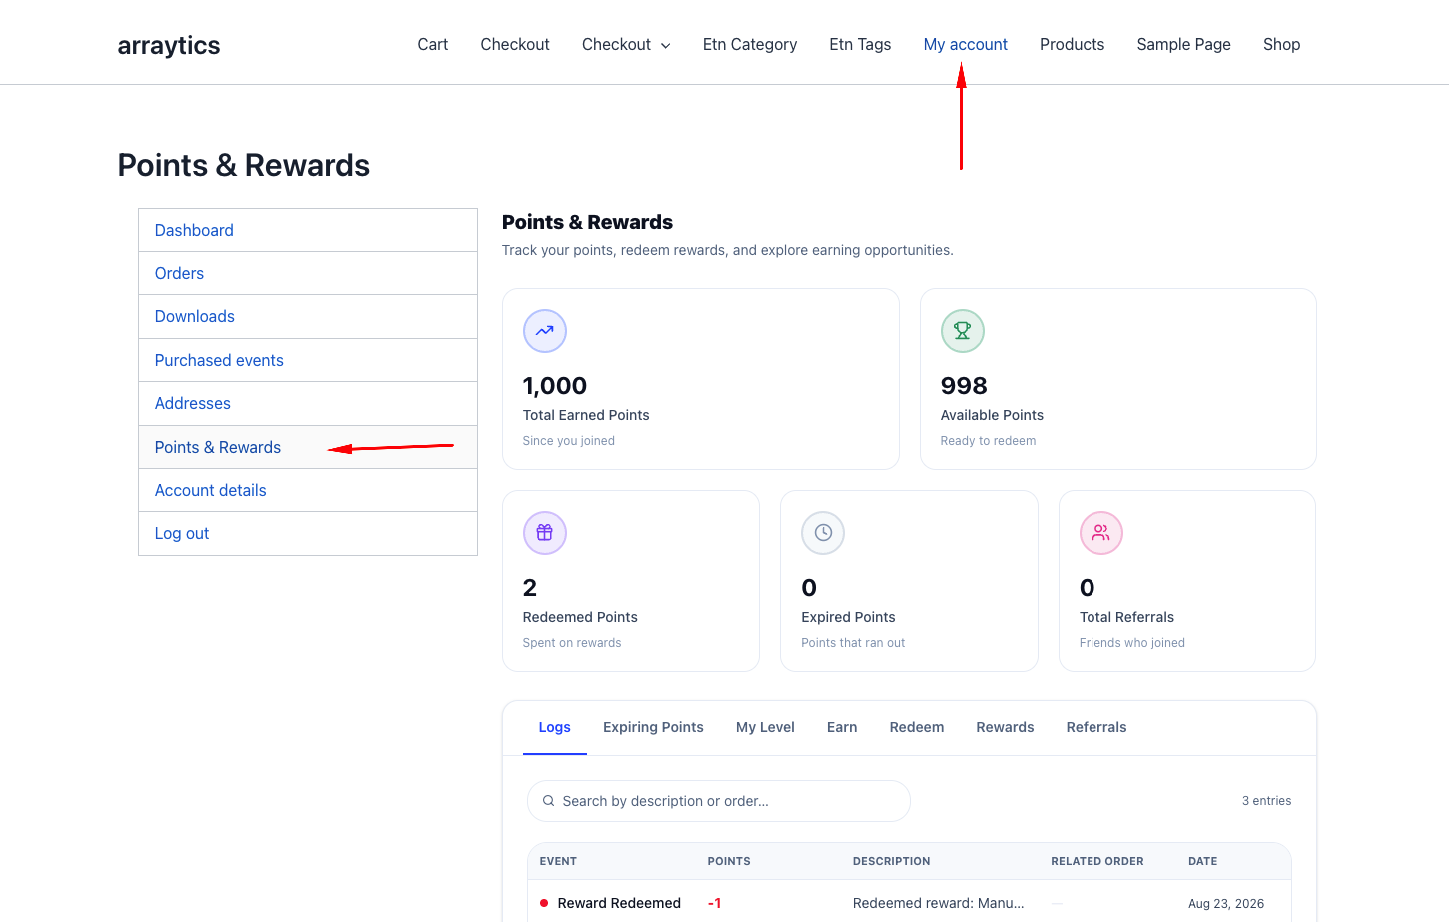
Easy Digital Downloads: Searches published pages for the [pointics_account] shortcode or the Pointics Account block.
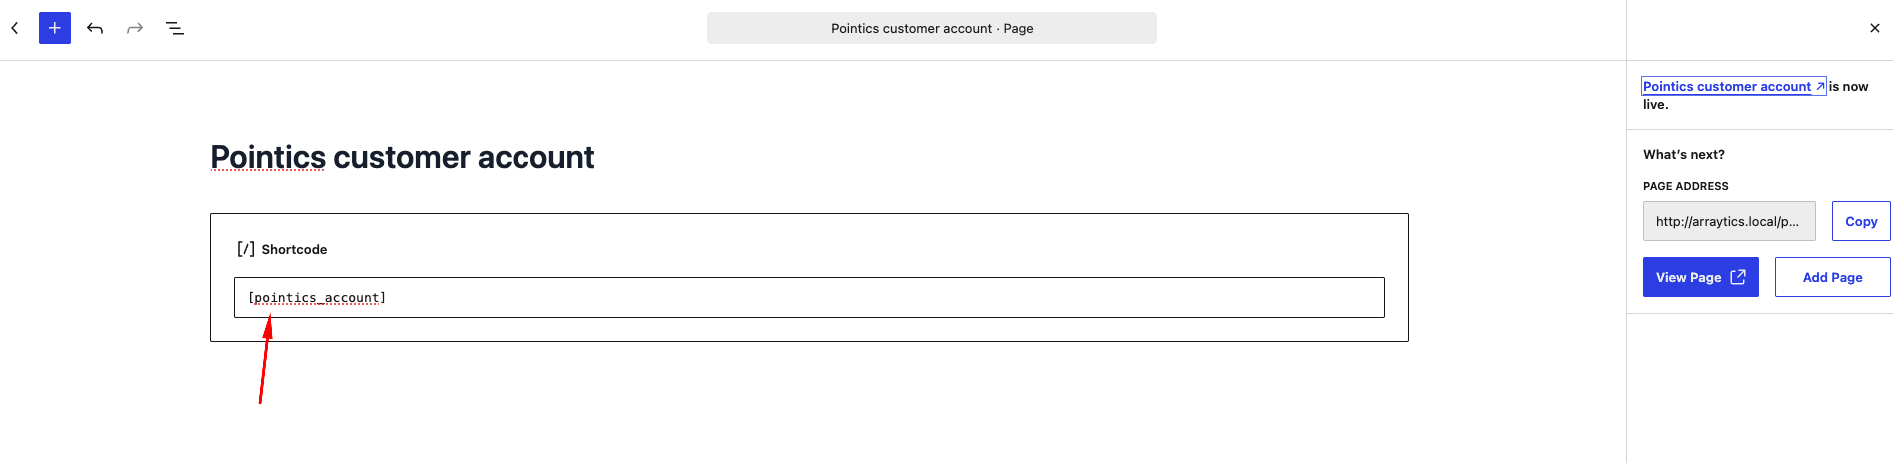
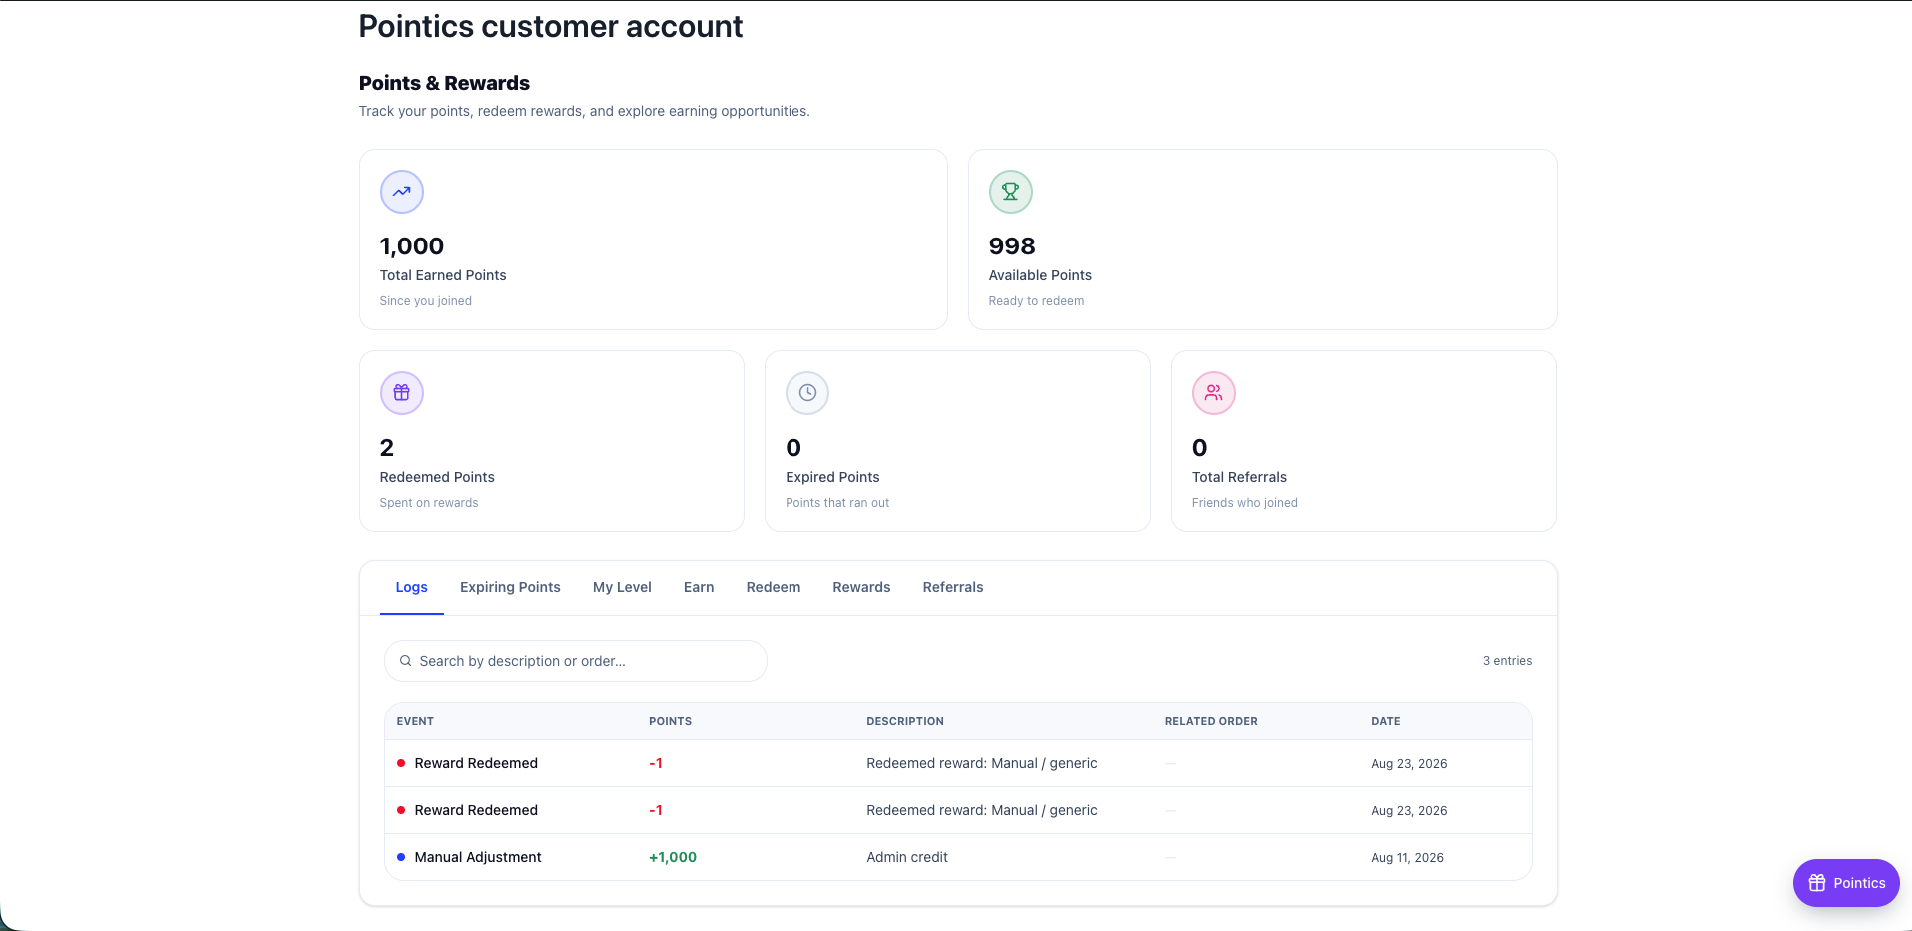
If both hosts are active, Pointics tries the WooCommerce account page first. EDD is used as a fallback when WooCommerce has no suitable page.
If neither can provide an account page, the customer link falls back to the login screen.
How a Save Is Checked #
flowchart TD
    A[Open Settings] --> B[Current values loaded]
    B --> C[Edit any section]
    C --> D[Save Change]
    D --> E{Every field recognised?}
    E -- no --> F[Rejected: unknown setting]
    E -- yes --> G{Any connection setting?}
    G -- yes --> H[Rejected: read-only]
    G -- no --> I[Each value checked against its own rules]
    I -- out of range --> J[Rejected with the exact rule]
    I -- ok --> K[Saved]
    K -- save failed --> L[Settings could not be saved.]
    K -- ok --> M[Changes saved.]
Validation Rules #
- Saving without any recognized changes is refused with No known settings provided.
- Unknown settings are rejected instead of being stored.
- AI connection settings owned by the connect flow are read only from this screen.
- Values outside their supported list are rejected with the allowed options.
- Values below their minimum are rejected.
- Invalid WooCommerce or EDD statuses are silently removed instead of being stored.
- If saving fails, nothing changes and Pointics displays Settings could not be saved. Please try again.
- The singular and plural point labels must contain at least one character.
- The Save Change button remains disabled while either point label is empty.
- An unrecognized AI service falls back to Aisentic rather than breaking the settings form.
Limitations #
- The Settings screen exposes General, WooCommerce, EDD, Branding, AI, Advanced and Data, but some settings such as expiry mode, expiry days, level qualification window, earn ratio, redeem ratio and the master storefront switch are managed elsewhere.
- The WooCommerce section is hidden when WooCommerce is inactive.
- The EDD section is hidden when Easy Digital Downloads is inactive.
- The AI section is hidden when the AI feature is disabled.
- Hidden integration sections keep their saved settings.
- Hide Pointics Branding requires Pointics Pro with a valid licence.
- A white-label value saved while the licence was active remains stored after licence expiry but is ignored.
- Customer-facing point labels and the internal program label are separate values.
- Branding changes may take up to 5 minutes to reach logged-out visitors because their branding data is cached.
- Settings cannot connect or disconnect the AI provider and cannot store an AI provider API key.
- There is no individual reset button for each setting.
Troubleshooting #
| Problem | Solution |
|---|---|
| No known settings provided. | Nothing was submitted. Change a field and save again. |
| Unknown settings… | A field is not recognized, often because an add-on was deactivated. |
| Read-only settings… | Aisentic connection details cannot be edited here. Manage them from the Home screen. |
| expiry_mode must be one of: off, rolling, fifo. | Use one of the supported expiry modes. |
| expiry_days must be at least 1. | Expiry requires a value of at least 1 day. |
| Settings could not be saved. Please try again. | The save failed. Check your hosting environment and retry. |
| Save Change stays greyed out | No value has changed, or one of the point label fields is empty. |
| WooCommerce section is missing | WooCommerce is inactive. Activate it and reload the page. |
| EDD section is missing | Easy Digital Downloads is inactive. Activate it and reload. |
| AI section is missing | The AI feature is disabled for the site. |
| Label, status and storefront fields are disabled | The loyalty program is off. Turn the master switch back on. |
| No page shows the rewards panel yet | Add the [pointics_account] shortcode or Account block to a published page. |
| A Show Points toggle does not match the other integration section | The settings are shared between WooCommerce and EDD, so both sections edit the same values. |
| Provider and Model fields are unavailable | Aisentic selects these automatically. Switch to WordPress AI to choose them yourself. |
| Provider list is empty | No provider is installed or no provider has a configured key in WordPress Connectors. |
| Model list is empty | The selected provider does not expose a supported tool-calling model. |
| Hide Pointics Branding shows an upgrade prompt | Pointics Pro with an active licence is required. |
| A saved order status disappeared | The status is not registered on that store host. Register it first. |
| Branding changes are not visible to logged-out visitors | Wait up to 5 minutes for the cached branding data to refresh. |
| Point labels changed in some places but not others | Customer-facing labels and the internal program label are separate settings. |
| Uninstalling left Pointics data behind | This is the default behavior. Enable Delete all data on uninstall before uninstalling if you want the data removed. |
Notes #
- Deactivating Pointics never deletes loyalty data. Data is removed only when the plugin is uninstalled and Delete all data on uninstall is enabled.
- Changing multiple fields across multiple settings sections counts as a single save.
- WooCommerce and EDD use separate award and revoke status lists but share the same seven Show Points on Your Store settings.
- Logged-out visitors can only access a limited set of public loyalty configuration values such as branding, point labels and selected program defaults.
- Your AI provider API key is never included in Pointics public or private payloads.
Was this article helpful?


