
Overview #
Reservation Settings control how guests book a table. You decide how early and how far ahead they can book, how many guests can come, what a booking costs, and who picks the table.
This guide shows every setting on the Reservation Rules screen, plus the messages, button text and payment options for your booking form.
Watch our step-by-step guide on configuring WPCafe Reservation Settings, schedules, and booking rules. Or continue reading the guide below!
Requirements #
- WPCafe (free) with the Reservation module turned on in WPCafe > Settings > Modules.
- WPCafe Pro for the settings marked (Pro): buffer time, who picks the table, and the table layout.
Step 1: Open Reservation Rules #
Go to WPCafe > Reservations > Reservation Rules. Change the settings you need, then click Save Changes at the top.
When guests can book #
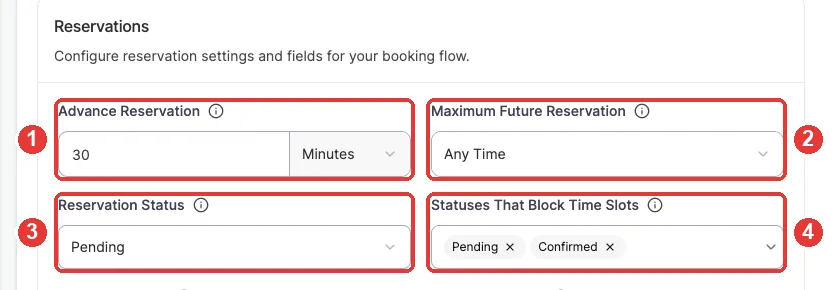
- Advance Reservation (1): how early a guest must book. Example: 30 minutes means a guest cannot book a table that starts in 10 minutes. You can use minutes, hours or days.
- Maximum Future Reservation (2): how far ahead guests can book. Example: 2 Months. Any Time means no limit.
- Reservation Status (3): the status a new booking gets. Pending = you approve each booking. Confirmed = bookings are approved at once.
- Statuses That Block Time Slots (4): bookings with these statuses use up seats. When all seats are used, that time is full.
Guests and price #
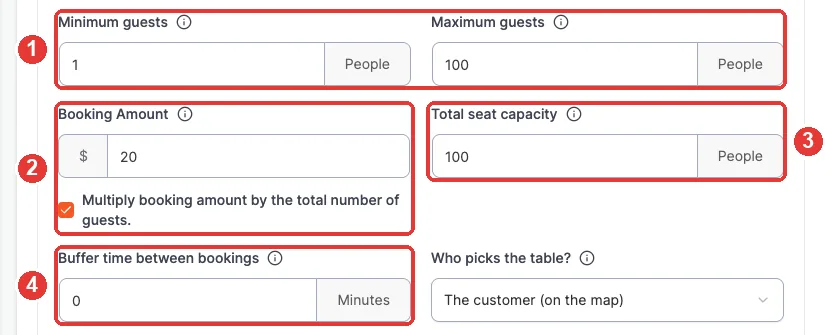
- Minimum guests / Maximum guests (1): the smallest and largest group a guest can book online.
- Booking Amount (2): a fee for the booking. Tick Multiply booking amount by the total number of guests to charge per guest. Example: $20 × 4 guests = $80. Leave it at 0 for free bookings.
- Total seat capacity (3): how many guests you can seat at the same time.
- Buffer time between bookings (4) (Pro): free minutes before and after each booking, for example to clean the table.
Deposit, table layout and customer accounts #
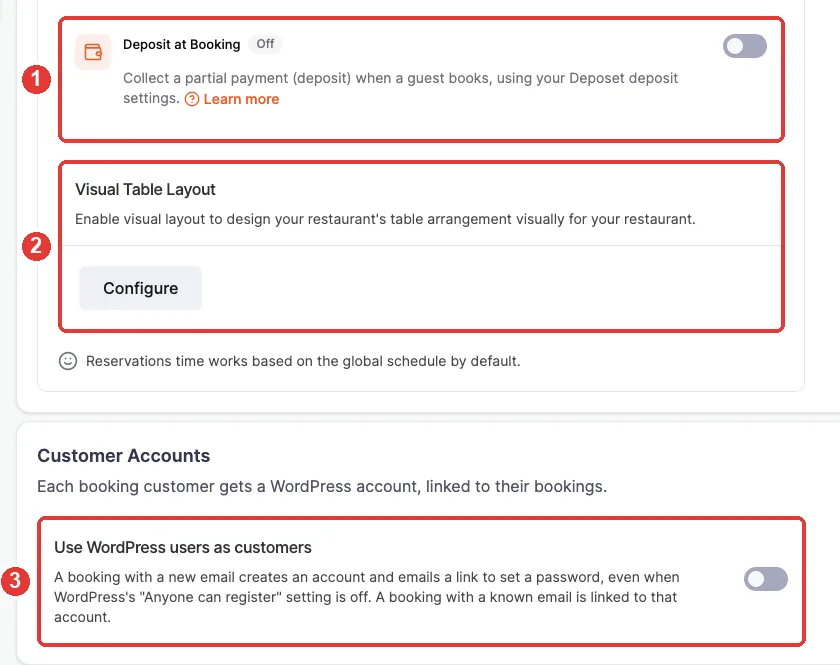
- Deposit at Booking (1): take part of the payment when the guest books. This needs the Deposet plugin.
- Visual Table Layout (2) (Pro): click Configure to open the table map builder.
- Use WordPress users as customers (3): each new guest email gets a WordPress account and an email to set a password. A known email is linked to its account.
Step 2: Choose Who Picks the Table (Pro) #
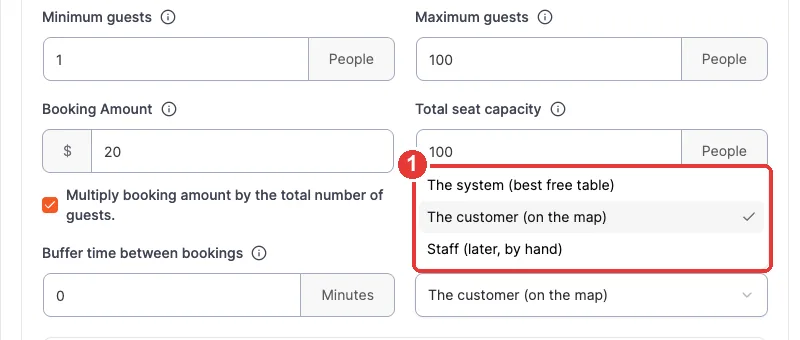
Who picks the table? decides how a booking gets its table. Open the list (1) and choose one option.
| Option | What the guest sees |
|---|---|
| The system (best free table) | No map. The guest picks guests, time and, if you allow it, an area. WPCafe gives the best free table. |
| The customer (on the map) | A map of your tables. The guest clicks the table or chairs they want. |
| Staff (later, by hand) | No map. The guest can pick an area. Your staff choose the table later. |
When you choose The system or Staff, three more options appear:
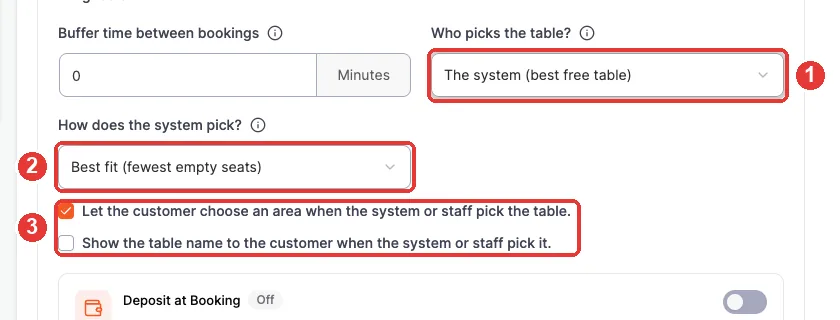
- Who picks the table? (1) is set to The system.
- How does the system pick? (2): Best fit (fewest empty seats) or Priority first (tables marked High first, then Normal, then Low).
- Two checkboxes (3): let the guest choose an area (the list starts with No preference), and show the table name to the guest. The table name is hidden by default.
| Note: The customer (on the map) works only when the Select table field is visible in Reservations > Customization. |
Step 3: Change Button Text and Thank You Messages #
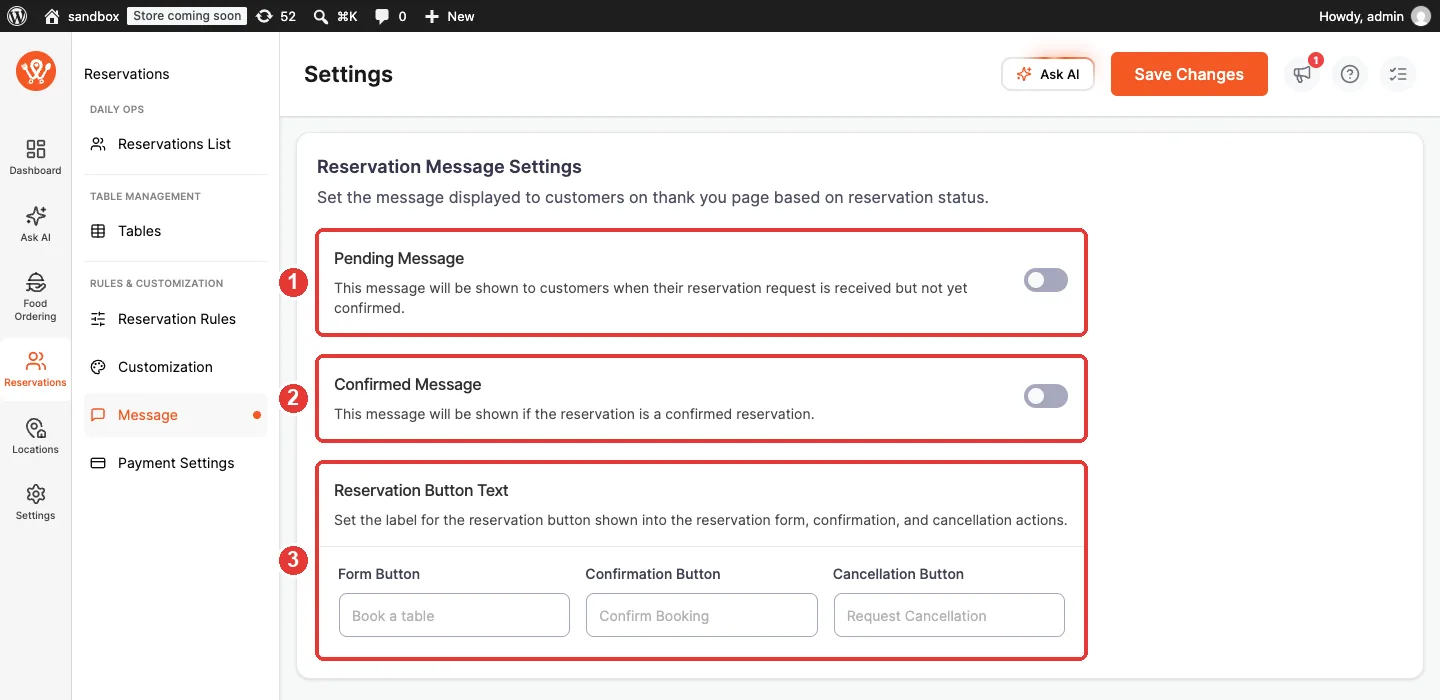
Go to WPCafe > Reservations > Message.
- Pending Message (1): shown after booking when you still need to approve it. Example: “Thanks! We will confirm your table soon.”
- Confirmed Message (2): shown when the booking is confirmed.
- Reservation Button Text (3): change the words on the Form Button, Confirmation Button and Cancellation Button.
- Use the switch to turn each message on or off. Click Save Changes.
Step 4: Choose How Guests Pay #
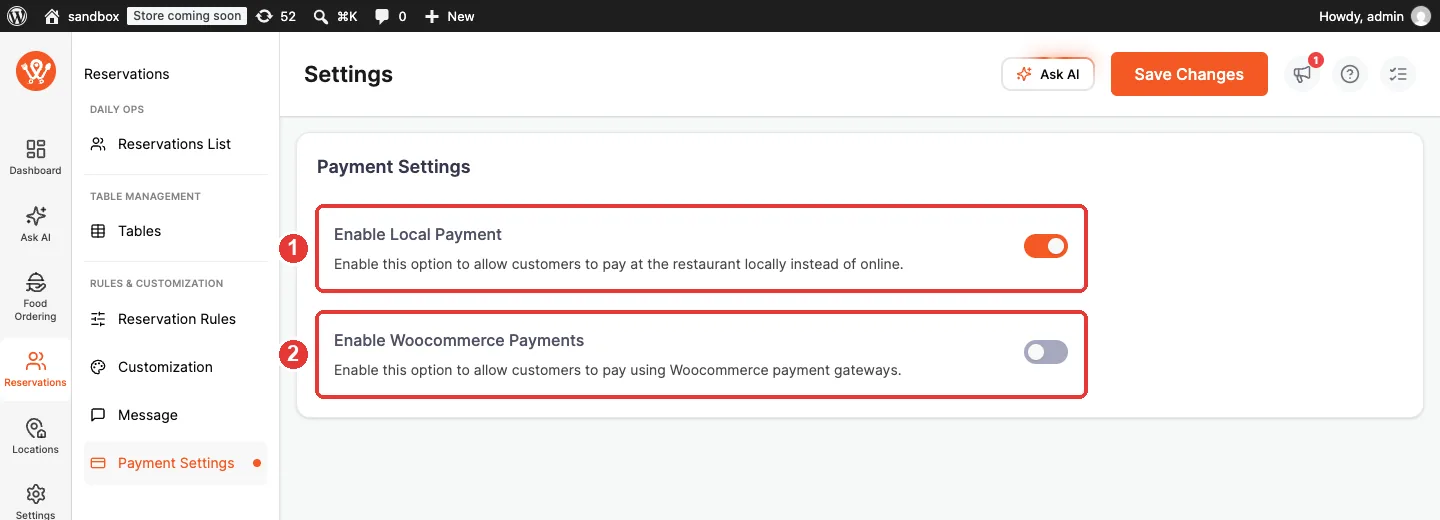
Go to WPCafe > Reservations > Payment Settings.
- Enable Local Payment (1): the guest pays at the restaurant.
- Enable Woocommerce Payments (2): the guest pays online with your WooCommerce payment methods.
Step 5: Use Different Settings for a Branch (Pro) #
If you have more than one branch, each branch can have its own rules.
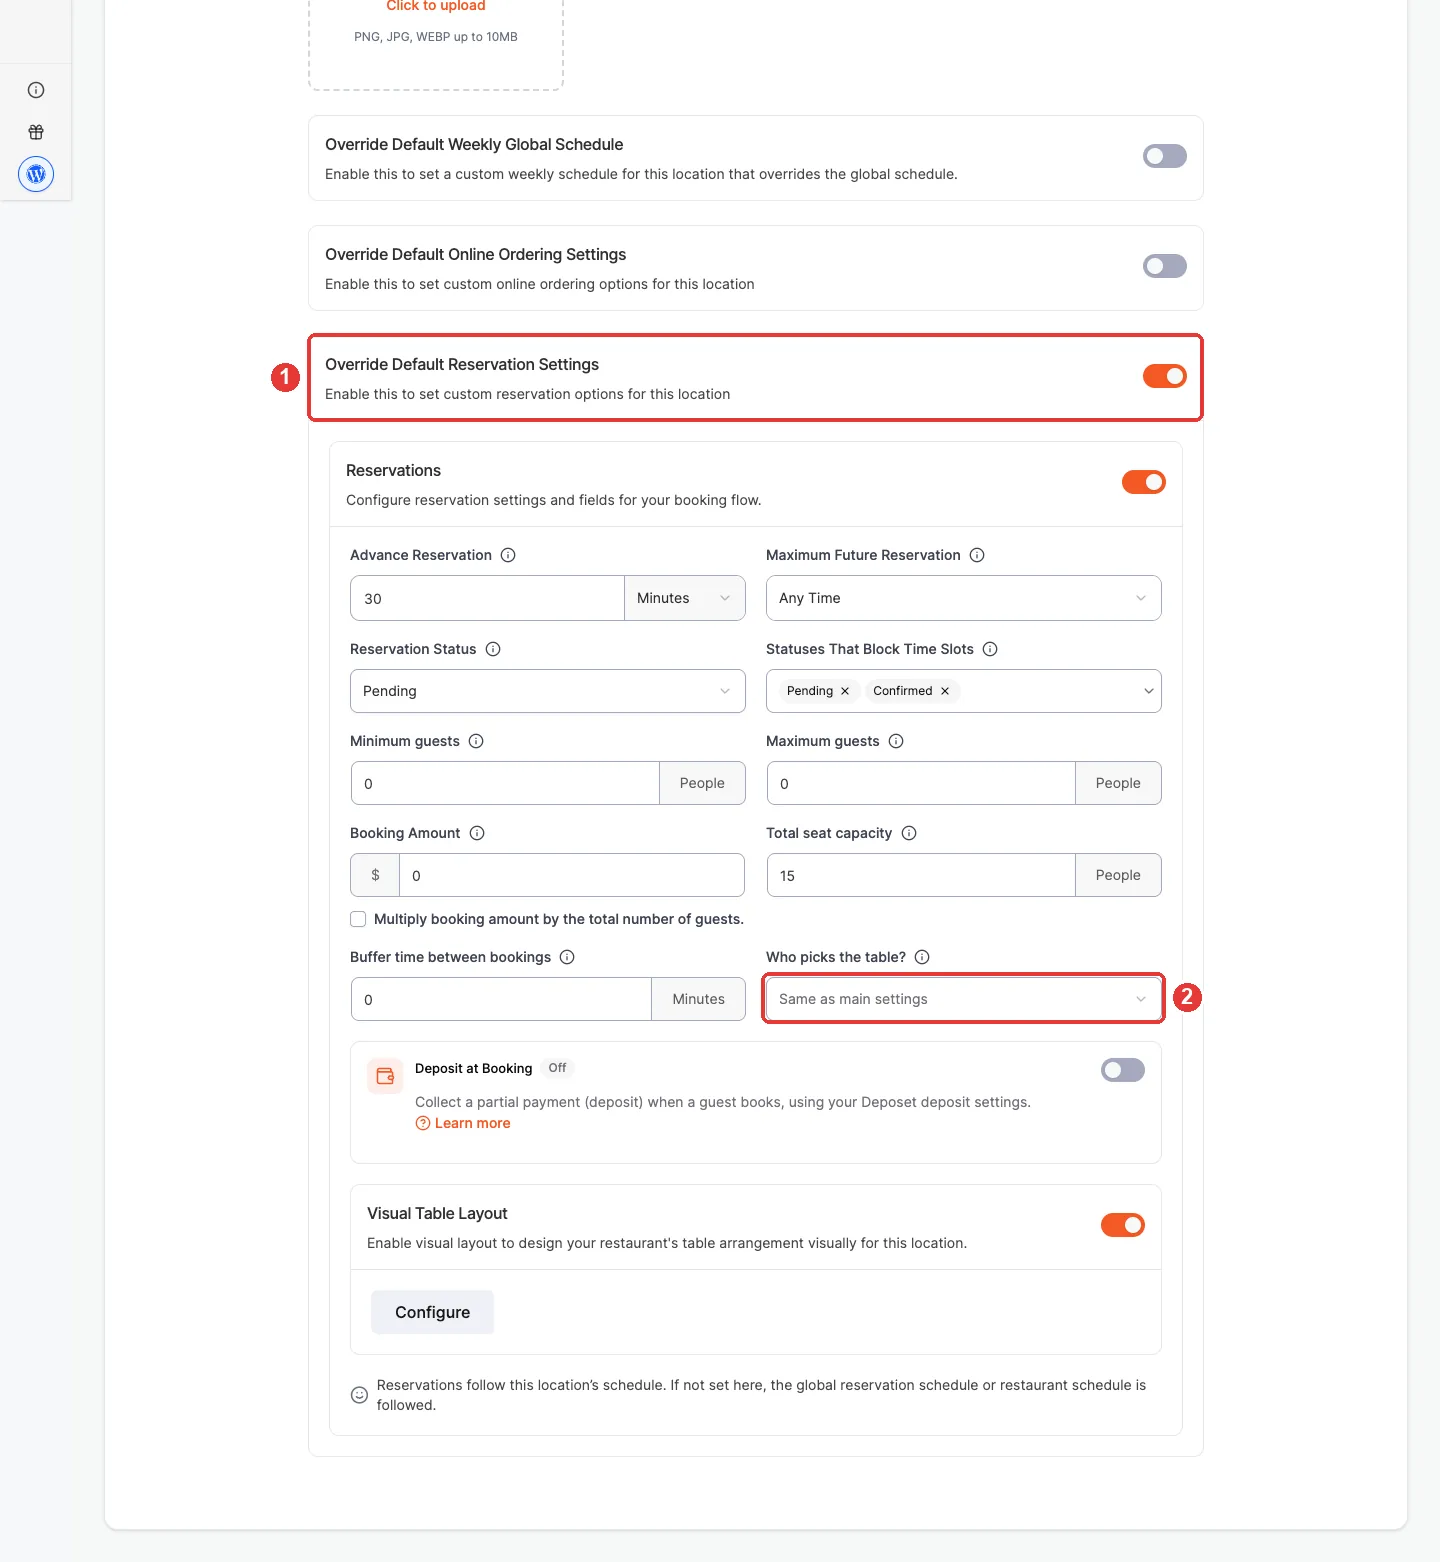
- Go to WPCafe > Locations and open a branch.
- Switch on Override Default Reservation Settings (1). The same rules as Step 1 appear for this branch.
- For Who picks the table? (2), choose Same as main settings or a different option.
- Click Save Changes.
Frequently Asked Questions (FAQ) #
| Q1: Can I limit how far ahead guests can book? Yes. Use Maximum Future Reservation. Example: 2 Months means guests can book up to 2 months ahead. |
| Q2: Can bookings be confirmed automatically? Yes. Set Reservation Status to Confirmed. To check each booking first, use Pending. |
| Q3: Can I leave a gap between two bookings at the same table? Yes, with WPCafe Pro. Set Buffer time between bookings, for example 15 minutes. |
| Q4: Can I change the button text on the booking form? Yes. Go to Reservations > Message > Reservation Button Text. |
Conclusion #
Reservation Rules decide when guests can book, how many can come, and what they pay. Set them once, and change them per branch when you need to.


