
The FluentCommunity module brings Eventin inside your community portal. Once it is on, each space gets its own Events page, members can create events without leaving the portal, and every published event is announced in the space feed with a link to buy tickets. You decide, per space, who can see, create, and manage those events.
Prerequisites #
- Eventin and Eventin Pro — installed and active. The module is a Pro feature.
- FluentCommunity — installed and active, with at least one space created.
- Pretty permalinks — set Settings → Permalinks to anything other than Plain, so the in-portal event pages resolve.
Step 1 — Turn on the FluentCommunity module #
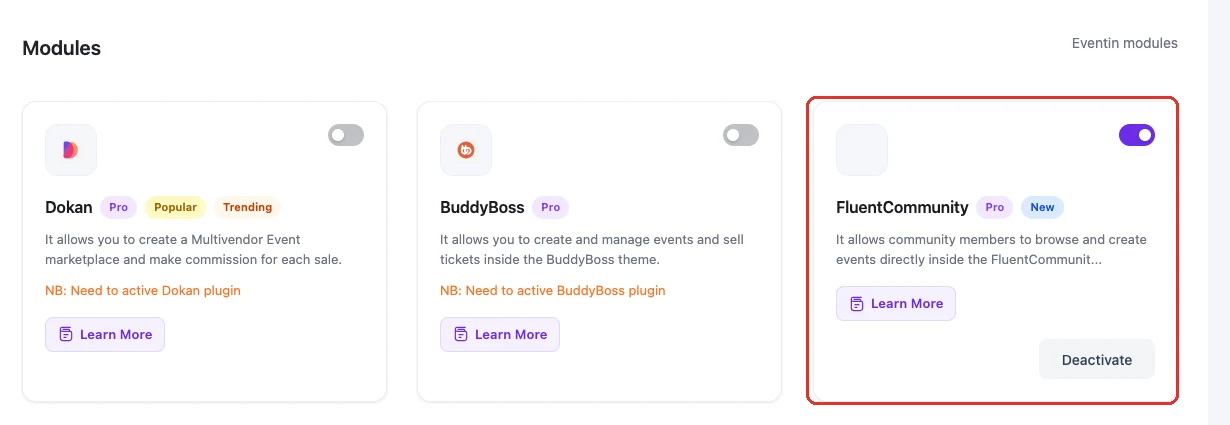
Go to Eventin → Extensions and scroll to the Modules section. Find the FluentCommunity card and switch its toggle on. The integration only runs once this toggle is on — a card that merely looks enabled is not enough.
Step 2 — Enable events for a space #
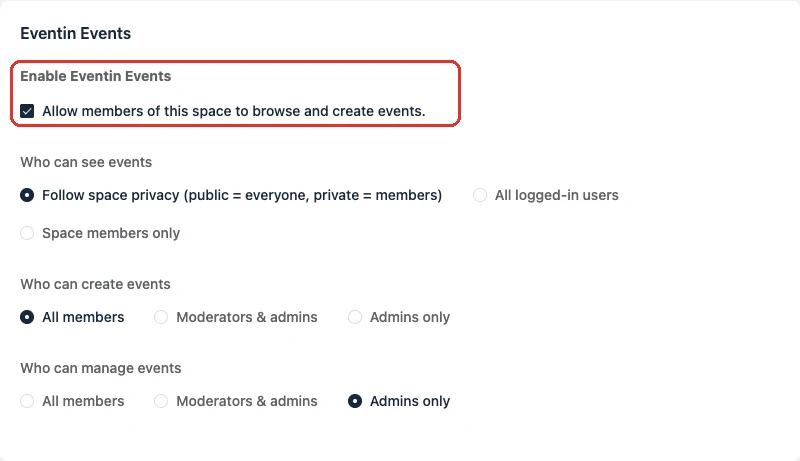
Events are switched on one space at a time, so a community can keep events in the spaces where they belong. Open the space in the portal, click the … menu beside the space name and choose Customize Space (or add ?customize_space=1 to the space URL). In General Settings, scroll to the Eventin Events section.
- Tick “Enable Eventin Events”. Until this is ticked, the space has no event pages and no Events link.
- Click “Save Changes”.
Step 3 — Choose who can see, create, and manage events #
The same Eventin Events section holds three permission settings. They are checked on every request, so a member never gets more than you grant here.
- Who can see events — Follow space privacy (a public space shows events to everyone, a private space to its members), All logged-in users, or Space members only.
- Who can create events — All members, Moderators & admins, or Admins only. Creators get the Create Event link and can finish their own event through every step of the wizard.
- Who can manage events — the same three choices. Managers can edit and delete other people’s events in that space; everyone else is limited to their own.
Site administrators always have full access, whatever these are set to.
Step 4 — Open the space and check the new links #
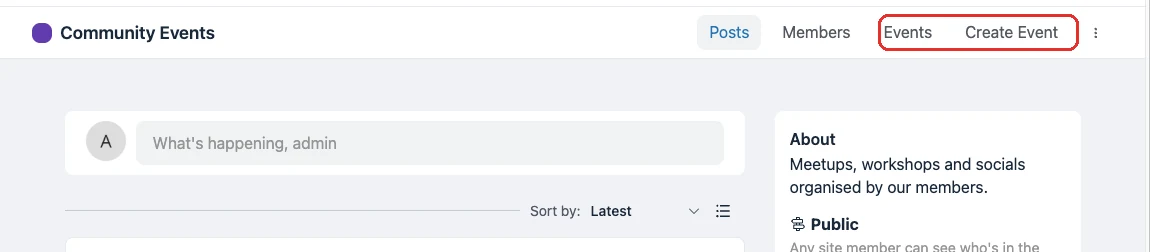
Back on the space page, the header now shows an Events link, and a Create Event link for anyone allowed to create. Members who cannot create only see Events.
Browsing events inside the portal #
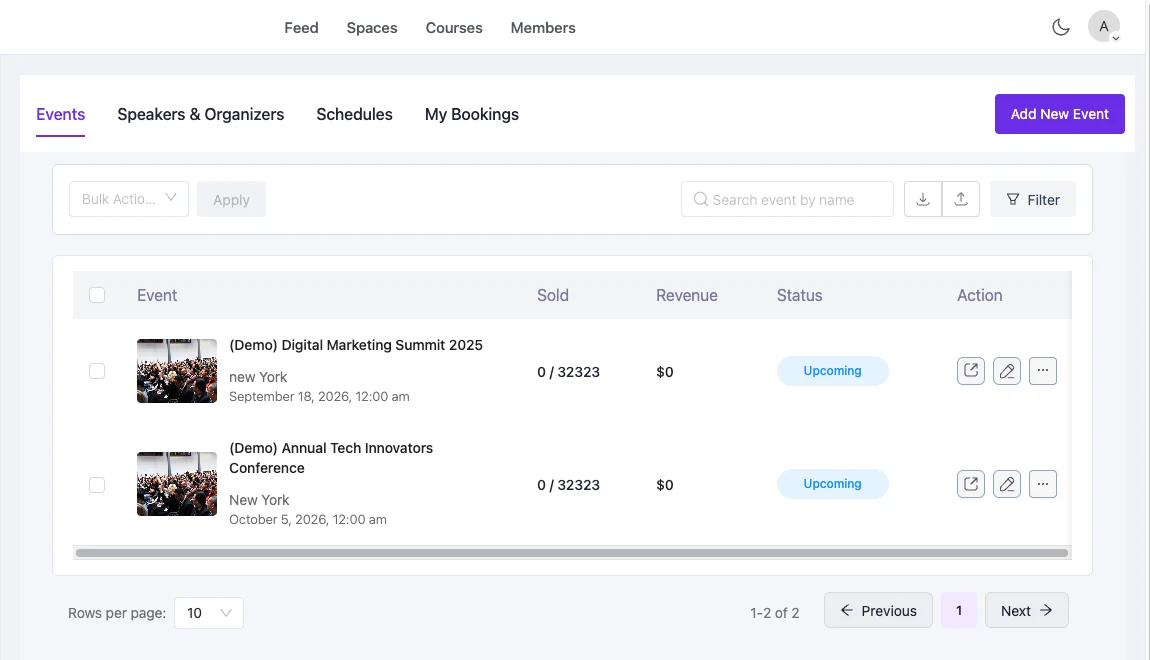
Clicking Events opens the Eventin dashboard inside the community portal, at /eventin-events/<space-slug>/. The list is scoped to that space: only events assigned to it appear, so two spaces never show each other’s events.
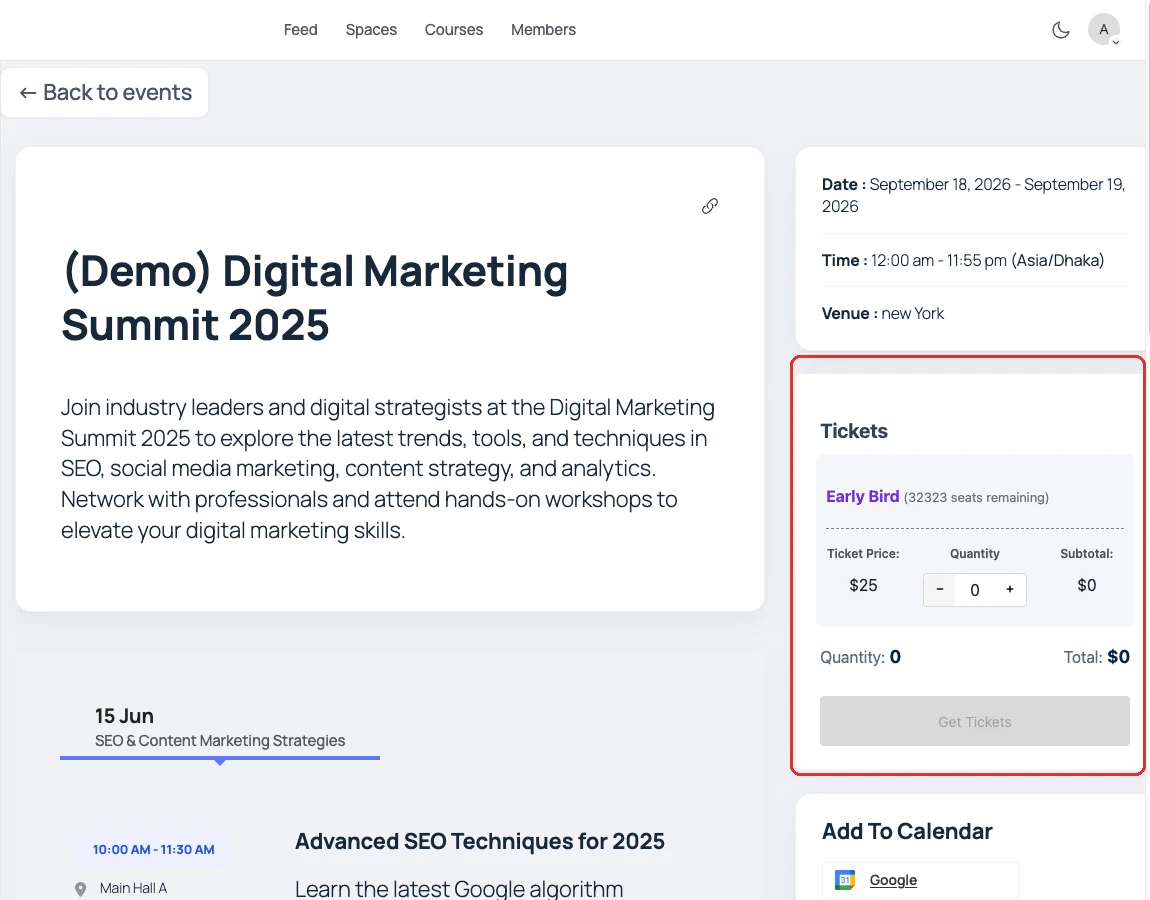
Clicking an event title opens its preview — the full event page, still inside the portal, with the description, schedule, and a Tickets panel. Choosing a quantity and clicking Get Tickets sends the buyer to the normal Eventin checkout.
Buying a ticket #
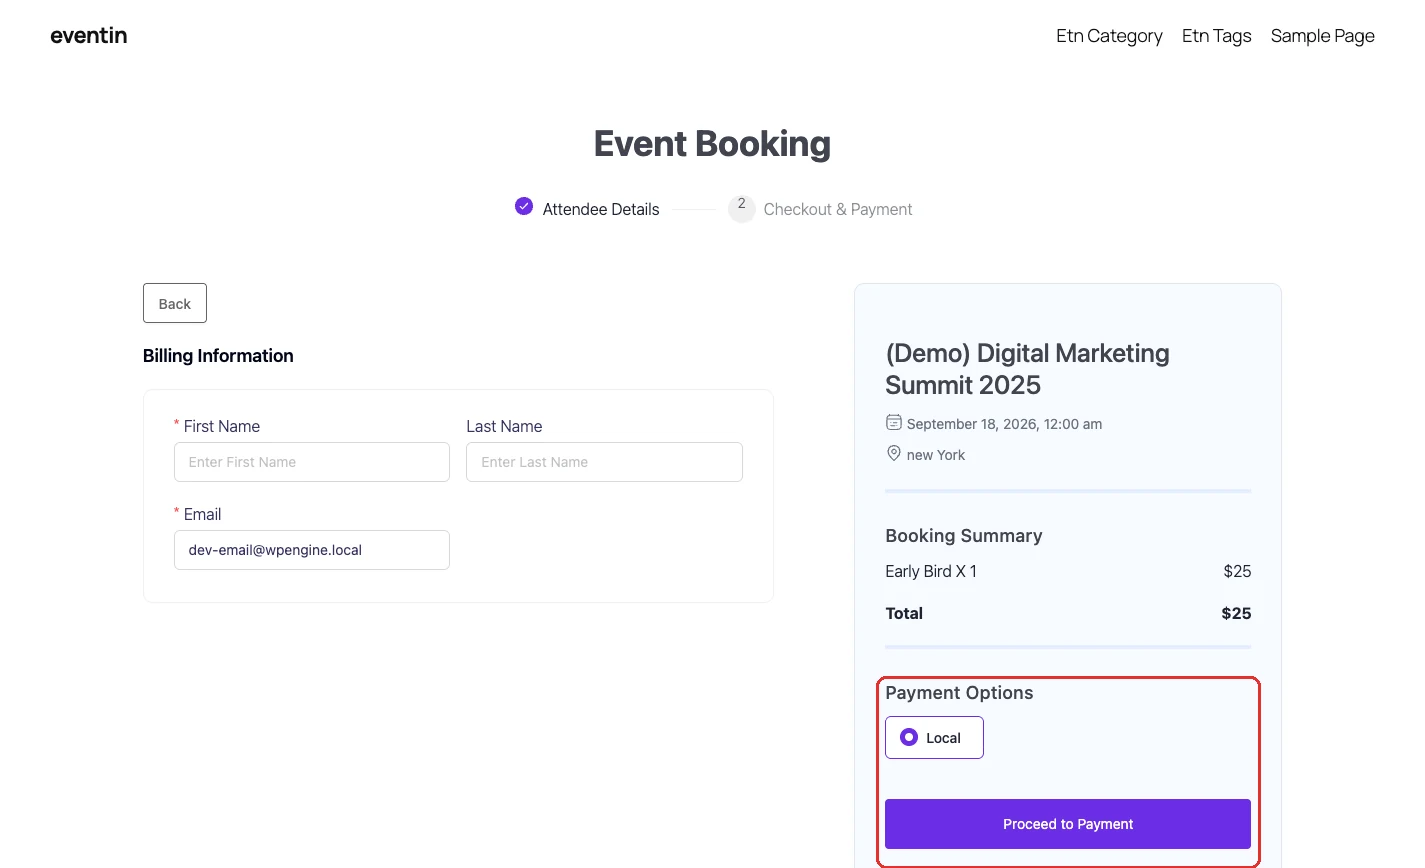
Set a quantity in the Tickets panel and click Get Tickets. The buyer lands on your site’s usual Eventin Event Booking page: attendee and billing details first, then the booking summary and Payment Options, ending with Proceed to Payment. Checkout runs outside the community portal by design, so your existing gateways, currency, and tax settings apply exactly as they do everywhere else.
Enable at least one payment method under Eventin → Settings → Payments first. Without one, the ticket panel shows “Payment methods are not enabled for this event!” and the Get Tickets button stays greyed out.
Creating an event from inside the space #
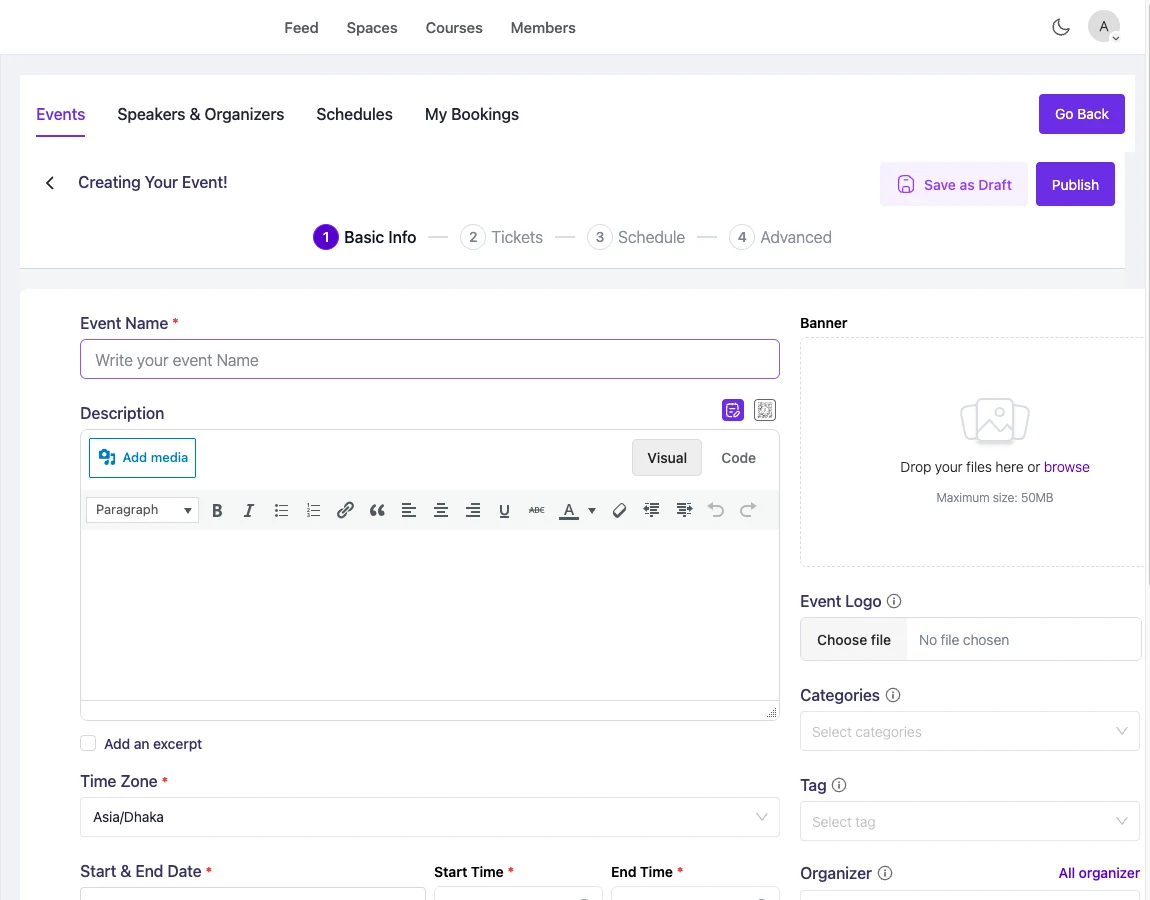
Create Event opens the same four-step Eventin wizard — Basic Info, Tickets, Schedule, Advanced — in the portal. Fill in the name, time zone, dates, and times, add tickets, then click Publish. The event is assigned to the space automatically, so it lands in that space’s list without any extra step.
What members see in the feed #
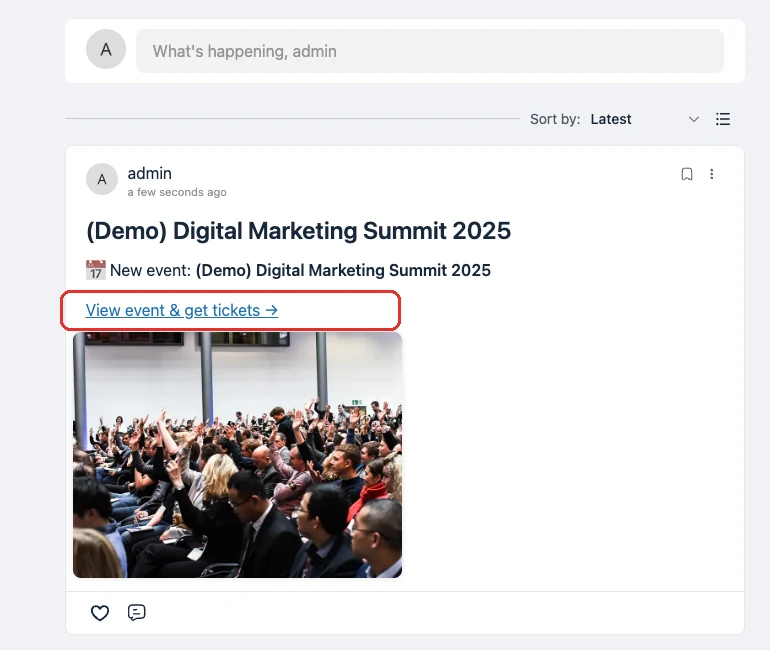
Every time an event is published in a space, Eventin posts it to that space’s feed with the event banner and a View event & get tickets link straight to the in-portal preview. Draft events post nothing — the feed entry appears the moment the event is published.
FAQs #
Q: I turned on the module but my space has no Events link. Why? #
A: The module toggle alone does nothing to a space. Open that space’s Customize Space → General Settings → Eventin Events, tick Enable Eventin Events and save. Each space is off until you enable it.
Q: The Events link opens a “page not found”. What is wrong? #
A: Almost always permalinks. Go to Settings → Permalinks, pick any option other than Plain, and click Save Changes — that rebuilds the URLs the portal pages use.
Q: Do members need a WordPress role to create events? #
A: No. Permission comes from their role in the space plus your Who can create events setting. An ordinary subscriber who is an active member of the space can create events there, and nowhere else.
Q: Can a member edit someone else’s event? #
A: Only if they match Who can manage events. Everyone else can edit and finish their own events; attempts on other people’s events are refused by the server, not just hidden.
Q: Will these events also show on my main website? #
A: Yes. They are ordinary Eventin events, so they appear in the WordPress admin, in your event archive and shortcodes, and in the Eventin dashboard as usual. The space assignment only controls which space lists them in the portal.
Q: Where does ticket checkout happen? #
A: On your site’s normal Eventin checkout page. Get Tickets in the portal hands the buyer over to the same booking flow used everywhere else, so your existing payment settings apply unchanged.
Q: How do I switch events off again for one space? #
A: Untick Enable Eventin Events in that space’s settings and save. The links and pages disappear for that space; the events themselves stay in Eventin, and other spaces are untouched.
Conclusion #
Turn on the module once, enable Eventin Events in the spaces that need it, and pick the three permission levels. From then on your community browses, creates, previews, and buys tickets for events without ever leaving the portal — and every published event announces itself in the space feed.


