
Eventin can send your ticket buyers and attendees straight into HubSpot as contacts. Every booking creates or updates a contact with the event name, order number, order total and registration date, so your sales and marketing lists stay current without any manual export. The connection uses a HubSpot private app token — you paste it once and Eventin handles the rest.
Prerequisites #
- Eventin and Eventin Pro — both installed and active. The HubSpot integration is a Pro feature.
- A HubSpot account where you can create a private app (you need admin access in HubSpot).
Step 1 — Create a private app in HubSpot #
In your HubSpot account, go to Settings → Integrations → Private Apps and create a new app. On the Scopes tab, tick these four:
- crm.objects.contacts.read
- crm.objects.contacts.write
- crm.schemas.contacts.read
- crm.schemas.contacts.write
Save the app, then copy the access token it gives you. It starts with pat-. Keep it private — anyone with that token can write to your CRM.
Step 2 — Turn on the HubSpot extension in Eventin #
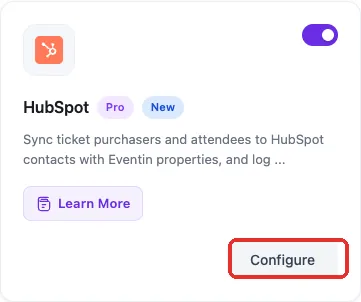
In WordPress, go to Eventin → Extensions and find the HubSpot card. Switch the toggle on, then click Configure.
Step 3 — Paste your token and connect #
Paste the token into Private App Access Token and click Save & Connect. Eventin checks the token with HubSpot and, if it works, creates the Eventin contact properties in your HubSpot account automatically.
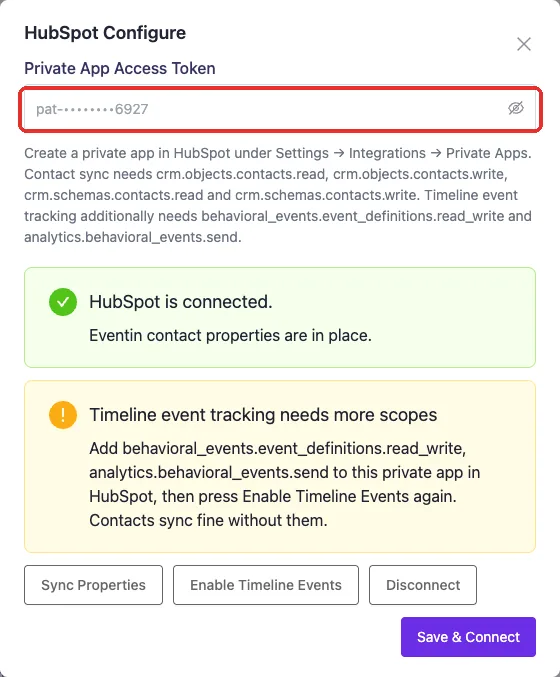
When it works you will see “HubSpot is connected” and “Eventin contact properties are in place”. For security the token is never shown again — the field only displays the last four characters, like pat-••••••••6927.
Two other buttons are here when you need them. Sync Properties re-creates the Eventin properties in HubSpot if someone deleted them. Disconnect removes the stored token.
Step 4 — Turn HubSpot on for an event #
Connecting your account does not sync anything on its own. You switch HubSpot on per event, so you decide which events feed your CRM.
- Open the event and go to the Advanced tab.
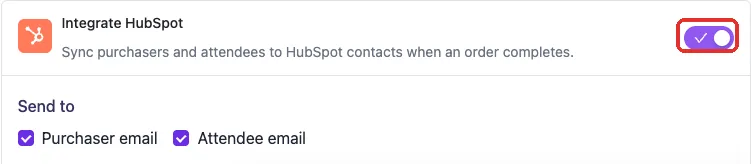
- Scroll to Third-Party Integrations and switch on Integrate HubSpot.
- Under Send to, choose Purchaser email, Attendee email, or both. Both are selected by default.
- Click Update to save the event.
What Eventin sends to HubSpot #
When someone books a ticket for that event, Eventin sends the buyer — and each attendee, if you selected attendees — to HubSpot as a contact. Alongside the standard email, first name, last name and phone fields, each contact gets these Eventin properties:
- Eventin Last Event Name — the title of the event they booked.
- Eventin Last Event ID — the event’s ID in WordPress.
- Eventin Last Order ID — the booking number, so you can trace a contact back to their order.
- Eventin Last Order Total — what they paid.
- Eventin Registration Date — when the booking was made.
- Eventin Attendee Type — whether this contact was the purchaser or an attendee.
Contacts are matched on email address. If someone books twice, HubSpot updates their existing contact with the newest event instead of creating a duplicate.
Optional — log ticket purchases on the contact timeline #
Eventin can also write a ticket purchase event onto the contact’s HubSpot timeline, so the purchase shows up in their activity history. This needs two extra scopes on your private app — behavioral_events.event_definitions.read_write and analytics.behavioral_events.send — and a HubSpot plan that includes custom behavioral events.
Add the scopes in HubSpot, come back to Eventin → Extensions → HubSpot → Configure, and click Enable Timeline Events. Contacts sync perfectly well without this, so skip it if your plan does not support it.
FAQs #
Q: I connected HubSpot but no contacts are arriving. Why? #
A: Connecting your account is only half the setup. Open the event, go to Advanced → Third-Party Integrations, switch on Integrate HubSpot and click Update. Bookings made before you switched it on are not sent retroactively.
Q: My attendees are not showing up in HubSpot, only the buyer. #
A: An attendee is only sent if your booking form actually collects an email address for them. If the attendee form asks for a name but no email, there is nothing to create a contact from, so Eventin skips that row. Add an email field to the attendee form and check that Attendee email is ticked under Send to.
Q: The buyer is also an attendee. Will HubSpot get two contacts? #
A: No. Eventin removes duplicate email addresses before sending, and the purchaser record wins because it carries the order total. You get one contact.
Q: I see “Timeline event tracking needs more scopes”. Is something broken? #
A: No. That notice only concerns the optional timeline feature. Your contacts are still syncing normally. Either add the two behavioral-event scopes to your private app, or ignore the notice.
Q: Where do I see the Eventin fields on a HubSpot contact? #
A: Open the contact in HubSpot and choose View all properties. The Eventin fields all begin with Eventin, so searching for that word in the property list brings them together.
Q: Can I change my token later? #
A: Yes. Open Configure, paste the new token over the old one and click Save & Connect. To stop syncing entirely, click Disconnect, or switch the HubSpot card off on the Extensions page.
Conclusion #
Create a private app in HubSpot, paste its token into Eventin → Extensions → HubSpot, then switch Integrate HubSpot on for the events you care about. From then on every booking lands in your CRM with the event, the order and the amount attached — ready for your lists, workflows and reports, with no exporting on your part.


