
Eventin (Pro) offers a powerful Webhook feature that enables you to push real-time event updates—like event creation, updates, or deletions—to external systems or APIs. Whether you’re integrating with third-party platforms or other applications, webhooks help keep all systems seamlessly in sync with your WordPress events.
Note: For the webhook feature, you have to activate the Eventin free and pro plugins.
Add New Webhook #
First of all, you have to activate the Eventin free and pro plugins. Now go to the Dashboard -> Settings -> Advanced -> Webhooks and click on the Enable Webhooks button.
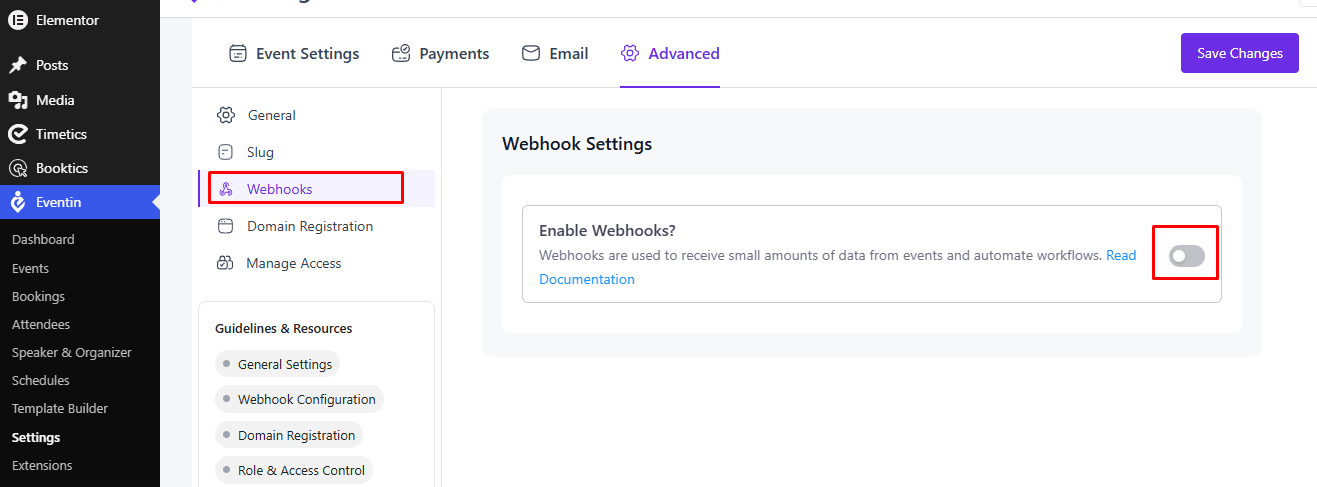
Click Add Webhooks, then click the Add New button. A new form will open. Fill in the required fields with your webhook information, then click the Create button to create the webhook.
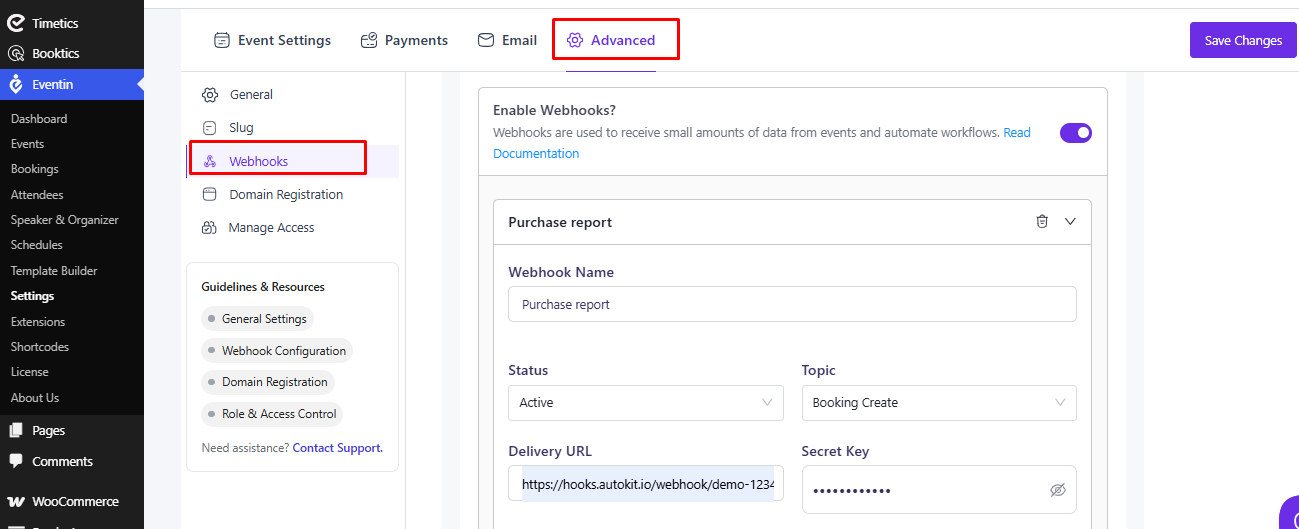
Please see the description of all the webhook fields.
- Name: Insert a webhook title in the Name field when you create a new webhook for your event.
- Status: There are 3 statuses for the webhook: Active, Pending, and Disabled. 1) If you want to deliver the payload, you need to select the active status. 2) If you don’t deliver now, you can select the pending status, and 3) You can select the disabled status if you don’t want to deliver the payload.
- Topic: According to the topic, the webhook trigger. Select the topic from the Topic field when you want to trigger the webhook.
- Delivery URL: Insert an API endpoint that accepts the POST request. Insert the URL where your webhook delivers the payload.
- Secret: Insert your webhook secret key here.
- Description: The description field is used to enter a description that explains what the webhook is used for.
The notification with data will now be sent to the delivery URL that you added to your webhook delivery URL in accordance with the topic action that you chose.
Frequently Asked Questions (FAQ) #
1. How do I enable the Webhooks feature in Eventin?
To use Webhooks, make sure both the Eventin Free and Eventin Pro plugins are installed and activated. Then navigate to Dashboard → Eventin → Settings → Advanced → Webhooks and enable the Webhooks option.
2. How do I create a new webhook?
Go to Dashboard → Eventin → Settings → Advanced → Webhooks, click Add New, fill in the required webhook details, and click Create to save it.
3. What is the Delivery URL?
The Delivery URL is the API endpoint where Eventin sends webhook data. Your endpoint must be able to receive POST requests.
4. What does the webhook status mean?
Active: Sends webhook payloads when the selected event occurs.
Pending: Saves the webhook but does not send payloads.
Disabled: Prevents the webhook from sending any payloads.
5. What is the Secret field used for?
The Secret is used to verify that incoming webhook requests are sent by your Eventin website, adding an extra layer of security.
6. Which events can trigger a webhook?
The available triggers depend on the selected Topic. When the chosen event occurs, Eventin automatically sends the webhook payload to the configured Delivery URL.
7. Is the Webhooks feature available in the free version?
No. Webhooks are available only in Eventin Pro. Both the Eventin Free and Eventin Pro plugins must be installed and activated.
Conclusion #
Eventin’s webhook support (available in the Pro version) provides a lightweight yet powerful integration mechanism. You can automate workflows, sync event data with other platforms, and build custom systems that react instantly to event changes. By offering control over triggers, payload destination, and security through secrets, this feature offers flexibility for developers and event managers alike.


