
Skip to content
Themewinter Logo
  • Home
  • About
  • Our Products
    • Eventin
    • WPCafe
    • WP Timetics
    • Poptics New
    • Booktics New
  • Blog
  • Deals
  • Login
Popular Search ticketqr codeemailtranslatelocation

Aisentic

  • Gettings Started
    • How to Manage Eventin Events Using AISentic’s AI Chatbot
    • How to Connect Your WordPress Plugins with AISentic
    • Getting Started with Aisentic: Your AI Assistant for WordPress

Authorsy

  • Introduction
  • Getting Started
    • Introduction
    • Plugin installation
    • License
  • Author Box
    • Add New Author
    • Author Settings
  • Voting
    • Voting
  • Shortcodes
    • ShortCode
  • Translation
    • Translation with Loco Translate

Delivery Module(Pro)

  • General
  • Add Food Store’s Location on Google Map(Pro)
  • Google autocomplete address in the checkout(Pro)
  • Minimum order amount to place order(Pro)

Eventin

  • Introduction of Eventin
  • Gettings Started
    • Introduction of Eventin
    • How to Install the Eventin Plugin
    • How to Upgrade Eventin Free to Pro Version
    • How to Activate an Eventin License
    • Quick Start Guide
  • General Settings
    • General Settings for Eventin
    • How to Change Event & Speaker Slug
    • How to Create a Webhook for Events (Pro)
    • How to Use Embeddable Scripts in Events(Pro)
    • How to Manage Role-Based Access in Eventin
    • How to Set Up Native Tax in Eventin
    • Getting support
  • Events
    • How to Create Event in Eventin
    • How to Create Event Categories and Tags
    • How to Assign Categories and Tags to Events
    • How to Create Recurring Event in Eventin
    • How to Create Event Ticket Variations
    • How to work global stock
    • How to Use the Waitlist Feature in Eventin
    • How to Check Event Report
    • How to Customize the Eventin Event Page with Elementor
    • How to Use WooCommerce Coupon for Events
    • How to insert Event Location in Eventin
    • How to Submit Events from the Front End in Eventin
    • How to Create a Hybrid Event in Eventin
  • Event Attendees
    • How to Refund a Booking (Full or Partial) in Eventin
    • How to Enable Event Attendee Registration
    • How to Add Attendee Extra Fields
    • How to Generate and Scan QR code(Pro)
    • How to Purchase Tickets on Eventin
    • How to Set a Countdown Timer for Ticket Purchases in Eventin
    • How to Send Event Certificates
    • How to Manage Attendees in Eventin
    • How to Manage Booking of Events
    • How to Add Attendees Manually (Pro)
    • How to View Event Bookings on the Frontend
  • Event Imports
    • How to import event from The Events Calendar to Eventin
    • How to import event from facebook in Eventin
    • How to import events in Eventin from Eventbrite?
  • Email Settings
    • How to Configure Confirmation Email for Event
    • How to Configure Reminder Email for Event
    • How to Configure RSVP Email
    • Email Automation Workflow Builder
  • Speakers and Organizers
    • Introduction of Eventin Speaker & Organizer
    • How to Create Eventin Speaker
    • How to Create Eventin Organizer
    • How to assign speakers on schedules
    • How to assign a speaker/organizer on events
  • Schedules
    • Introduction of Eventin Schedules
    • How to Create Eventin Schedule
    • How to Assign Schedule on Events
  • Payment Type
    • How to Configure FluentCart with Eventin
    • Which payment methods are supported by Eventin?
    • How to Configure the WooCommerce in Eventin
    • How to Configure the Stripe Payment Gateway in Eventin (Pro)
    • How to Configure the PayPal Payment Gateway in Eventin
    • How to Configure the Local Payment in Eventin
    • How to Configure SureCart in Eventin
  • Shortcodes & Widgets
    • Available Shortcodes & Widgets in Eventin
    • How to Use Eventin Shortcodes
    • Elementor Widgets in Eventin
    • Event Calendar View In Eventin
  • RSVP Events (Pro)
    • What is RSVP Event
    • How to Create RSVP in Eventin
    • RSVP Attendee Report
    • How to send RSVP invitations
  • Visual Seat Map
    • How to Create Event with Visual Seat Map in Eventin
  • Integration
    • How to Integrate Yoast SEO with Eventin
    • How to Integrate Zapier with Eventin
    • How to Integrate HubSpot with Eventin
    • How to Integrate FluentCommunity with Eventin
    • How to Integrate LearnDash with Eventin
    • How to Use WCFM Multivendor with Eventin
    • How to integrate Mailpoet with Eventin
    • How to integrate Zoho CRM with Eventin
    • How to integration Funnelkit (autonami ) with Eventin
    • How to integrate Mail Mint with Eventin
    • How to Integrate Tutor LMS with Eventin
    • How to Integrate Eventin with Bit Integrations
    • How to Integrate Eventin with Bit Flows
    • How to Integrate Eventin with OttoKit (formerly SureTriggers) to Automate Event Workflows
    • How to Integrate WowRevenue with Eventin
    • How to Integrate Oxyzen Builder with Eventin(Pro)
    • How to Integrate Bricks Builder with Eventin(Pro)
    • How to Integrate DIVI Builder with Eventin
    • How to Integrate FluentCRM with Eventin (pro)
    • How to Integrate Calendar with Eventin (Google, Apple etc)
    • How to Integrate Pabbly with Eventin
    • How to Integrate Twilio SMS Remindar with Eventin
    • How to Integrate Zapier with Eventin
    • How to Integrate BuddyBoss with Eventin(Pro)
    • How to Integrate Zoom Module with Eventin
    • How to Integrate Google Meet with Eventin (Pro)
    • How to Integrate Artificial Intelligence (AI) with Eventin (Pro)
    • How to Integrate Dokan with Eventin for Multivendor Events( Pro)
    • How to Integrate SEO Plugin with Eventin
    • Automate Eventin Bookings with Make.com Webhooks
    • How to Integrate Optiontics with Eventin
  • Templates
    • How to Override Email Template
    • How to Change Event Templates
    • How to Change Speaker Templates
    • How to Change Ticket Templates
    • How to Override Event Template
    • How to Override Speaker Template
    • How to Override Archive Page
  • Eventin MCP
    • How to use Eventin’s MCP to manage your WordPress events through Claude, Codex, and other AI assistants
  • Template Builder
    • How to Create Custom Event Landing Pages in Eventin (Pro)
    • How to Create Event Ticket Templates in Eventin (Pro)
    • How to Create Event Certificate Templates in Eventin (Pro)
  • Translations
    • How to Translate Eventin with WPML
    • Which languages are supported in Eventin?
    • Which translation plugins are supported in Eventin?
  • Rollback V4 to V3
    • Rollback V4 to V3
  • Troubleshooting
    • Admin Email Showing in Public Source Code
    • Ticket Email Sent from WordPress
    • ACF Field Support
    • How to Fix 404 issue on Event Page
  • Coupon
    • How to Create and Use Coupons in Eventin
  • General
    • How to Cancel Your Subscription

Optiontics

  • Upsells Block in Optiontics: Product Page Add-Ons
  • Mix & Match Products in Optiontics: Build-Your-Own Bundles
  • Multi-Currency Support in Optiontics
  • How to use Image Swatch Field in Optiontics
  • How to use in Button Group Field in Optiontics
  • How to use Checkbox Input in Optiontics
  • How to use Dropdown Field in Optiontics
  • How to use Radio Field in Optiontics
  • How to use File Upload Field in Optiontics
  • How to use Switch Product Addon using Optiontics
  • How to Add ShortCode Product Option Using Optiontics
  • How to use Range Slider Block in Optiontics
  • How to Add Font Picker Product Option Using Optiontics
  • How to Use Advanced Date and Time Picker using Optiontics
  • What is Optiontics?
  • How to Install Optiontics?
  • How to Create Product Options?

Pointics

  • Points Program
    • How Do I Create Point Earning Rules?
  • Reward Program
    • How Do I Create Rewards Customers Can Redeem?
  • Levels
    • How Do I Set Up VIP Levels?
  • Integrations
    • How Do I Use Pointics with WooCommerce
    • How Do I Use Pointics with Eventin
  • AI Features
    • How Do I Use the Pointics AI Assistant?
  • Getting Started
    • How Do I Set Up My Loyalty Program with the Pointics Setup Wizard?
    • Introduction to Pointics

WPCafe

  • Introduction of WPCafe
  • Troubleshooting
    • Slug Change
  • Getting Started
    • How to install the WPCafe Plugin
    • How to Upgrade WPCafe Free to Pro Version
    • How to Activate WPCafe License
    • Quick Start Guide
    • Plugin Uninstallation
  • Email Settings
    • How to Automate Reservation Emails in WPCafe
  • Product Addons
    • Product Addons (Pro)
  • Translation
    • How to Translate WPCafe
  • Rollback V2 to V3
    • How to Roll Back to an Older Version of WP Cafe
  • General settings
    • Presence Widgets in WP Cafe: Video Popup and Contact Card
    • How to Manage Global Schedule Settings
    • General Settings for Date and Time
    • Get Support
    • Theme Compatibility
    • User Roles and Permissions
    • How to use shortocde on WPCafe
    • WpCafe Elementor Widgets
  • Food Ordering
    • How to Set Up Dine-in, Pickup, Delivery, and ASAP Orders in WP Cafe
    • How to Use Optiontics with WP Cafe for Food Add-ons
    • How to use Recipt Layout in WPCafe for Order/Recipts Printing
    • How to Use Order Delay Notification in WPCafe
    • Product Nutritional and Allergen Info in WP Cafe
    • How to Use Product Label in WP Cafe
    • How to Manage Restaurant from Frontend or WordPress Site Panel – WP Cafe
    • How to Set Up the One Page Checkout in WPCafe
    • How to Add & Manage Food Categories and Tags
    • How to Add & Manage Brands
    • How to Add and Manage Food Menu in WPCafe
    • How to Manage Restaurant Locations in WPCafe
    • How to Show Food Menu by Location in WPCafe
    • How to Generate QR Codes for Food Menu
    • How to Enable Mini Cart in WPCafe
    • How to Set Up Tipping Using WPCafe
    • How to Add Discounts Using WPCafe
    • How to Enbale Sound Notification in WPCafe
    • How to Use Time Based Products in WPCafe
    • How to Setup Pickup for Food Ordering in WPCafe
    • How to Setup Delivery for Food Ordering in WPCafe
    • Searching Products with Pickup/Delivery(Pro)
  • Reservation
    • How to Set Up and Use Waitlist for Reservations in WPCafe
    • How to Receive Deposit Payment in Reservation in WP Cafe
    • How to Configure Reservation Settings in WPCafe
    • How to Customize the Reservation Form in WPCafe
    • How to Display the Reservation Form
    • Schedule
    • Email Settings
    • Reservation with Food Ordering (PRO)
    • How to Customize Table Layout in Reservation
  • Integrations
    • How to Integrate Uncanny Automator in WPCafe
    • How to Integrate FunnelKit Automation in WPCafe
    • How to Use WPML with WPCafe (Multilingual Setup)
    • How to Integrate Flowmattic in WPCafe
    • How to Add Mailmint Integration with WPCafe
    • How to Integrate MailPoet in WPCafe
    • WPCafe Multivendor Addon for WCFM Marketplace, Run a Multi-Restaurant Food Marketplace
    • How to integrate Zoho Flow with WPCafe
    • How to Create Webhook from WPCafe and Send Data to Any Third party integration
    • How to use Bricks Builder addon for WPCafe
    • How to Integrate Fluent CRM with WPCafe
    • How to Integrate Zapier in WPcafe
    • How to Integrate Pabbly with WPCafe
    • How to Integrate Shipday Plugin with WPCafe
    • How to Integration Twilio SMS with WPCafe
    • How to Integrate Clover POS with WPCafe
    • Loyalty Program Points & Rewards for Food Orders
    • How to Integrate Multivendor Addon in WPCafe
    • How to Use WPCafe Elements in Oxygen Builder
  • Style Settings
    • Style Settings
  • WPCafe MCP
    • How to Use WPCafe MCP with Claude, Codex & AI Assistants to Manage Your Restaurant
  • Home
  • Docs
  • WPCafe
  • General settings
  • Presence Widgets in WP Cafe: Video Popup and Contact Card
View Categories

Presence Widgets in WP Cafe: Video Popup and Contact Card

Overview #

Presence Widgets in WP Cafe are two small floating boxes for your restaurant site: a Video Popup that plays a short clip in the corner and a Quick Contact Card that shows your phone number, address, and hours. You set both up from the WP Cafe settings, choose where they appear, and pick when they show.

Most visitors leave a restaurant site without booking or calling. These two widgets keep a friendly welcome and your contact details on screen while people browse, so the next step is always one tap away.
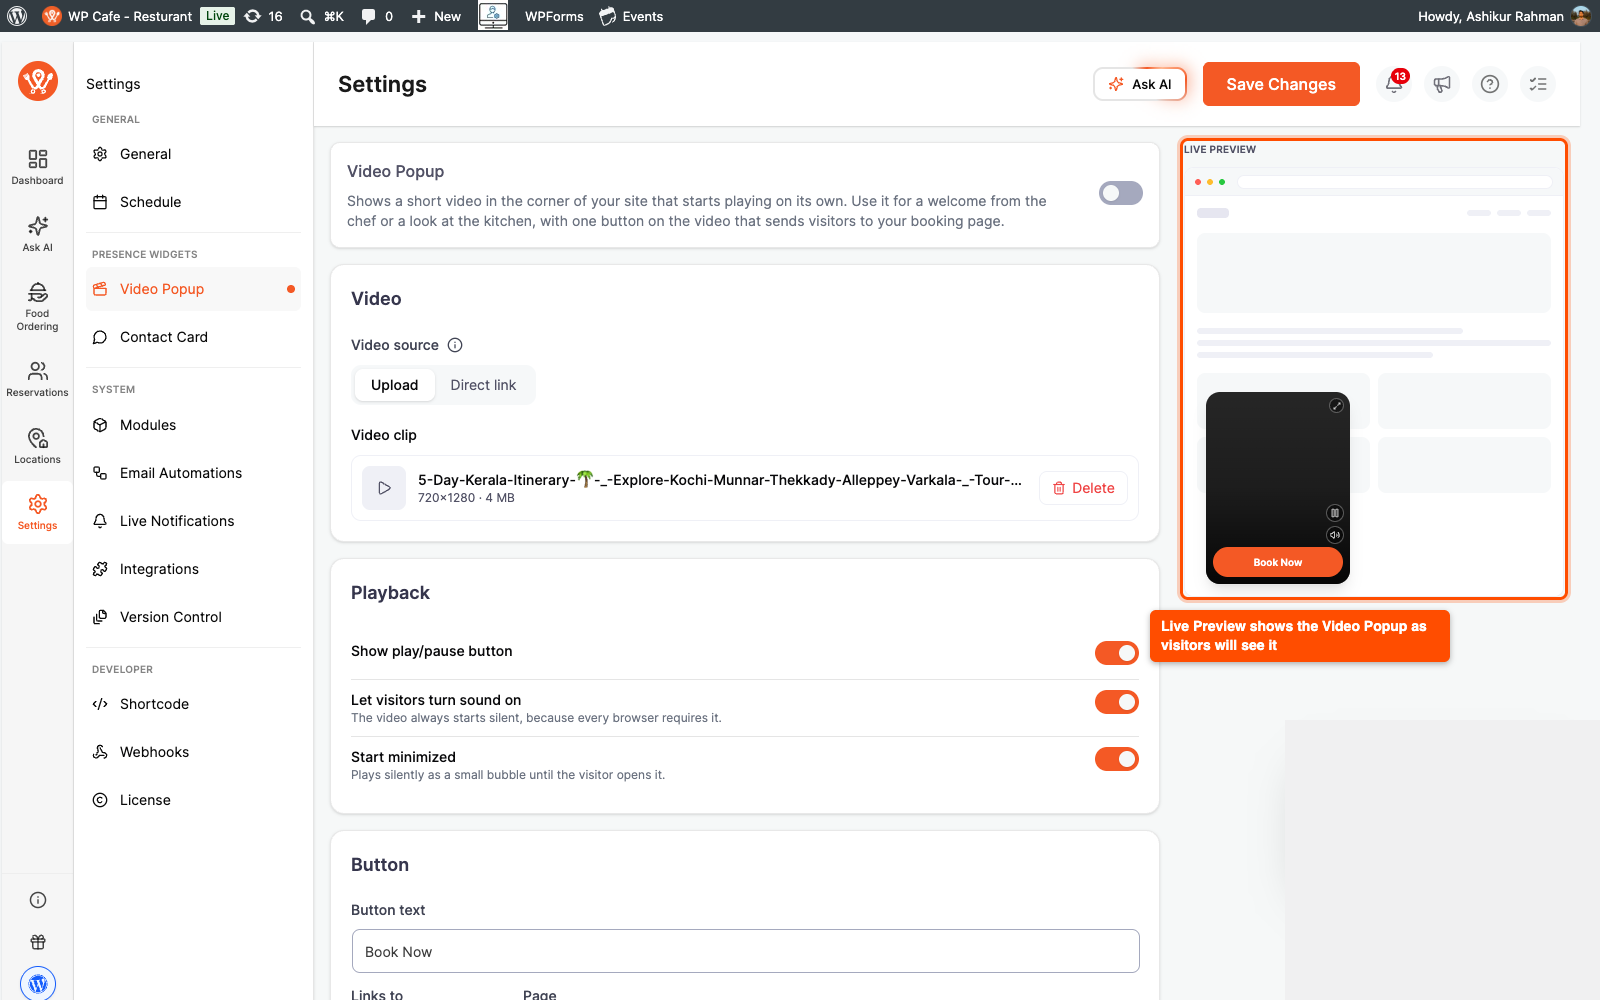
WP Cafe Video Popup live preview showing a corner video with a Book Now button

Requirements #

An active WordPress site with WP Cafe and WP Cafe Pro installed, since the Video Popup and Quick Contact Card are Pro features.

Step 1: Open the Presence Widgets settings #

Both widgets live in the same place.

  1. In your WordPress dashboard, go to WP Cafe.
  2. Open Settings.
  3. In the left menu, find the Presence Widgets group. It has two tabs: Video Popup and Contact Card.

Each tab has its own on/off switch at the top, so you can run one widget, both, or neither.
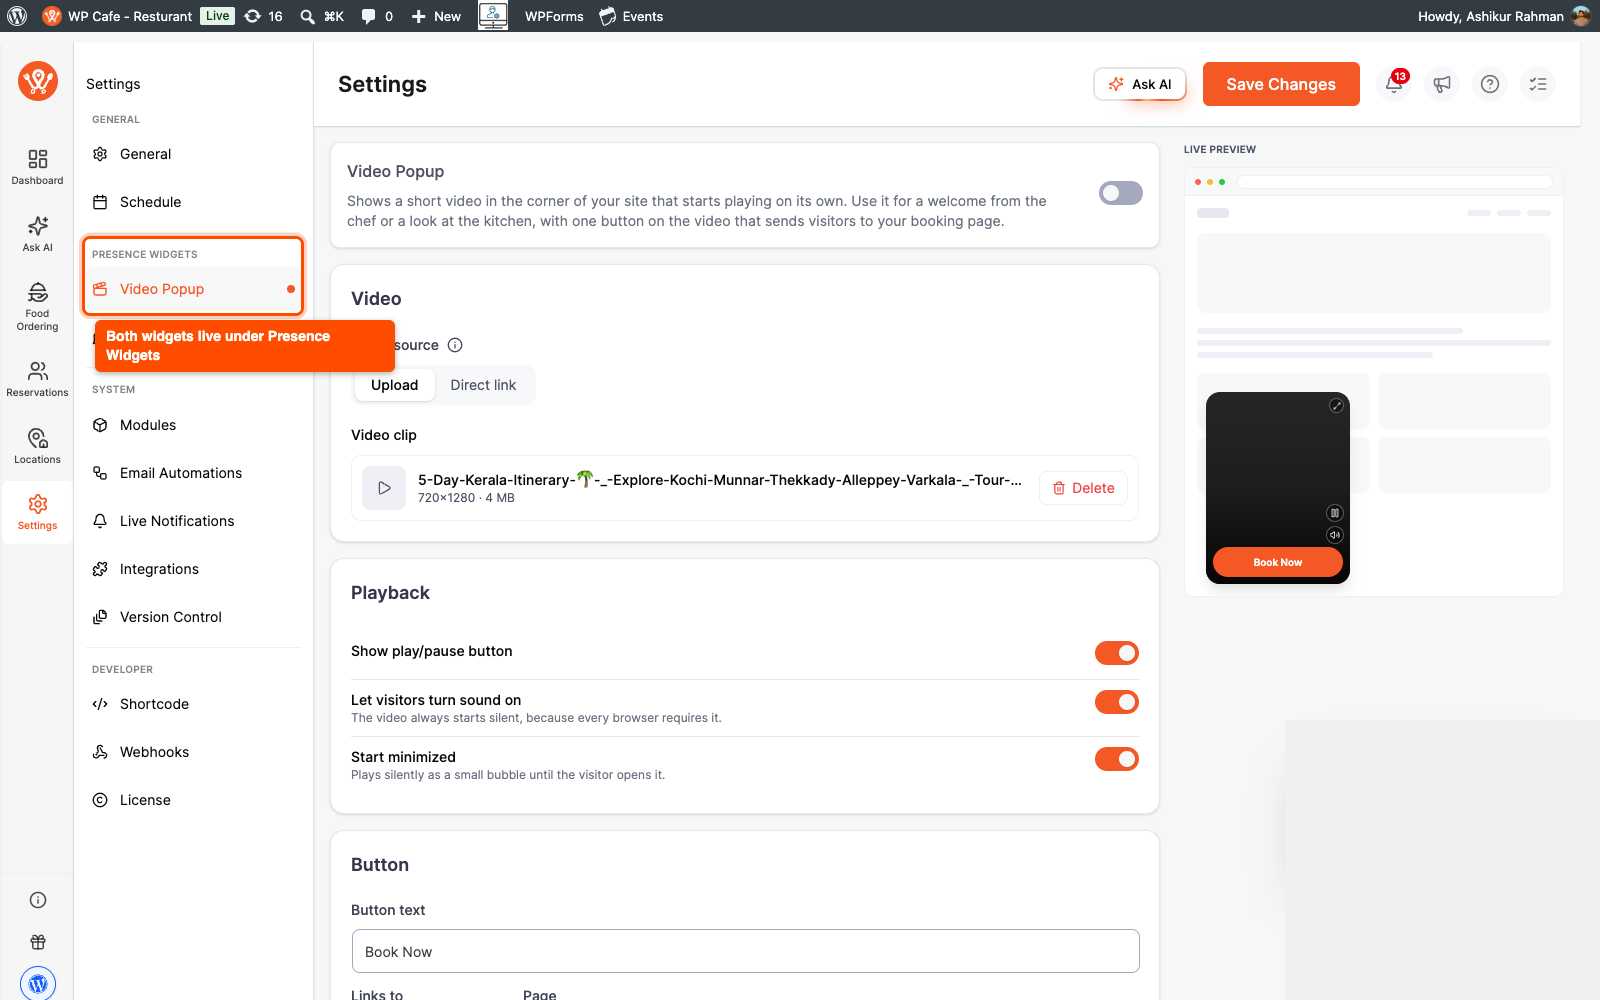
WP Cafe settings sidebar with the Presence Widgets group, Video Popup and Contact Card tabs

Step 2: Set up the Video Popup #

Open the Video Popup tab and turn on the switch at the top. Then pick your video under Video source, using one of two options:

  1. Upload: click Choose video file and pick an MP4 or WebM from your media library, or upload a new one.
  2. Direct link: paste a Video URL. This can be a direct MP4 or WebM link, or a share link from YouTube, Vimeo, Loom, Wistia, or Dailymotion.

The clip plays on its own, silently, and loops. A short portrait clip works best, for example a hello from the chef or a quick look at the kitchen.
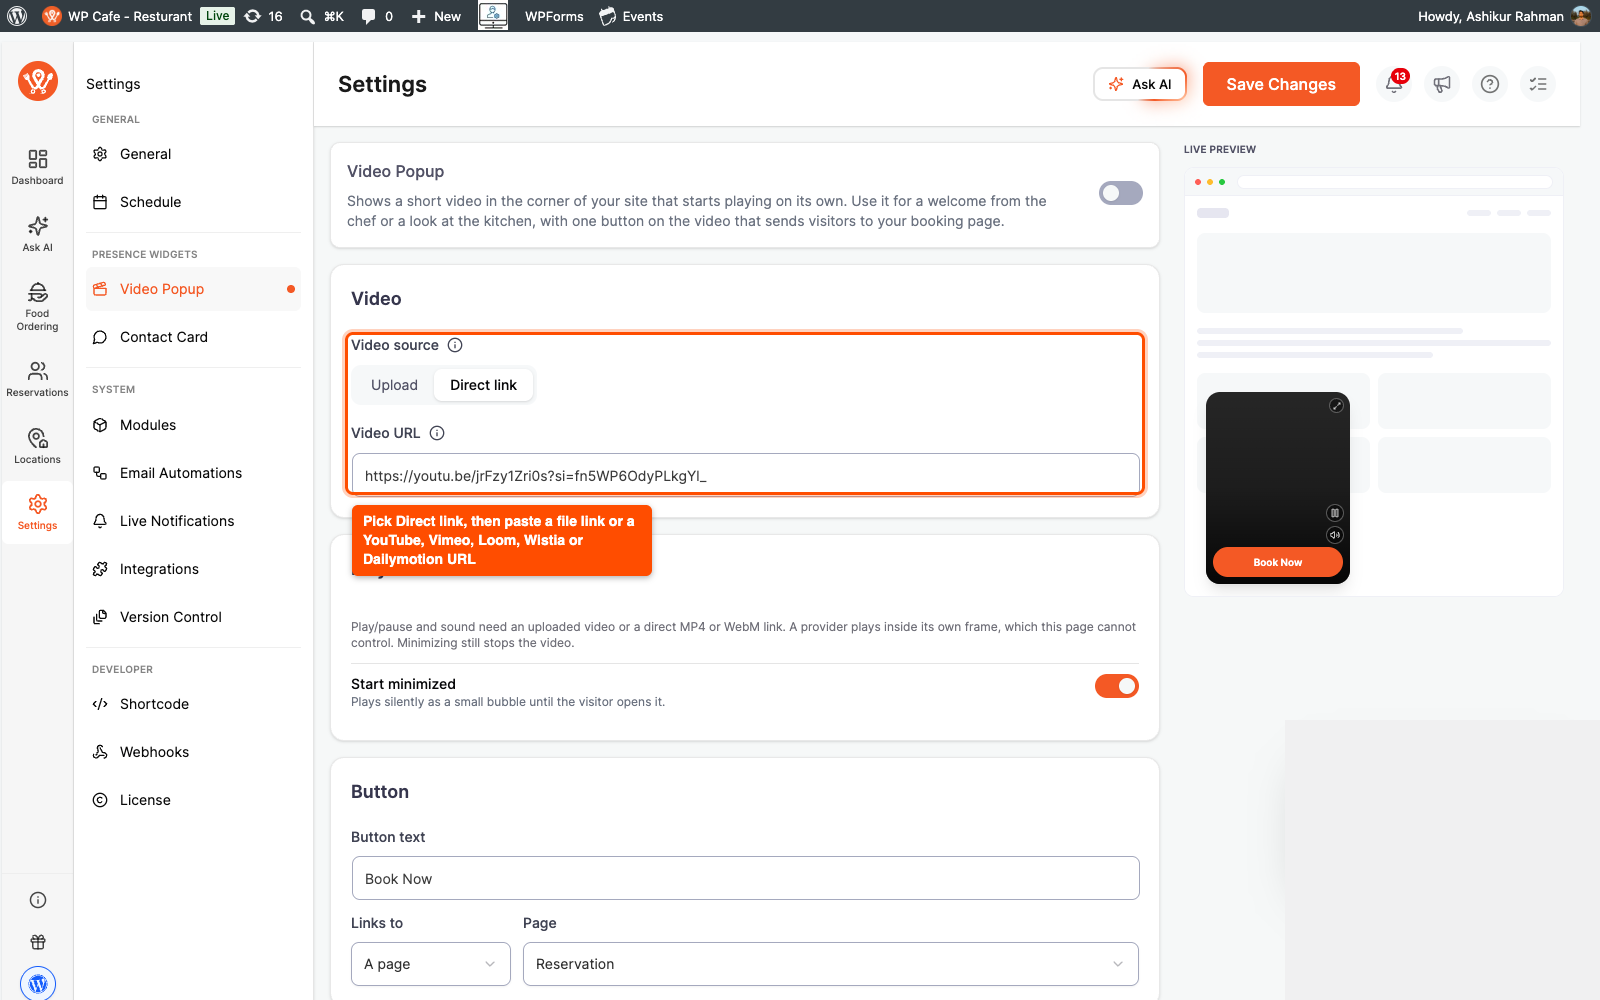
Video Popup source set to Direct link with a video URL field

Set the playback options #

Under Playback you decide how the video behaves:

  • Start minimized: the video plays as a small bubble until the visitor opens it.
  • Show play/pause button and let visitors turn sound on: these appear only for an uploaded file or a direct MP4 or WebM link.

A link from YouTube, Vimeo, or another provider plays inside its own frame, which the page cannot control, so those two switches are hidden for a provider link. Closing (minimizing) the video always stops it, whichever source you use.
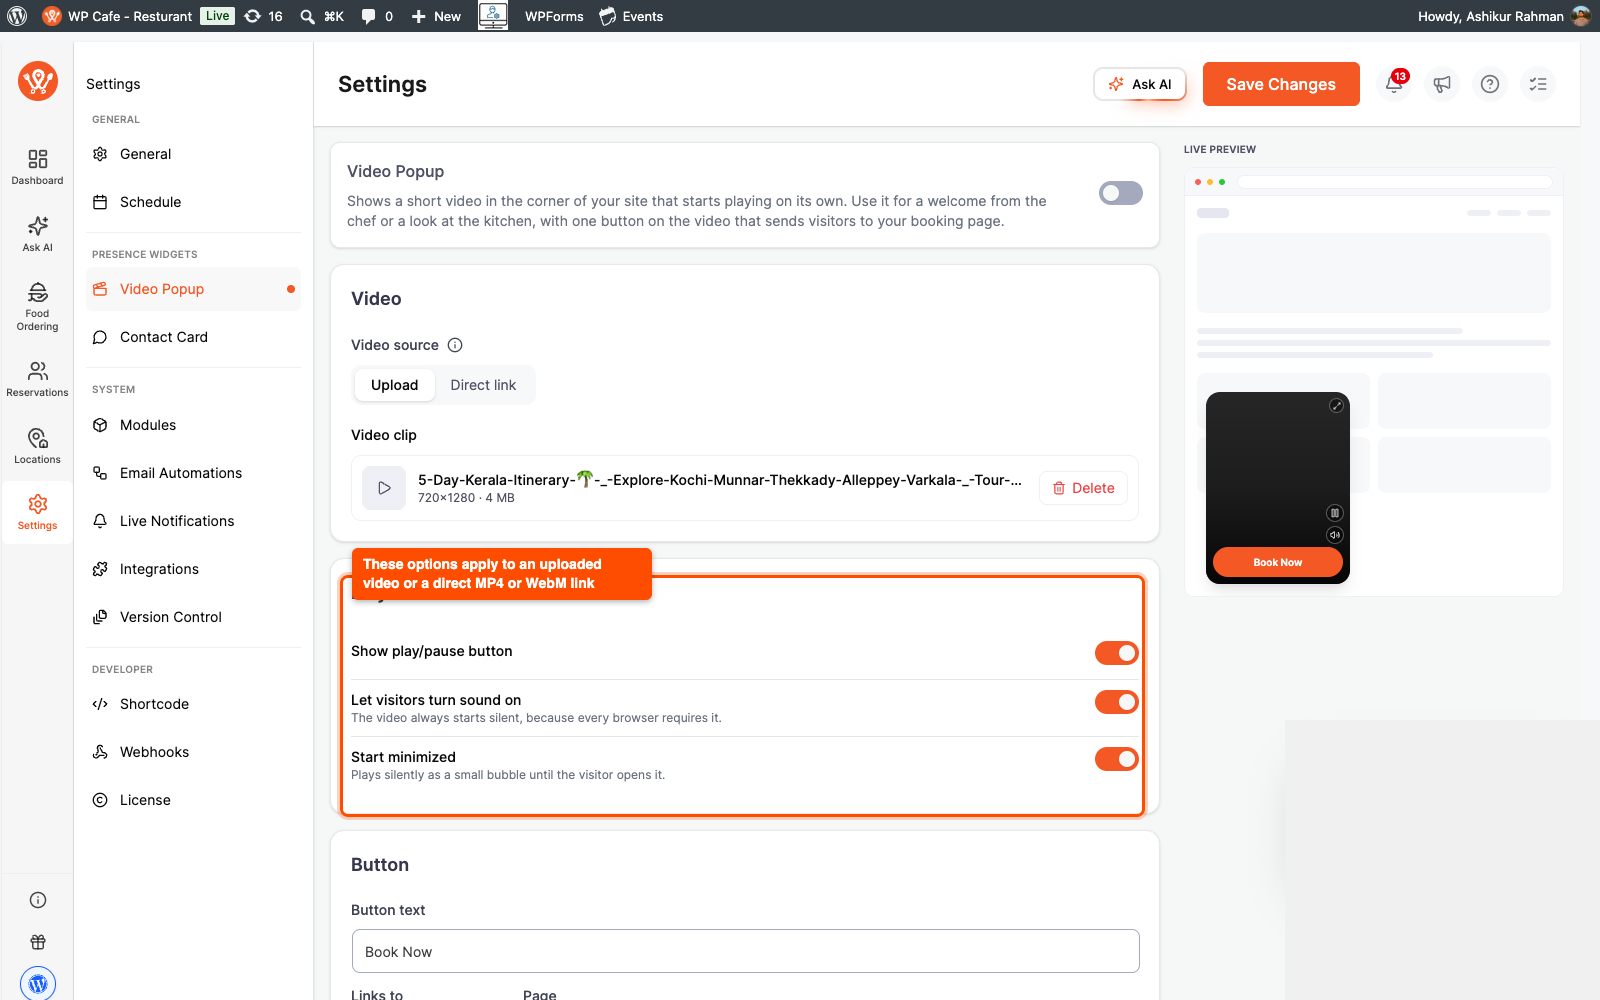
Video Popup playback options: show play/pause, let visitors turn sound on, start minimized

Add a button on the video #

Use the Button section to send viewers somewhere after they watch.

  1. Type the button text, for example, “Order now” or “Book a table.”
  2. In Links to, choose Page to pick one of your pages, or Link to paste any URL.

The button sits on the video and opens in a new tab.

Step 3: Set up the Quick Contact Card #

Open the Contact Card tab and turn on the switch at the top. Fill in the header first:

  1. Title, for example, “Get in touch.”
  2. Subtitle, a short line like “We’re happy to help.”
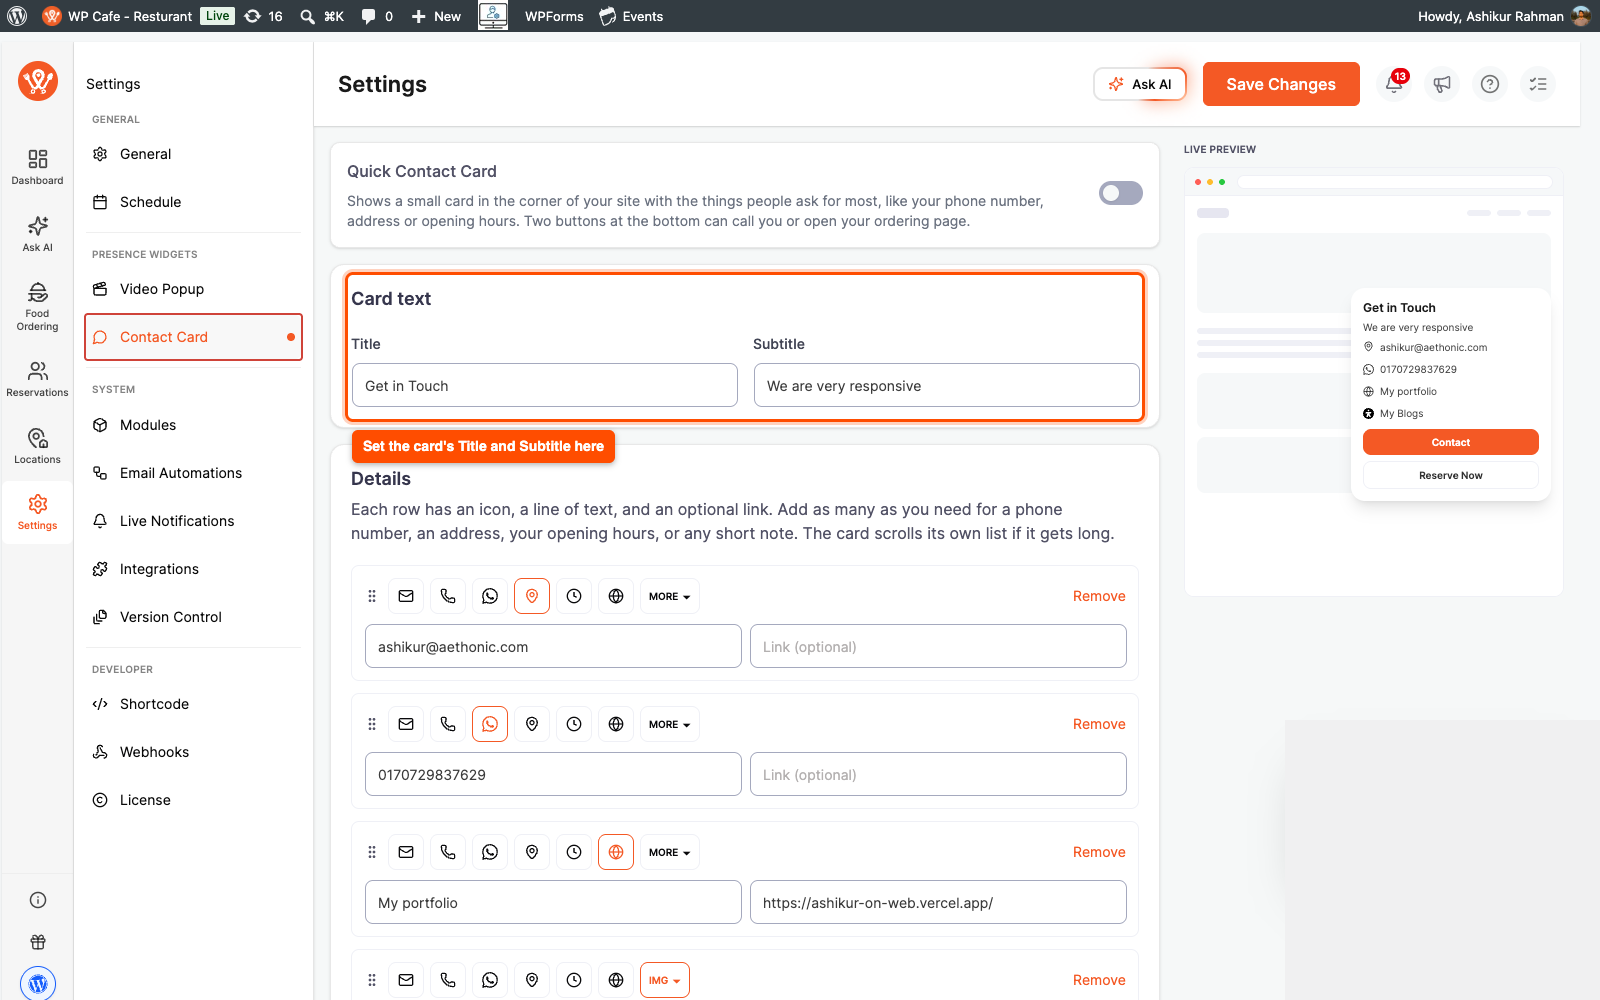
Quick Contact Card Title and Subtitle fields in WP Cafe settings

Add your contact rows #

Under Details, each row has an icon, a line of text, and an optional link. Add one row per thing people ask for, like a phone number, an address, or your opening hours. The card scrolls its own list if it gets long. For each row:

  1. Click the icon to open the icon picker. Pick a built-in icon, or choose your own icon and upload a PNG or SVG (square, 32×32 or larger).
  2. Type the text for that row.
  3. Add a link (optional), such as a tel: number for a phone row or a map link for an address.

To reorder rows, drag the handle or use the up and down arrow keys.
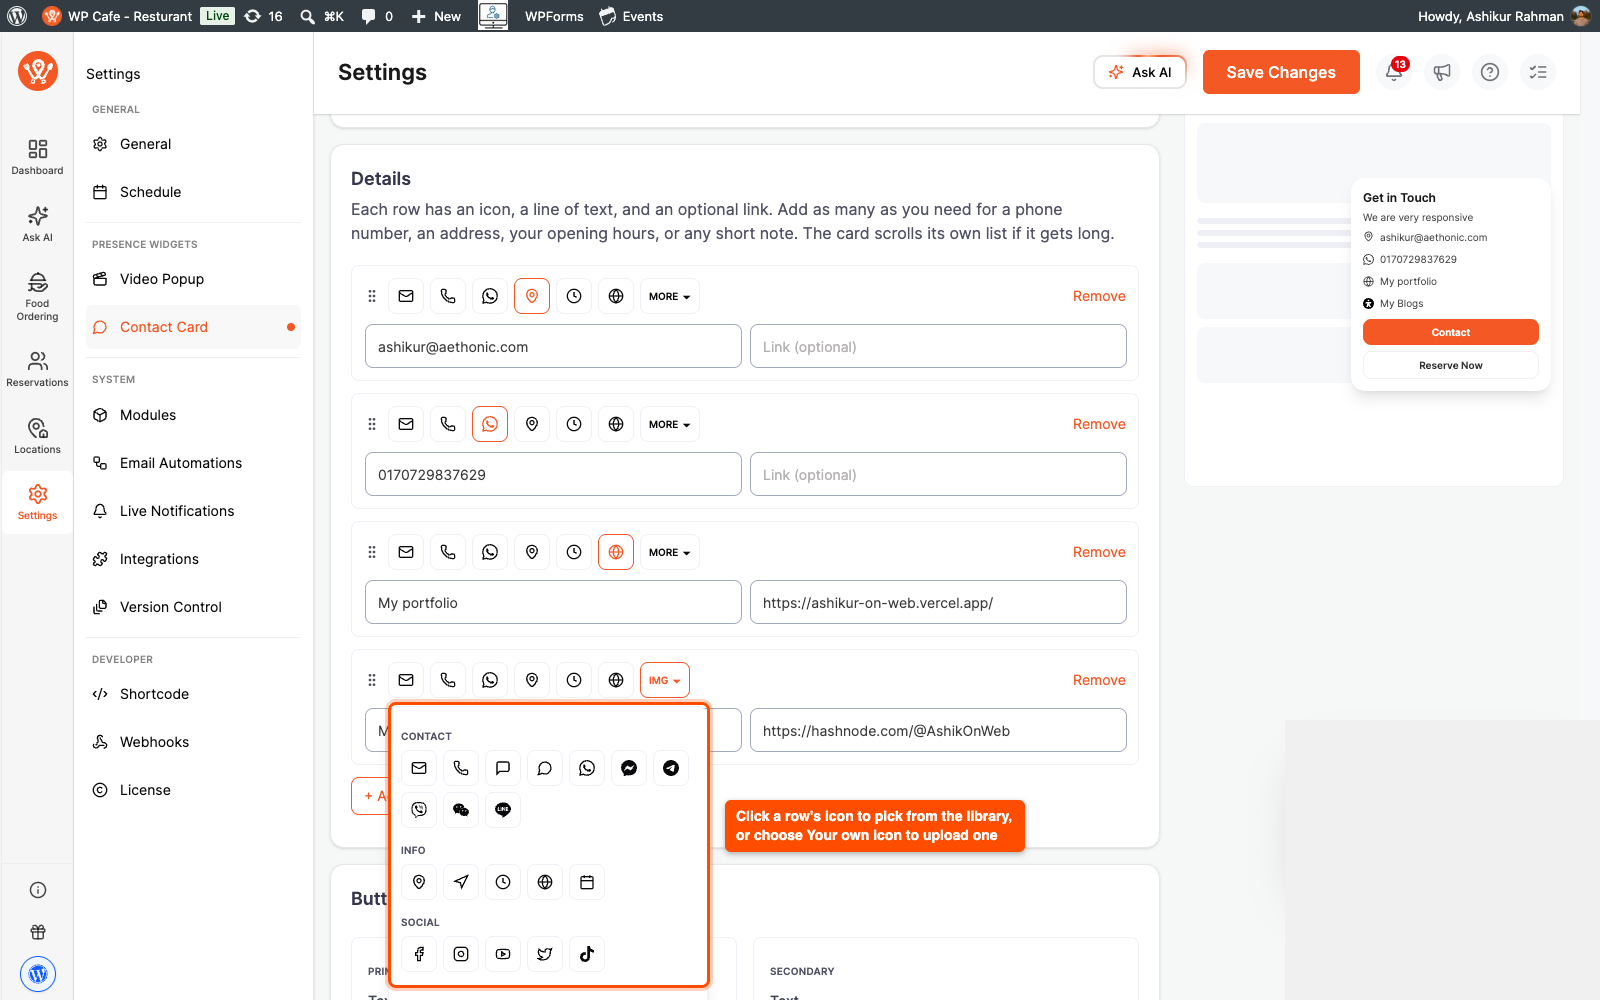
Quick Contact Card details rows with the icon picker open showing built-in icons

Add the two bottom buttons #

The Buttons section gives the card two buttons at the bottom, Primary and Secondary. A common setup is a primary button that calls you and a secondary button that opens your ordering page. For each one, set the text and the link.

Step 4: Choose where and when a widget appears #

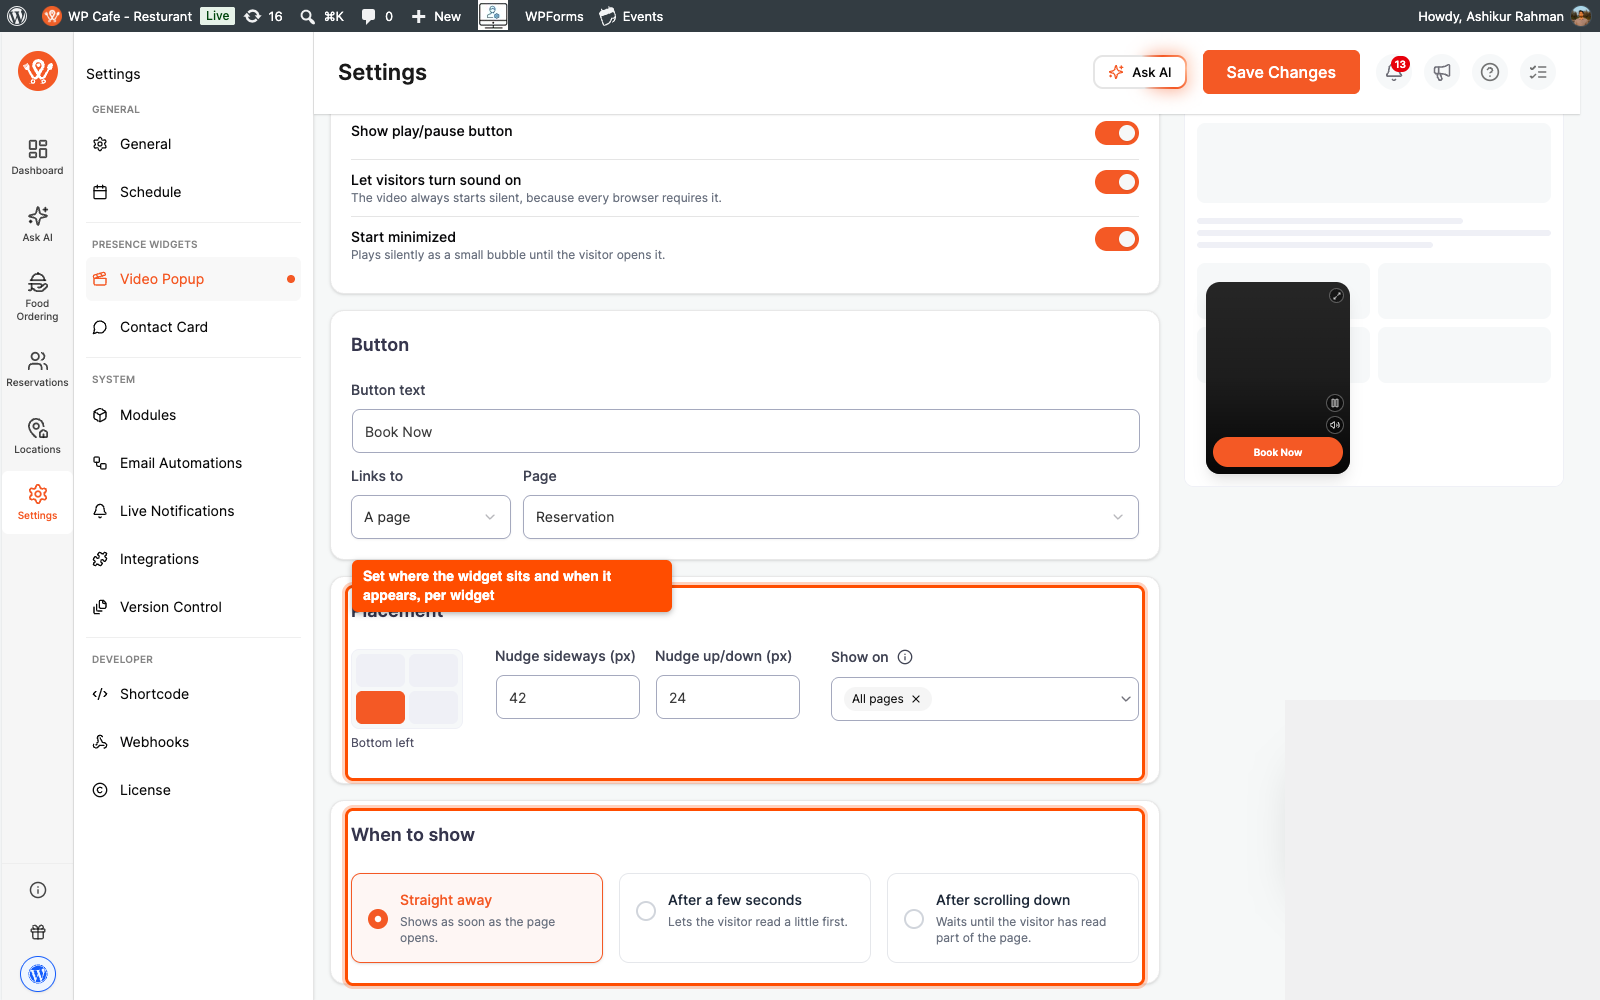
Both tabs end with the same two sections, Placement and When to show. Set them per widget.

Placement controls the position:

  • Corner: pick which corner of the screen the widget sits in.
  • Nudge sideways and Nudge up/down: move the widget a few pixels so it does not cover a theme button or a cookie bar.

When to show has two parts:

  • Show on: choose All pages, specific pages, or Nowhere to keep it off without losing your setup.
  • The trigger: Straight away, after a few seconds (set the seconds to wait), or after scrolling down (set the scroll depth). A delay or scroll trigger lets people read a little before the widget appears.
Frequently Asked Questions (FAQ) #

Q1: My video widget is not showing on the site. Why?
The most common cause is a link the site cannot play. If you paste a link that is not a direct MP4 or WebM file and not from YouTube, Vimeo, Loom, Wistia, or Dailymotion, the popup stays hidden and the settings show a warning. Switch to a supported link or an uploaded file.
Q2: Why can’t I see the play/pause and sound switches for my YouTube video?
A YouTube, Vimeo, Loom, Wistia, or Dailymotion video plays inside the provider’s own frame, which the page cannot control, so those switches are hidden for provider links. They appear only for an uploaded file or a direct MP4 or WebM link. Closing the video still stops it in every case.
Q3: Can I use my own icon in the Contact Card?
Yes. In any row of the Contact Card, click the icon, choose Your own icon, and upload a PNG or SVG that is square and at least 32×32 pixels. Use it for a brand mark or a logo. Every other row can still use a built-in icon.

Conclusion #

The Presence Widgets in WP Cafe keep a welcome video and your key contact details on screen while people browse, so booking or calling is always one tap away. Set up the Video Popup and Quick Contact Card in WP Cafe settings, then open your site to see them live. Overview

Presence Widgets in WP Cafe are two small floating boxes for your restaurant site: a Video Popup that plays a short clip in the corner and a Quick Contact Card that shows your phone number, address, and hours. You set both up from the WP Cafe settings, choose where they appear, and pick when they show.

Most visitors leave a restaurant site without booking or calling. These two widgets keep a friendly welcome and your contact details on screen while people browse, so the next step is always one tap away.

WP Cafe Video Popup live preview showing a corner video with a Book Now button

Requirements #

An active WordPress site with WP Cafe and WP Cafe Pro installed, since the Video Popup and Quick Contact Card are Pro features.

Step 1: Open the Presence Widgets settings #

Both widgets live in the same place.

  1. In your WordPress dashboard, go to WP Cafe.
  2. Open Settings.
  3. In the left menu, find the Presence Widgets group. It has two tabs: Video Popup and Contact Card.

Each tab has its own on/off switch at the top, so you can run one widget, both, or neither.

WP Cafe settings sidebar with the Presence Widgets group, Video Popup and Contact Card tabs

Step 2: Set up the Video Popup #

Open the Video Popup tab and turn on the switch at the top. Then pick your video under Video source, using one of two options:

  1. Upload: click Choose video file and pick an MP4 or WebM from your media library, or upload a new one.
  2. Direct link: paste a Video URL. This can be a direct MP4 or WebM link, or a share link from YouTube, Vimeo, Loom, Wistia, or Dailymotion.

The clip plays on its own, silently, and loops. A short portrait clip works best, for example a hello from the chef or a quick look at the kitchen.

Video Popup source set to Direct link with a video URL field

Set the playback options #

Under Playback you decide how the video behaves:

  • Start minimized: the video plays as a small bubble until the visitor opens it.
  • Show play/pause button and let visitors turn sound on: these appear only for an uploaded file or a direct MP4 or WebM link.

A link from YouTube, Vimeo, or another provider plays inside its own frame, which the page cannot control, so those two switches are hidden for a provider link. Closing (minimizing) the video always stops it, whichever source you use.

Video Popup playback options: show play/pause, let visitors turn sound on, start minimized

Add a button on the video #

Use the Button section to send viewers somewhere after they watch.

  1. Type the button text, for example, “Order now” or “Book a table.”
  2. In Links to, choose Page to pick one of your pages, or Link to paste any URL.

The button sits on the video and opens in a new tab.

Step 3: Set up the Quick Contact Card #

Open the Contact Card tab and turn on the switch at the top. Fill in the header first:

  1. Title, for example, “Get in touch.”
  2. Subtitle, a short line like “We’re happy to help.”
Quick Contact Card Title and Subtitle fields in WP Cafe settings

Add your contact rows #

Under Details, each row has an icon, a line of text, and an optional link. Add one row per thing people ask for, like a phone number, an address, or your opening hours. The card scrolls its own list if it gets long. For each row:

  1. Click the icon to open the icon picker. Pick a built-in icon, or choose your own icon and upload a PNG or SVG (square, 32×32 or larger).
  2. Type the text for that row.
  3. Add a link (optional), such as a tel: number for a phone row or a map link for an address.

To reorder rows, drag the handle or use the up and down arrow keys.

Quick Contact Card details rows with the icon picker open showing built-in icons

Add the two bottom buttons #

The Buttons section gives the card two buttons at the bottom, Primary and Secondary. A common setup is a primary button that calls you and a secondary button that opens your ordering page. For each one, set the text and the link.

Step 4: Choose where and when a widget appears #

Both tabs end with the same two sections, Placement and When to show. Set them per widget.

Placement controls the position:

  • Corner: pick which corner of the screen the widget sits in.
  • Nudge sideways and Nudge up/down: move the widget a few pixels so it does not cover a theme button or a cookie bar.

When to show has two parts:

  • Show on: choose All pages, specific pages, or Nowhere to keep it off without losing your setup.
  • The trigger: Straight away, after a few seconds (set the seconds to wait), or after scrolling down (set the scroll depth). A delay or scroll trigger lets people read a little before the widget appears.
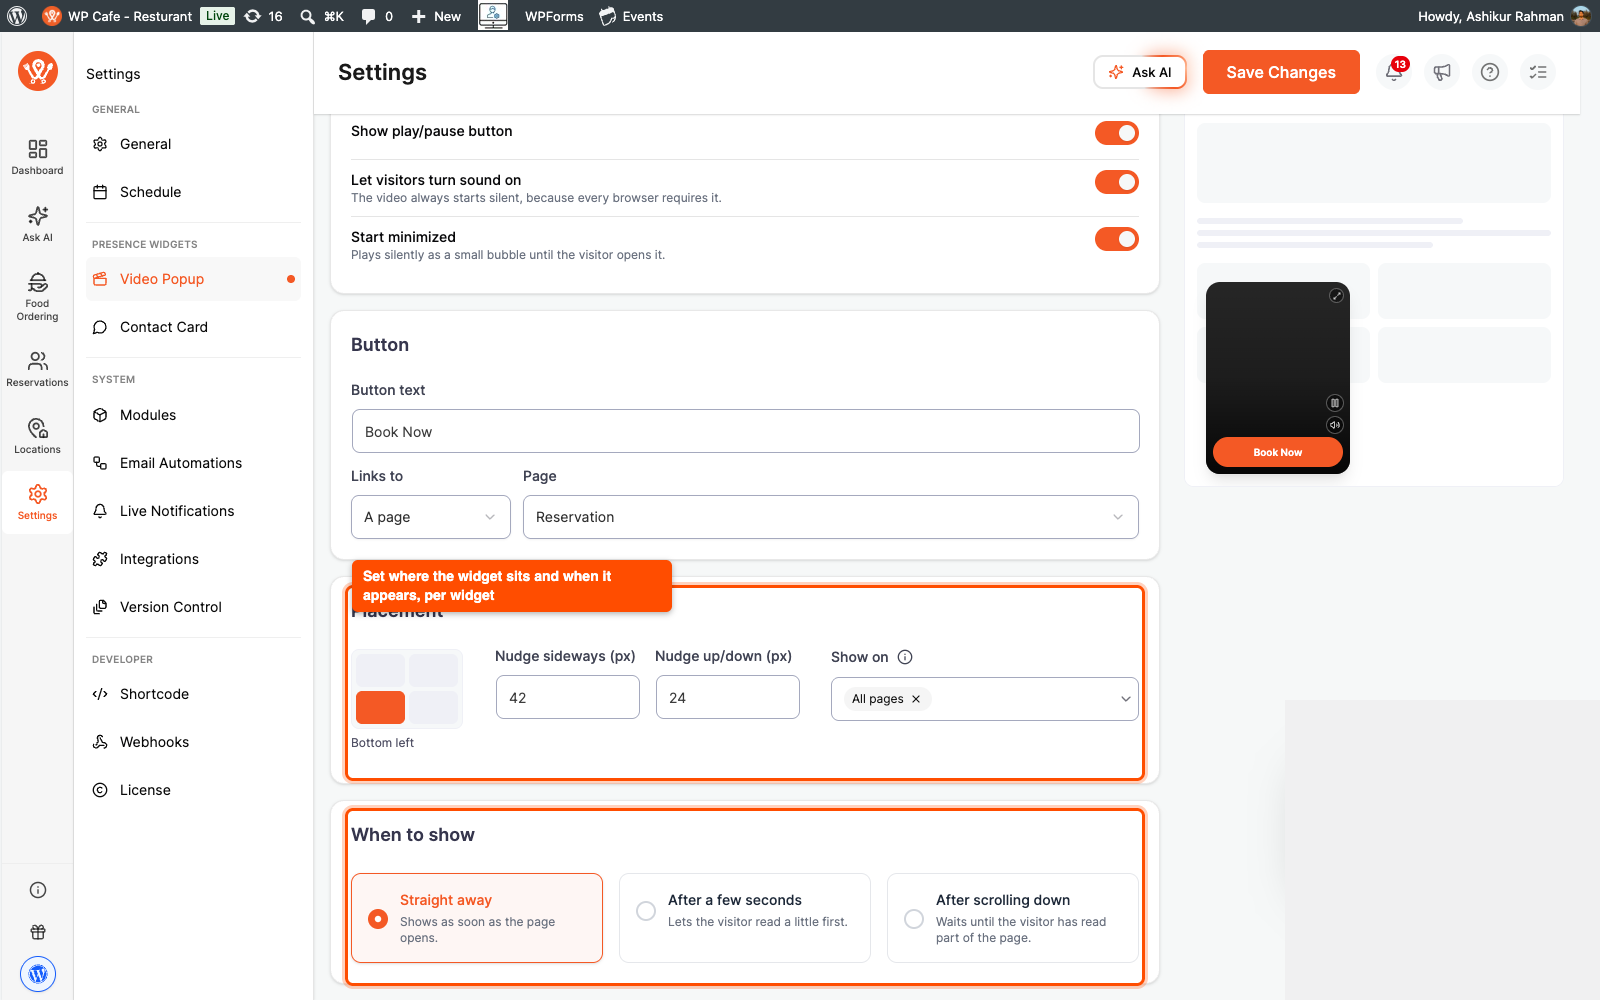
Presence widget Placement and When to show settings in WP Cafe

Frequently Asked Questions (FAQ) #

Q1: My video widget is not showing on the site. Why?
The most common cause is a link the site cannot play. If you paste a link that is not a direct MP4 or WebM file and not from YouTube, Vimeo, Loom, Wistia, or Dailymotion, the popup stays hidden and the settings show a warning. Switch to a supported link or an uploaded file.
Q2: Why can’t I see the play/pause and sound switches for my YouTube video?
A YouTube, Vimeo, Loom, Wistia, or Dailymotion video plays inside the provider’s own frame, which the page cannot control, so those switches are hidden for provider links. They appear only for an uploaded file or a direct MP4 or WebM link. Closing the video still stops it in every case.
Q3: Can I use my own icon in the Contact Card?
Yes. In any row of the Contact Card, click the icon, choose Your own icon, and upload a PNG or SVG that is square and at least 32×32 pixels. Use it for a brand mark or a logo. Every other row can still use a built-in icon.

Conclusion #

The Presence Widgets in WP Cafe keep a welcome video and your key contact details on screen while people browse, so booking or calling is always one tap away. Set up the Video Popup and Quick Contact Card in WP Cafe settings, then open your site to see them live.

What are your Feelings

Share This Article :

  • Facebook
  • X
  • LinkedIn
  • Pinterest
Updated on September 20, 2026
WpCafe Elementor WidgetsHow to Manage Global Schedule Settings
Table of Contents
  • Overview
  • Requirements
    • Step 1: Open the Presence Widgets settings
    • Step 2: Set up the Video Popup
    • Set the playback options
    • Add a button on the video
    • Step 3: Set up the Quick Contact Card
    • Add your contact rows
    • Add the two bottom buttons
    • Step 4: Choose where and when a widget appears
  • Frequently Asked Questions (FAQ)
    • Conclusion
  • Requirements
    • Step 1: Open the Presence Widgets settings
    • Step 2: Set up the Video Popup
    • Set the playback options
    • Add a button on the video
    • Step 3: Set up the Quick Contact Card
    • Add your contact rows
    • Add the two bottom buttons
    • Step 4: Choose where and when a widget appears
  • Frequently Asked Questions (FAQ)
    • Conclusion
Copyright © 2013-2026 ThemeWinter. – A Brand of Arraytics.