
Overview #
The WP Cafe Reservation Waitlist lets guests join a waiting list when the time slot they want is fully booked. When a booking for that slot is cancelled, WP Cafe emails the next guest in line a link to claim the table, and the claimed table becomes a real reservation without any work from your staff.
Without a waitlist, a guest who finds a full slot leaves, and a table freed by a late cancellation often stays empty. The waitlist keeps those guests, offers the freed seats in a fair order, and gives each guest a limited time to confirm so the table never sits on hold for long.

Requirements #
- WP Cafe (free) with the reservation feature set up
- WP Cafe Pro, because Reservation Waitlist is a Pro module
- A page that shows the reservation form (how to add the reservation form)
- WooCommerce (optional), only if your reservations take online payment
Step 1: Enable the Reservation Waitlist Module #
- Go to WP Cafe > Settings > Modules.
- Find the Reservation Waitlist card. It sits in the Reservation group.
- Turn on the toggle.
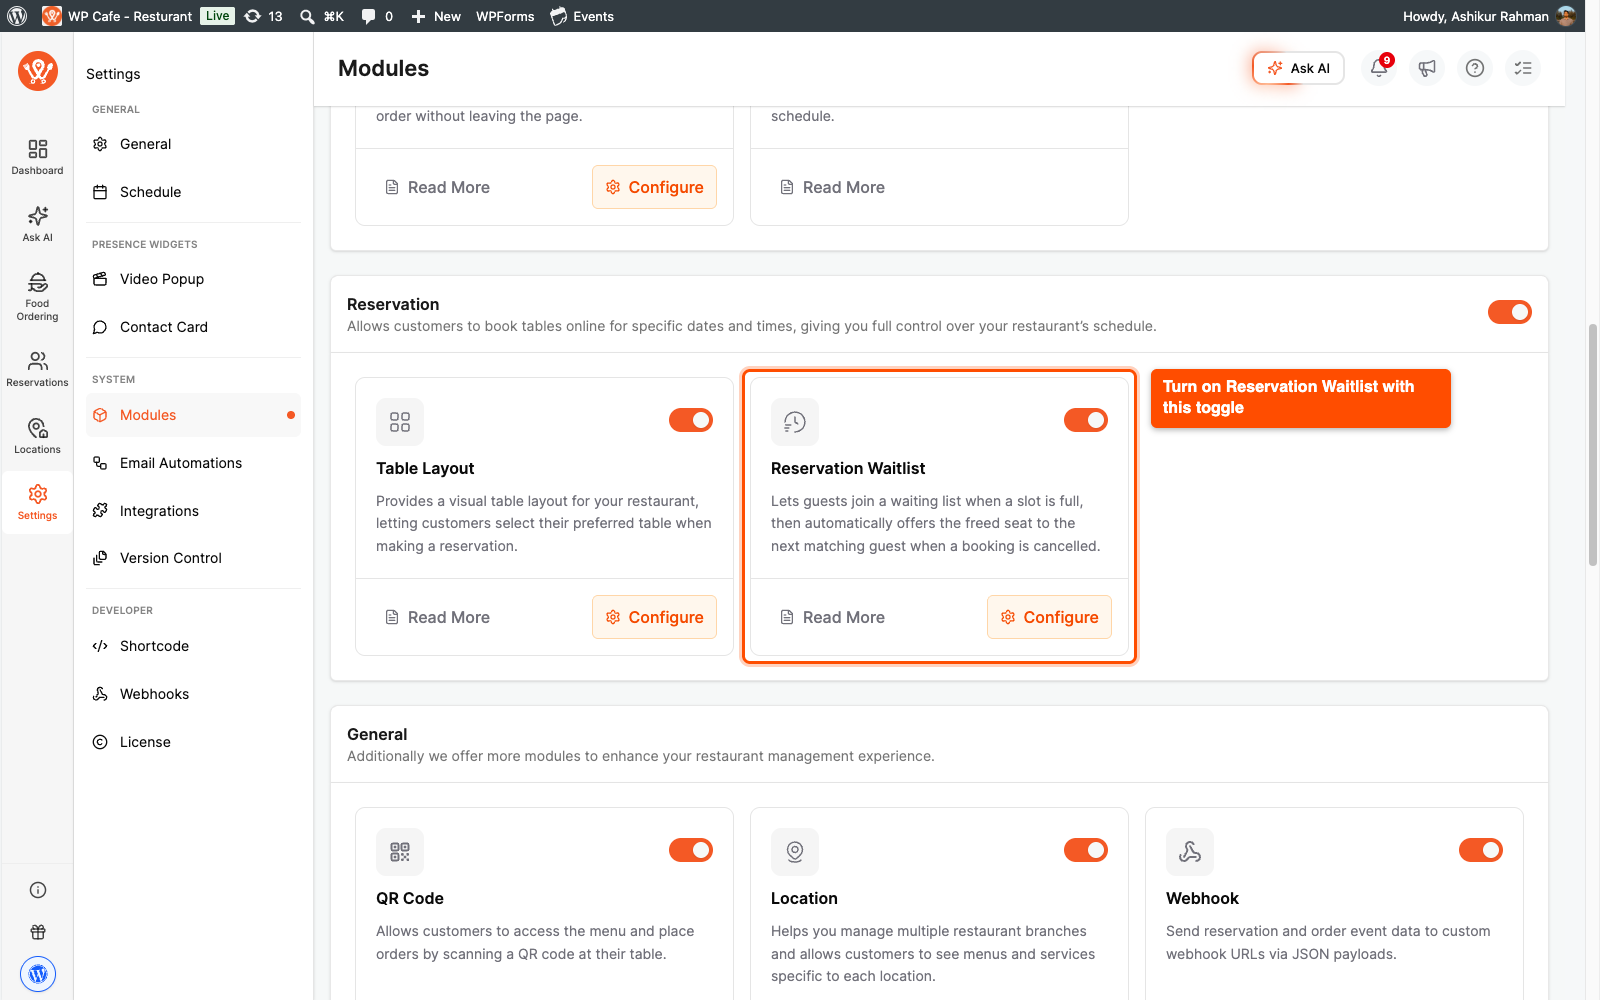
Once the module is on, WP Cafe does three things for you:
- Adds two items to the Reservations menu: Waitlist under Daily Ops (right below Reservations List) and Waitlist Settings under Rules & Customization.
- Creates a page called Waitlist Claim with the
[wpc_waitlist_claim]shortcode. The claim links in offer emails open this page. - Adds three email flows to Email Automations: Waitlist joined confirmation, Waitlist table offer, and Waitlist offer expired. They are added only once, so turning the module off and on again does not create copies.
| Tip: Keep the Waitlist Claim page published. If you delete it, WP Cafe creates a new one, but any offer links already sent point to the old address. |
Step 2: Configure the Waitlist Settings #
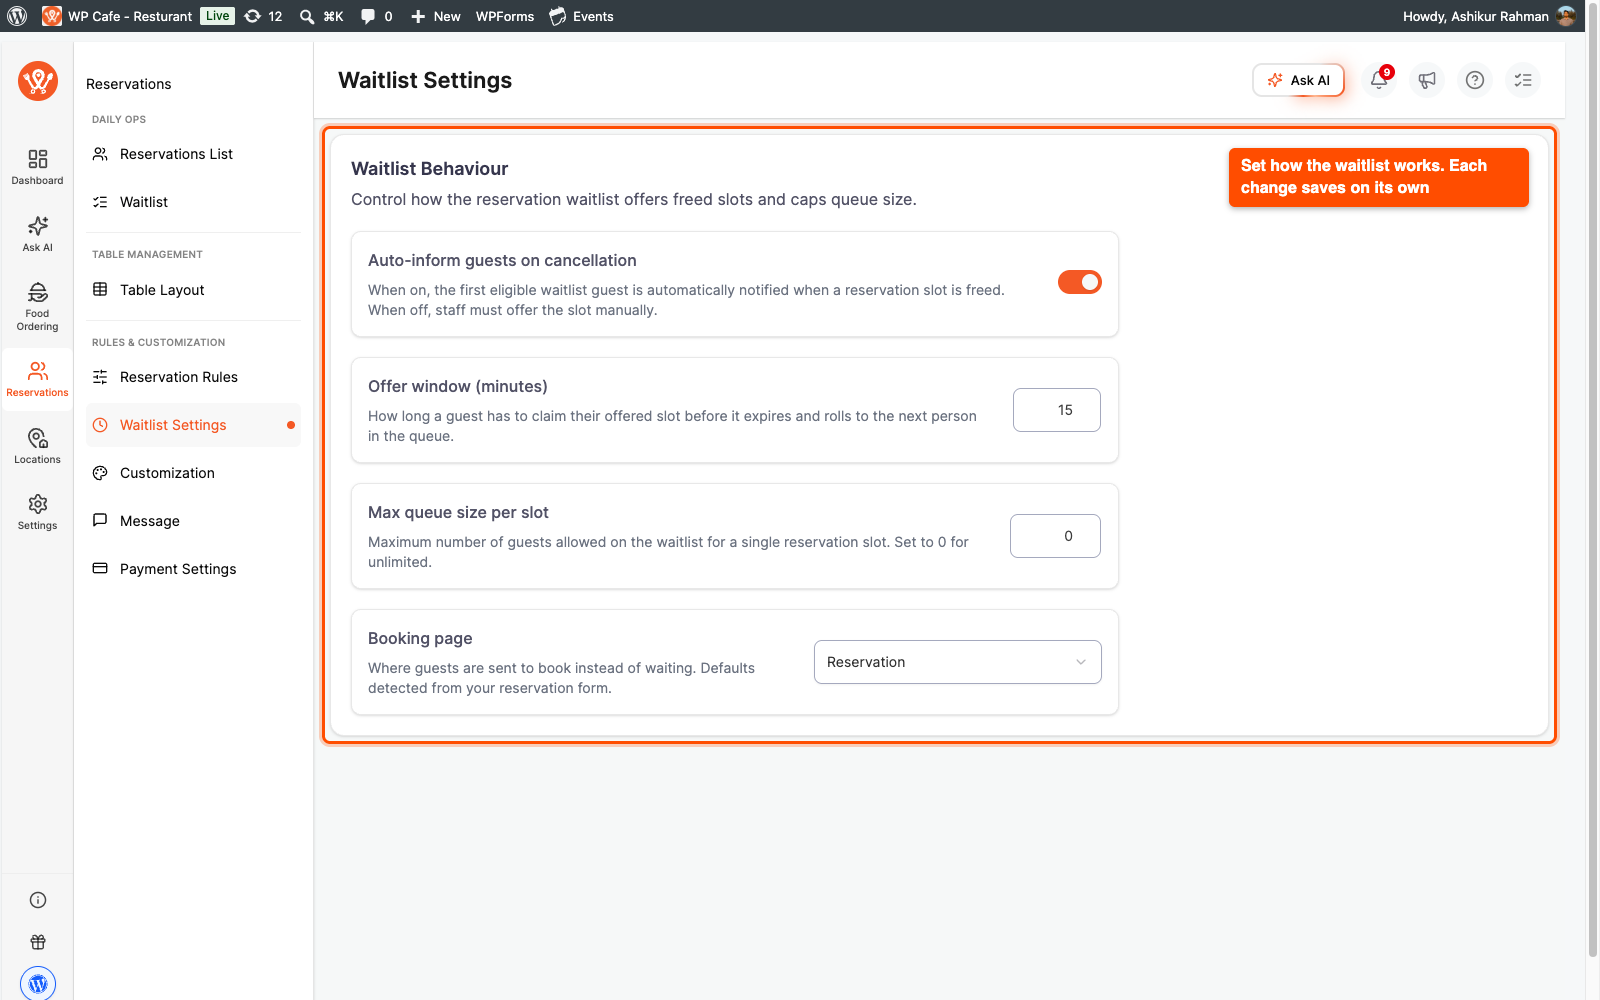
Go to Reservations > Waitlist Settings (under Rules & Customization) and set how the waitlist behaves.
| Setting | What it does |
| Auto-inform guests on cancellation | On: the first guest who fits gets an offer email as soon as a table frees up. Off: nothing is sent, and your staff offers the table from the Waitlist page. |
| Offer window (minutes) | How long a guest has to claim the table. When it runs out, the offer passes to the next guest. |
| Max queue size per slot | The most guests who can wait for one time slot. Set it to 0 for no limit. |
| Booking page | Where guests go when they choose to book another time instead of waiting. WP Cafe picks the page with your reservation form by default. |
There is no Save button. Each setting saves as soon as you change it.
Step 3: How Guests Join the Waitlist #
There is nothing to add to your pages. The waitlist appears inside your existing reservation form.
- The guest opens the reservation form and picks a date and time.
- If that slot has no room for their party, the form shows a card that names the time, for example 1:30–2:00 PM is fully booked.
- The guest fills in their name, email, phone, and number of guests, then clicks Join the waiting list.
- The form confirms their place, for example “You’re #2 on the waiting list”, and they get a Waitlist joined confirmation email.
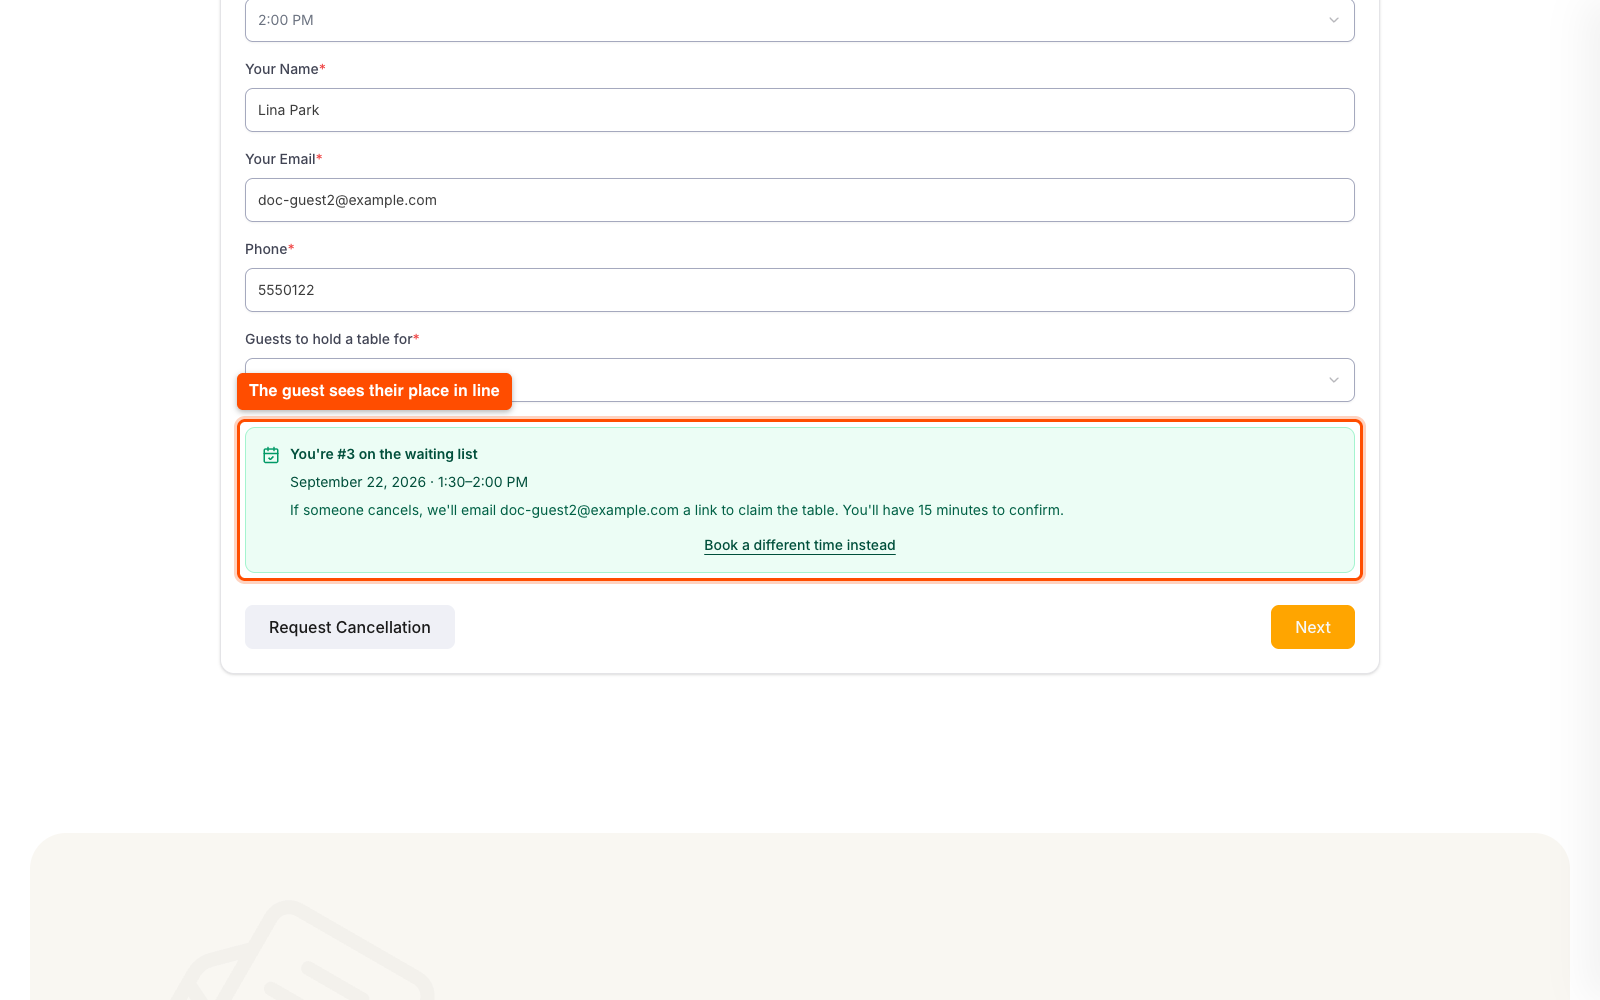
A guest can only join once for the same slot. If you set a max queue size and the list is full, the form tells them the waitlist for that slot is full. The Book a different time instead button clears the form so they can pick another time.
| Note: To stop spam, a visitor can only send a few waitlist requests per minute. After that they see “Too many requests. Please try again in a minute.” Normal guests never reach this limit. |
Step 4: What Happens When a Table Frees Up #
WP Cafe checks the waitlist when a reservation for that slot is cancelled or deleted, or when its WooCommerce order is cancelled, refunded, or fails.
- WP Cafe goes down the queue in order and picks the first guest whose party fits the free seats. A party of 2 can get the offer ahead of a party of 6 if only 2 seats opened.
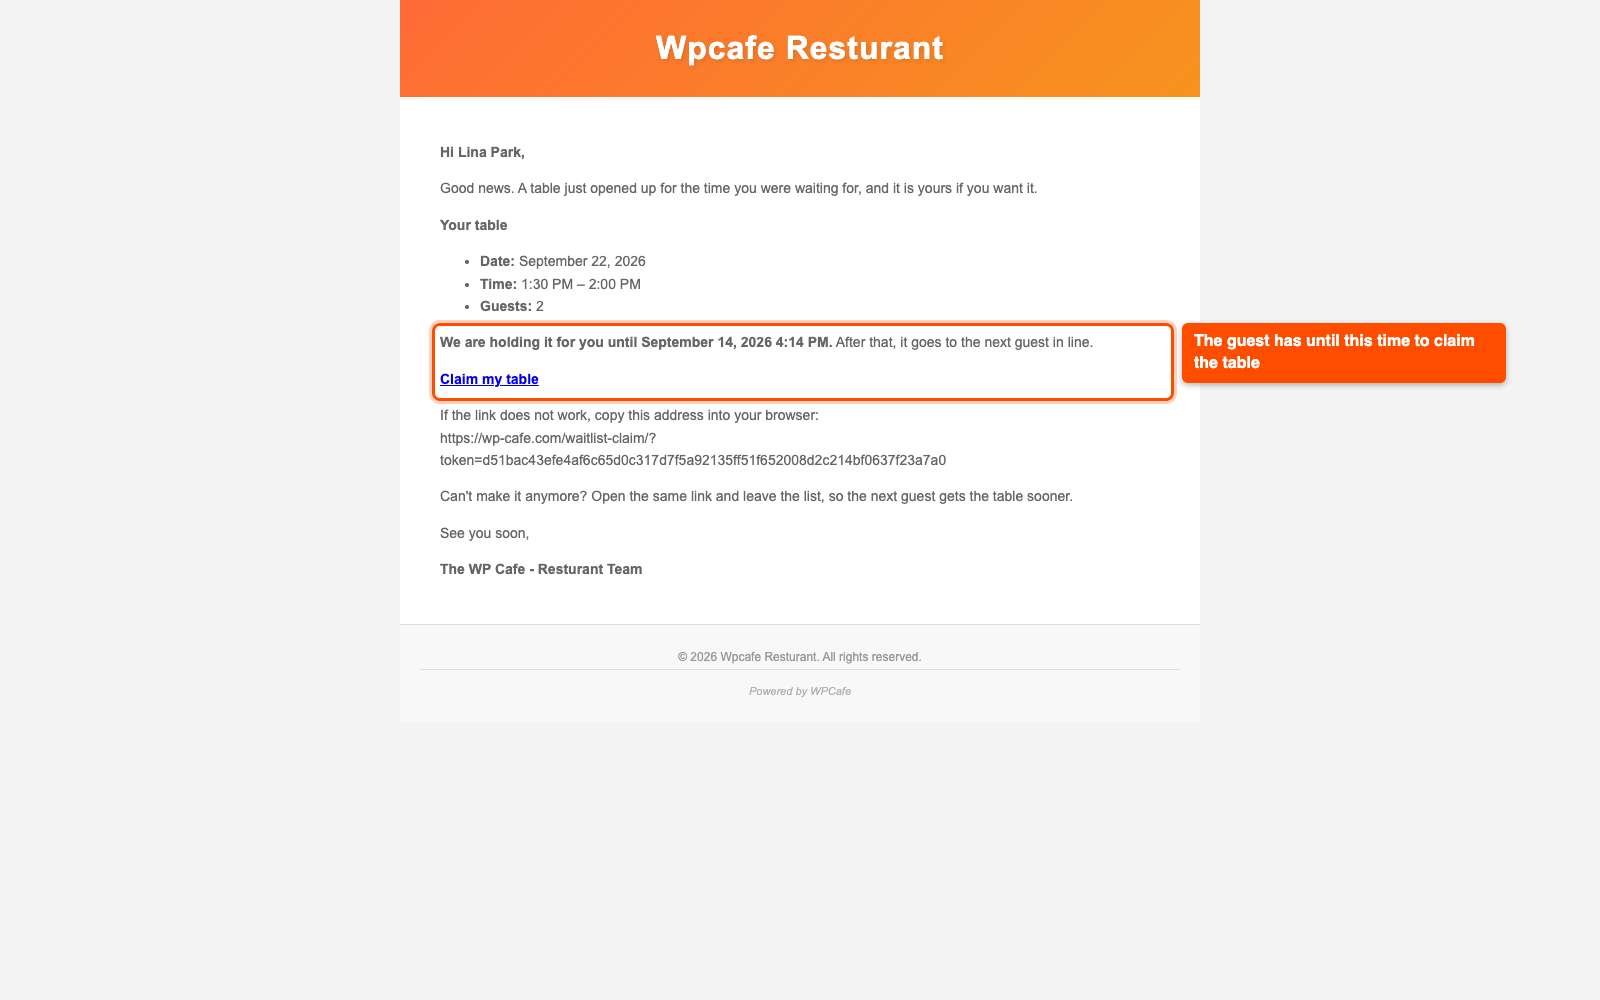
- That guest gets the Waitlist table offer email with a Claim my table link.
- The seats are held for that guest until the offer window ends, so a new booking from the form cannot take them.
- Only one offer runs per slot at a time. If the guest does not claim in time, the offer is marked expired, they get the Waitlist offer expired email, and the next guest who fits gets the offer.
Step 5: How Guests Claim the Table #
The claim link opens the Waitlist Claim page. It shows the date, time, party size, and a countdown for the offer.
- The guest clicks Claim my table.
- If the booking is free, the reservation is created right away and the page shows Your table is confirmed.
- If your reservations take online payment, the guest goes to the WooCommerce checkout to pay, the same as a normal paid booking.
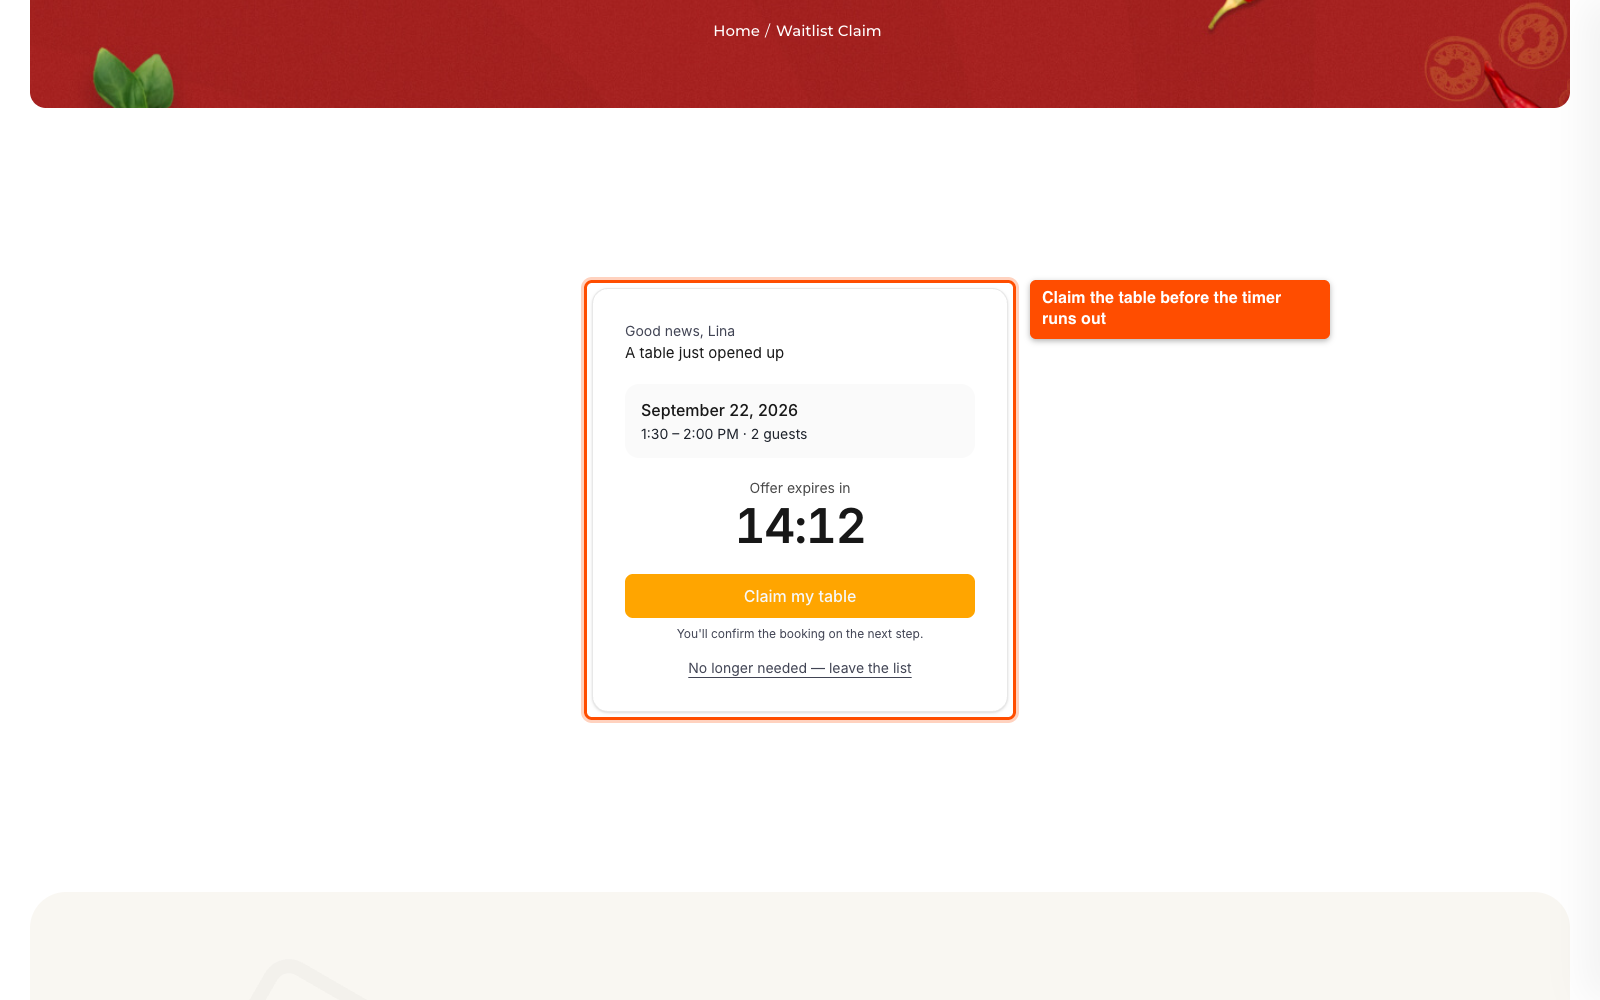
The new reservation shows up in the Reservations List like any other booking and sends the same Reservation Created notification email. If the guest no longer wants the table, they click the No longer needed button on the same page, and the offer moves to the next guest.
| Note: The confirmation email comes from the Reservation created notification flow in Email Automations. If you deleted that flow, guests who claim a table (and guests who book normally) will not get a confirmation email. |
Step 6: Manage the Queue from the Admin #
Go to Reservations > Waitlist (under Daily Ops). The list opens on today’s date. Use the date picker to see another day, Show all dates to see every day, and use the status filter or search box to find a guest.
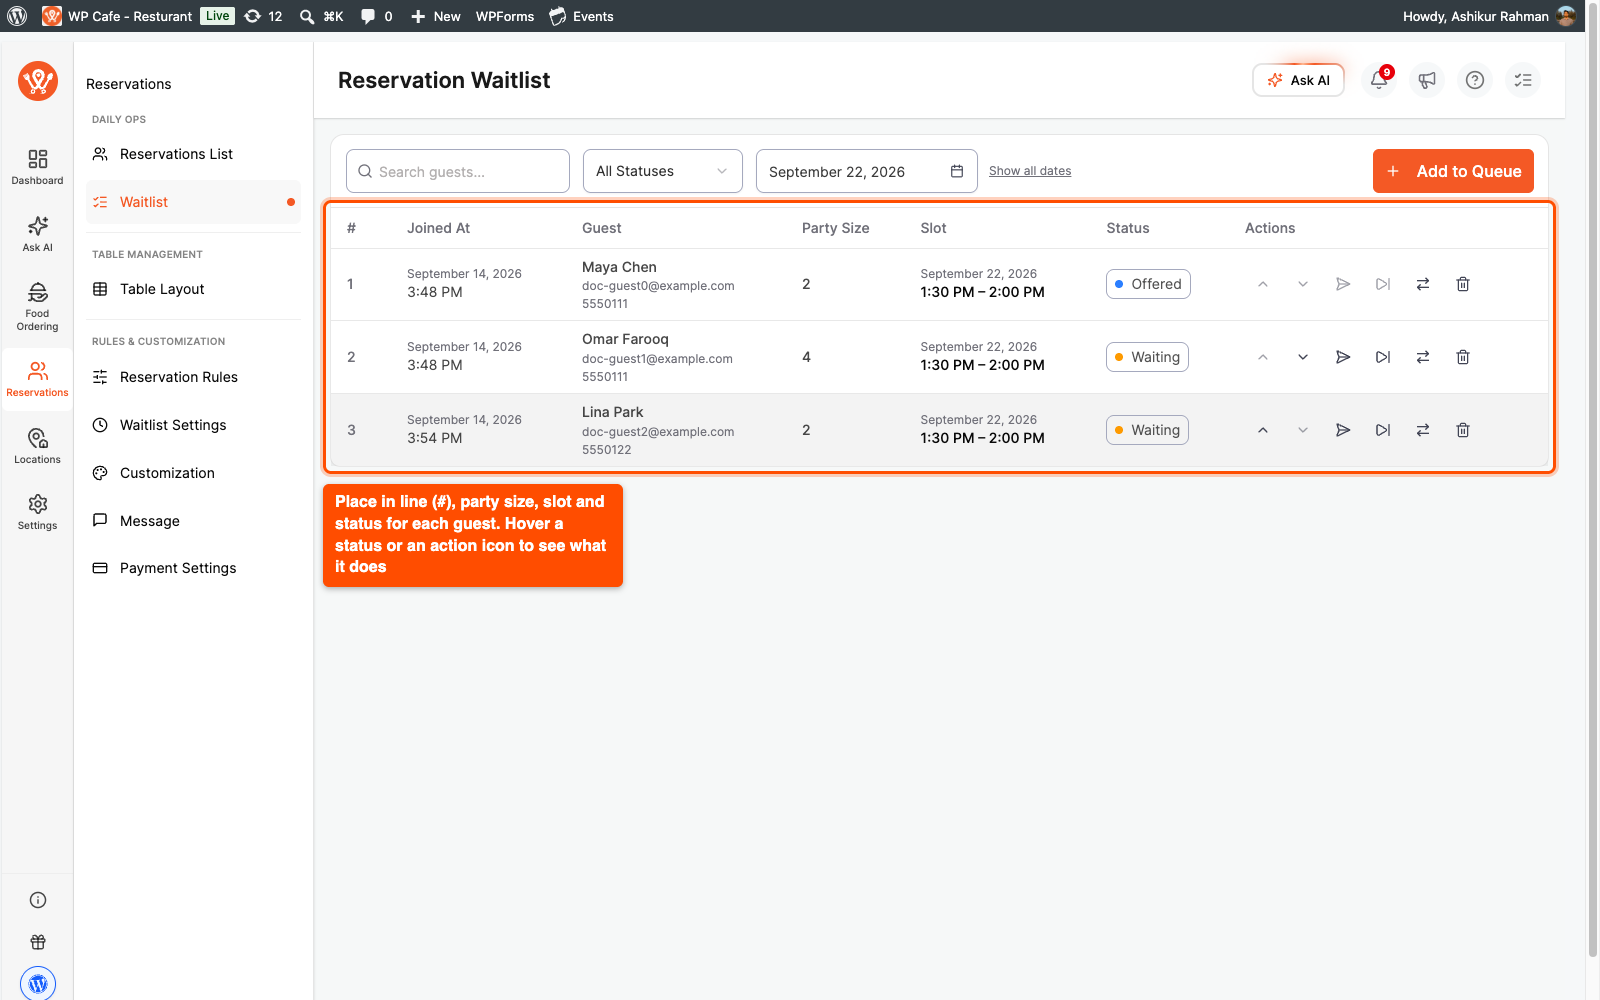
The # column is the guest’s place in line for that slot. The Status column tells you where each guest is. Hover over a status to see what it means.
| Status | Meaning |
| Waiting | In line for the slot. No offer sent yet. |
| Offered | A table was emailed to them and is held until the offer window ends. |
| Claimed | They took the table. A real reservation now exists. |
| Expired | They did not claim in time, so the table went to the next guest. |
| Removed | Off the list, either by the guest or by your staff. |
Each row has icon buttons in the Actions column. Hover over an icon to see its name. When an action is not available, the icon is greyed out and hovering tells you why.
| Action | What it does |
| Move up / Move down | Changes the guest’s place in line for that slot. Waiting guests only. |
| Offer now | Sends the offer email right away. Use this when auto-inform is off. Waiting for guests only. |
| Skip | Moves the guest to the back of the line. Waiting for guests only. |
| Convert to reservation | Books the table for a waiting or offered guest directly, without the claim link. |
| Remove | Takes the guest off the list. If they had an open offer, it goes to the next guest. This cannot be undone. |
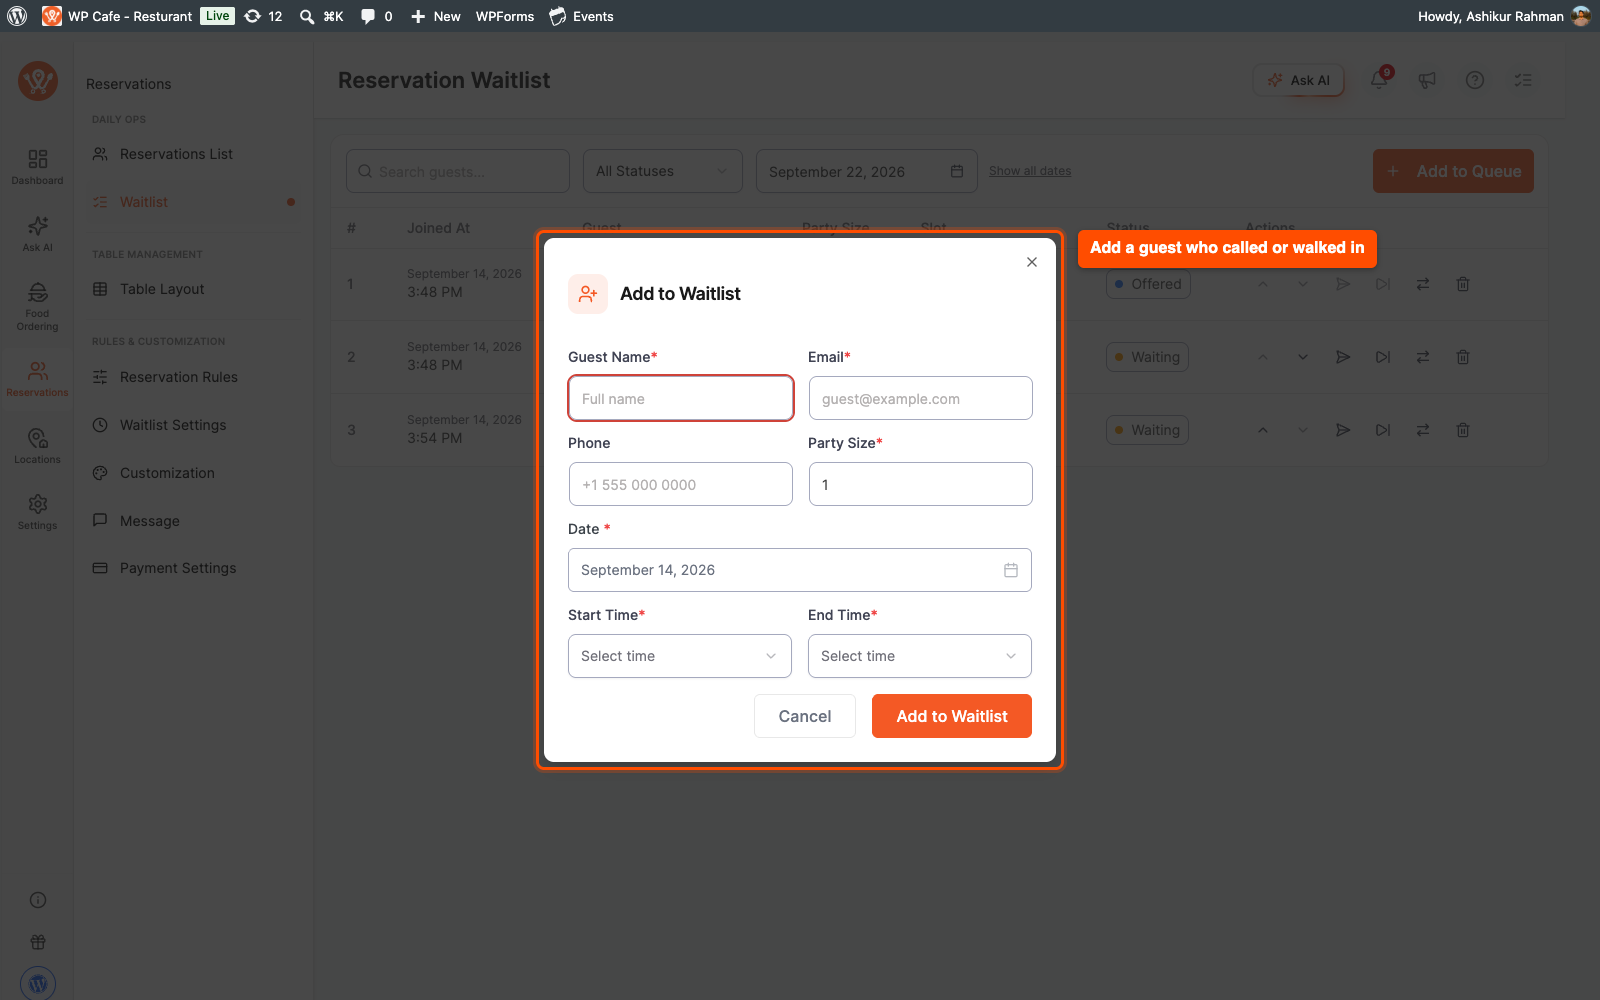
To add a guest who called or walked in, click Add to Queue, fill in their name, email, phone (optional), party size, date, start time, and end time, then click Add to Waitlist.
Step 7: Customize the Waitlist Emails #
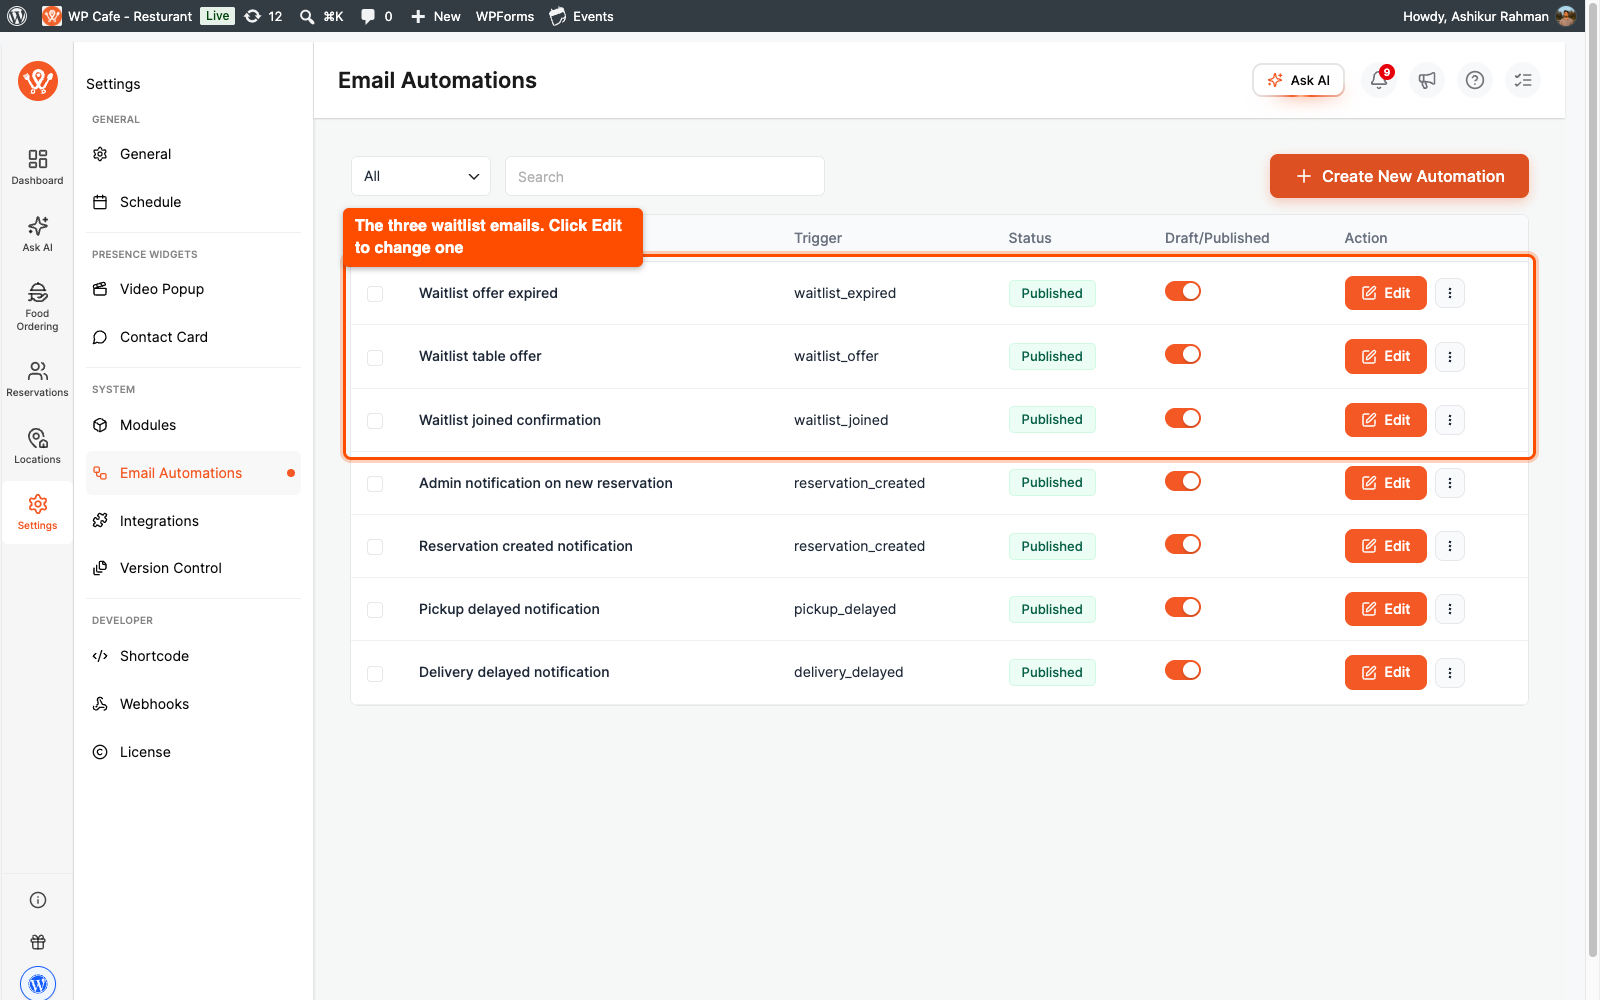
Go to WP Cafe > Settings > Email Automations to edit the three waitlist flows. You can change the subject, the text, and who receives each email (how to use Email Automations).
| Flow | Sent when |
| Waitlist joined confirmation | A guest joins the waitlist. |
| Waitlist table offer | A table is offered to a guest. Keep the claim link in this email. |
| Waitlist offer expired | A guest’s offer runs out. |
| Note: If you delete one of these flows, WP Cafe does not add it back, and that email stops going out. Edit or turn off a flow instead of deleting it. |
Frequently Asked Questions (FAQ) #
| Q1: A booking was cancelled but no one on the waitlist got an email. Why? Check that Auto-inform guests on cancellation is on. When it is off, WP Cafe waits for your staff to click Offer now. Also check party sizes: a guest only gets an offer when their whole party fits the freed seats, so a large party keeps waiting until enough seats open. |
| Q2: What happens to a guest who does not claim their table in time? Their entry is marked Expired, they get the offer-expired email, and the table goes to the next guest who fits. They are not put back in line automatically. To try again, they can rejoin the waitlist from the reservation form, or your staff can add them with Add to Queue. |
| Q3: Does a guest who claims a table get the normal booking confirmation? Yes. A claimed table creates a regular reservation, so it sends the same Reservation created notification email as a booking made from the form. If the booking needs payment, WooCommerce also sends its order emails after checkout. Make sure the Reservation created notification flow exists in Email Automations. |
Conclusion #
The WP Cafe Reservation Waitlist turns cancellations into bookings by offering free tables to guests who were already waiting. Turn on the module, set your offer window, and check the Waitlist page during service to see who is next in line.


