
Introduction #
The LearnDash integration turns an event ticket into course access. You link each ticket type to one of your LearnDash courses, and when someone buys that ticket they are enrolled automatically — no manual enrolling, no spreadsheets. If the order is later refunded or cancelled, the course access is removed again.
Prerequisites #
- Eventin — installed and active.
- LearnDash LMS — installed and active on the same WordPress site. LearnDash is a premium plugin, so install it yourself from your LearnDash account first. Eventin cannot download it for you.
- At least one published LearnDash course — this is what the ticket will unlock.
- An Eventin event with at least one ticket type — courses are linked per ticket, so an event with no tickets has nothing to link.
Step 1 — Turn on the LearnDash add-on #
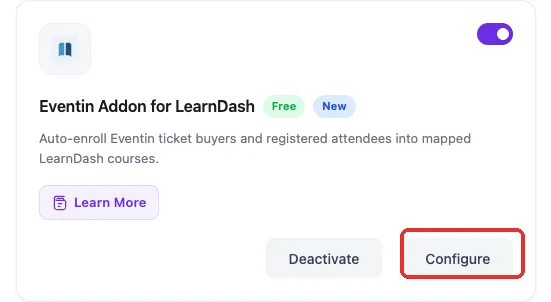
Go to Eventin → Extensions and find Eventin Addon for LearnDash. Switch its toggle on. Eventin downloads and activates the companion add-on for you, then a Configure button appears on the card.
If LearnDash is not active yet, Eventin will tell you to install it first. Install LearnDash, then come back and switch this on.
Step 2 — Choose who gets enrolled #
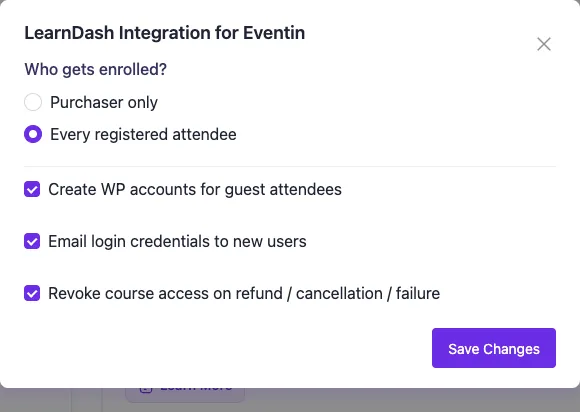
Click Configure on the same card. These settings apply to every event on your site, so you only set them once.
- Who gets enrolled? — Purchaser only enrols just the person who paid, and gives them every course in the order. Every registered attendee enrols each attendee named on the order into the course for their own ticket. If someone buys five tickets for their team, this is the setting that decides whether one person or five people get the course.
- Create WP accounts for guest attendees — keep this on. LearnDash grants course access to a user account, so a buyer with no account cannot be given a course. When this is on, Eventin creates a Subscriber account for them automatically.
- Email login credentials to new users — sends those newly created users their login details so they can actually reach the course. Turn this off only if you send your own welcome email.
- Revoke course access on refund / cancellation / failure — removes the course again when the money goes back. Turn it off if you would rather let refunded buyers keep the course.
Click Save Changes when you are done.
Step 3 — Link each ticket to a course #
This part is done per event. Open the event you want to sell courses with and go to its Advanced tab, then find Integrate LearnDash in the Third-Party Integrations card.
- Switch Integrate LearnDash on. A table opens showing one row for every ticket type on this event.
- In the Mapped Course column, pick the course that ticket should unlock. Leave a ticket blank and it simply unlocks nothing.
- Click Update at the top of the page. There is no separate save button for this card — it saves with the event.
Tickets appear in this table as soon as you add them on the Tickets tab, so you do not need to save the event first.

What happens when someone buys a ticket #
Once the order is marked complete, Eventin does the whole thing on its own:
- It looks up the buyer (or each attendee, depending on your setting) by email address.
- If there is no WordPress account for that email, it creates one as a Subscriber.
- It grants that account access to the course you linked to their ticket.
The buyer can then log in and open the course from My Courses as any LearnDash student would. To check it worked, open LearnDash LMS → Courses, open the course, and look at its enrolled users.
What happens on a refund #
If Revoke course access on refund is on, refunding or cancelling the order removes the course again. Two safeguards mean a refund never takes away more than it should:
- If the same person also bought that course through another order that has not been refunded, they keep it.
- If you had already enrolled them in that course by hand before Eventin was involved, that enrolment is left alone.
Deleting a single attendee from an order works the same way: only that attendee’s course is removed, and the other attendees on the order keep theirs.
FAQs #
Q: I bought a ticket but no course was given. What should I check? #
A: Work through these in order: LearnDash is active; the add-on is switched on under Eventin → Extensions; Integrate LearnDash is switched on for that specific event; the ticket that was bought has a course chosen in the Mapped Course column; and you clicked Update after choosing it. The order also has to be complete — a pending or failed order does not enrol anyone.
Q: My ticket types are not showing in the table. #
A: Add your ticket types on the event’s Tickets tab first. They appear in the LearnDash table automatically once they exist. If the table says no courses were found instead, create and publish a course in LearnDash LMS → Courses.
Q: Can one ticket unlock more than one course? #
A: One course per ticket. If you want a ticket to unlock a larger body of material, build that material as lessons and topics inside a single LearnDash course and point the ticket at that course. Alternatively, create a separate ticket type for each course you want to sell.
Q: What happens if the buyer already has a WordPress account? #
A: Their existing account is used and no new one is created. Matching is done on the email address, so the course lands on the account they already log in with. Their role is not changed.
Q: I am logged in as an administrator and I can open the course without buying anything. Is the integration broken? #
A: No. LearnDash has its own setting that gives administrators access to every course, so an admin account is not a good way to test this. Buy a test ticket with a different email address, or check the course’s enrolled users list instead.
Q: I refunded an order but the buyer can still open the course. #
A: That is usually one of three things working as intended: Revoke course access on refund is switched off; the buyer holds the same course through a second order that is still paid; or you enrolled them manually at some point, which Eventin will not undo. It can also happen if the course itself is set to Open or free in LearnDash, because then everyone can open it regardless of enrolment.
Q: What happens if I deactivate LearnDash later? #
A: Nothing breaks. The integration simply stops doing anything and your site keeps working. Your ticket-to-course choices are kept, so reactivating LearnDash picks up where you left off.
Conclusion #
Selling a course with Eventin comes down to three things: switch the LearnDash add-on on under Eventin → Extensions, choose once whether the buyer or every attendee gets enrolled, then link each ticket to a course on the event’s Advanced tab. After that every sale enrols the right people on its own, and every refund tidies up after itself — without ever removing course access that somebody else has already paid for.


