How to Manage Workshops and Seminars in WordPress (Step-by-Step Guide)
Table of Contents
Managing workshops and seminars sounds simple until you start handling registrations, payments, attendee lists, and reminders manually. That’s when things become time-consuming and hard to manage.
The better approach is to use a WordPress event booking plugin that lets you manage your entire workshop booking system, handle seminar registration, and control attendee bookings without any manual work.
In this guide, we will discuss how to manage workshops and seminars in WordPress using Eventin, so you can run your events smoothly without switching tools.
Let’s get started.
Quick Overview
Managing workshops and seminars manually can slow you down and create confusion. A workshop booking system or seminar registration plugin helps you manage registrations, tickets, and attendees from one place.
With a WordPress event booking plugin like Eventin, you can handle bookings, payments, and attendee tracking without using multiple tools.
- Common challenges in workshop and seminar management
- How Eventin simplifies event booking and registration
- How to set up workshop and seminar booking in WordPress
- Managing tickets, payments, and attendees easily

What are the most common challenges in traditional workshop management
Planning a workshop or seminar sounds exciting until you hit the small details. Here are some most common challenges people face when running events the old-fashioned way:
- Manual registration and attendance tracking: Many organizers struggle with manual workshop registration due to no proper seminar booking system. It’s easy to lose track of who signed up, who paid, and who actually showed up, especially when everything is handled through spreadsheets or email threads.
- Handling multiple sessions or speakers: If your event features several sessions or guest speakers, it’s challenging to manage who’s speaking when and where, especially without a proper scheduling tool.
- Sending reminders and follow-ups: It’s hard to keep everyone informed without a system that automatically sends reminders or follows up after the event.
- No centralized agenda or event landing page: Attendees need a clear overview of what’s happening and when. Without a dedicated page, things can feel scattered.
- Lack of payment/integration support for paid seminars: If you’re charging for your workshop, collecting payments manually or through third-party apps can be a hassle.
- Managing limited seats or capacity: If your space has a seat limit, it’s challenging to prevent overbooking unless you have a booking system that tracks availability in real-time.
How Eventin solves these problems
Eventin is an event management plugin for WordPress, which is equally good as a complete workshop management solution to manage event bookings directly on your WordPress site. Whether you’re running a workshop or seminar, it provides all the necessary features to stay organized, save time, and keep things on track, all in one place.
Here’s how Eventin helps:
- Easy event creation with speaker/session support: You can create your whole event from the WordPress dashboard. Set the date, time, location, and add all the key details. If you’re running a seminar with multiple speakers or sessions, simply list each one by its corresponding time slot.
- One dashboard to manage all: Eventin keeps things simple with one central dashboard. From there, you can check who’s registered, update session info, see speaker profiles, and even view your ticket sales—all in one place.
- Built-in booking system with seat limits: If your event has limited seats, just set a cap. Eventin will handle the rest. It tracks the number of spots remaining and closes registration when it’s full, eliminating the need for manual work on your part.
- Email automation for reminders and follow-ups: Eventin includes email automation that lets you schedule reminders before the event, updates about session changes, and thank-you messages after it’s over. You can customize the emails to match your tone and event branding.
- Zoom and calendar sync for online sessions: If your workshop is online, you can connect your Zoom account to generate meeting links automatically. Eventin also syncs with Google Calendar or Outlook so that attendees can add sessions to their schedule with a single click.
- QR code check-in for offline events: For physical seminars or training sessions, Eventin generates QR codes with each ticket. You can scan these codes at the entrance for quick check-ins, which helps you maintain accurate attendance records without the need for clipboards or printed lists.
🎉 Power Up Your Workshop & Seminar Booking with Eventin
Eventin is a complete WordPress event booking plugin that helps you manage workshop booking, seminar registration, ticket sales, and attendee management from one place. You can create events, accept bookings, sell tickets, send confirmation emails, and track attendees with QR check-ins—without using multiple tools.
🔗 Try Eventin NowHow to set up workshop and seminar booking in WordPress with Eventin
Let’s see how Eventinmakes it easy to manage everything from one place and get your workshop and seminar page ready without any hassle.
Install and activate the Eventin Plugin
Start by installing the Eventin plugin from your WordPress dashboard.
- From your WordPress dashboard, go to Plugins > Add New
- Search for “Eventin”
- Click Install and then Activate
- Once activated, you’ll see the Eventin menu in your WordPress sidebar
If you’re using Eventin Pro, upload the premium version and activate your license key.
Create your workshop or seminar event
Once Eventin is installed and activated, it’s time to create your workshop or seminar and enable online workshop registration so users can easily book their seats.
Head to your WordPress dashboard. Go to Eventin > Add New Event and fill out the basic event details:
- Event Title: Add the workshop name. Example: “Photography Basics Workshop.”
- Start & End Date: Select when your workshop starts and ends. For a one-day event, both dates can be the same.
- Start and End Time: Set the exact time for your sessions.
- Add Event Recurring (optional): For repeating sessions (e.g., weekly seminars), enable Recurring Mode and set the pattern.
- Event Type: Choose Offline Event (in-person) or Online Event (like Zoom sessions).
- Venue Location: Enter the venue address or link for virtual events.
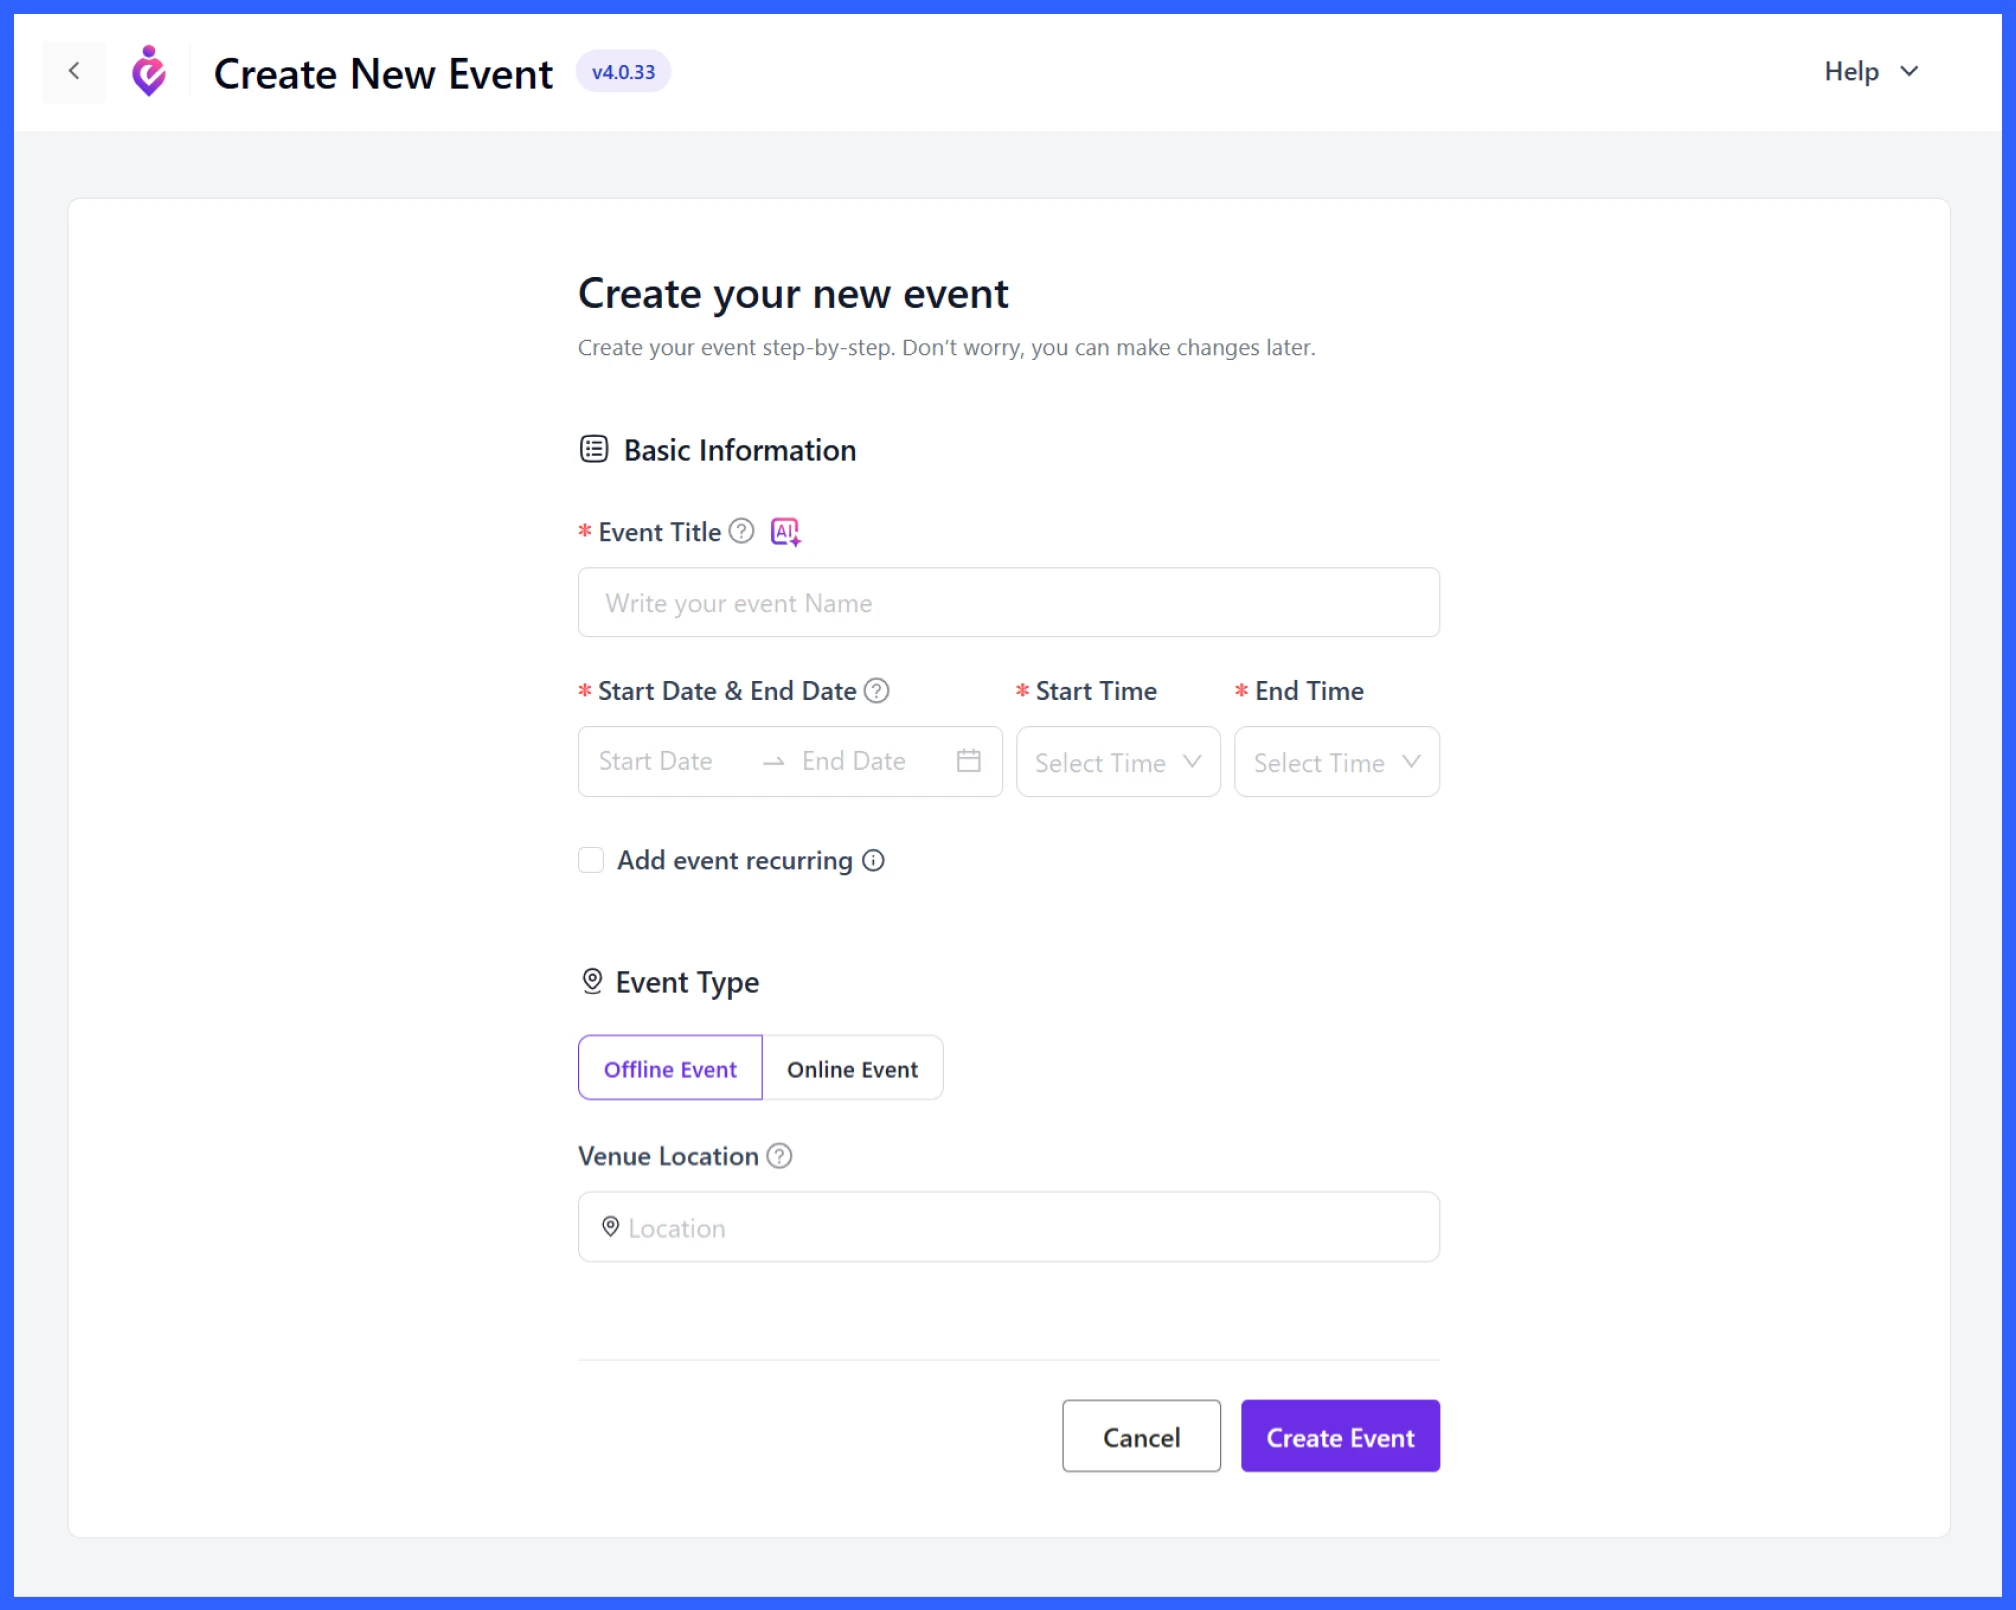
When done, click “Create Event” to save your details. You can also add a short or detailed description later to give attendees more context, or use Eventin AI feature to create engaging event content.
💡Further read: How to Create Recurring Events in WordPress
Set up tickets and pricing
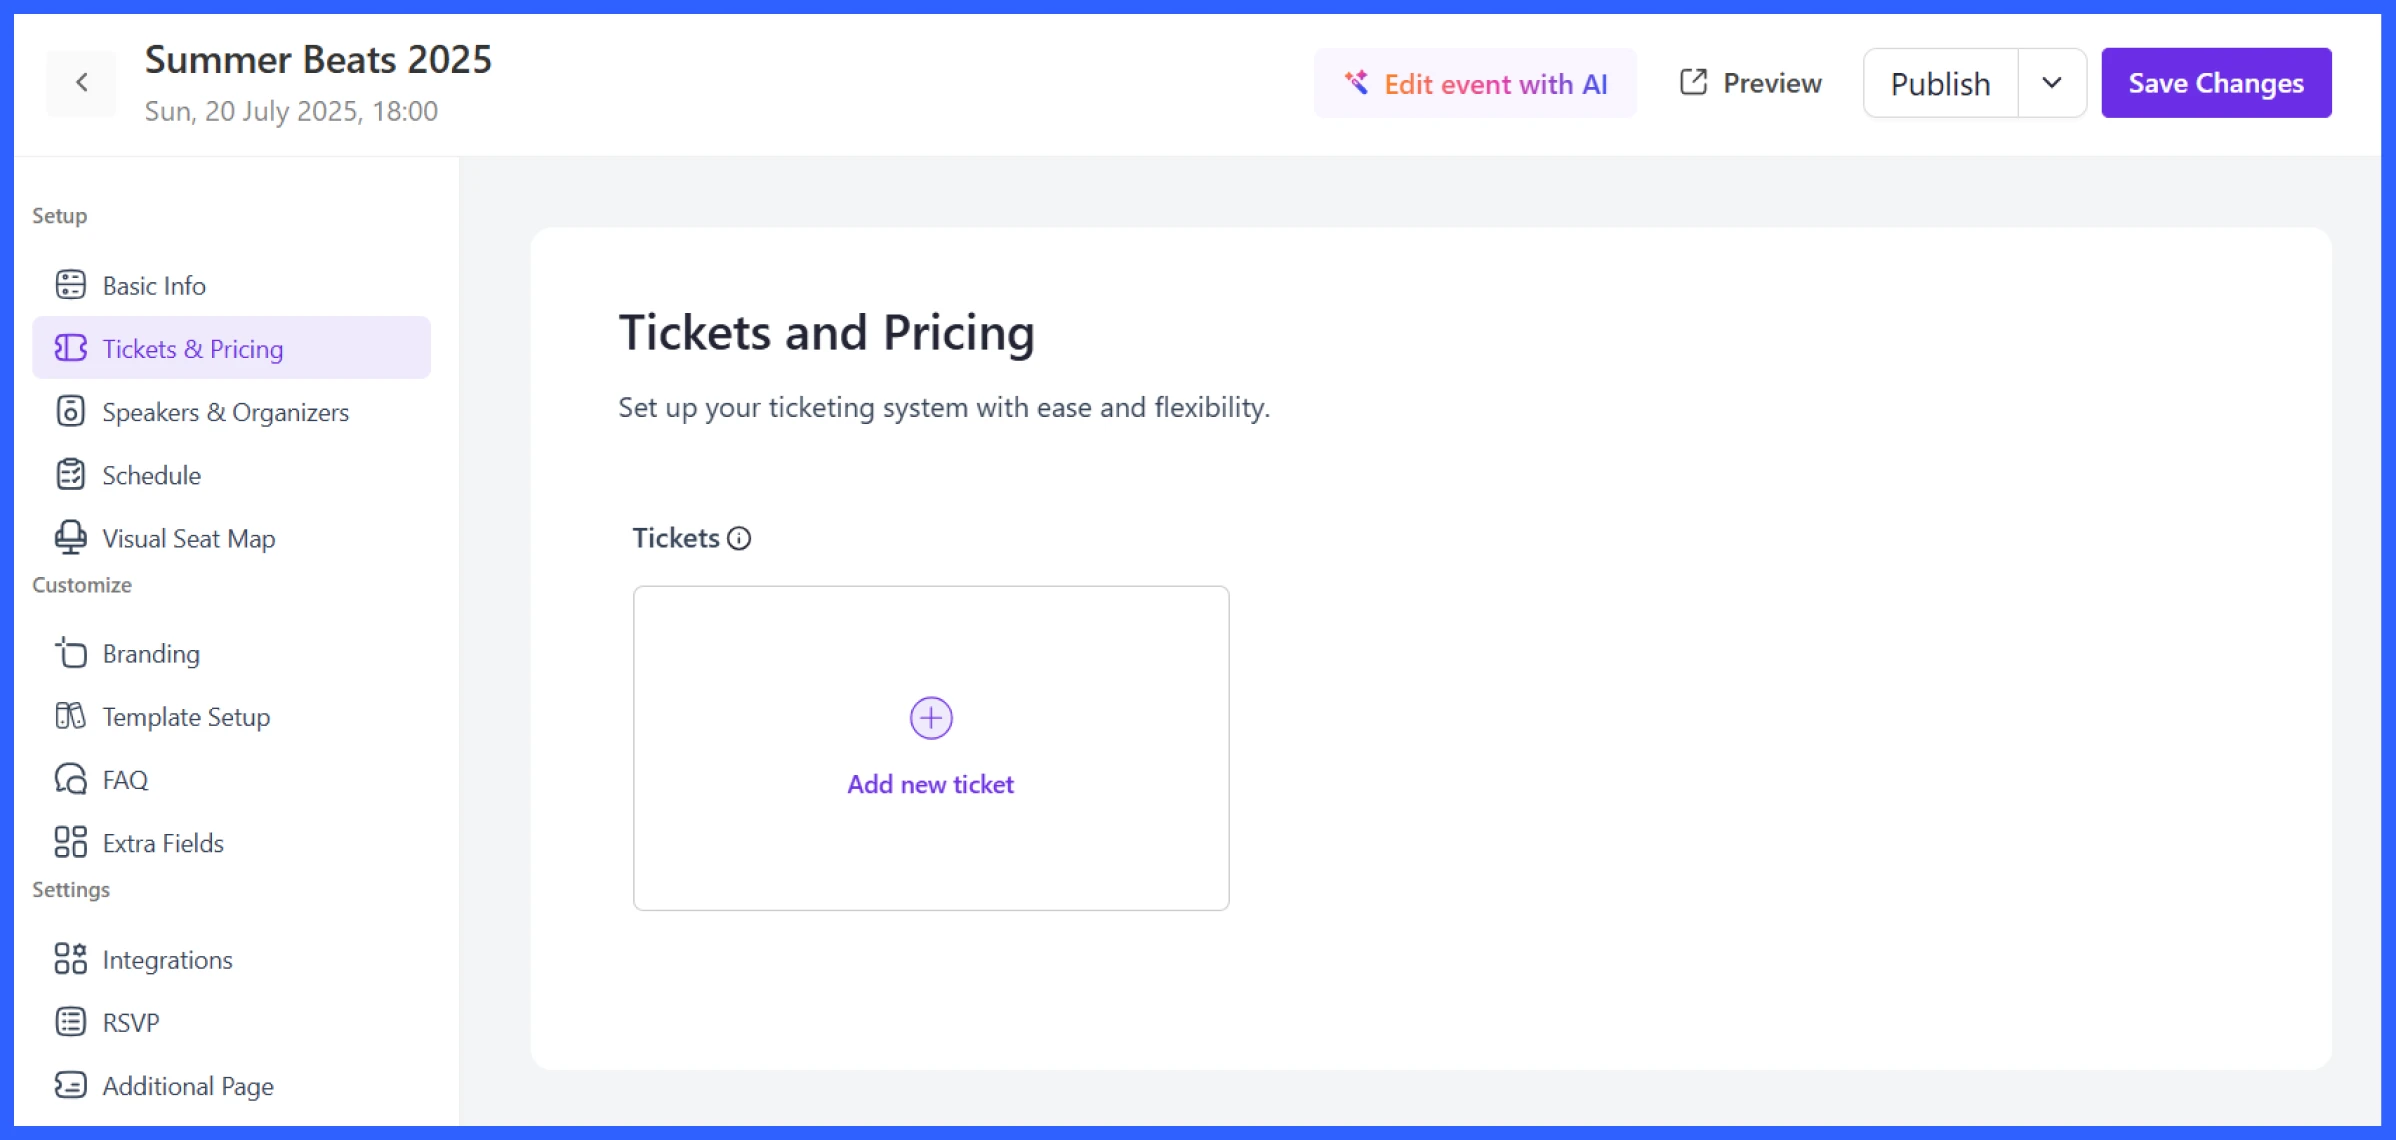
After your event is created, scroll to the Tickets & Pricing section and set up different ticket types for workshop ticket booking or seminar ticket booking based on your audience.
Here’s where you set up ticket types for registration:
Click “Add New Ticket”, and a pop-up will appear where you can add:
- Ticket Name: For example, Standard Pass, Team Bundle, Student Access
- No. of Tickets: Set a seat limit to control workshop capacity
- Ticket Price: Enter a fixed price or leave it as 0 for free events
- Start/End Date and Time: Define when ticket sales begin and end
- Min/Max Quantity: Limit how many tickets a person can book (valid for group registrations)
- Ticket Description: Mention what’s included, like “Includes digital workbook and session recordings.“
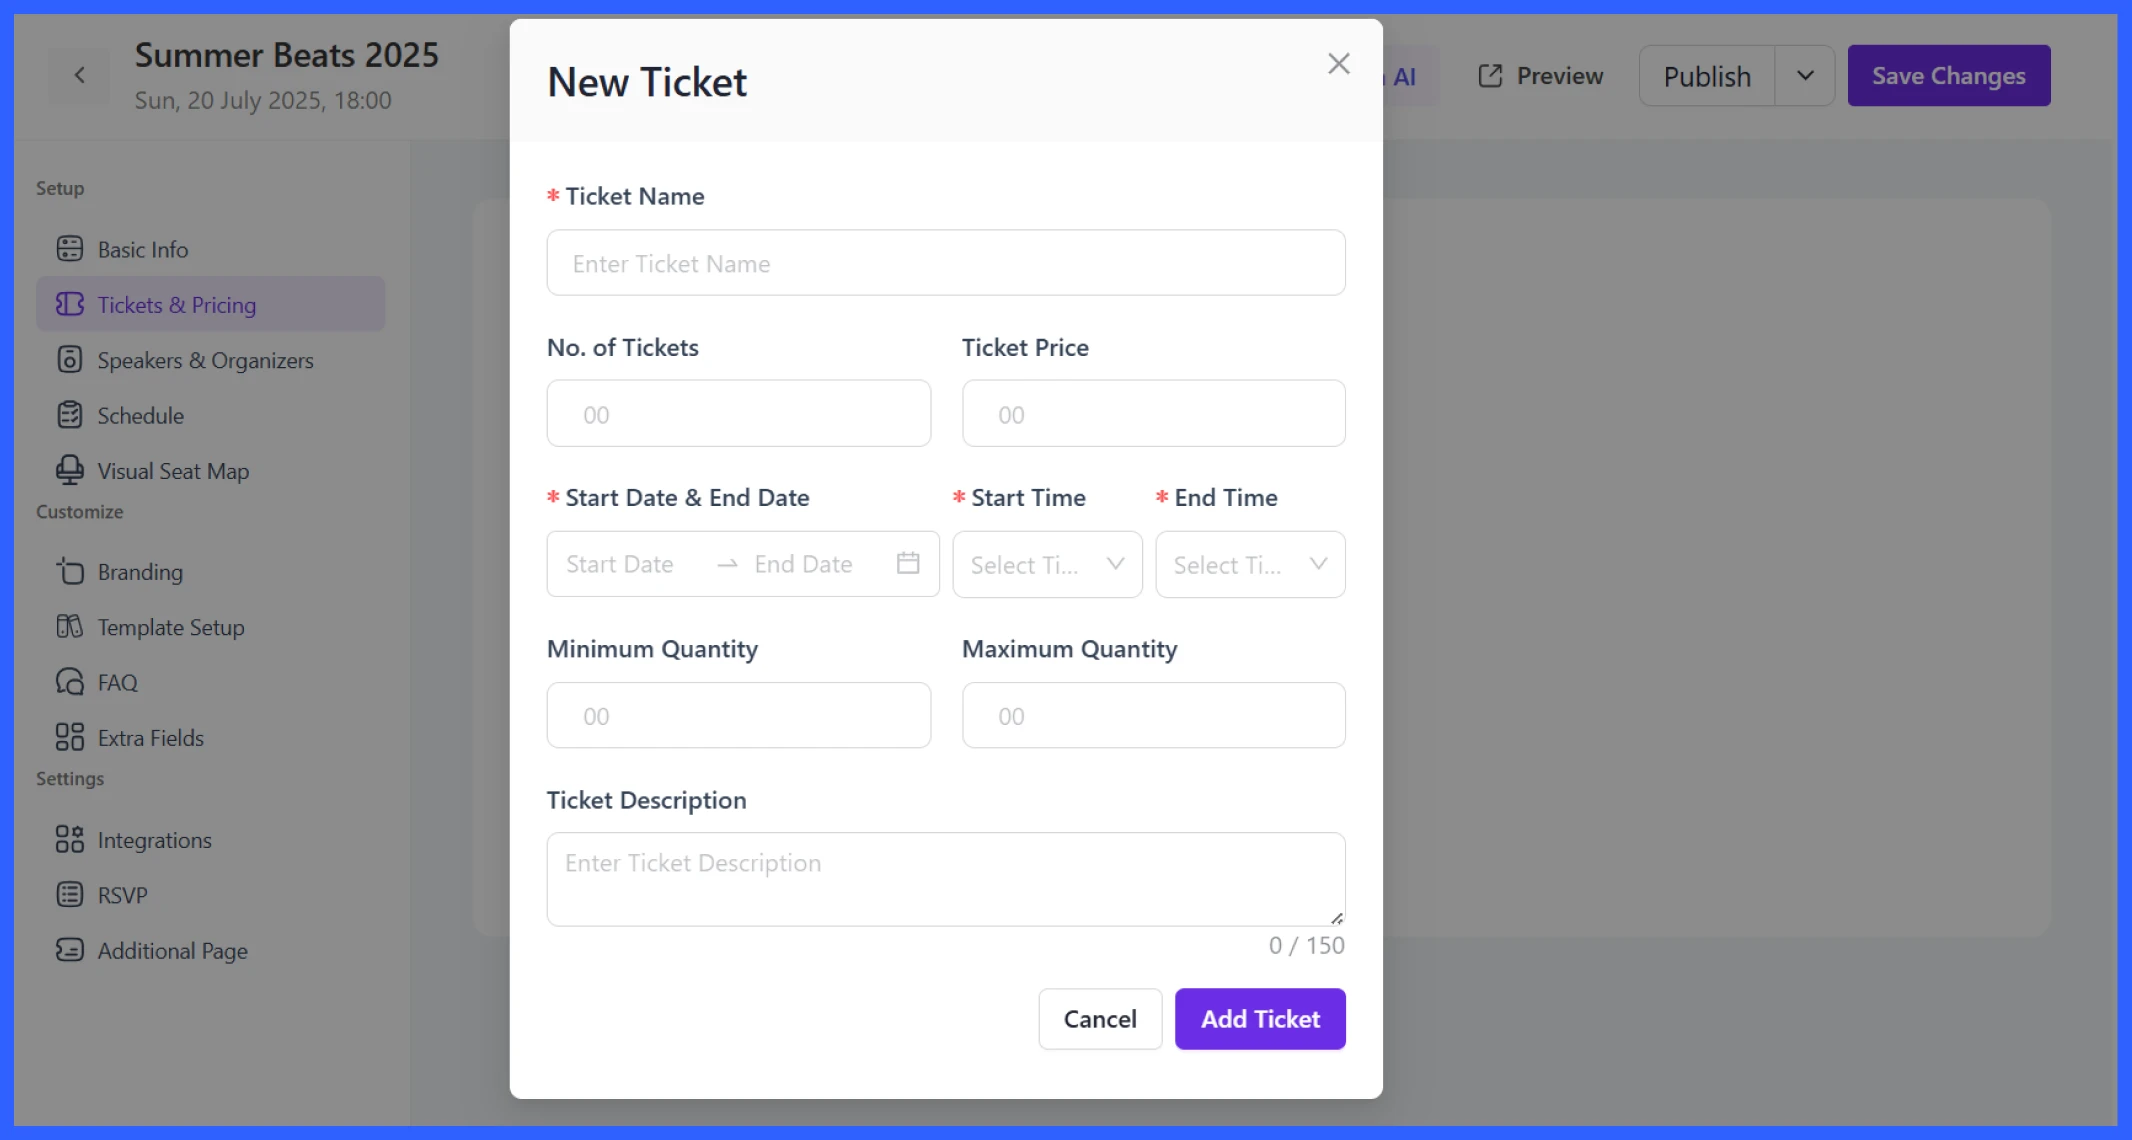
Once set, click Add Ticket. You can create multiple ticket tiers depending on your event type or audience.
This is where Eventin works well as a WordPress event booking plugin. You can create different booking options for different attendee types, control seat limits, and keep your workshop or seminar registration process organized from the start.
💡Further read:How to Sell Event Tickets in WordPress for Free
Add Speakers and Sessions
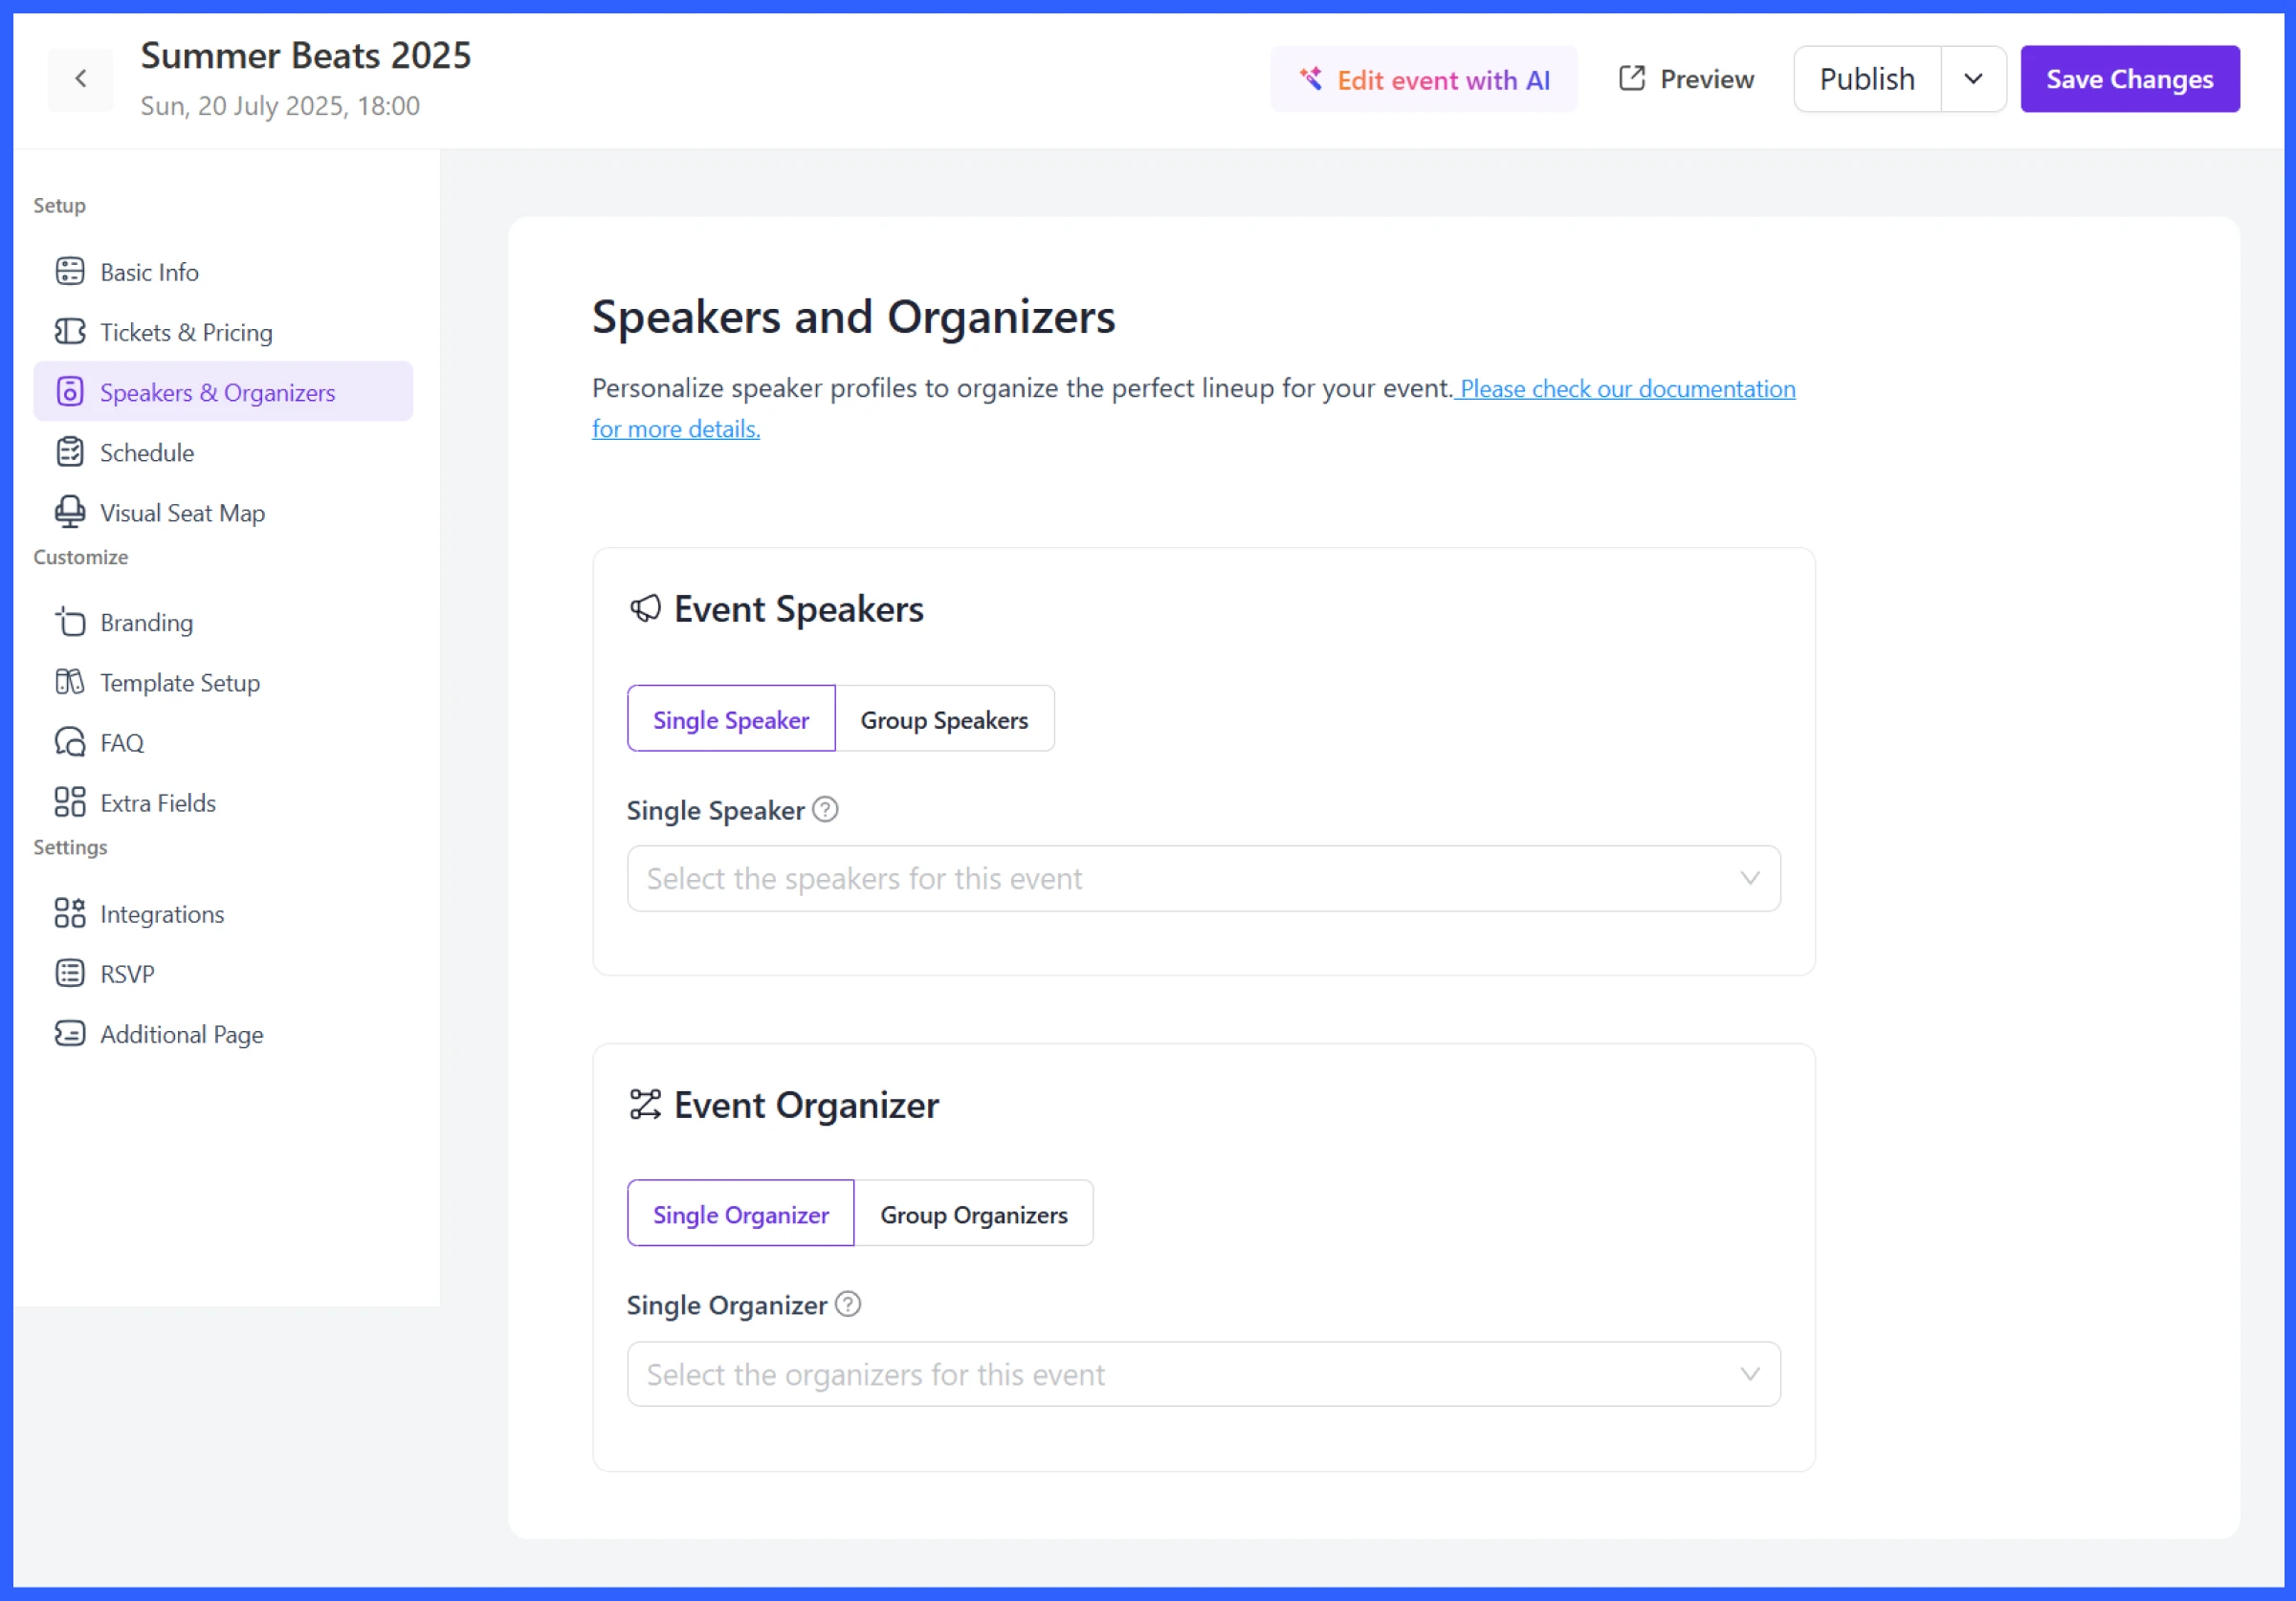
In workshops, speakers or instructors are a key part of the value. Simply, go to Eventin > Speakers,
- Click Add Speaker and upload their name, title, profile image, and short bio
- You can also list their company or area of expertise
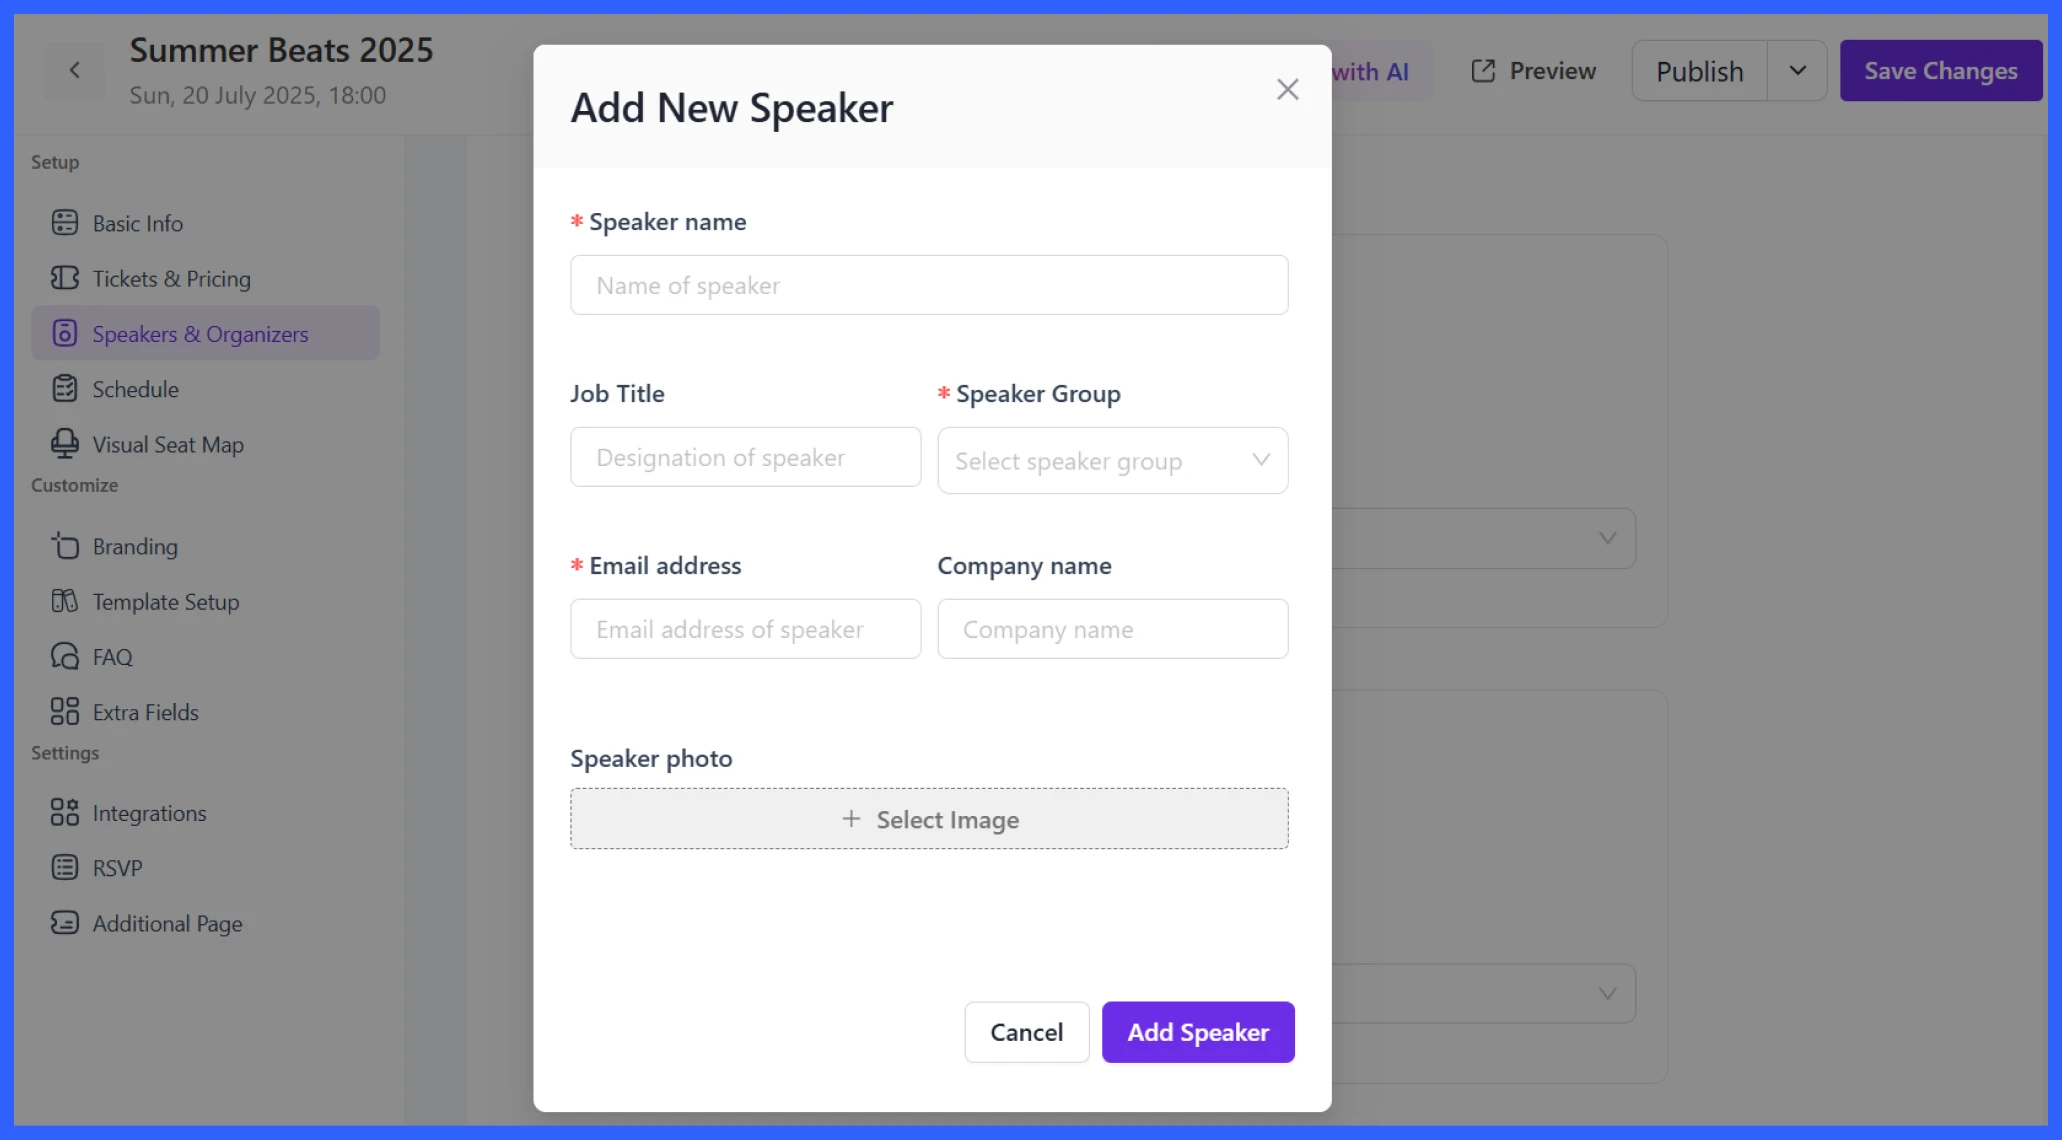
Eventin supports both Single Speakers and Speaker Groups. If you are running panels or collaborative sessions. Similarly, you can add Organizers to show who’s behind the event.

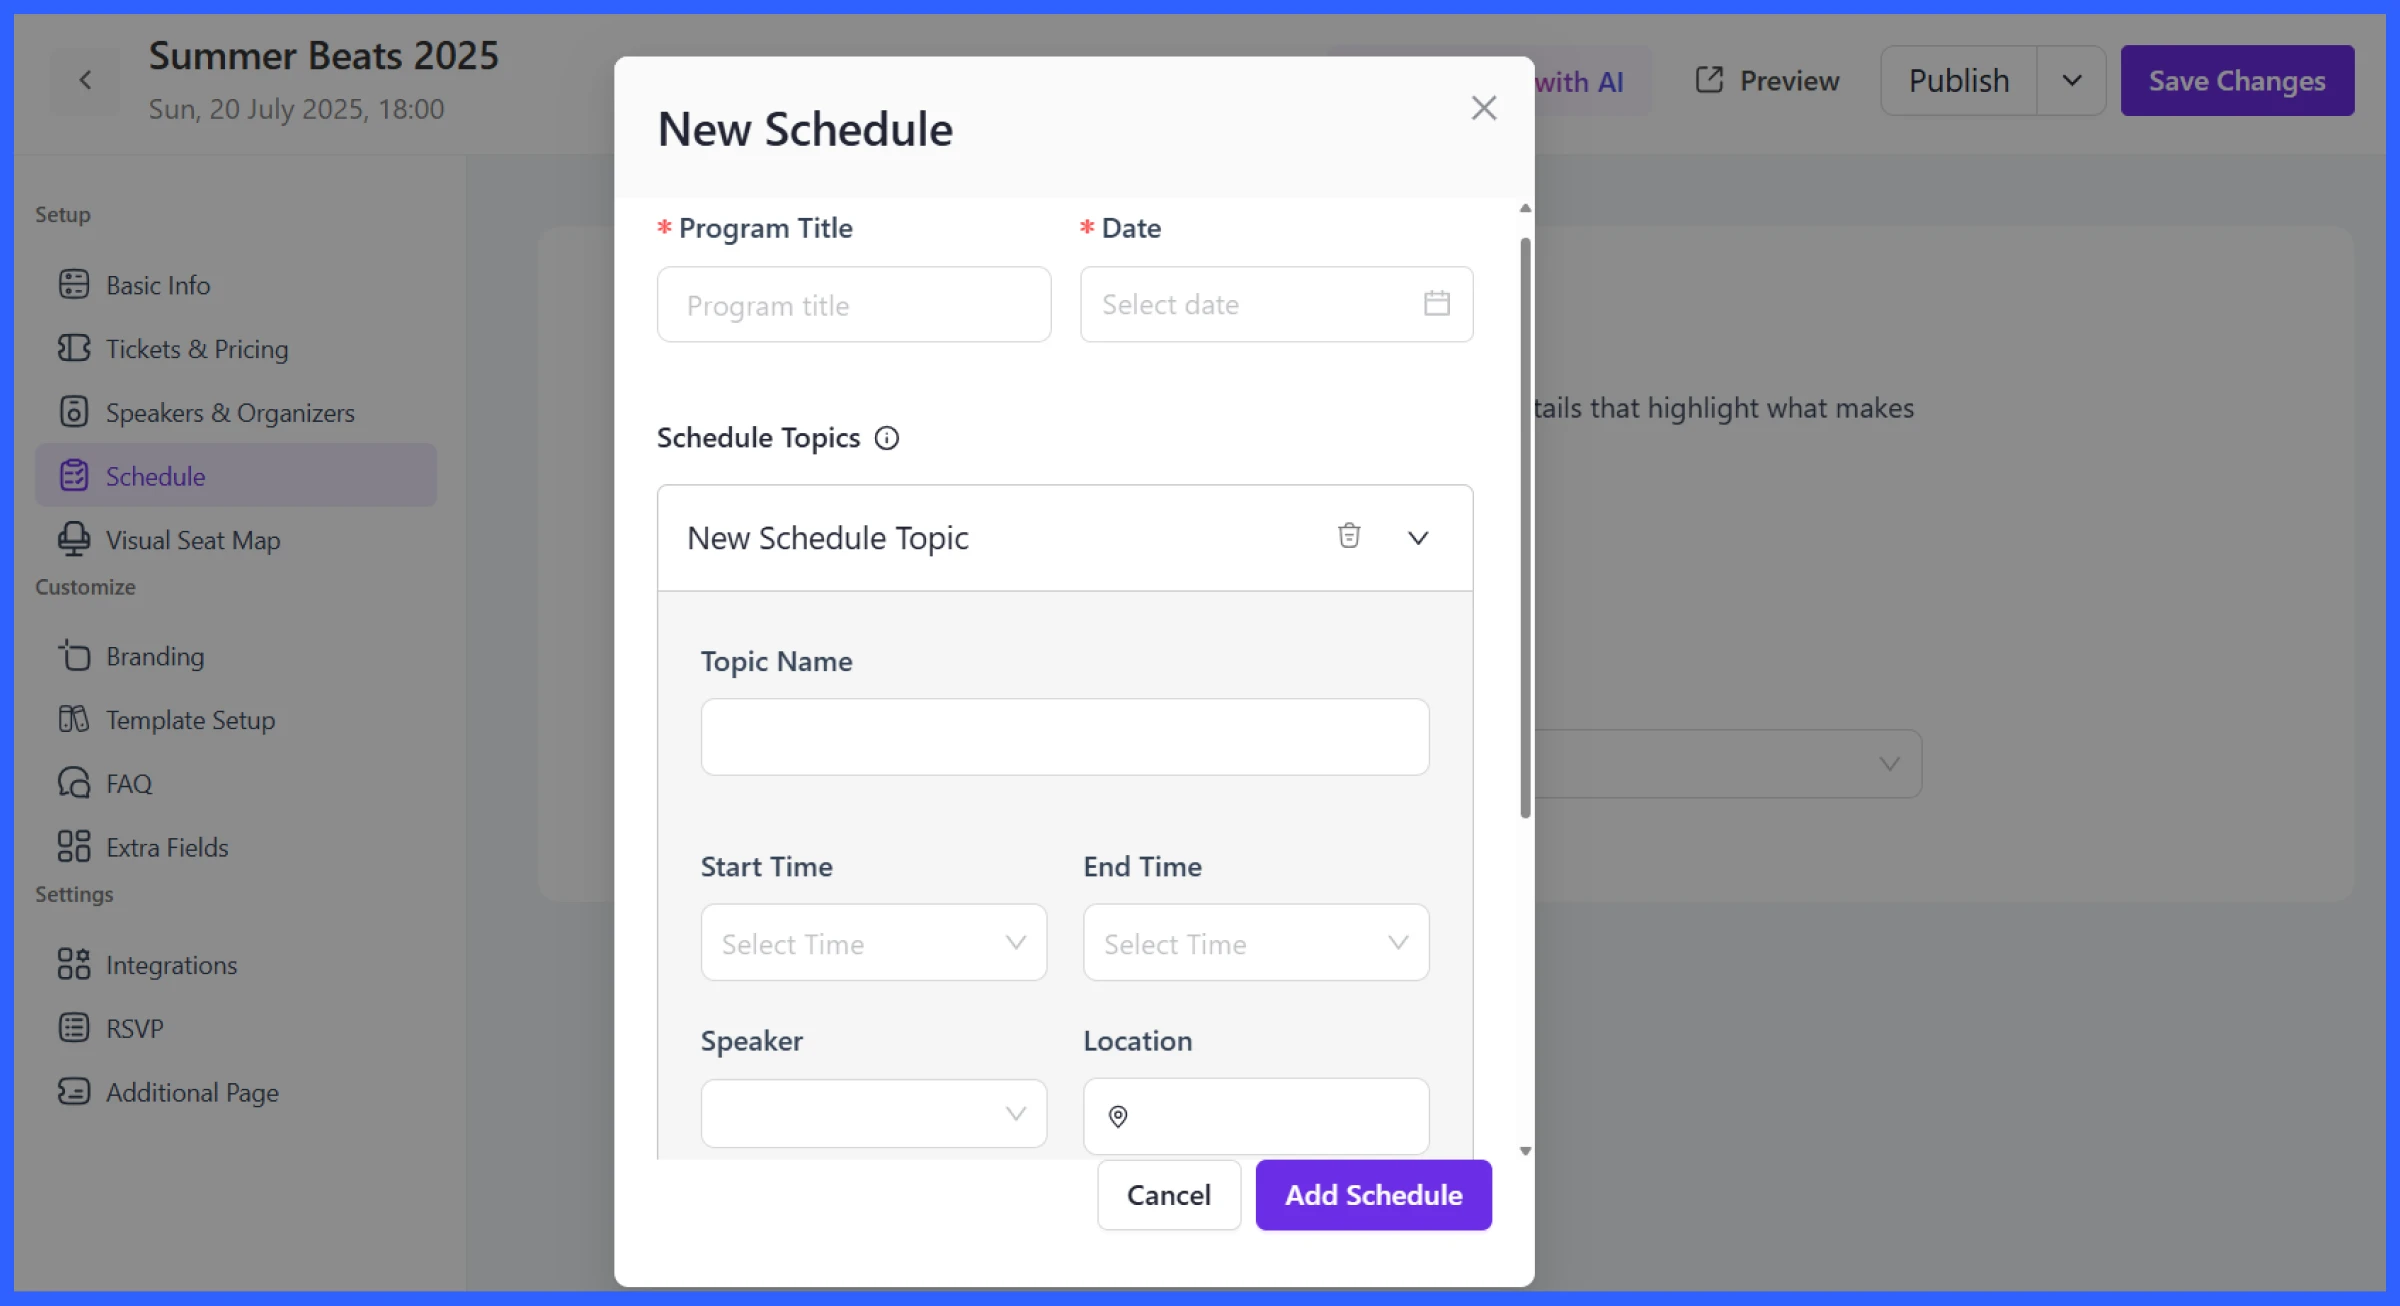
Build the Workshop Agenda
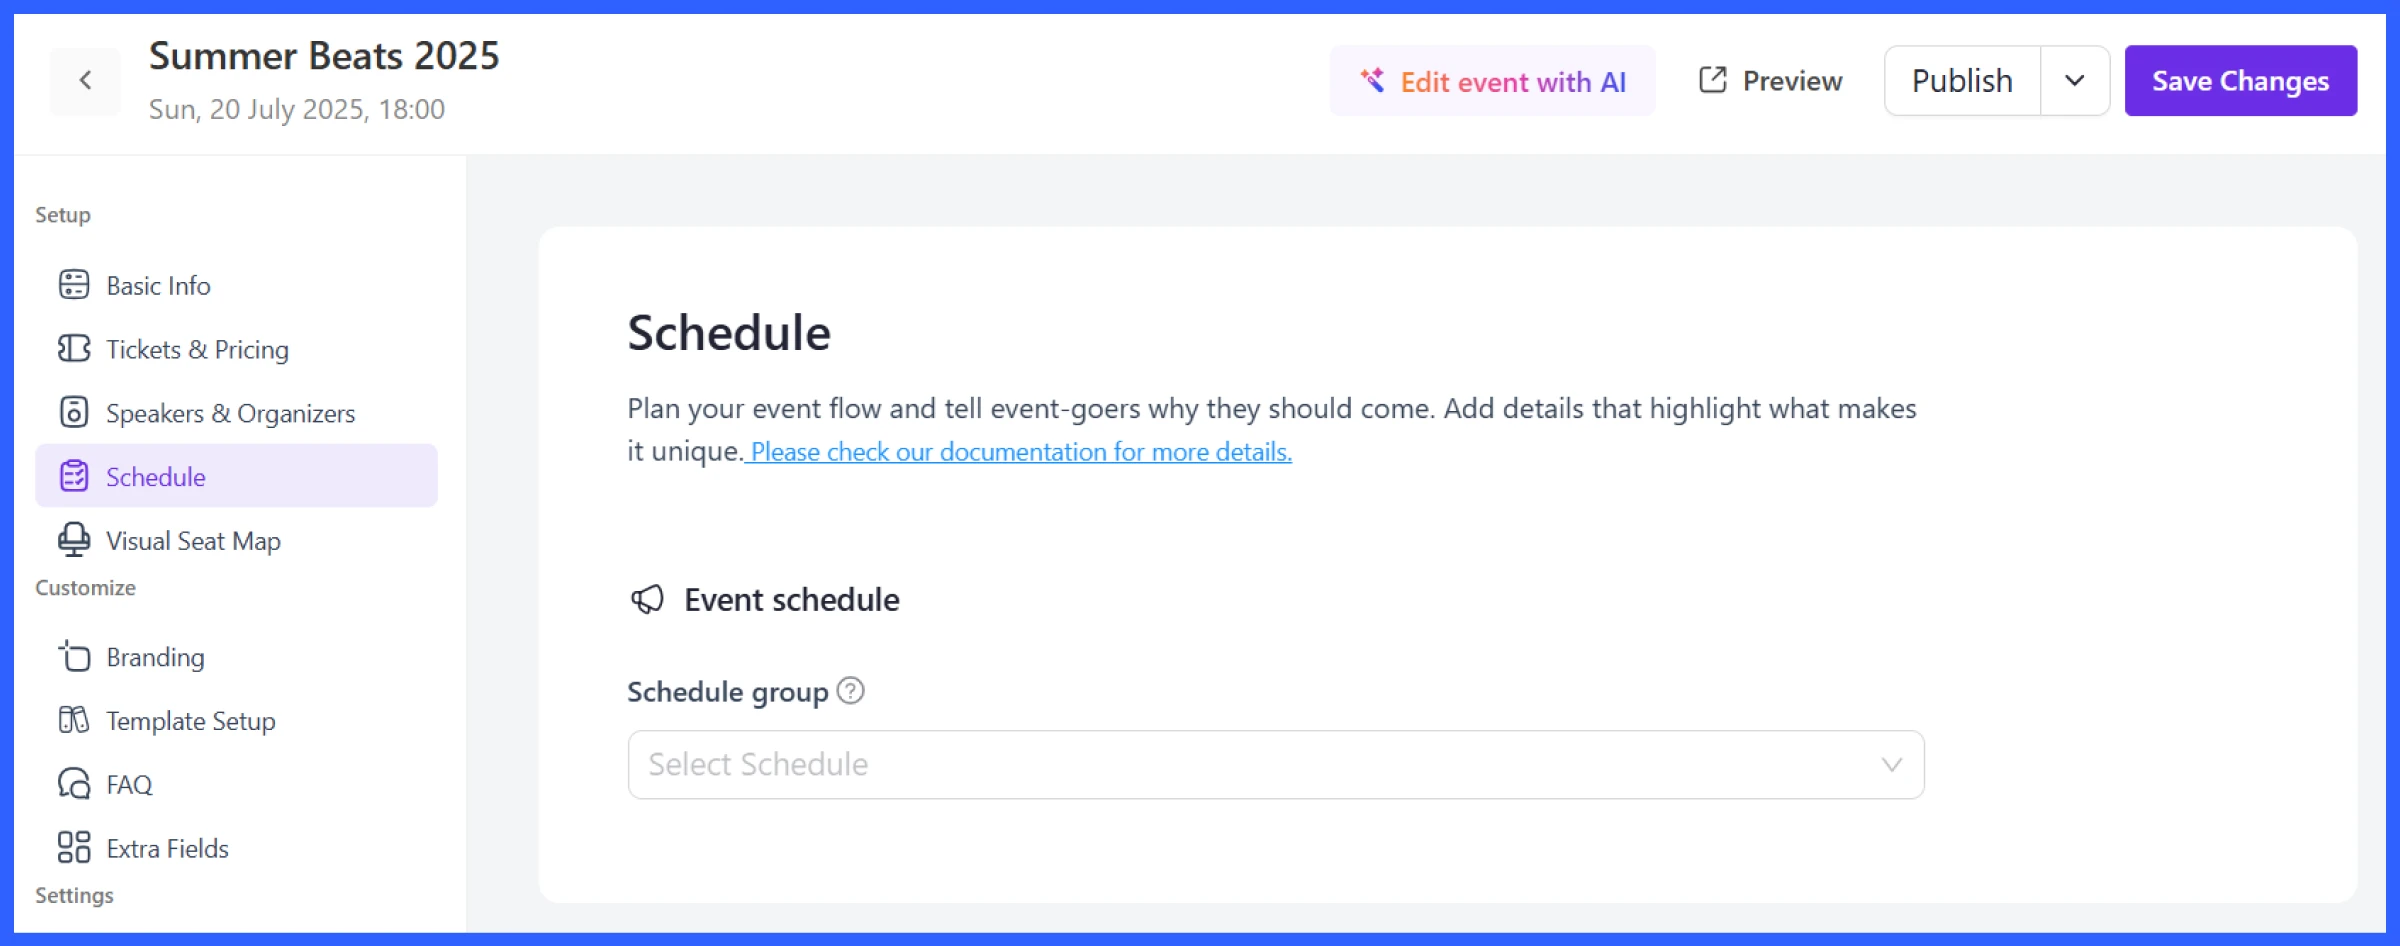
Now it’s time to break your event into sessions. Go to the Schedule tab inside your event and click Add Schedule.
Here’s what you can configure:
- Program Title: Like “Day 1: Marketing Basics” or “Panel Discussion: Building Brand Awareness”
- Date: Choose the day for that session block
- Schedule Topics:
- Topic Name: e.g., “Email Marketing 101”, “Q&A with Guest Speaker.”
- Start/End Time: Control how long each session runs
- Speaker: Assign from your speaker list
- Location: Useful for multi-room events or hybrid formats
Once saved, this will appear as a visual timeline on your event landing page.
💡Further read: How to Create Seamless Event Registration with Eventin
Add branding
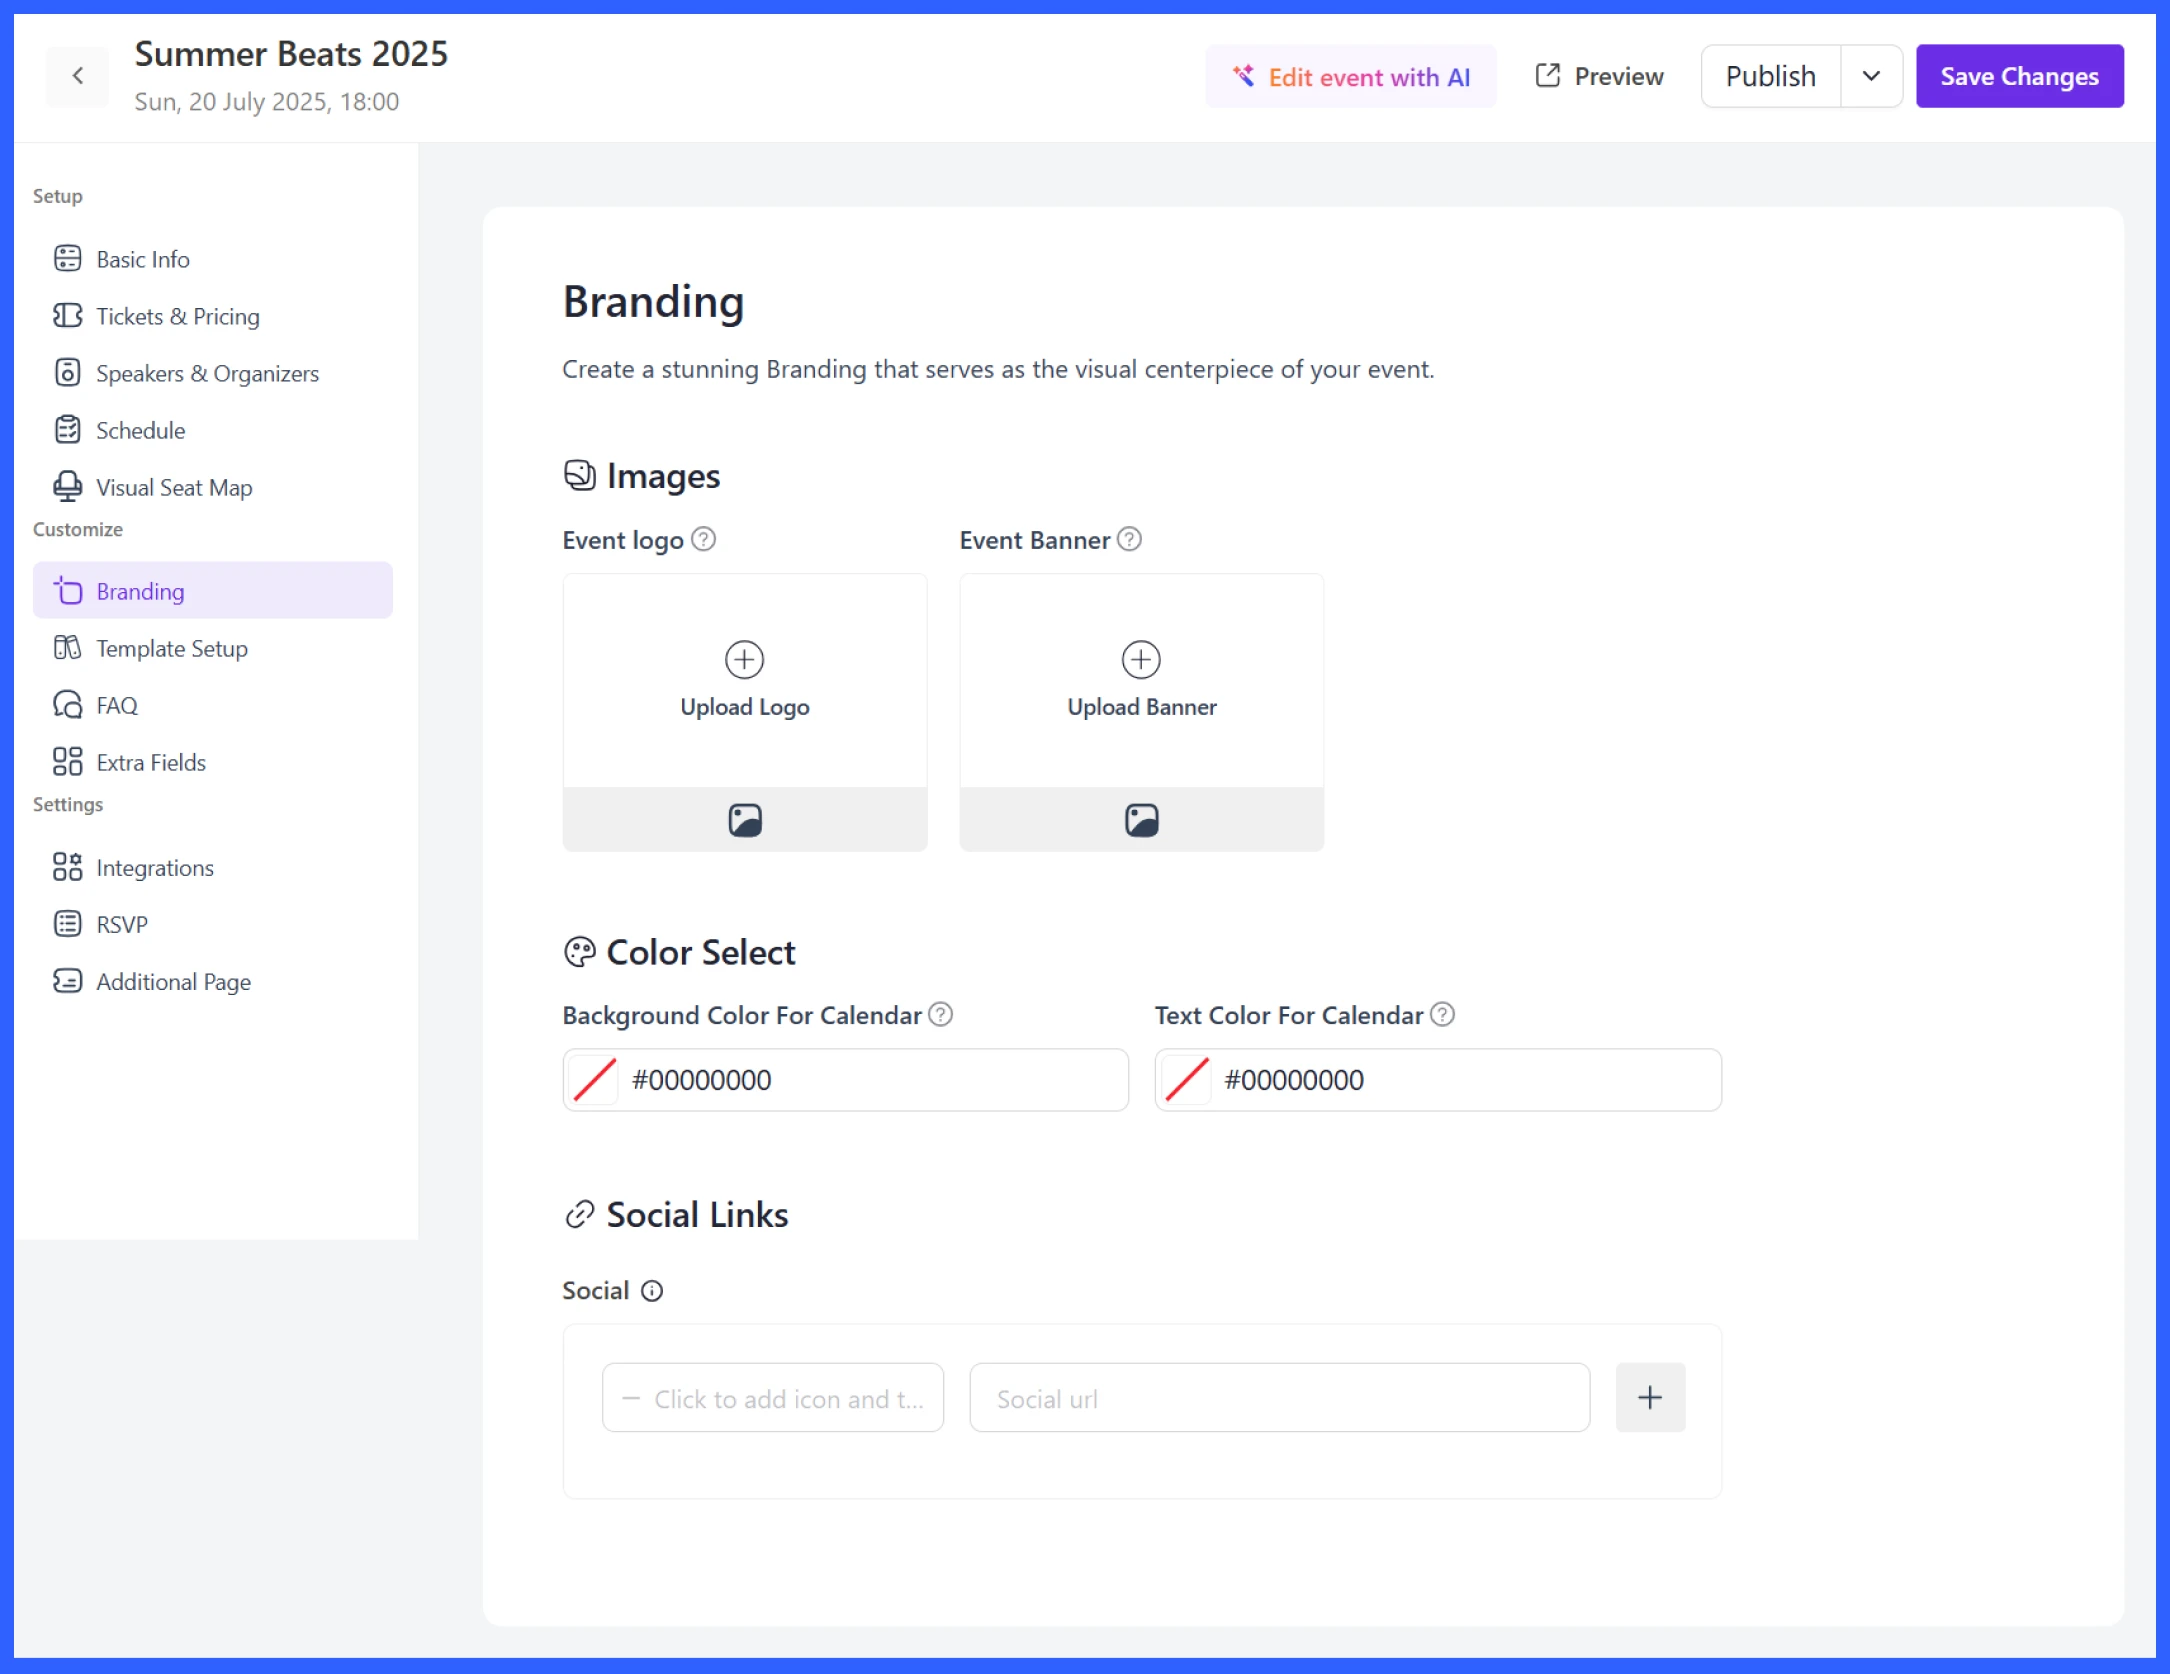
Keep your workshop consistent with your brand:
- Upload your event logo, banner image, and choose your brand colors
- Add social media links so attendees can follow or share the event
- This creates a more polished and recognizable experience on your event page
Customize the workshop landing page
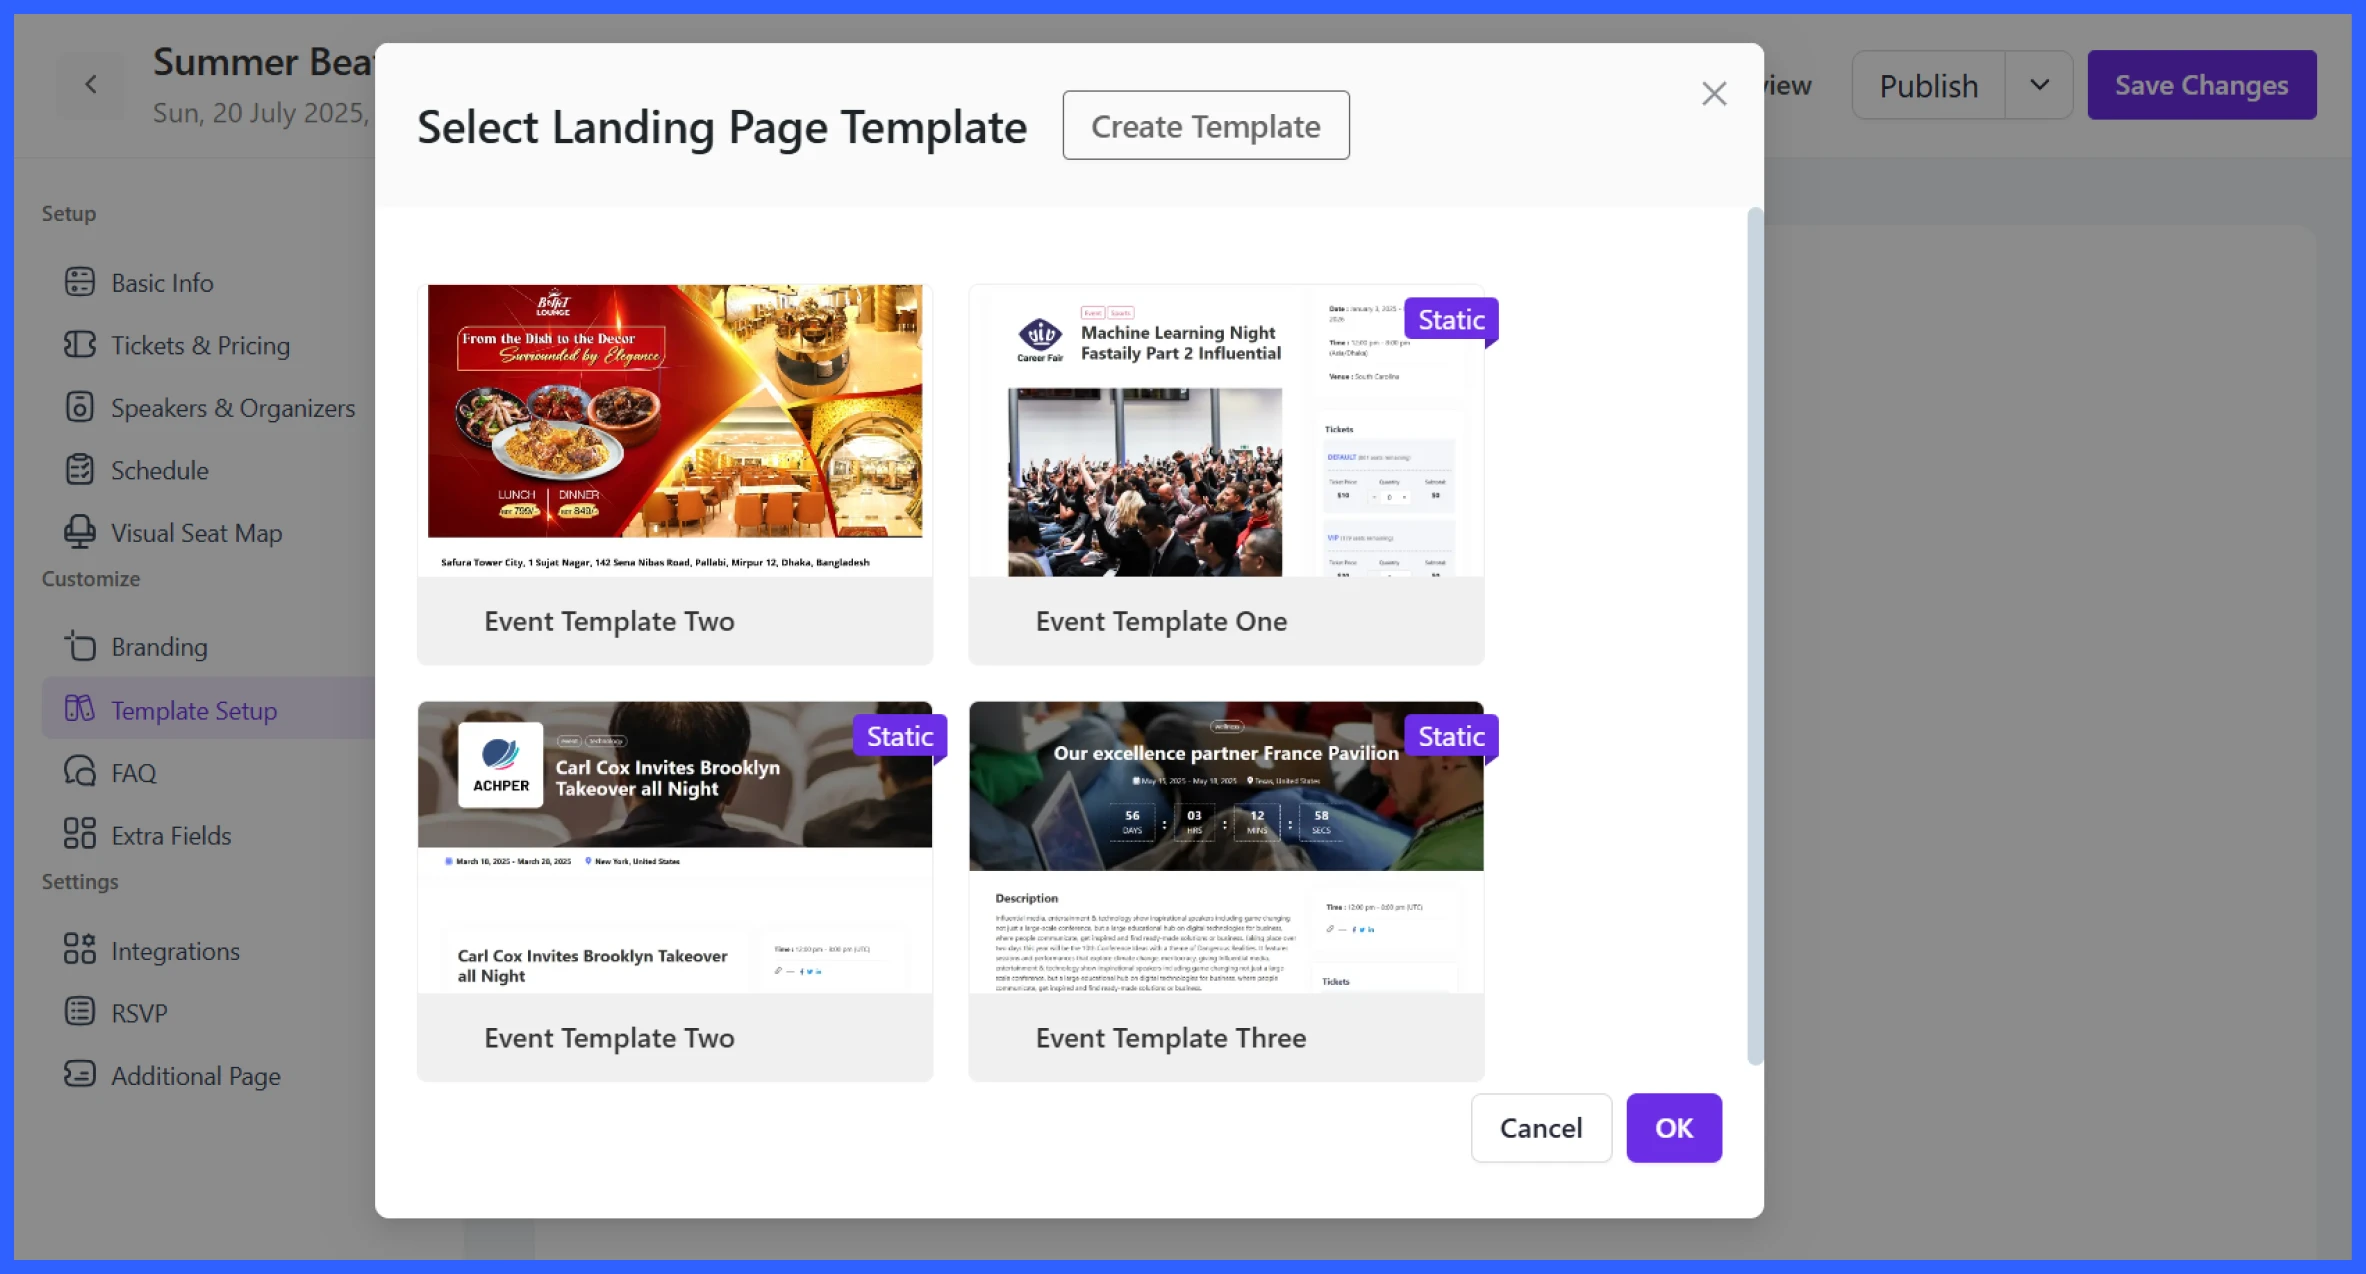
Your event landing page is where potential attendees learn everything about your workshop. Go to the Template Setup tab and choose from multiple pre-built layouts.\
Each template displays key details like:
- Event name, date, time, and location
- Speaker profiles with bios and images
- Ticket types and prices with registration buttons
- Add-to-calendar and sharing options
- Workshop agenda (sessions and times)
- Optional teaser video or media section
- Organizer details and related events
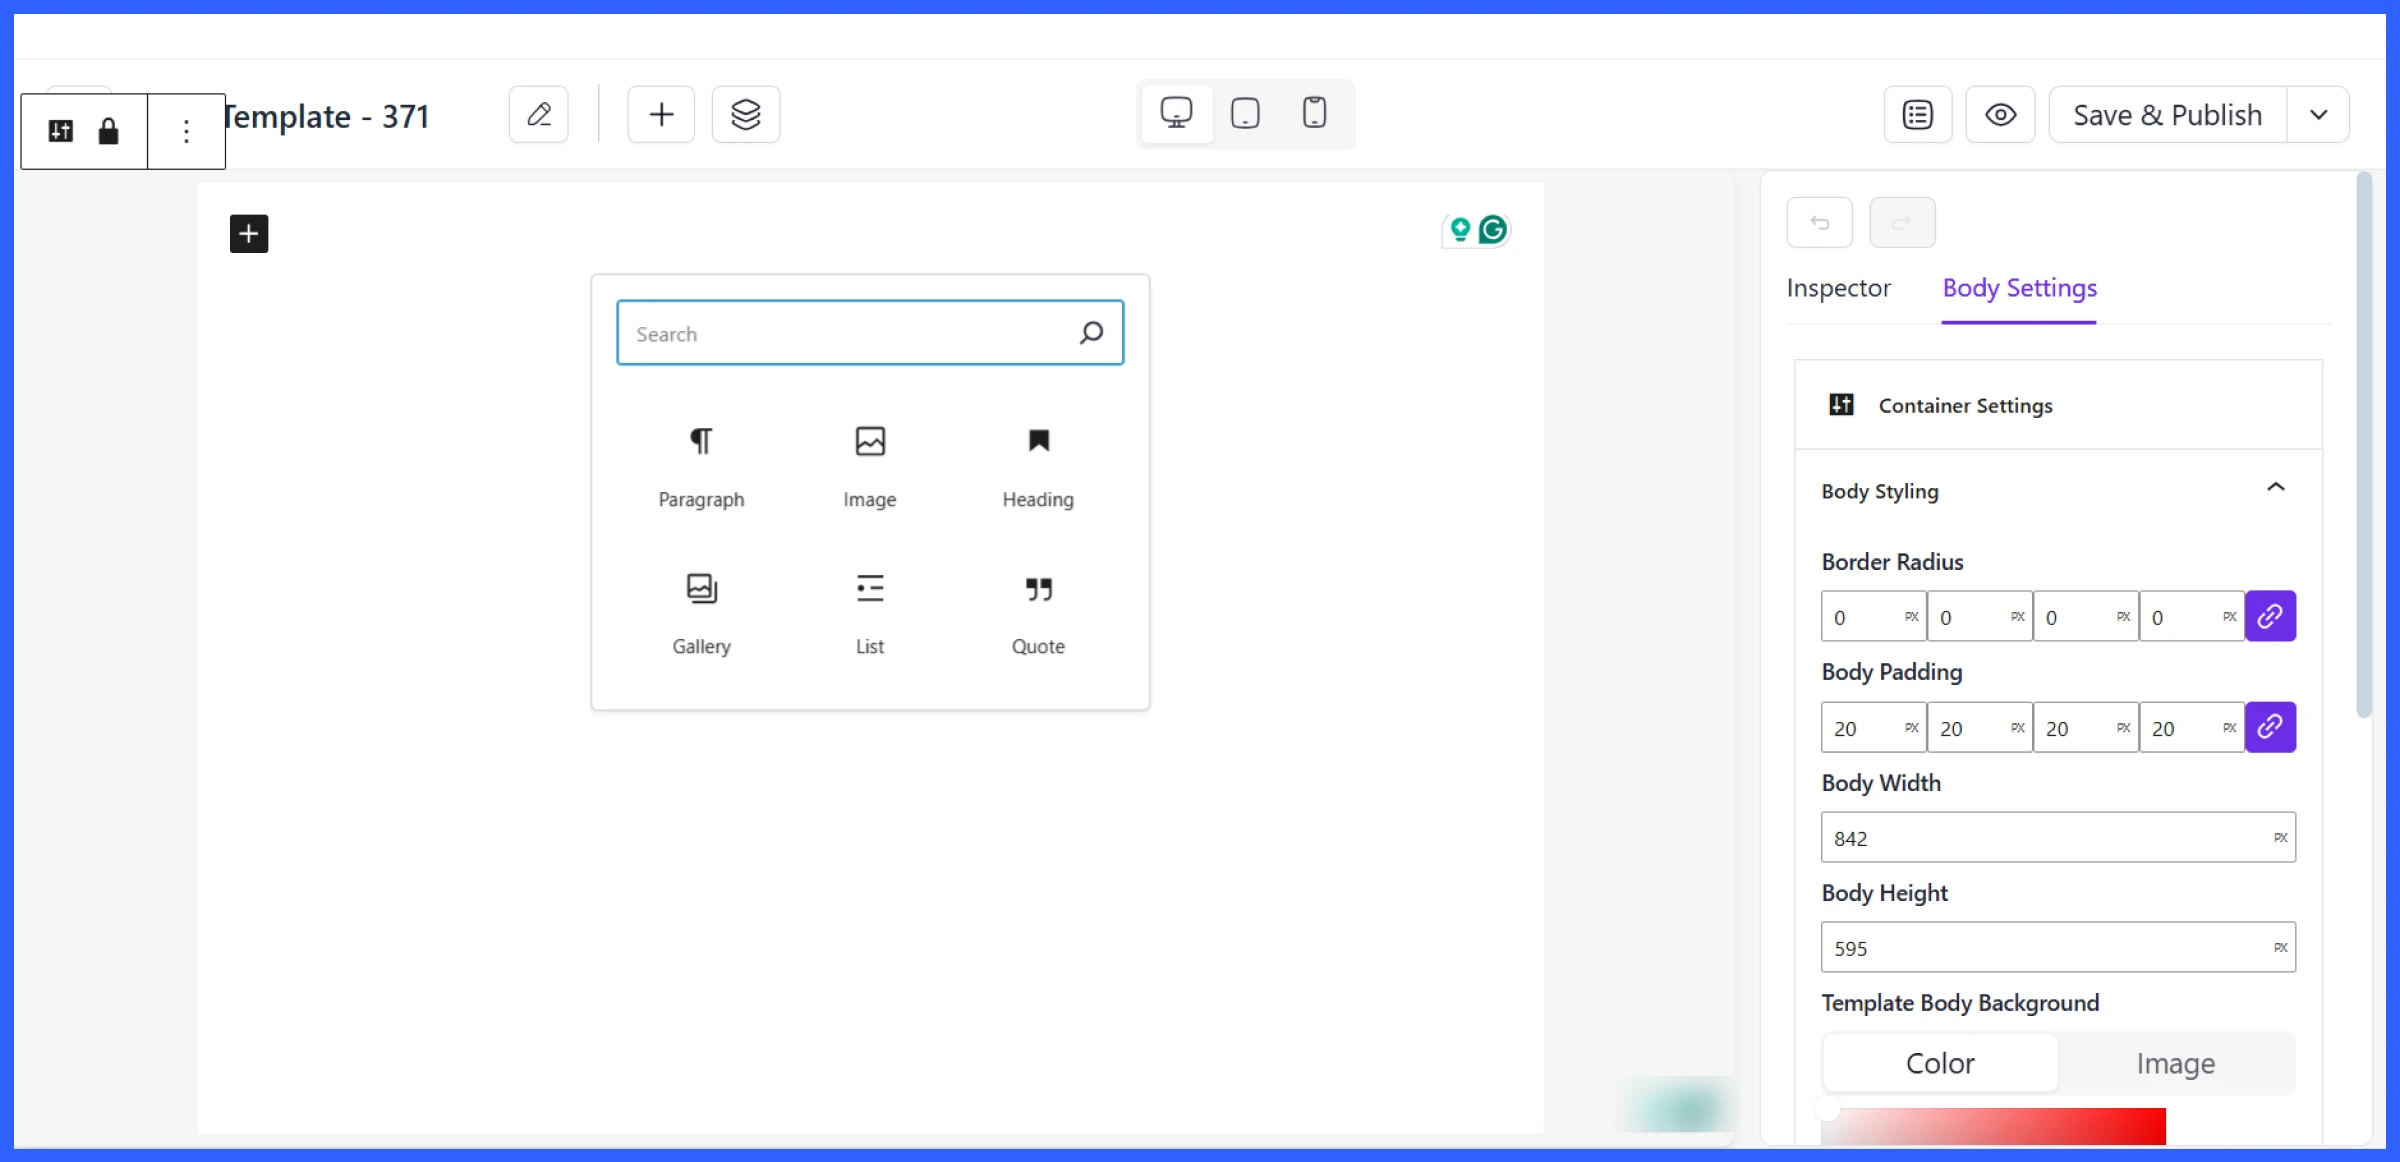
If you want complete control, use the Template Builder to drag and drop sections, tweak layouts, and apply your own styling. Once you’re done, just hit Save & Publish.
Enable email notifications and reminders
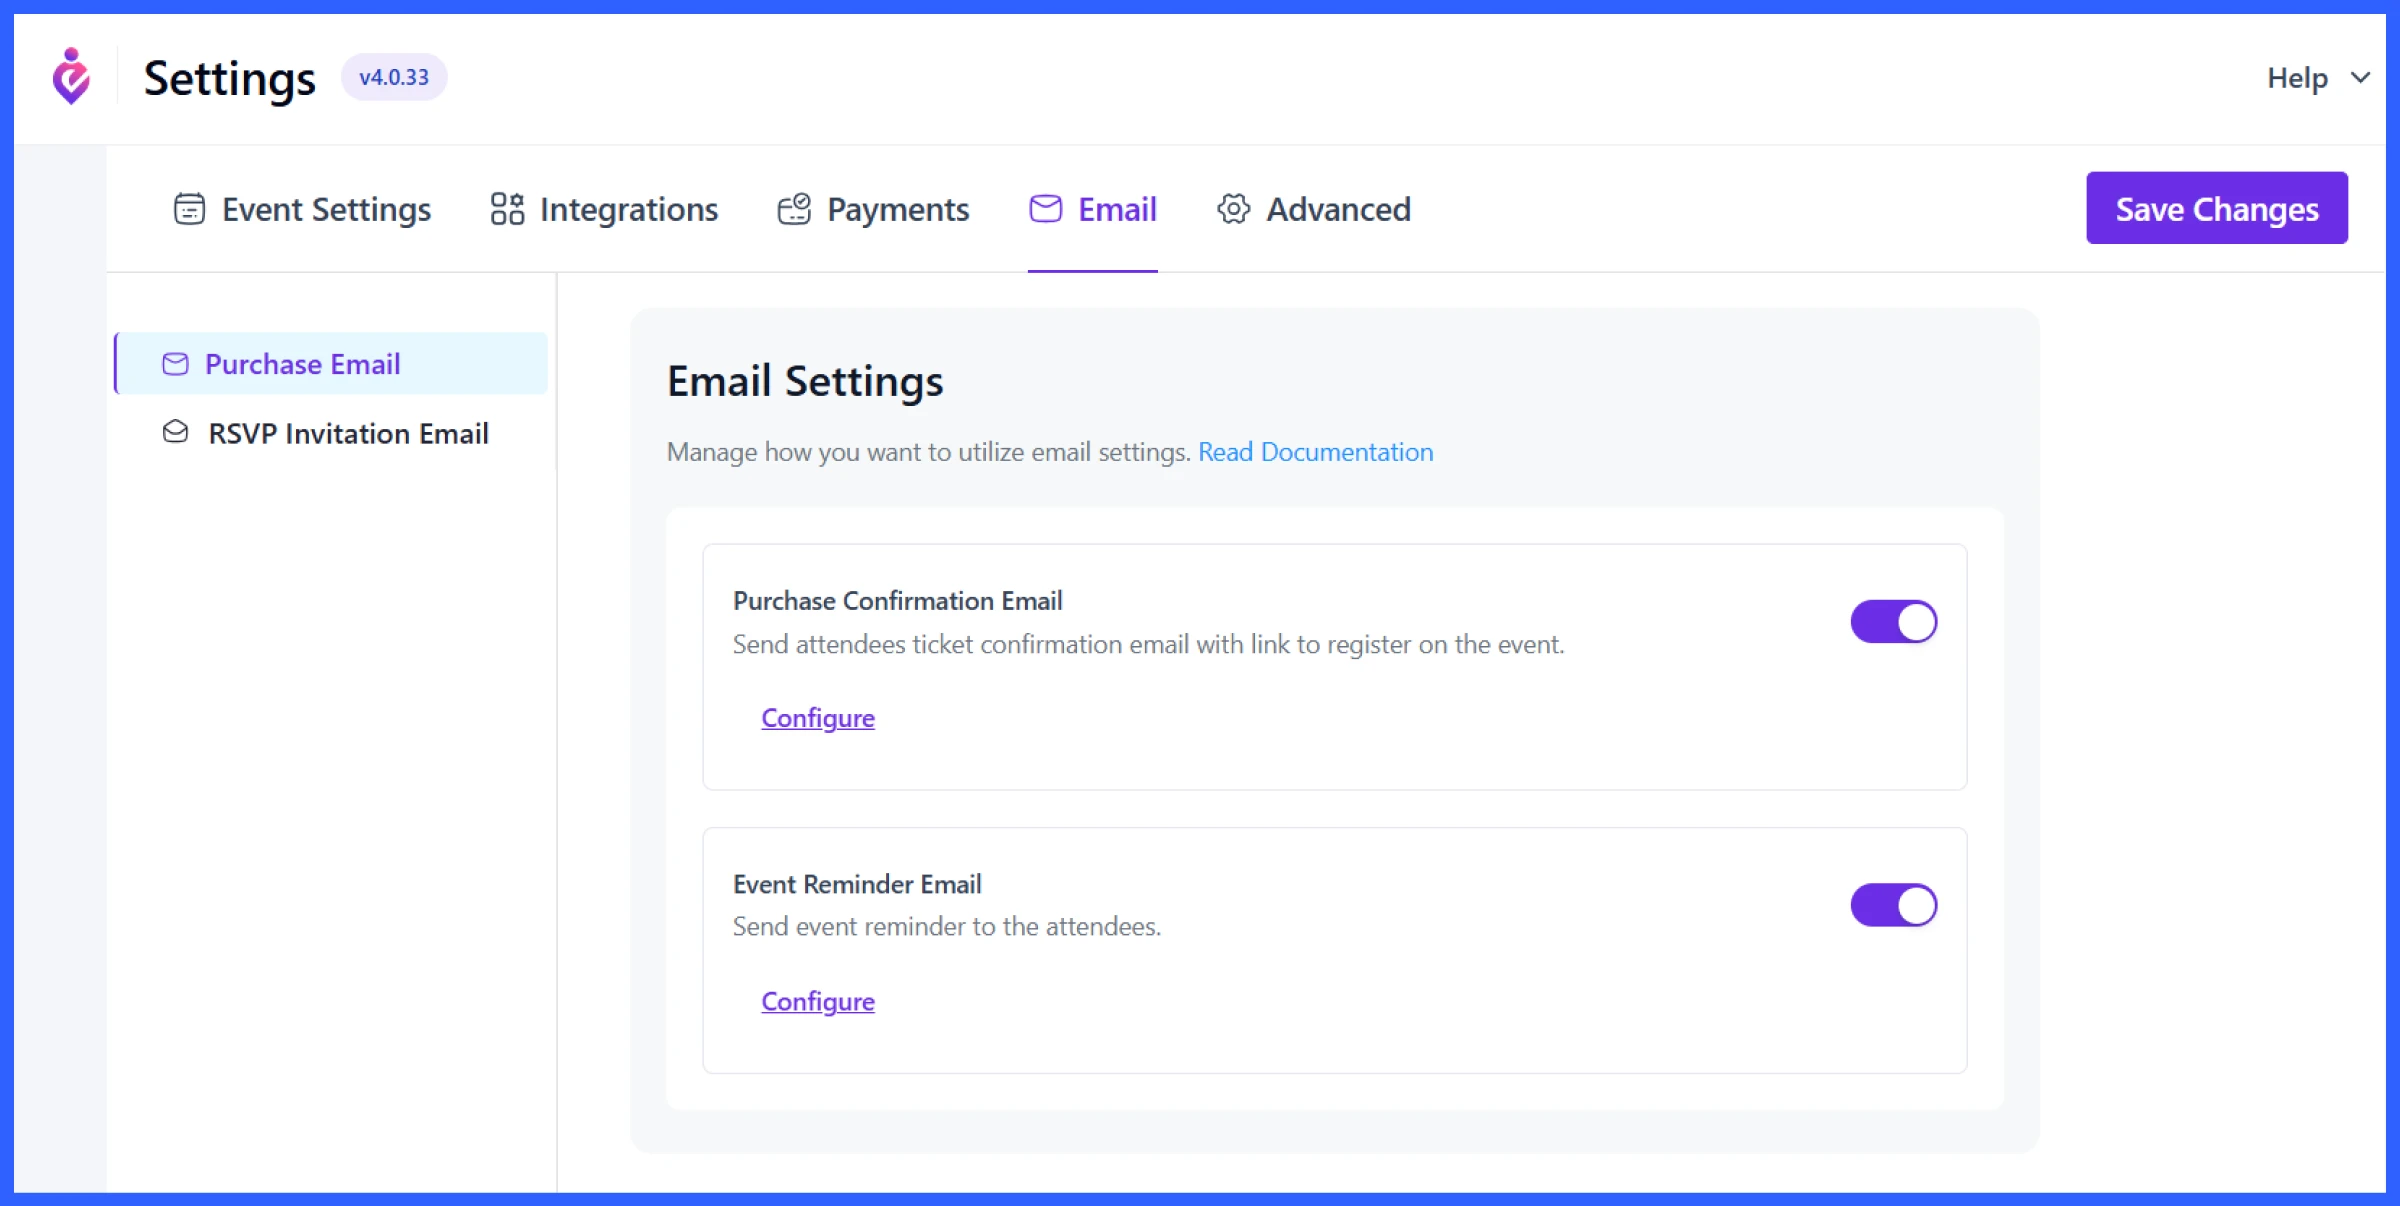
You can enable automated emails to confirm ticket purchases, send reminders before the event, send a booking confirmation email, or follow up after it ends. Simply go to Settings > Email and enable two important options:
- Purchase Confirmation Email: Sent immediately after a booking.
- Event Reminder Email: Send 1-2 days before the workshop with key details like venue address or session links.
Click Configure to customize the messages. You can include links, tips, directions, or last-minute updates.
Sync with the calendar and set the payment method
You can also accept payments and manage your event booking system for workshops directly from your website.
- Calendar Sync: Attendees can add events to Google, iCal, or Outlook with one click.
- Integrations: Connect Zoom or Google Meet for virtual sessions via Settings > Integrations.
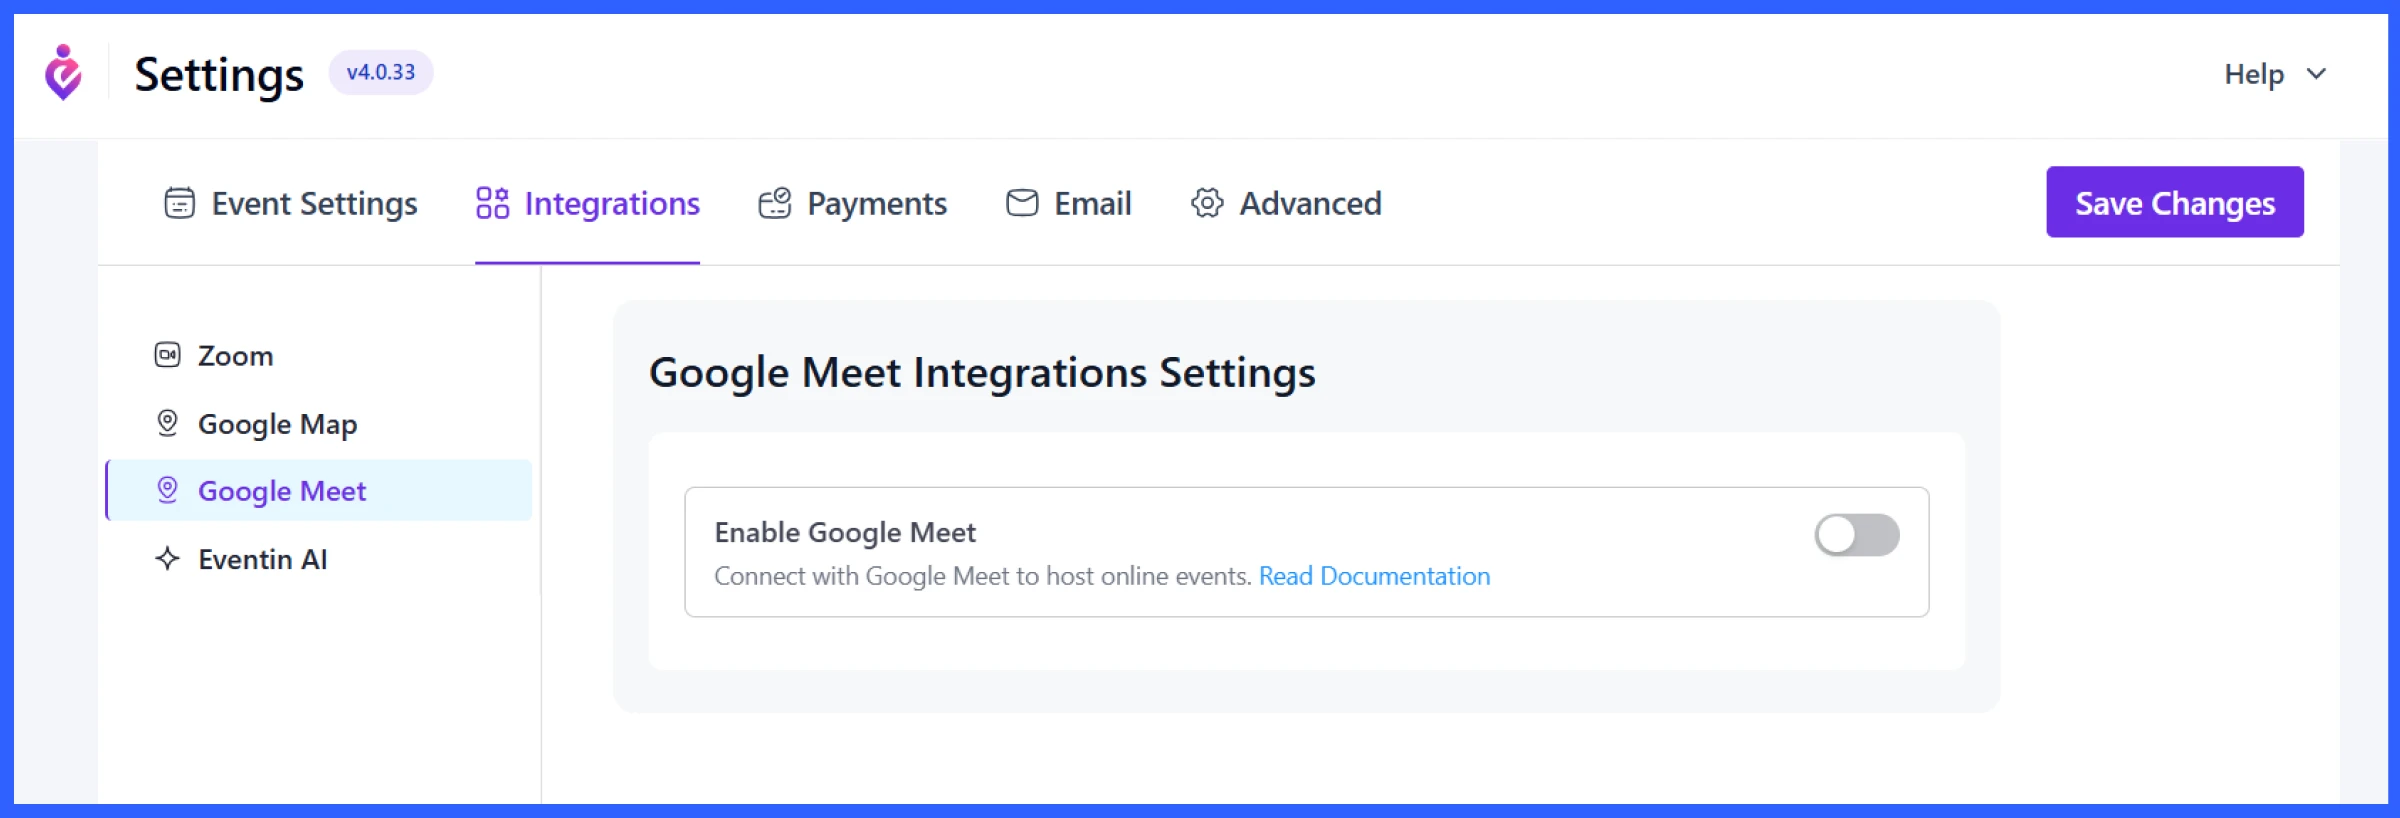
- Payments: Enable WooCommerce, Stripe, or PayPal under Settings > Payments to accept online payments.
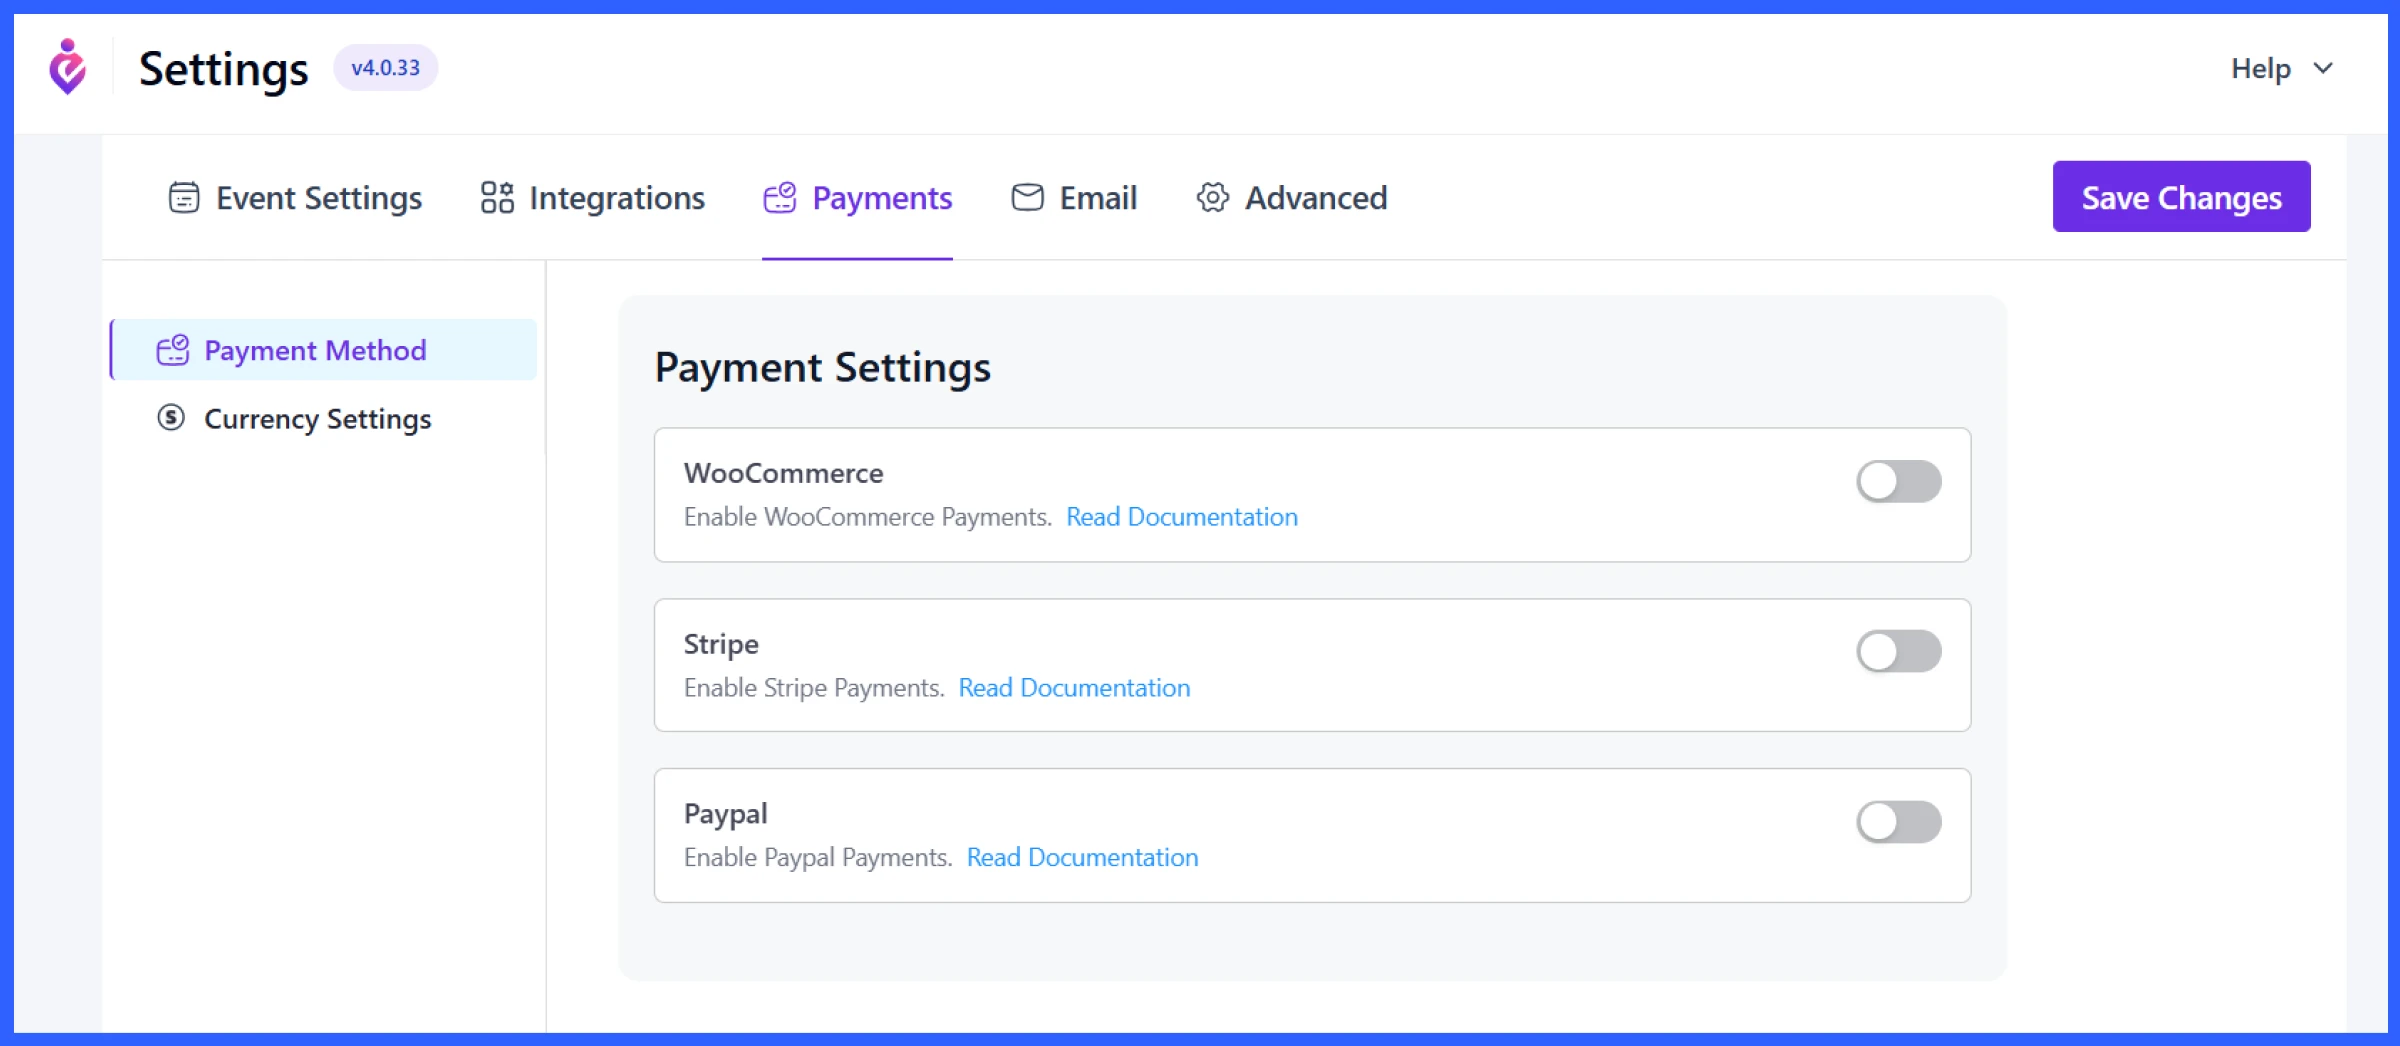
Toggle on your preferred provider and follow the setup instructions.
Publish the event
Once all details, tickets, speakers, branding, and emails are set, click Publish to make your event live. Eventin also offers features like attendee lists, RSVPs, and custom fields to tailor the experience further.
🚀 Start Your Workshop Booking System
Now that you know how to set up workshop and seminar booking in WordPress, it’s time to put it into action. With a WordPress event booking plugin like Eventin, you can create events, accept bookings, manage seminar registration, sell tickets, and track attendees—all from one place.
👉 Get Started with EventinPro tips for hosting a workshop in WordPress
Once your event is set up, there are a few things you can do to make sure everything runs smoothly and to get more value from each event you host. Here are some practical tips to host a seminar in WordPress or manage a workshop effectively:
- Promote your workshop: Use Eventin’s built-in shortcodes and widgets to feature your event on your homepage, blog sidebar, or landing pages. Also, share the event link across your social channels, email newsletters, and community groups to drive sign-ups.
- Collect feedback using post-event emails: After the event, send a follow-up email with a feedback form. This helps you understand what went well and what could be improved for next time.
- Use recurring workshop booking: If you host workshops regularly (weekly classes, monthly seminars), use Eventin’s recurring event feature to duplicate schedules and sessions. It saves time and keeps your calendar consistent.
- Use countdown timers for urgency: A countdown timer on your event page or header helps create a sense of urgency, especially as the event date approaches or tickets run low.
- Upsell future events or courses: If you’re using an LMS plugin like Tutor LMS, promote related courses at the end of your workshop. You can also suggest follow-up workshops or bundle offers using WooCommerce.
💡Further read: Best WordPress Event Management Plugins
Bonus: Use Eventin + multivendor setup for multiple workshops and seminars in WordPress
If you want to run a bigger platform where multiple trainers or speakers can host their own workshops, you can use Eventin with a multivendor plugin like Dokan.
This setup works well for:
- Online learning communities
- Training institutes with different instructors
- Co-working spaces offering training sessions
- Educational platforms with guest instructors
- Platforms like Meetup, where anyone can host a session
Want to see how this works in action?
These guides walk you through the process of turning your site into a fully functional multivendor workshop or seminar hub, step by step. You can also check this video below,
FAQs about workshop management with Eventin
How do I create a workshop booking system in WordPress?
You can create a workshop booking system in WordPress using a plugin like Eventin. It lets you create events, add booking forms, set ticket limits, collect registrations, and manage attendees from one dashboard without manual work.
What is the best WordPress plugin for seminar registration?
Eventin is one of the best WordPress seminar registration plugins. It allows you to manage seminar bookings, create registration forms, sell tickets, and track attendees with features like QR check-in and automated emails.
Can I sell paid workshop tickets in WordPress?
Yes, you can sell paid workshop tickets in WordPress using an event booking plugin. With Eventin, you can create multiple ticket types, set prices, accept online payments, and manage bookings easily.
How do I limit seats for a seminar in WordPress?
You can limit seminar seats by setting a maximum attendee limit when creating your event. Eventin allows you to control seat availability and stop registrations automatically when the limit is reached.
Can I manage online and offline workshops in one plugin?
Yes, you can manage both online and offline workshops using one plugin. Eventin supports virtual events with Zoom or Google Meet as well as in-person events with full booking and attendee management features.
How do I send booking confirmation emails for events?
Booking confirmation emails can be automated using an event registration plugin. Eventin sends instant confirmation emails after registration, along with reminders and event details to keep attendees informed.
💡Read also:Why Eventin is Better Than Other Event Management Systems
Ready to manage your next workshop and seminar with Eventin?
So, this was all about how to manage a workshop in WordPress.
Workshops and seminars often involve juggling a lot—attendee lists, speaker schedules, payments, and reminders. Eventin takes all these moving parts and brings them under one roof.
Instead of using separate tools, using a seminar registration plugin helps you manage events, bookings, and attendees without confusion. In fact, Eventin makes online workshop management in WordPress super easy.
Whether you’re running a small local seminar or a large online workshop series, Eventin adapts to your needs with built-in booking, session management, and even QR-based check-ins for offline events, so you can focus on delivering value to your attendees.