WooCommerce Product Options Examples: 15 Setups


Table of Contents
Some examples of WooCommerce product options are pizza toppings, custom text, file uploads, gift wrapping, delivery dates, warranties, and premium upgrades. They show how stores can let shoppers buy products, add relevant extras, and increase order value without creating a separate product for every possible combination.
A standard product page offers a price, a quantity field, and an Add to Cart button. That works for simple products, but it breaks down when customers want a specific design, an extra service, or a delivery preference. It also forces store owners to either build dozens of near-identical listings or handle the details over email after the sale.
This guide covers 15 practical store setups and explains which fields, pricing rules, and conditional options work best for each one.
WooCommerce Product Options: Quick Facts
- 1
15 practical setups: This guide covers food, personalized products, configurable products, services, delivery, and ticket upgrades.
- 2
160 possible combinations: A T-shirt with 5 sizes, 8 colours, and 4 print positions creates 160 combinations if every choice is treated as a variation.
- 3
40 stock-controlled variations: If only size and colour affect inventory, the store needs 40 variations instead of 160.
- 4
5 order checkpoints: Selected options should be checked in the cart, checkout, confirmation email, admin order screen, and packing slip or invoice.
- 5
5 implementation steps: Choose the product, list the decisions, select fields and pricing rules, add conditional logic, and test the complete order journey.
What Are WooCommerce Product Options and What Can They Do?
WooCommerce product options are extra choices or custom fields that customers complete before adding an item to the cart. They can include checkboxes, dropdowns, text fields, image swatches, file uploads, date pickers, and paid upgrades.
These options, also called extra product options, custom product fields, or product add-ons, help stores sell personalized products, collect complete order details, and increase order value without creating a separate product for every possible combination.
Can You Add Product Options Without a Plugin?
You can’t add product add-ons without a plugin. Default WooCommerce offers variations and attributes only, and those describe what a product is: its size, its colour, its material. Product options capture what an individual customer wants, such as a name to engrave, a file to print, or a date to deliver on.
That information changes from order to order rather than from product to product, so there is nowhere in core WooCommerce to store it.
Adding custom product fields without a plugin means writing PHP against WooCommerce hooks and maintaining it through every update.
For a complete setup walkthrough, read our guide on how to add custom product options in WooCommerce, including field types, pricing rules, conditional logic, and testing.
The distinction matters commercially, not just technically. Consider a T-shirt sold in 5 sizes and 8 colours with 4 print positions and an optional name:
- As variations only: 5 × 8 × 4 = 160 variations to create, price, and keep in stock. The customer’s name still can’t be captured either, because a free-text name has infinite values.
- As variations plus options: 40 variations for size and colour (the parts that need real stock), plus a print-position dropdown, a name field, and an artwork upload.
That is the gap a product options plugin fills, and it is why every example below separates inventory-controlled choices from customer-supplied ones.
15 Real-World WooCommerce Product Options Examples
These examples cover food, personalized products, configurable items, and service upgrades. Each one identifies the need, the fields, the pricing rule, and the benefit.
| Store setup | Useful options | Pricing or logic | Main benefit |
|---|---|---|---|
| Pizza | Crust, toppings, sauce | Paid toppings and conditional fields | Higher order value |
| Custom cake | Flavor, size, message, date | Size-based pricing | Made-to-order sales |
| T-shirt | Name, artwork, print position | Personalization fee | Fewer product variations |
| Personalized mug | Text, design, colour | Custom printing fee | Captures personalization details in the same order |
| Engraved jewelry | Metal, font, engraving | Flat or per-character fee | Supports a flat or per-character engraving fee |
| Gift box | Box size, products, message | Tiered bundle pricing | Larger curated orders |
| Print product | Size, paper, artwork | Quantity-based pricing | Fewer manual requests |
| Computer | RAM, storage, warranty | Upgrade pricing | Guided upsells |
| Furniture | Material, size, finish | Formula or tiered pricing | Custom high-value sales |
| Pet product | Name, size, photo | Personalization fee | Emotional product value |
| Warranty | Coverage and duration | Fixed upgrade fee | Protection revenue |
| Installation | Setup, training, maintenance | Service fee | Additional service income |
| Event ticket | VIP access, meals, merchandise | Upgrade pricing | Adds paid ticket upgrades |
| Delivery | Date, time slot, express shipping | Delivery surcharge | Convenience revenue |
| Premium upgrade | Material, finish, packaging | Fixed or percentage fee | Offers paid upgrades on the same product page |
Example 1: Pizza Customization
Use checkboxes for toppings, radio buttons for crust and size, and a text area for cooking instructions, then charge for premium toppings and hide irrelevant fields with conditional logic.
Customers want to build a pizza around their taste or dietary preferences. Offer crust, size, sauce, cheese, toppings, spice level, and cooking notes. Conditional rules keep the form short: a vegan cheese option only appears once “vegan” is selected. The result is a clearer kitchen ticket and adds paid extras to the order total .
Restaurants can also customize menu items in WPCafe using Optiontics when they need toppings, sauces, portion choices, and drink add-ons.
Example 2: Custom Cakes and Bakery Products
Use dropdowns for flavor and size, a text field for the message, a date picker for pickup, and size-based pricing on a single base product.
Customers usually need a cake for a specific event and guest count. Add flavor, size, frosting, decoration, message, pickup date, and an optional reference image upload. Larger sizes, premium flavors, and custom decoration each add to the total, and one manageable base product replaces a catalog of near-identical cake listings.
Example 3: Custom T-Shirts
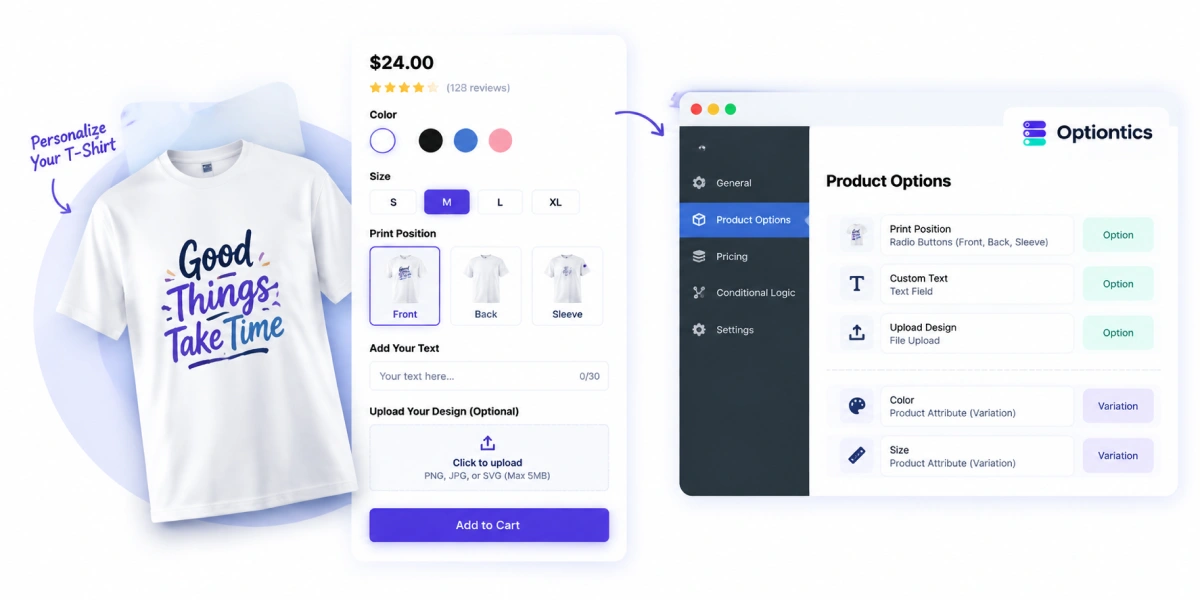
Keep size and colour as variations, then add a text field for the name, an upload for artwork, and a print-position dropdown behind a “custom printing” toggle.
This is the clearest example of the split described above: variations handle what needs stock, options handle what the customer supplies. Show the personalization fields only when custom printing is selected, and attach a printing fee so the upgrade prices itself.
This is one of the most practical custom product examples because customers can personalize a standard item without the store creating a separate product for every design.
Example 4: Personalized Mugs
Use a text field for the message, a file upload for a photo, and image swatches for the mug style, with a flat printing fee.
Gift buyers want to create something specific. A printing fee turns a low-margin item into a considered gift purchase, and the uploaded photo arrives attached to the order instead of in a follow-up email.
Personalized mugs are popular customization examples because shoppers can add names, photos, messages, or artwork to create a unique gift. If you are building a wider personalized gift catalog, this guide explains how to sell personalized gifts with WooCommerce using text fields, image uploads, paid extras, and production rules.
Example 5: Engraved Jewelry
Use dropdowns for metal and chain length, a text field for engraving, and per-character or flat pricing to protect margin.
Offer metal type, gemstone, chain length, font, engraving text, and gift packaging. Display the engraving fields only when engraving is selected. Per-character pricing matters here: a 3-character monogram and a 40-character message are very different jobs at the bench.
Example 6: Custom Gift Boxes
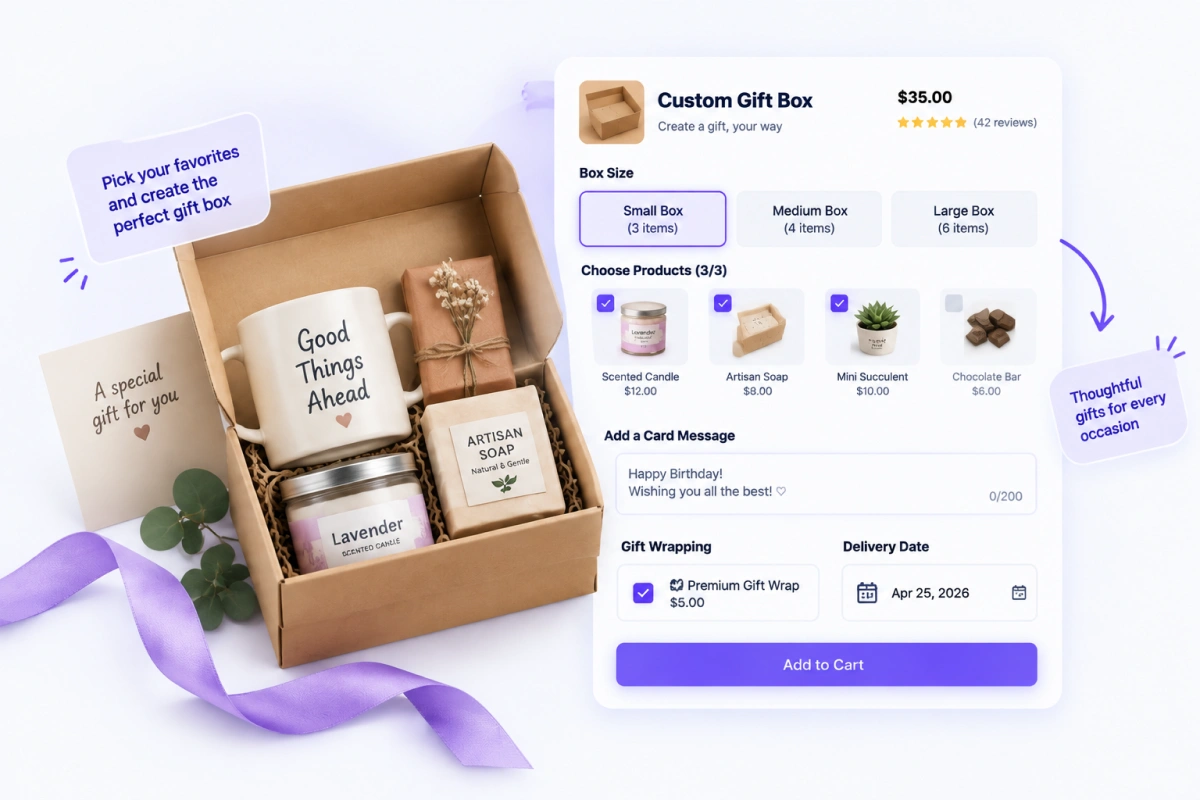
Use checkboxes for contents, a dropdown for box size, a text field for the card message, and tiered pricing that rewards fuller boxes.
Let customers choose box size, products, greeting card, message, packaging, and delivery date. Conditional rules should match the number of selectable products to the chosen box size, so a small box can’t be over-filled at checkout.
Example 7: Print Products With Artwork Uploads
Use a file upload for artwork plus dropdowns for paper, finish, and dimensions, with quantity-based pricing and a rush surcharge.
Print buyers need production details and a way to send artwork in the same transaction. Capturing paper type, dimensions, finish, quantity, proofing preference, and the file itself on the product page is what removes the back-and-forth email thread that normally follows a print order.
Example 8: Computer Configuration
Use radio buttons for components, dropdowns for the operating system, and conditional logic to hide incompatible combinations.
Buyers want to configure a budget or a performance target. Offer RAM, storage, processor, graphics card, operating system, warranty, and setup services. Conditional rules prevent impossible builds, and hardware and support upgrades sit naturally in the flow as relevant upsells rather than bolted-on cross-sells.
Computer builds are useful product configurator examples because customers need to select several connected components before placing an order.
Example 9: Furniture Customization
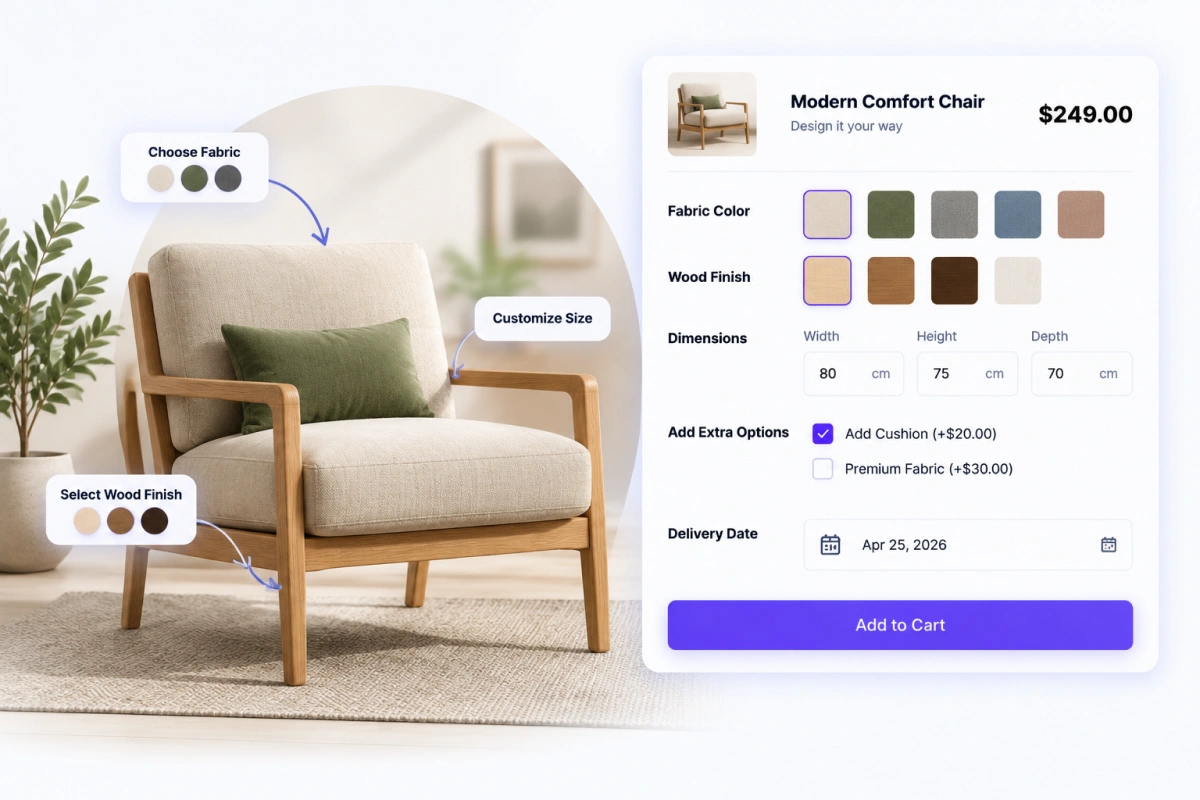
Use number fields for dimensions, image swatches for material and finish, and formula-based pricing driven by measurements.
Furniture shoppers need an item to fit a room and match its interior. Provide dimensions, material, colour, finish, upholstery, hardware, and assembly choices. Measurement-based pricing, effectively a price calculator on the product page, supports made-to-order sales without an unmanageable number of listings.
Example 10: Personalized Pet Products
Use a text field for the pet’s name, swatches for colour, a dropdown for size, and an upload for a photo, with a personalization fee.
Add pet name, breed, size, colour, embroidery, photo, and matching accessories. Size-based conditions keep the order accurate, since harness embroidery placement differs by size. Personalization adds emotional value that supports a higher price.
Example 11: Extended Warranty
Use radio buttons for coverage tiers with a fixed fee per tier, shown on high-ticket products only.
Customers buying expensive products often want protection. Offer warranty duration, accidental coverage, replacement protection, and priority support. Each tier carries a fixed upgrade fee.
Example 12: Installation and Setup Services
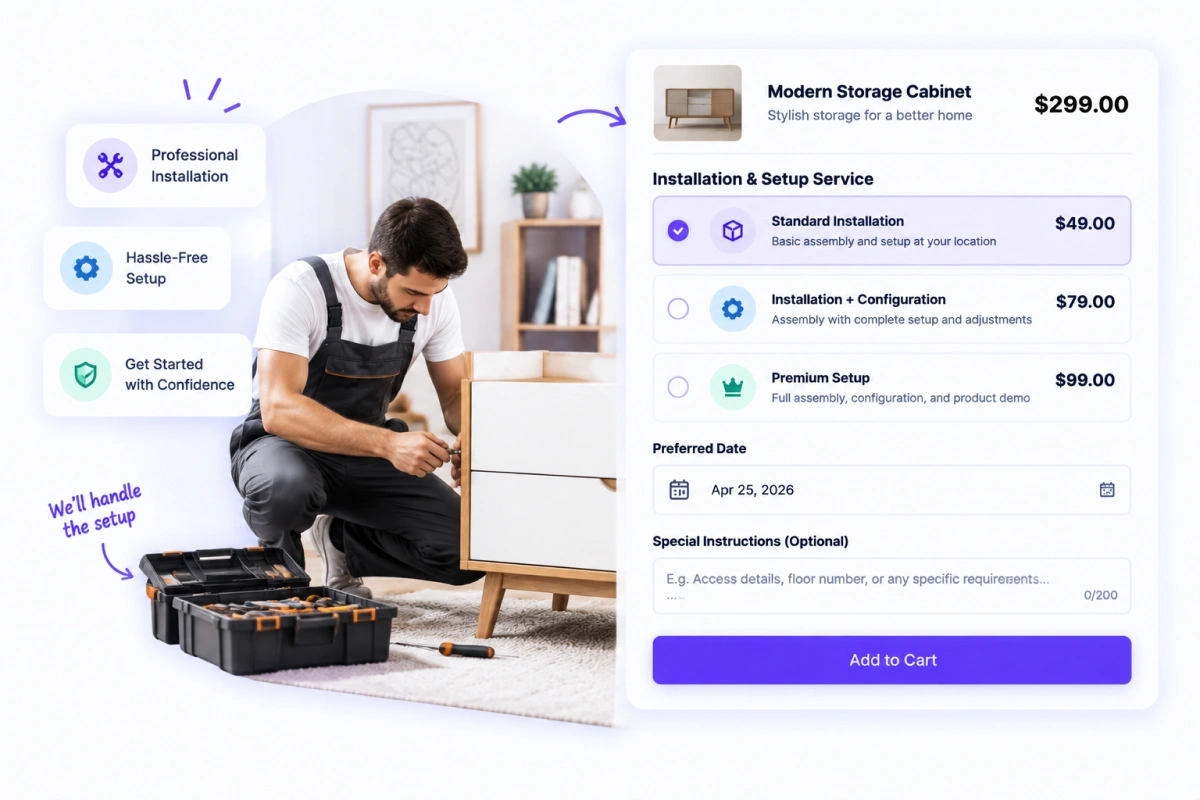
Use checkboxes for each service, a date picker for scheduling, and conditional logic so training only appears after installation is selected.
Some buyers prefer professional help after purchase. Offer installation, setup, training, maintenance, and priority service, each with its own fee. The date picker matters: capturing a preferred window on the product page is what makes the service schedulable without a phone call.
Example 13: Event Ticket Upgrades
Use radio buttons for ticket tier and checkboxes for extras, revealing VIP benefits only after a VIP ticket is selected.
Attendees often want more than basic admission. Add VIP seating, meals, merchandise, parking, workshops, certificates, or backstage access as paid extras, each at a fixed upgrade price.
Example 14: Delivery Options
Use a date picker and time-slot dropdown with a surcharge on express or local delivery.
Customers frequently value convenience as much as the product. Let them choose a delivery date, time slot, express shipping, local delivery, or special instructions. Location-based rules should show only the slots that are genuinely available for that address.
Example 15: Premium Material and Product Upgrades
Use image swatches and radio buttons to present premium choices beside the standard product, priced as a fixed or percentage uplift.
Some shoppers will pay more for better materials, finishes, packaging, or priority production. Presenting the upgrade on the same page, rather than as a separate premium listing, makes the comparison immediate and keeps the catalog small.
These upgrades are also effective product add-on examples because they increase order value while keeping the main product simple and easy to manage.
Which Product Option Type Should You Use?
The best option type depends on the decision the customer is making and the information your store needs. Use checkboxes for multiple choices, radio buttons for one choice from a short list, text fields for personalization, and uploads for customer files. Add conditional logic when one selection should change the fields that appear next.
| Option type | Best for | Example |
|---|---|---|
| Checkbox | Multiple optional choices | Extra pizza toppings |
| Radio button | One choice from a short list | Warranty duration |
| Dropdown | Several predefined choices | Furniture material |
| Text field | Short customer input | Engraving text |
| Textarea | Longer instructions | Cake message |
| Image or colour swatch | Visual choices | Fabric or product colour |
| File upload | Artwork or reference files | T-shirt design |
| Date/time picker | Scheduling | Cake delivery date |
| Quantity field | Extra units or components | Additional print copies |
Use these product options ideas to decide which fields, add-ons, and pricing rules fit your product best. The right choice depends on whether customers are selecting a product variation, adding a paid extra, or customizing the product before purchase. For a deeper explanation of these pricing models, read our WooCommerce product add-on pricing guide.
What’s the Difference Between Product Options, Variations, Add-Ons, and Bundles?
Product variations are for choices that need separate stock, SKUs, images, or base prices. Product options collect flexible customer-supplied details. Add-ons are optional extras such as gift wrapping or installation. Bundles combine products, and configurators guide customers through many dependent choices.
| Feature | Use it when | Example |
|---|---|---|
| Variation | The choice needs inventory management | T-shirt size and colour |
| Product option | The customer adds information or personalization | Engraving text |
| Add-on | The customer buys an optional extra | Installation service |
| Bundle | Several products are sold together | Custom gift box |
| Configurator | The product has many dependent choices | Custom computer |
Most stores end up using more than one system on the same product. A T-shirt can use variations for size and colour, an option for a printed name, and an add-on for gift packaging, all on one listing.
You can also compare product variations and product options in WooCommerce to understand which choices should manage inventory and which should collect personalization details.
Where Do Product Options Appear After a Customer Orders?
Selected options should appear in five places: the cart, the checkout page, the order confirmation email, the WooCommerce admin order screen, and any packing slip or invoice you generate. If a selection is visible on the product page but missing from the admin order, your fulfillment team is working blind.
This is the step most stores skip, and it is where custom option setups usually fail in practice. Before publishing a configurable product, place a real test order and confirm:
- Cart. Options and their added fees are listed under the line item, and the total reflects them.
- Checkout. Selections survive the cart-to-checkout transition, including uploaded files.
- Confirmation email. The customer can see what they ordered, which reduces “did my engraving text save?” support tickets.
- Admin order screen. Every selection is readable by whoever picks and packs, and uploaded files are downloadable.
- Packing slip or invoice. If you use a PDF invoice plugin, confirm option data carries through; This is an important order-flow issue to test.
Do this on mobile as well as desktop. A 20-field conditional form that works on a laptop can be genuinely difficult to complete on a phone, and product pages skew mobile for most consumer stores.
How Do You Implement These Examples in WooCommerce?
These examples are easiest to implement by creating an option group, adding fields, assigning prices, and applying the group to selected products or categories. Menu names vary by plugin, but the planning process is the same.
- Choose the base product. Decide which product needs personalization, an upgrade, or extra information. Separate inventory-controlled choices from optional extras before you build anything.
- List every customer decision. Classify each one as a variation, option, service, delivery selection, or upgrade.
- Select fields and pricing rules. Add checkboxes, dropdowns, swatches, uploads, flat fees, percentage fees, per-character pricing, or quantity pricing as needed.
- Apply conditional logic. Hide irrelevant fields and reveal the next choice only when it matches the previous selection. This is what keeps a 20-field configurator feeling like a 5-field one.
- Test the complete order journey. Work through the five checkpoints in the section above, on desktop and mobile.
How Do You Build These Product Options With Optiontics?
Optiontics is an AI-powered WooCommerce product options and add-ons plugin from ThemeWinter, with 20+ field types including text inputs, checkboxes, radio buttons, dropdowns, number fields, colour and image swatches, date pickers, and file uploads.
It supports conditional logic, fixed, percentage, per-character, and formula-based pricing, and option groups that apply to a single product, a set of products, or an entire category.
Two things make the setups above faster to build:
- Describe the product, get the configurator. Instead of building field by field, describe what you sell in a sentence and let Optiontics generate the option fields, pricing rules, and conditional logic for you.
- Start from a template. Pre-built configurators cover apparel, print products, gift wrap, cakes, mugs, and bundles, so most of the 15 examples above have a starting point you can customize rather than build from scratch.
Documentation:How to Create Product Options?
For the T-shirt setup specifically: keep size and colour as WooCommerce variations, then create an Optiontics group containing a name text field, an artwork upload, a print-position dropdown, and a printing fee. Preview the form, place one test order, and confirm every selection reaches the admin order screen.
Can product options change the product price?
Yes, product options can change the total when a store assigns a price to a selection. Common methods include fixed fees, percentage charges, quantity pricing, per-character pricing, and measurement-based formulas. Customers should see the added cost before checkout.
When should you use variations instead of product options?
Use variations when a choice needs its own stock, SKU, image, or base price, such as a shirt’s size and colour. Use product options for personalization, instructions, uploads, services, or flexible extras that do not need separate inventory items.
Can product options use conditional logic?
Yes, conditional logic can show or hide fields based on earlier selections. For example, a file upload can appear after “Custom design,” or VIP benefits can appear after a VIP ticket. This keeps complex forms shorter and easier to complete.
Where do selected product options appear after checkout?
Selected options should appear in the cart, checkout, confirmation email, and WooCommerce admin order details. Display depends on the plugin, so test a complete order before publishing.
Which Product Should You Add Options To First?
Start with your best-selling product and add only the options customers already email you about. The best product option setups are not the ones with the most fields. They are the ones that make buying easier, improve order accuracy, or give customers a genuine reason to spend more.
Add one setup, place a test order, confirm the data reaches your fulfillment process, and only then expand to the rest of the catalog. Use the 15 examples above as a starting point, then build the custom fields, paid upgrades, and conditional choices in Optiontics.