A Guide on How to Add Custom Product Options in WooCommerce
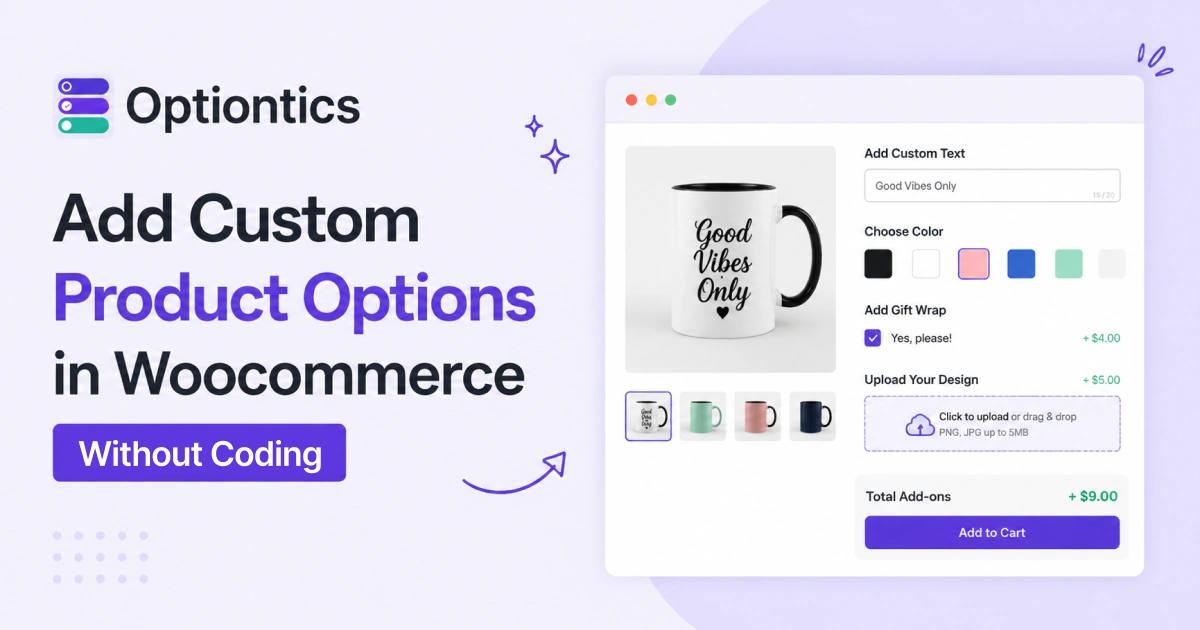
Table of Contents
WooCommerce custom product options let you add and display extra product information beyond the default title, price, and description. You can add extra fields like material details, care instructions, size charts, or specifications using the custom product options to make it more informative.
You can add these custom fields using code, but that requires editing PHP and a basic understanding of WooCommerce’s data structure.
On the other hand, a simpler option is using plugins like Optiontics, which lets you create and manage custom fields directly from a visual, drag-and-drop interface without requiring any coding.
Here’s a simple step-by-step guide on how to add extra product options in WooCommerce:
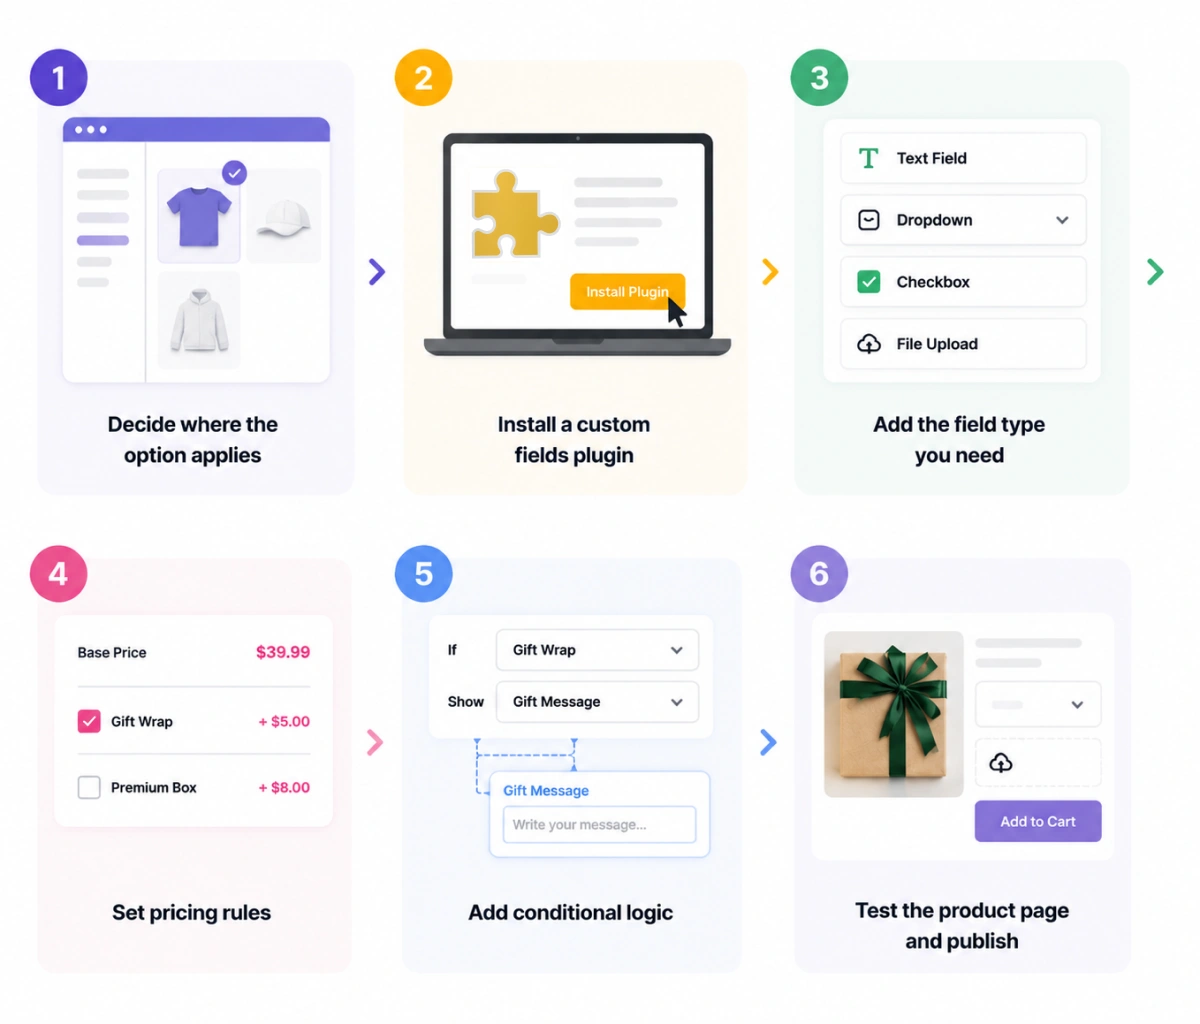
- Decide where the option applies
- Install a custom fields plugin
- Add the filed type you need
- Set pricing rules
- Add conditional logic
- Test the product page and publish
Do you want to know how to create custom product fields in WooCommerce? Learn why native WooCommerce falls short for product customization, what custom product options are, and how to add them to your store.
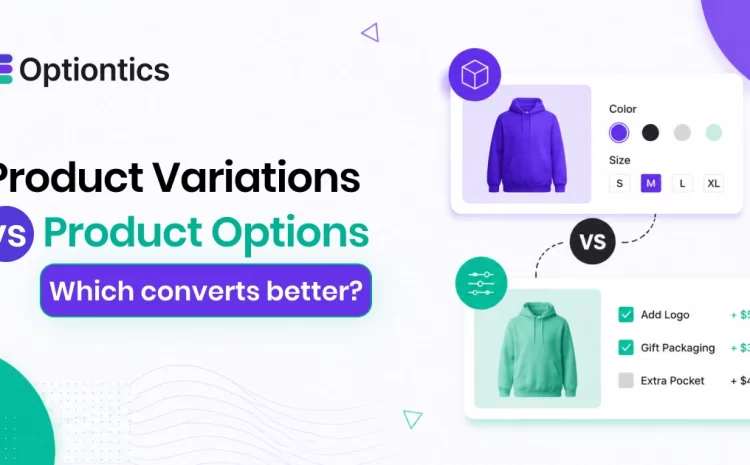
- Use product variations for fixed choices like size or color, and custom product options for personalization and add-ons
- Native WooCommerce doesn’t support conditional logic, file uploads, or advanced pricing.
- A product options plugin lets you add custom fields, pricing rules, and conditional logic without coding.
- Apply options globally or to specific products, depending on your store’s needs.
- Test your options before publishing to ensure pricing and customer selections work correctly.
Why Native WooCommerce Falls Short for Product Customization
WooCommerce’s built-in way of handling product differences is called variations. They work fine for simple, predictable choices like “Size: Small, Medium, Large” or “Color: Red, Blue, Green.” But variations weren’t really built for personalization.
Here’s where they tend to fall short:
Built for size and color, not personalization
If a customer wants to add their name, write a custom message, or pick something that isn’t a fixed attribute, variations don’t really fit that use case.
No conditional logic, file uploads, or formula pricing
WooCommerce doesn’t have a built-in way to say “show this field only if the customer picks that option,” or let someone upload a photo, or calculate a price from multiple inputs.
Combinations add up fast
Add a few attributes like size, color, and material, and you can end up with dozens or even hundreds of variations. That’s a lot of manual setup for what’s often a simple customization request.
This is the gap that custom product options are designed to fill.
What Are WooCommerce Custom Product Options?
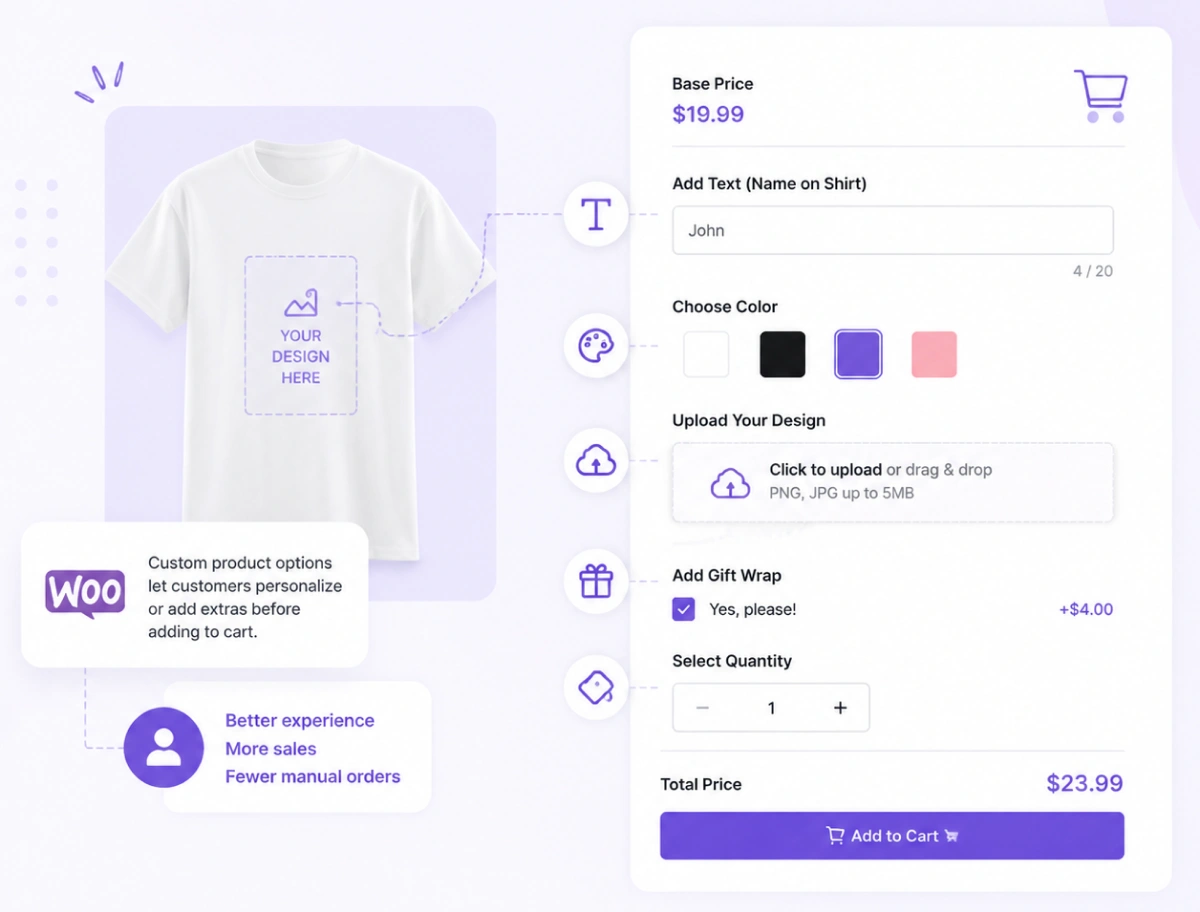
In simple terms, WooCommerce custom product options are extra fields, like text boxes, dropdowns, checkboxes, swatches, or file uploads. You can add extra fields to WooCommerce product page so customers can personalize their order or choose extras before checkout.
Unlike variations, the Woocommerce custom fields don’t require creating a separate product version for every possible combination.
You can think of it this way: variations decide which product the customer is ordering. But Woocommerce Custom fields decide how that product gets configured, and they can add to its price too.
For example, you can use Woocommerce custom product options to let customers:
- Add a gift message or note
- Choose extra toppings on a food item
- Upload artwork for a custom print
- Pick a fabric, finish, or engraving text
- Select a delivery date
- Add gift wrapping or a warranty
Why Woocommerce Custom Product Options are Important?
It’s easy to think of custom product options as a nice-to-have. For a lot of stores, they’re closer to essential.
If you sell anything that can be personalized, gifts, engraved items, made-to-order goods, custom apparel, custom product options for woocommerce are often the difference between a generic product page and one that actually matches how customers want to buy.
They also open the door to upsells that don’t feel forced. A checkbox for gift wrapping, an option to add a warranty, or an upgrade to premium material, these are small woocommerce product add-ons, but they add up across hundreds of orders.
There’s also a practical side. Instead of customers emailing you with “can I get this engraved?” or “do you have this in another color?”, they can configure exactly what they want right there on the product page. That means fewer support questions and clearer orders for you to fulfill.
Woocommerce Product variations vs. Product options: What’s the Difference?
These two get mixed up a lot, so here’s a simple side-by-side comparison:
| Categories | WooCommerce Variations | WooCommerce Custom Product Options |
|---|---|---|
| Best for | Fixed product types like size, color, material | Extra choices, personalization, paid upgrades |
| Simple example | T-shirt size: S, M, L | Add gift wrap, custom text, file upload |
| Main problem solved | Shows different versions of the product | Collects details and sells extras |
| Setup difficulty | Can get messy with many combinations | Easier, even with lots of optional fields |
| Pricing | Price changes per variation | Add extra price per option, fixed or formula-based |
| Custom input | Limited | Text, file upload, date, notes, and more |
| Conditional logic | Not supported | Supported, show fields based on earlier choices |
Quick comparison: If a choice changes which exact product ships, that’s a variation. If a choice changes how the product is set up, or adds something extra, that’s a custom option.
To get a better idea on the differences between woocommerce product variation and options, check this article out.
What You Actually Need to Add Custom Options
Before jumping into setup, it helps to know what you’re actually looking for. Most stores need a mix of the following:
A range of field types
At minimum, text fields, dropdowns, and checkboxes. If you sell personalized or made-to-order products, you’ll likely also want file uploads, color or image swatches, and date pickers.
Conditional logic
This lets fields show up only when relevant, like displaying a “gift message” box only if the customer checks “Add gift wrap.”
Flexible pricing
Fixed fees, percentage-based pricing, per-character pricing for engraving, or formula-based pricing for made-to-order products priced by size or quantity.
Some way to see what’s working
Ideally, you want to know whether these options are actually adding to your average order value (AOV), rather than just guessing.
Once you know which of these matter for your store, the setup itself is quick.
Step-by-Step: How to Add Custom Product Options in WooCommerce
Adding custom product options in Woocommerce doesn’t have to be complicated. You can decide where the options apply, add the fields you need, set pricing, and publish, all from your WordPress dashboard.
Here are all the steps on how to set up product add-ons in WooCommerce.
Step 1 – Decide global vs. product-specific options
Start by figuring out where each option should apply.
Global options apply across your whole store, or to specific categories and tags. Think gift wrapping, a rush-order fee, or a warranty add-on, things that could apply to many products.
Product-specific options apply to just one product. Think of an engraving field on a single item, or fabric choices that only make sense for one specific product.
Most stores end up using a mix of both: a few global add-ons, plus product-specific fields for items that need personalization.
Step 2 – Install a Woocommerce product options plugin (or code it, with caveats)
WooCommerce doesn’t come with custom fields built in, so you’ll need a way to add them. You have two main ways to build custom product options.
The first is a code-based approach using functions.php. This can work for very simple cases, like adding one text field to one product.
However, coding requires PHP knowledge, and it gets messy fast if you need multiple field types, conditional logic, or pricing rules. It can also break after a theme update if it’s not set up carefully.
The second way is to use a dedicated plugin like Optiontics. You get a visual builder, multiple field types, conditional logic, and pricing rules without writing any code. For most stores, this is the more practical option.
Unless you’re comfortable maintaining custom PHP long-term, a plugin is usually the faster and safer choice.
Step 3 – Choose a field type for your use case
Once your plugin is active, you’ll typically see a library of field types. Common ones include:
- Text field, for short personalization like names or initials
- Text area, for longer notes or gift messages
- Dropdown or radio buttons, for choices like size or style
- Checkbox, for optional add-ons like gift wrap
- Color or image swatches, for visual selection
- File upload, for customer-submitted artwork or photos
- Date picker, for delivery or booking dates
- Number field or range slider, for quantities or dimensions
Pick only what your product actually needs. Adding too many fields can clutter the page and make checkout feel more complicated than it needs to be.
Step 4 – Set pricing rules
If an option should affect the price, this is where you set it up. Common pricing types include:
- Fixed price, like adding $5 for gift wrap
- Percentage, like adding 10% for rush processing
- Per-character or per-unit, often used for engraving
- Formula-based, where the price is calculated from multiple inputs, useful for made-to-order products priced by size or material
Getting this step right turns your product options from a customization feature into something that genuinely affects order value.
Step 5 – Add woocommerce conditional logic
If an option should affect the price, this is where you set it up. Common pricing types include:
- Fixed price, like adding $5 for gift wrap
- Percentage, like adding 10% for rush processing
- Per-character or per-unit, often used for engraving
- Formula-based, where the price is calculated from multiple inputs, useful for made-to-order products priced by size or material
Getting this step right turns your product options from a customization feature into something that genuinely affects order value.
Step 6 – Test on the front end and publish
Before going live, walk through the product page as a customer would. Check if:
- The fields display properly on desktop and mobile
- The price updates correctly as options are selected
- Conditional fields show and hide as expected
- The selected configuration carries through to the cart and order confirmation
Once everything checks out, publish. It’s also worth keeping an eye on how customers actually use these new options over the first week or two.
Plugin Comparison: What Actually Matters When Choosing One
Not all product options plugins are built the same way. Here’s how a few popular ones stack up:
| Feature | Optiontics | ThemeHigh Extra Prodcut Optiosn | Studio Wombar Advanced Product Fields |
|---|---|---|---|
| Pre-built templates | 40+ | None | None |
| AI-powered setup | Yes | No | No |
| Drag-and-drop builder | Yes | Partial | No |
| Live front-end preview | Yes | No | No |
| Conditional logic | Yes | Yes | Yes |
| Formula-based pricing | Yes | Partial | Yes |
| Built-in AOV insights | Yes | No | No |
| Unique strength | AI generation + beginner-friendly + lightweight | Affordable multi-site licensing | Developer-friendly, powerful formulas |
Beyond features, it’s worth checking how much a plugin affects your page load time, whether the pricing is one-time or recurring, and how many sites your license covers if you manage more than one store.
Note: Check out some more Woocommerce plugin to increase sales.
The Easiest Way to Set This Up: Optiontics
If you’d rather not build all of this field by field, Optiontics is a WooCommerce plugin built around exactly this workflow.
Optiontics comes with 40+ pre-built templates covering the use cases above, personalized products, made-to-order configurators, service add-ons, and bundles. So all you have to do is just customize a template rather than starting from scratch.
The plugin also includes an AI builder where all you have to do is describe your product in a sentence, and it generates the fields and pricing rules for you. You can also use simple commands to edit or update the template later, like adding an option or changing a price rule. This makes it easy to fine-tune your product’s extra option anytime.
Here’s a quick look at how it fits into the steps above:
| Optiontic Features | How It Helps |
|---|---|
| 20+ field types | Add text, dropdown, checkbox, radio, number, swatch, and file upload fields |
| Conditional logic | Show only the fields customers need, based on earlier selections |
| Dynamic pricing | Charge extra using fixed, percentage, per-character, or formula-based pricing |
| Pre-built templates | Set up common use cases like gifts, personalization, and bundles faster |
| AI option builder | Describe your product, and Optiontics builds the fields and pricing rules |
| Live preview | Check how options look before publishing |
Combined with a drag-and-drop builder and a dashboard that shows how these options affect your AOV, Optiontics covers most of what’s outlined above without needing separate tools.
Ready to simplify product customization? Explore Optiontics’ pricing to choose the plan that’s right for your WooCommerce store.
Pro Tips to Boost AOV with Product Options
Start small: A single, well-placed gift-wrap checkbox often performs better than a long, cluttered form.
Make pricing visible in real time: Customers are more comfortable adding extras when they can see the total update as they go.
Use conditional logic to reduce clutter, not add to it: Hide whatever isn’t relevant to the current selection.
Track which options actually get used: If something is rarely selected, it might need better placement or clearer labeling.
Check how it looks on mobile: Most WooCommerce traffic comes from mobile, and a cramped configuration form can quietly hurt conversions
Final Thoughts
A good WooCommerce product page shouldn’t stop at just selling the base item.
When a customer is ready to buy, that’s the best time to offer something extra, whether it’s a personalization field, a paid upgrade, or a small add-on that makes the order feel tailored to them.
That’s the real value of custom product options.
The setup itself doesn’t have to be complicated. Decide where each option applies, choose the right field types, set your pricing rules, add conditional logic where it helps, and test before publishing.
If you’d rather skip the manual setup, a plugin like Optiontics gets you there faster, with templates, AI-assisted setup, and built-in AOV tracking. Either way, the goal stays the same: a product page that feels tailored to each customer, without adding clutter or slowing your store down.
FAQs
Can I add custom product options in WooCommerce without a plugin?
Yes, for a single simple field, you can use a code snippet in functions.php. For multiple fields, conditional logic, or pricing rules, a plugin is easier to set up and maintain.
Can I charge extra for custom product options?
Yes. Most plugins support fixed fees, percentage pricing, per-character pricing, and formula-based pricing, useful for gift wrap, engraving, or rush delivery.
How do I add conditional logic to WooCommerce product options?
You set this up inside a product options plugin by creating rules like “show this field only if that option is selected.” Native WooCommerce variations don’t support this.
Can I apply the same options to multiple products at once?
Yes, using global options. You can apply fields to all products, a category, or specific tags instead of setting up each product individually.
Do custom product options work with variable products?
Yes. Most modern plugins support both simple and variable products, including options tied to specific variations.
Will adding custom product options slow down my store?
It depends on the plugin. Lightweight, well-built plugins add minimal load time, while heavier ones can slow your store down.

Build Smarter Product Pages with Optiontics
Create custom product options, dynamic pricing, and conditional logic without writing code. Launch personalized shopping experiences in minutes.