How to Create an Online Food Ordering Website in WordPress 2026
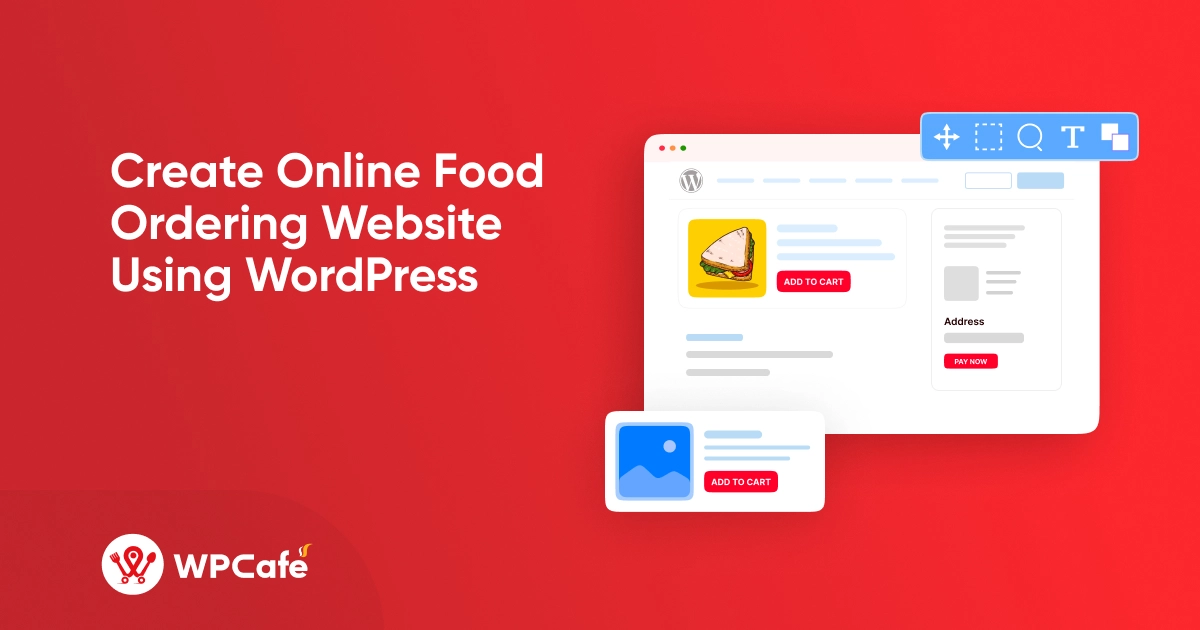
Table of Contents
Would you like to set up an online food ordering website for your restaurant?
More people now prefer to browse menus, place orders, and pay directly from a website without picking up the phone. For restaurant owners, this means having a reliable online ordering website is no longer optional-it’s essential.
WordPress makes this process simple. You can create a professional food ordering website that manages menus, handles payments, and processes orders in one place.
In this guide, we’ll walk through how to set up a fully functional online food ordering system for your restaurant using WordPress, step by step.
🎯 Quick Overview: What You’ll Learn
In this guide, you’ll learn how to create a complete online food ordering website using WordPress from start to finish. Here’s what we’ll cover:.
- How to set up a WordPress website for your restaurant
- How to turn WooCommerce into a food ordering system
- How to add a restaurant menu with categories and pricing
- How to accept online orders with pickup and delivery options
- How to set up payments and checkout for food orders
- How to manage orders, customers, and notifications
- How to use WPCafe to handle menus, ordering, reservations, and more in one place
What you need to create an online food ordering website
Before building an online food ordering website, you need a domain and hosting. The domain is your website’s address on the internet, and the hosting is your virtual memory. Choose the domain name wisely, as it should reflect the brand and your standards. Hosting should be safe, and it should be faster so that users have a better experience.
Looking for help? How to get a domain name and web hosting! | Read more.
If you already have a WordPress website
First, you must ensure that you have a WordPress site set up and running. Next, you can explore the various plugins and features in WordPress that can help you create a functional and user-friendly online ordering system.
If you do not have a website yet, you do not have to worry about it. It is easy to start a website using WordPress, which is the world’s best website builder. It is utilized by millions of small to large businesses all over the world, and it is a free and open-source program.
🙌 Let’s set up your WordPress Food Ordering Website
It’s easier than you think! Follow these steps to set up a WordPress website.
💁 Note: Skip this section if you already have a WordPress website.
Step 1. Choose a domain name
A domain name is the unique address that identifies your website on the internet. Choosing a memorable domain name is important for brand identity. It’s what you type into the address bar of your browser to reach a specific website. For example, www.ubereats.com here “ubereats.com” is the domain name. Similarly, pick up your domain name like this – www.”fireonspice”.com.

The following are the steps to getting your domain name:
- Choose a domain name registrar: A “Domain name registrar “ sells domain names. Popular registrars include Namecheap, GoDaddy, and Google Domains.
- Search for your desired domain name: Check if your preferred name is available and explore alternative options if needed.
- Register your domain name: Once you choose a name, purchase it from the registrar. The registration period typically ranges from one to ten years.
- Configure your DNS settings: This connects your domain name to your web hosting service. Most registrars offer tools to manage your DNS settings easily.
With these steps, you can secure your domain name and establish your online identity. Remember to choose a memorable name, relevant to your website, and that reflects your brand.
Step 2. Select a hosting provider
Once you choose a domain name, it’s time to select the hosting supplier. Think of hosting as your virtual memory; it provides the need for the development of your store. Compare the features, reliability, and support carefully to find the ideal hosting supplier for your online business. Consider options like HostGator, Bluehost, Namecheap, GoDaddy, and WordPress.com for high-quality hosting services. You can also explore trusted local providers for potentially better deals and local support.
Step 3. Connect your domain to hosting
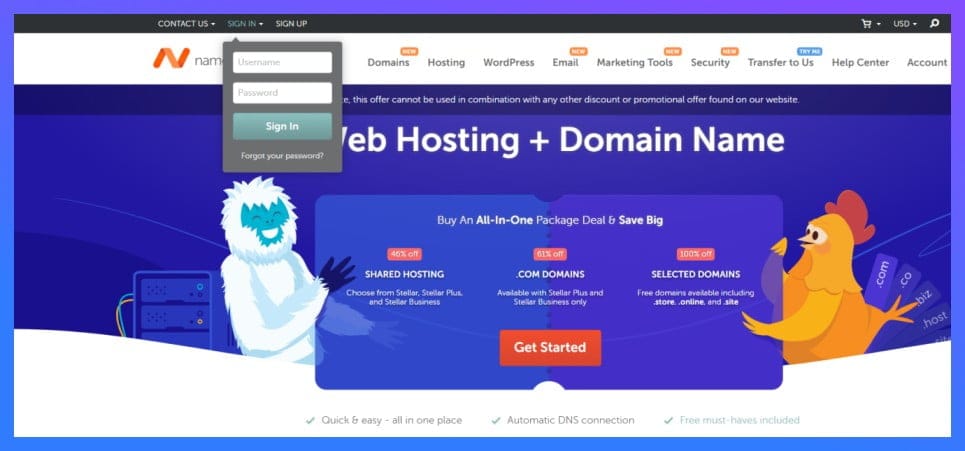
➕ Sign in to your Namecheap account ( while we used Namecheap as an example here, you can connect to your domain from anywhere, regardless of where you registered it).
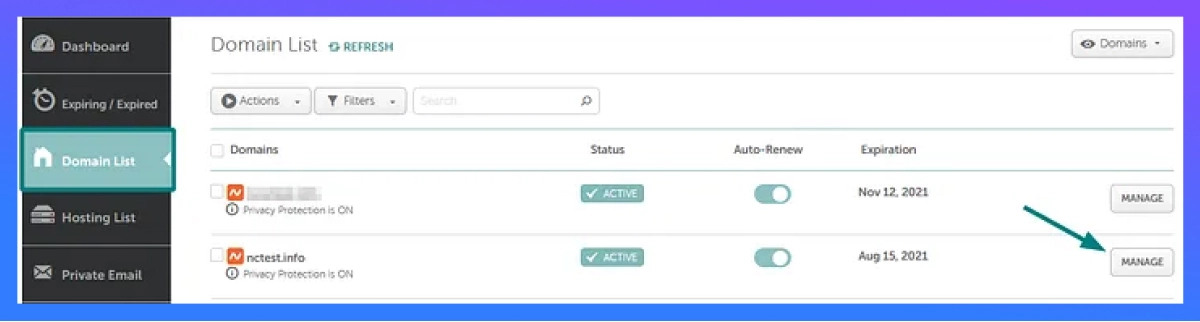
➕ Choose “Domain List” from the sidebar, then click on the “Manage” button of your domain name.
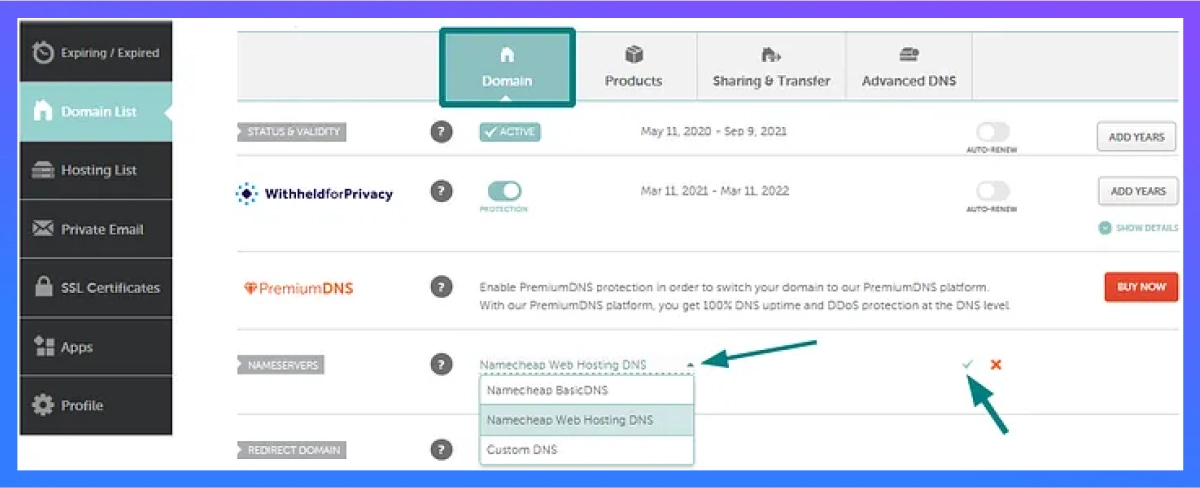
➕ Select “Namecheap Web Hosting DNS” from the drop-down menu in the Nameservers section and use the checkmark icon to save changes
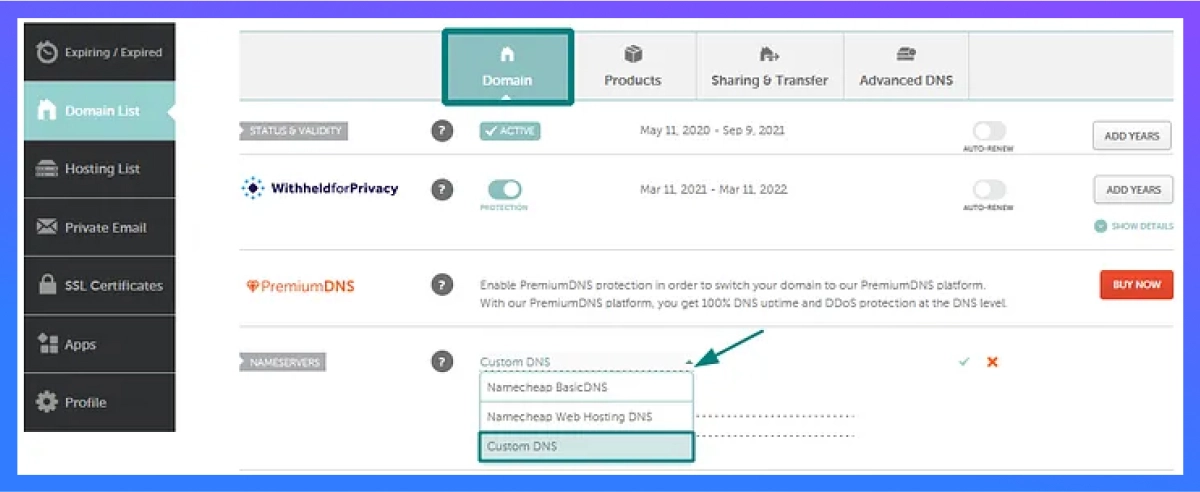
To connect a domain to a third-party server or hosting plan using your hosting provider’s nameservers, set them as Custom for your domain by selecting Domain List in your account, clicking Manage, and selecting “Custom DNS” from the drop-down menu.

Enter hosting nameservers one by one in each line, press Add nameserver if needed. Save changes, expect 24–48 hours for domain propagation.
Note: Some hosting providers may provide nameservers with IP addresses.
Step 4. Install WordPress
➕ Open cPanel and login. (The hosting provider will give you all the information).
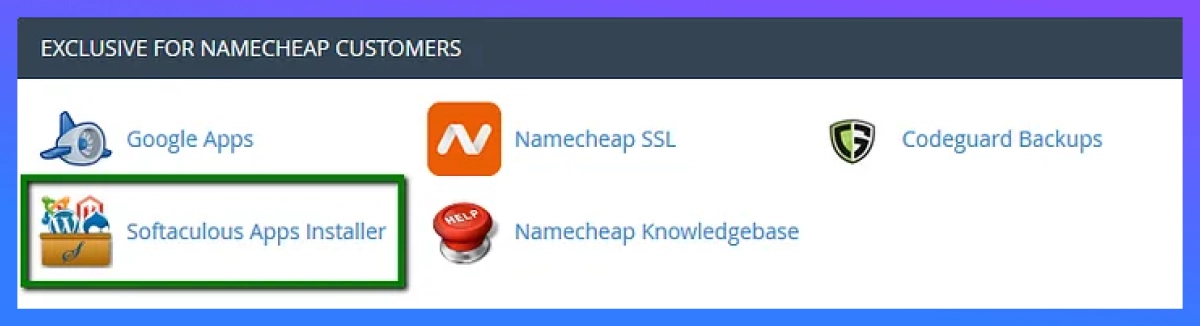
➕ To install Softaculous Apps Installer, go to the Exclusive for Namecheap customers section.
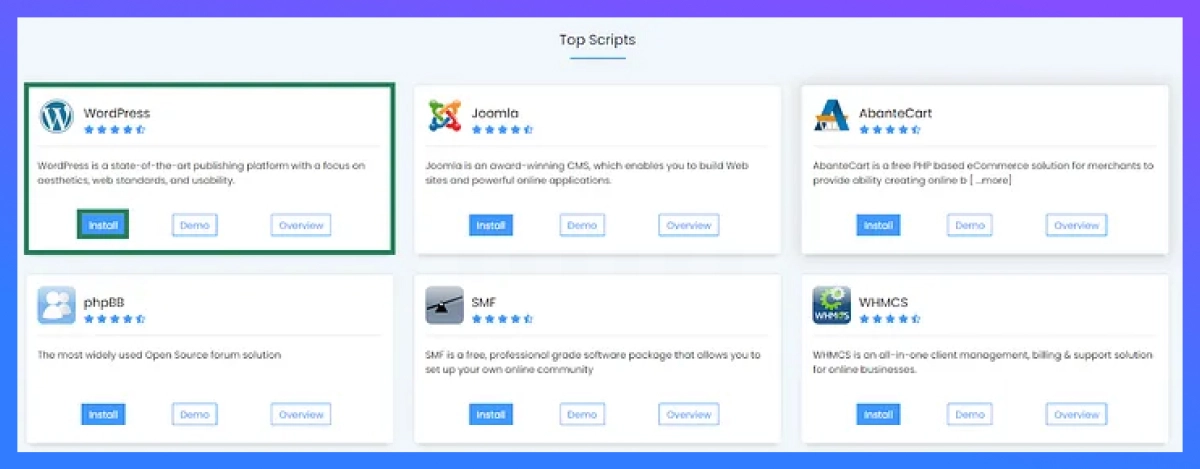
➕ On the homepage, you will see the WordPress icon, then click the “install” button.
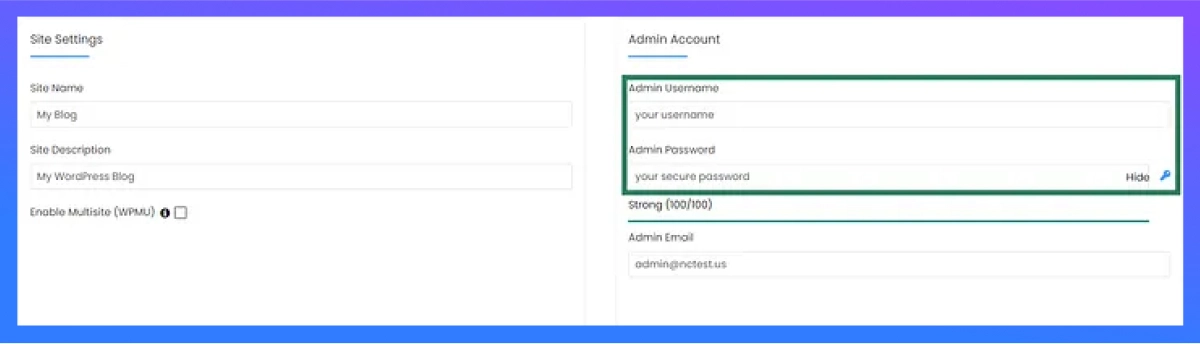
➕ To install WordPress, select the desired domain, specify the root folder in the In Directory field, and choose the desired version. The default database name and table prefix are wp_, but it’s recommended to change them for security reasons. Fill out the Site Settings section according to your needs, and ensure secure and hard-to-guess details in the Admin Account section. Change these fields as needed.

➕ After all is done, click “Install” when ready, and WordPress will be successfully installed.
➕ Now log in to your WordPress Dashboard to begin working on your website.
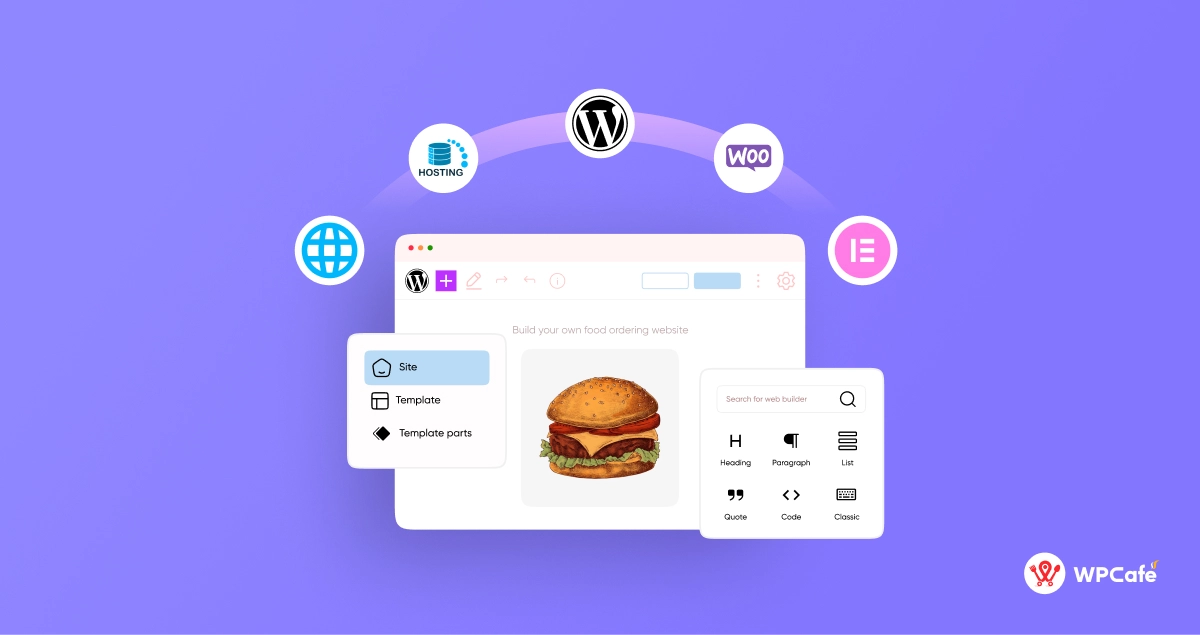
Now, let’s start building your online food ordering website
Now we are going to create a food ordering website. To complete this, 3 plugins need to be installed: two are mandatory, and one is optional. Firstly, you need the “WooCommerce plugin” to enable selling features. Secondly, you will need the “Food Ordering Plugin” for managing food orders. Lastly, for customization and editing, you can install “Elementor” or any similar plugins. Additionally, to view the website properly, choose a “Restaurant theme”.
Install WooCommerce in WordPress
Log in to your WordPress admin dashboard(if you’re already logged in, then skip this step).
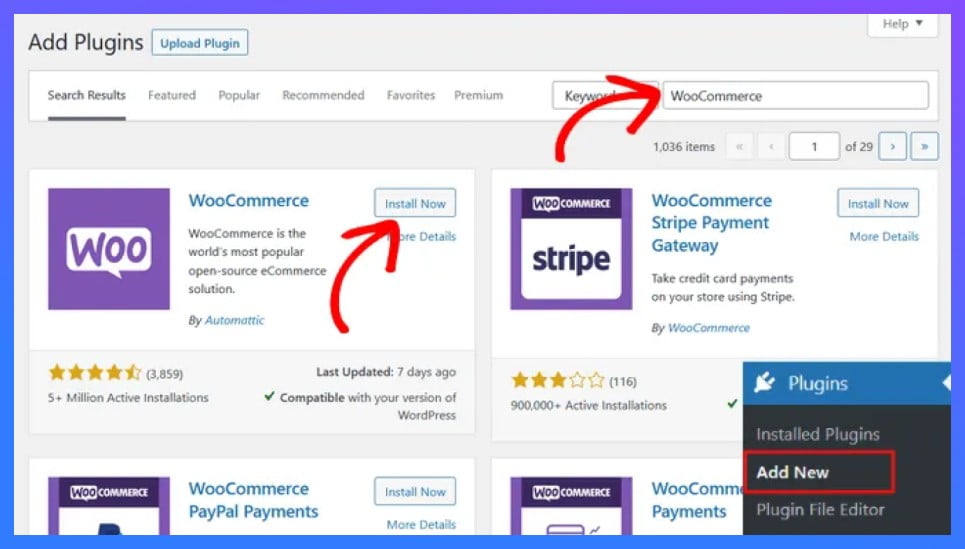
- In the search bar, type “WooCommerce” and press Enter. Look for the official WooCommerce plugin.
- Click on the “Install Now” button next to the WooCommerce plugin.
- Click “Activate” after installing WooCommerce. After that, WooCommerce will launch its configuration wizard, guiding you through the essential settings to set up your store.
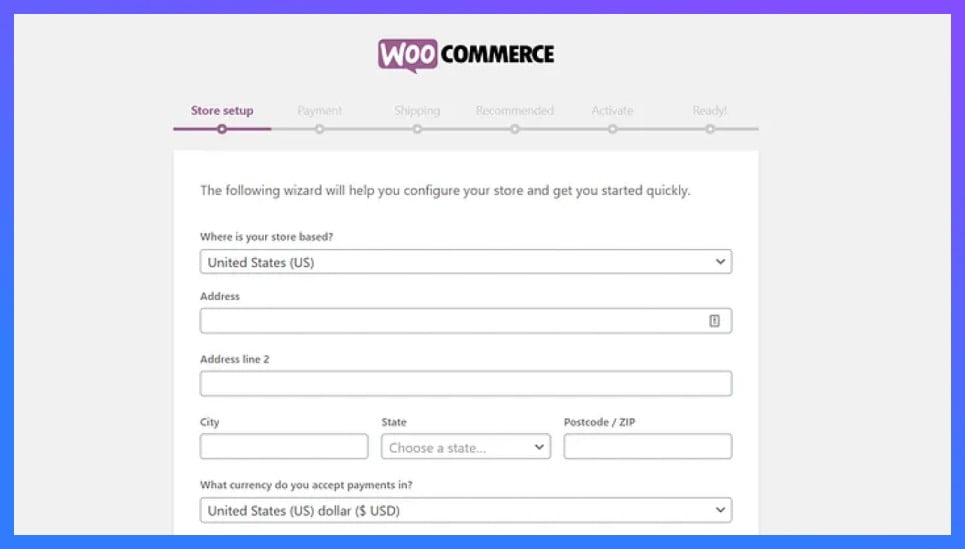
You need to specify your location, the currency you want to use, and the kinds of products you want to sell.
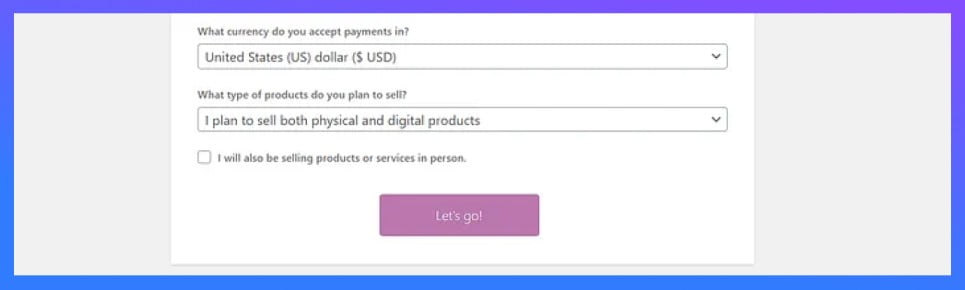
After completing every field, press the Let’s go! button.
Install a Restaurant Management Plugin in your WordPress
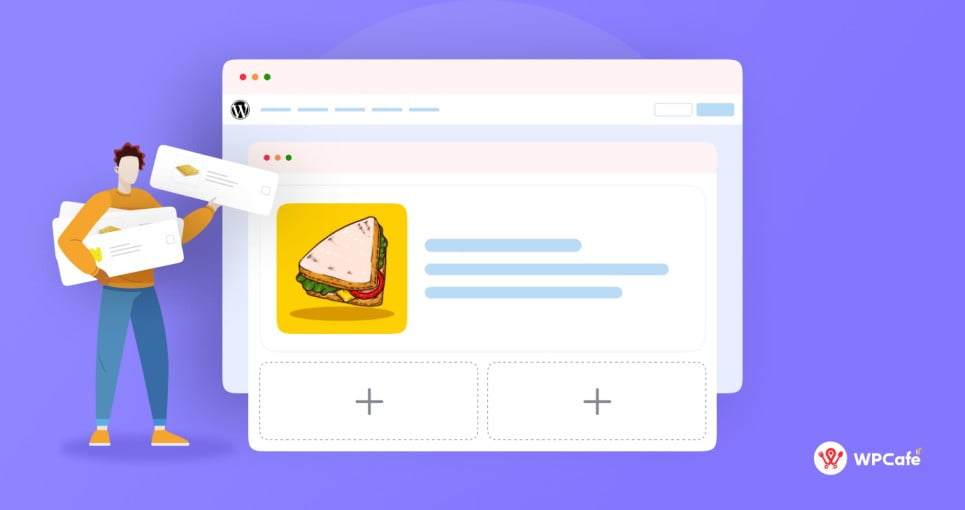
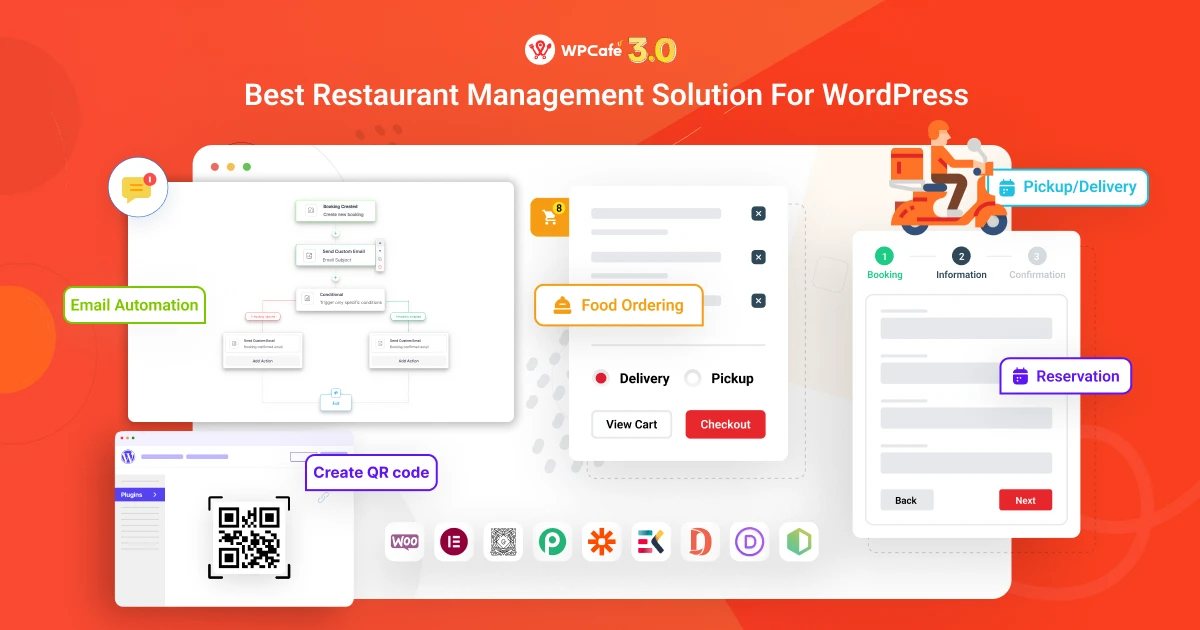
For this setup, we’ll use WPCafe as our restaurant management plugin.
WPCafe is built specifically for restaurant websites. It helps you turn a basic WooCommerce setup into a complete food ordering system without adding multiple plugins.
With WPCafe, you can:
- Create and manage your food menu
- Accept online orders with pickup and delivery options
- Set time slots and scheduling rules
- Manage table reservations
- Add tips, discounts, and product add-ons
- Get real-time order notifications
Instead of combining different tools for each feature, WPCafe gives you everything in one place, making your restaurant website easier to manage and scale.
From the WordPress Dashboard, you can install and activate WPCafe (free).💥
Installing and activating WPCafe (Free) from the dashboard
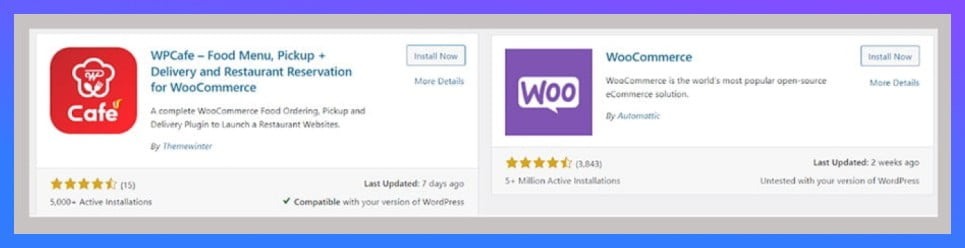
- In the left-hand menu, click “Plugins” and then “Add New.”
- Type “WPCafe” in the search bar and press Enter.
- Select the official “WPCafe Plugin” and click “Install”.
- When it has been installed, click on Activate, then wait a little while
Install Elementor in WordPress
Install Elementor if you want to customize your WordPress website like drag and drop. It’s not mandatory, but food menu widgets can be added to your website with Elementor. Additionally, you can create beautiful pages on your restaurant WordPress site using regular widgets.
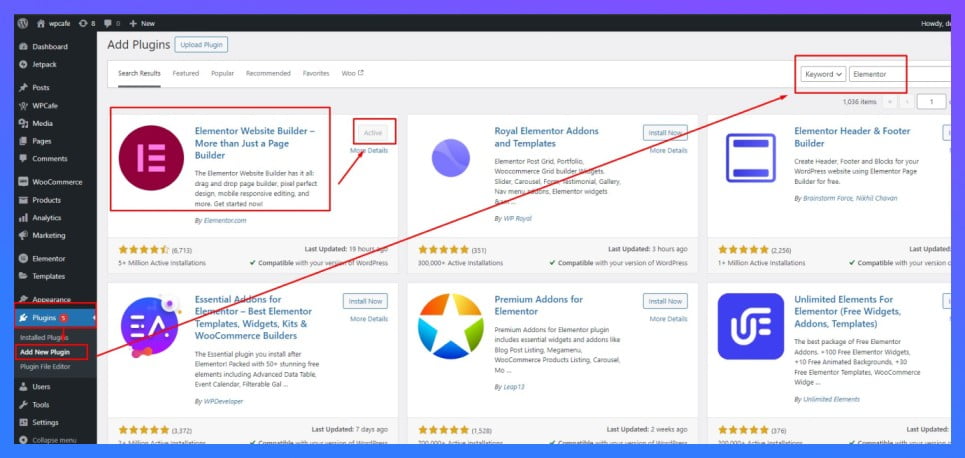
In the same way that you already installed two plugins, click on “Plugins” and select “Add New”. Search for “Elementor” and click “Install”. Press “Activate” and wait for the plugin to install.
What is Elementor and how can it help you design a restaurant website? Read more
Install food ordering website theme

Again the same way that you already installed plugins, go to Dashboard > Appearance > Themes > Add New Theme > Active. Here you can choose any WordPress theme from thousands available; I am using the default theme as an example. You can customize the theme to fit your needs and preferences. You can also add more plugins to make your site even more powerful.
➕ Add new item on your food ordering website
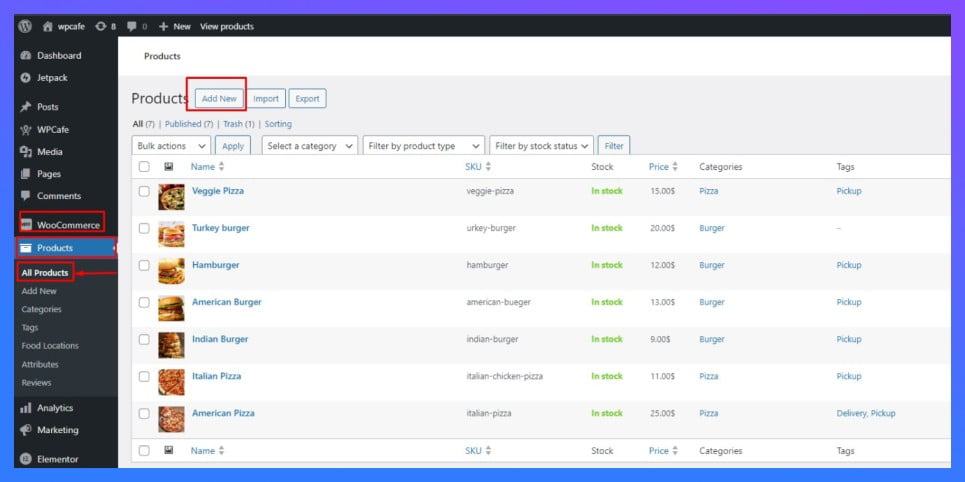
Click on “WooCommerce,” and you should see several options. Look for “Products” and click. This is where you can manage and add new products.
Click the “Add New” button to add a new product. This will take you to a page where you can enter all of your product’s details, such as the title, description, price, and images.
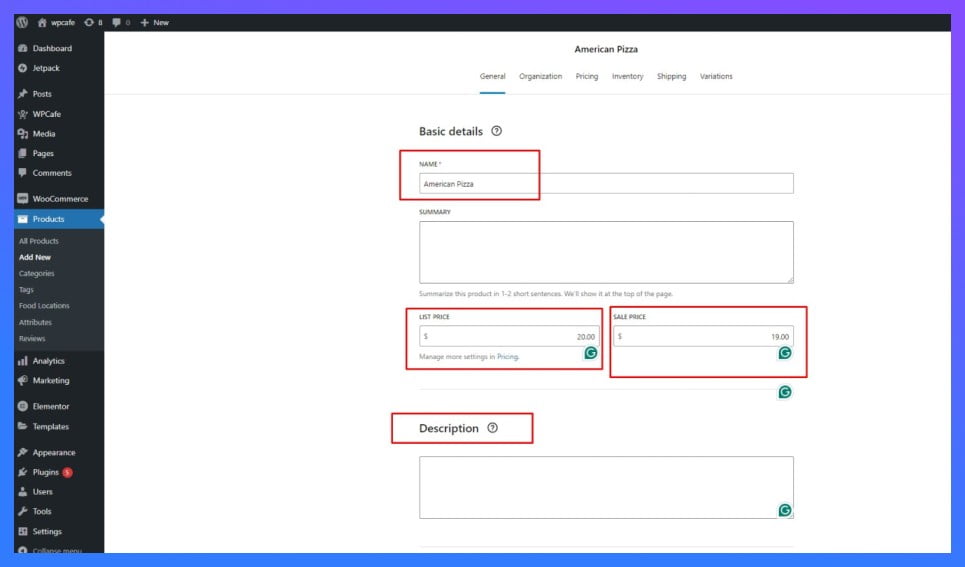
Start with the basics like the Item name, price and description. Add a detailed description to help your customers understand. Below that, you can set the product price.
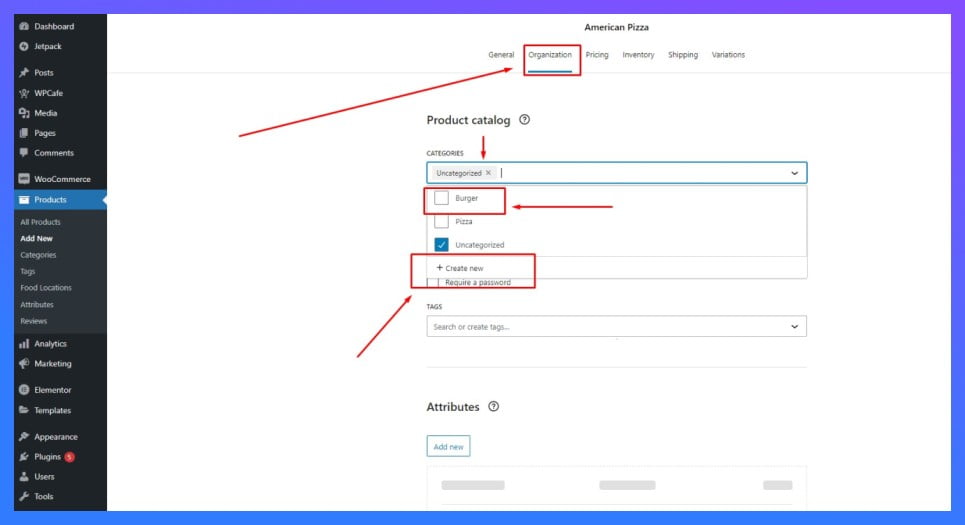
Now, on the right side, you’ll find a “Product Catalog” under the Organization menu. You can assign the product to a category, which helps organize your store. If you haven’t created any categories yet, you can do so by clicking“Create New .” For example, Here are two categories I created: Pizza and Burger
User interface for the frontend view
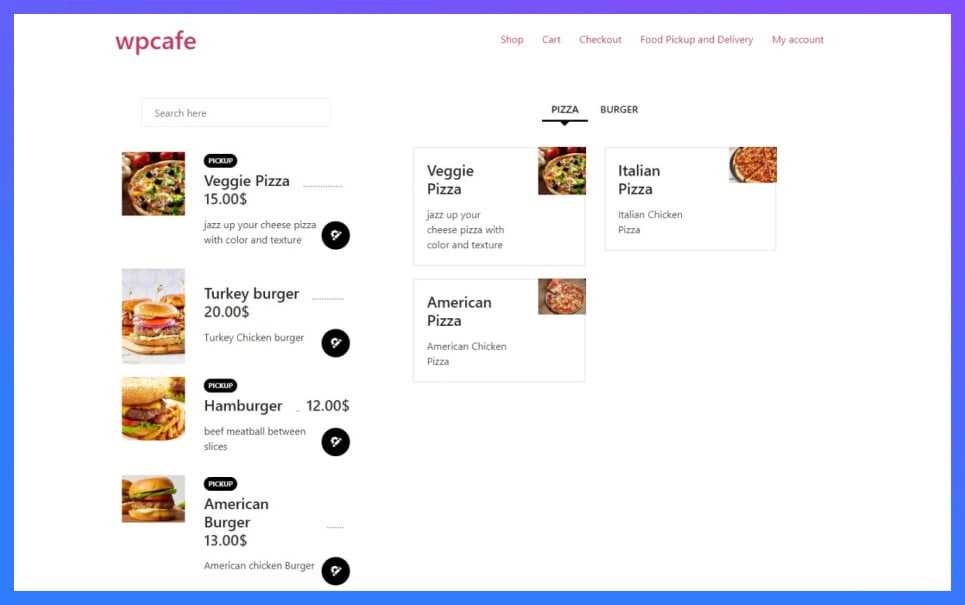
With the default theme, here is a basic view of a WordPress food-ordering website. If you want to make it more elegant, you can use popular restaurant themes.
(Example Image)
How to manage your restaurant menu and food ordering
Once your website is set up, the next step is managing daily restaurant operations smoothly. This is where most setups fail – not in building the site, but in handling orders, menus, and customer experience.
Instead of using different plugins for each task, you can manage everything from one place with WPCafe. It turns your WordPress site into a complete restaurant ordering system, so you don’t have to deal with complex setups or scattered tools.
Here’s how it helps you run your restaurant website day to day:
Handle pickup and delivery without confusion
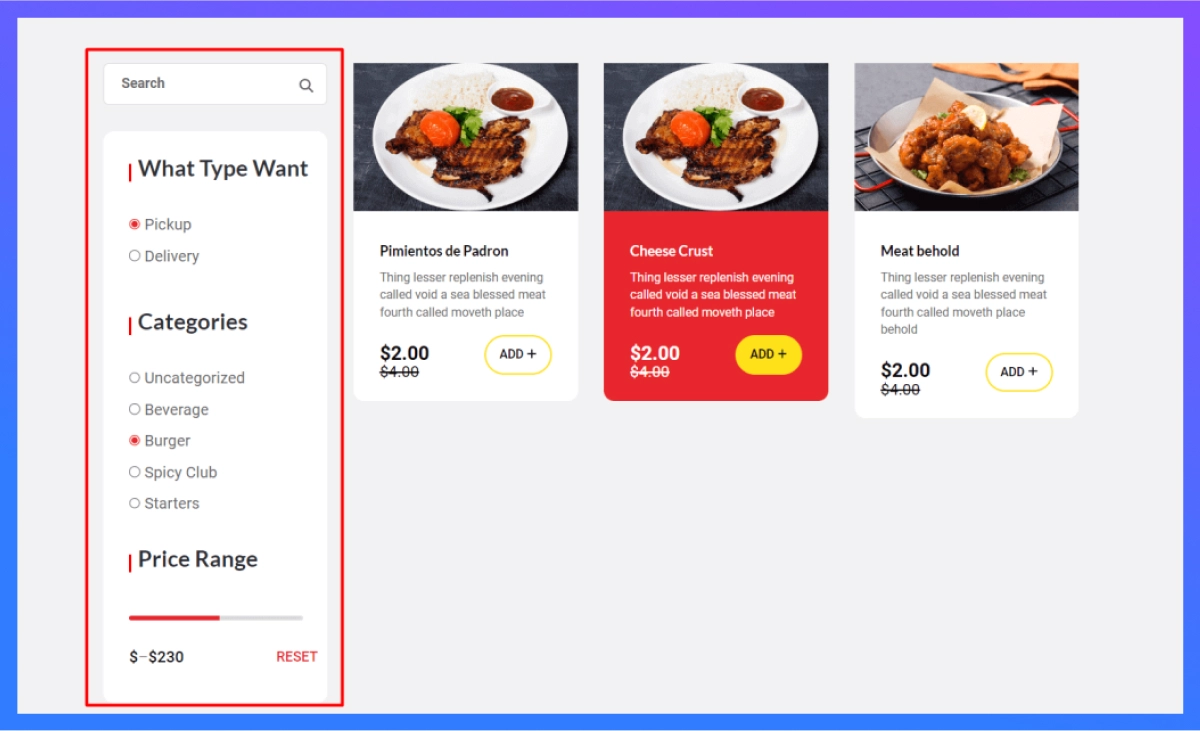
You can define how and when customers receive their orders. Set delivery zones, choose pickup or delivery options, control available time slots, and block holidays when your restaurant is closed.
This keeps your ordering process clear for both you and your customers, and helps avoid missed or delayed orders.
Offer flexible pricing, discounts, and tips
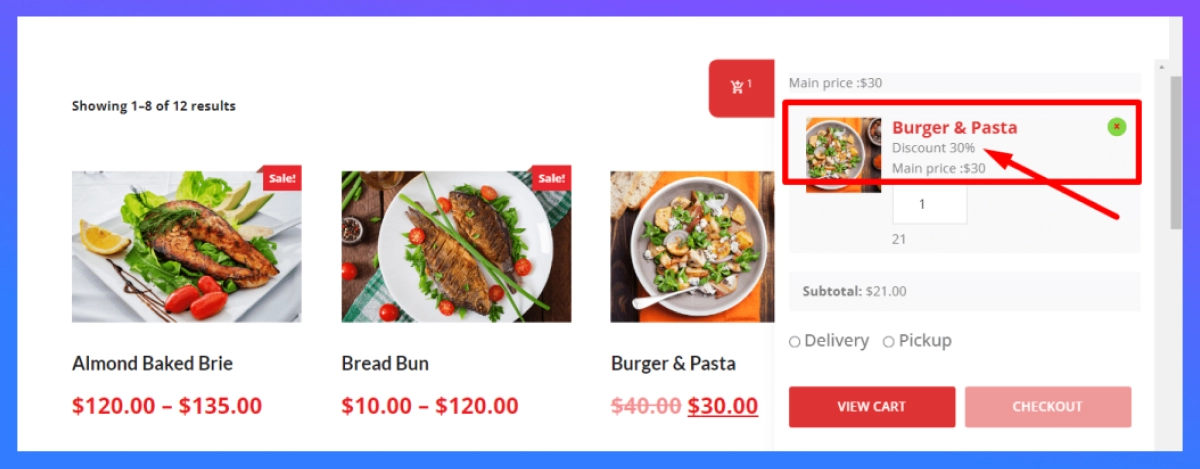
Running offers is simple. You can apply percentage or fixed discounts to menu items and adjust pricing anytime. You can also allow customers to add tips during checkout. It’s optional, but it helps increase order value and gives customers a way to show appreciation.
📌 As an owner of a WooCommerce online food ordering website, you may want to enable the tip option for your customers. This allows them to add amount as a tip for your service.To enable the tip option on your website, follow these steps.. | Read more.
Make ordering faster with a smooth cart experience
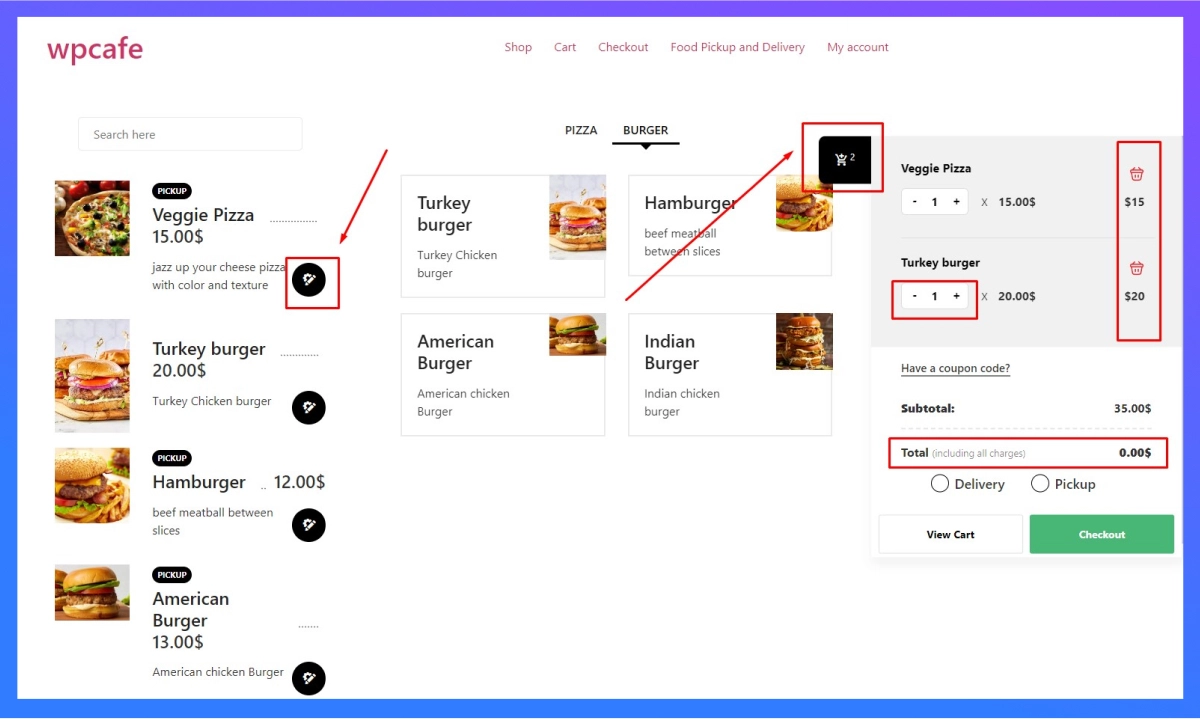
A clean ordering flow matters. Customers should be able to adjust quantities, review items, and checkout quickly without friction. With a built-in mini cart and real-time updates, customers can place orders without jumping between pages, which helps reduce drop-offs.
📌 With so many WooCommerce plugins available, choosing the right mini cart plugin can be challenging. Here are the top 5 free and premium WooCommerce mini cart plugins in one place, so you can easily choose which one suits your needs.| Read more
Let customers customize their orders
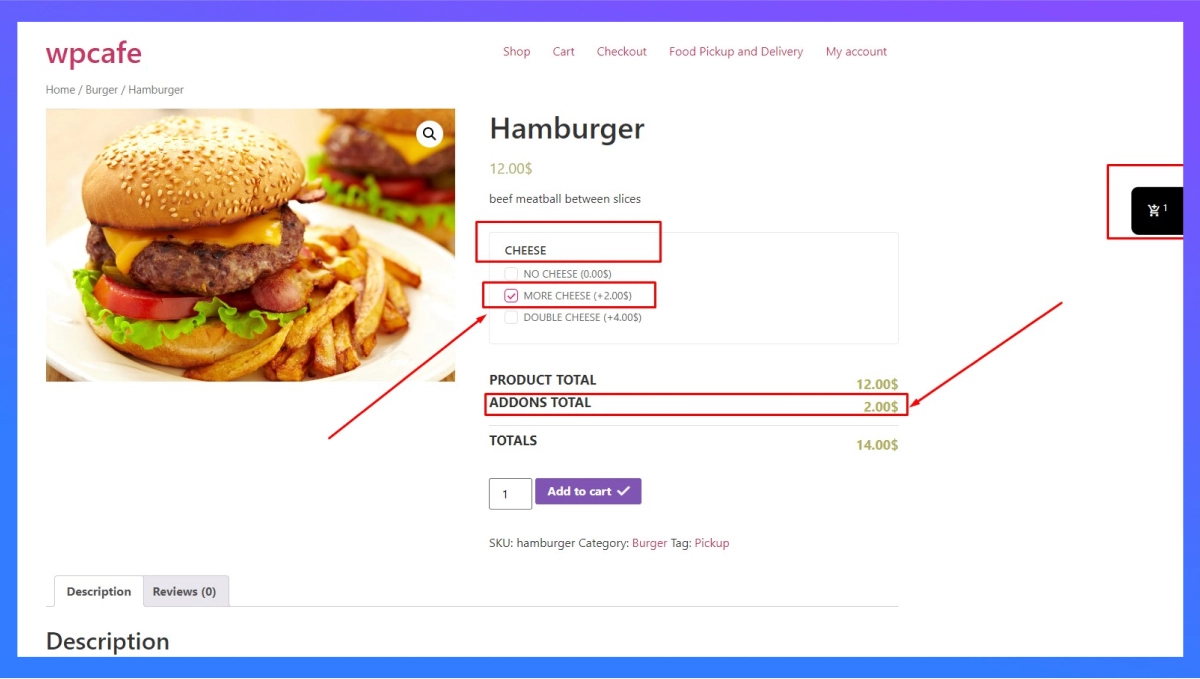
Food ordering is rarely one-size-fits-all. Customers often want extra toppings, add-ons, or sides.
With product add-ons, you can let customers customize their meals directly from the menu. This not only improves the ordering experience but also increases the average order value without extra effort.
Get instant order alerts (so nothing gets missed)
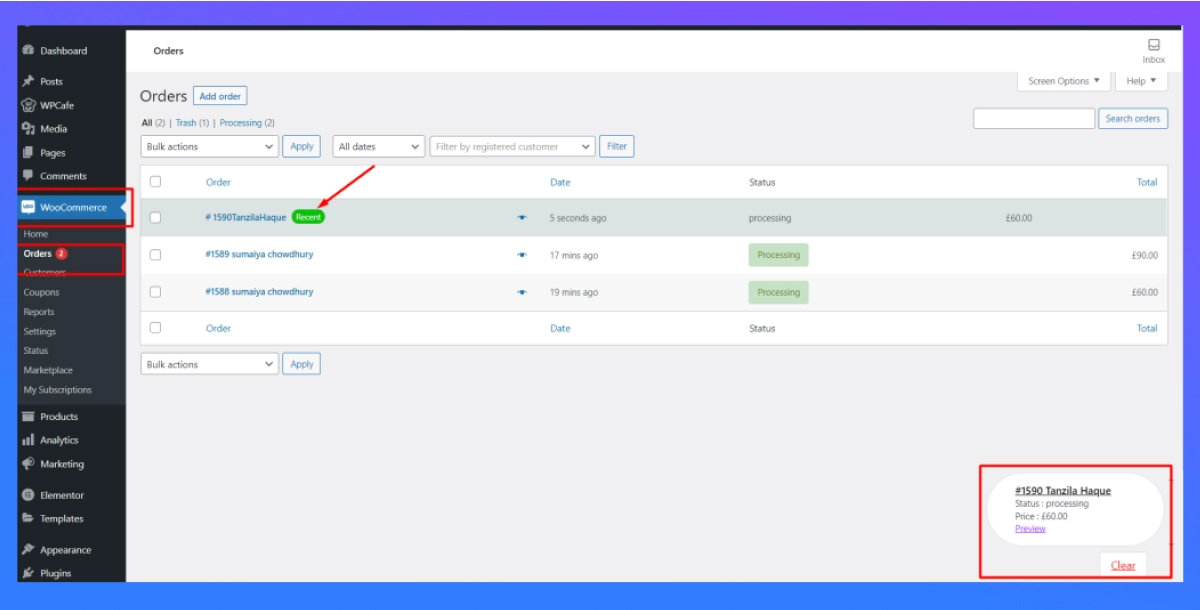
When a new order comes in, you need to act fast.
WPCafe gives you real-time order notifications with sound and visual alerts, so your team can prepare orders immediately. This is especially useful during busy hours when manual refresh isn’t practical.
Manage table reservations alongside orders
If your restaurant offers dine-in, you can handle reservations from the same website. Customers can book tables based on availability, and you can manage all bookings without switching systems. This keeps your operations simple and organized
Add QR code ordering for a modern experience
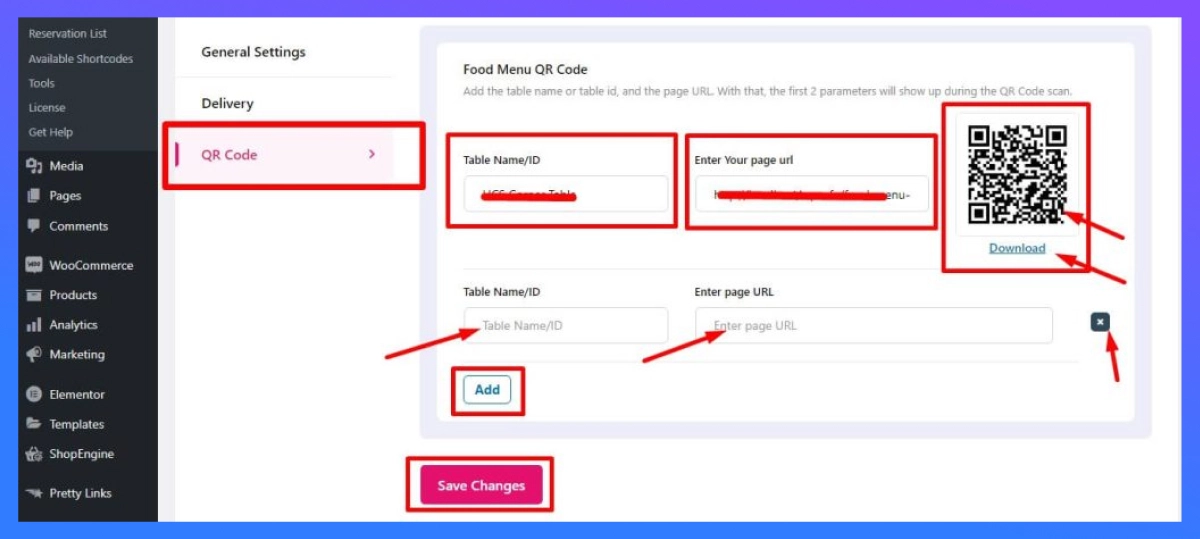
You can also offer QR food ordering for dine-in customers.
Guests scan a QR code, view your digital menu, and place orders directly from their phones. You can update the menu anytime without reprinting anything, which saves time and cost.
Bonus tips for enhancing your online food ordering experience

- Optimize Load Times: Use tools to compress images and streamline code, enhancing your website’s speed.
- Visual storytelling: Don’t just list menu items – entice with high-quality photos and videos that showcase the food’s preparation, ingredients, and presentation. Consider 360° product views for a truly immersive experience.
- Optimize for mobile orders: Most online orders happen on smartphones. Ensure your website is responsive, loads quickly, and offers a smooth ordering process optimized for smaller screens.
- Personalize the experience: Utilize customer data to offer personalized recommendations, remember dietary preferences, and suggest past favourites. This creates a sense of connection and encourages repeat business.
- Don’t underestimate the power of reviews: Encourage customer reviews and testimonials, showcase positive feedback prominently, and actively respond to both positive and negative reviews. Transparency builds trust and demonstrates your commitment to improvement.
- Offer multiple payment options: Providing a variety of secure payment gateways, including popular digital wallets and local options. Make checkout quick and painless.
Troubleshooting common issues
- Problems with online food ordering websites can range from technical glitches to user error. Here are some quick fixes:
- Clear Your Cache: Sometimes, old data stored in your browser can cause display issues on the website.
- Update Browser: Ensure you are using the latest version of your browser for optimal functionality
🪝 Remember: These are just starting points. Continuously explore new technologies, tools, and trends to stay ahead of the curve and keep your online food ordering website at the forefront of the competitive landscape.
In summary
Every restaurant is different, so build your website around your menu, customers, and how you operate. Focus on what makes ordering simple and convenient for your audience.
Keep your website easy to use. A clear menu, smooth checkout, and fewer steps help customers order faster and come back again.
With WordPress and WPCafe, you can manage everything in one place and create a reliable online food ordering system that grows with your business.
📚 Quick Overview: What You’ll Learn: Seasonal Marketing Ideas to Drive More Restaurant Orders
Frequently asked questions (FAQ)
Q1: Do I need coding experience to build a WordPress website?
-Not necessarily! WordPress uses a user-friendly interface and numerous plugins to create websites without coding knowledge.
Q2: Do I need to buy a domain name and hosting?
-Yes, these are essential for your website to exist online. Choose a domain name that reflects your brand and a reliable hosting provider.
Q3: How can I optimize my website for mobile devices?
-Choose a responsive theme and test your website thoroughly on different mobile devices and screen sizes.
Q4: How can I track my website analytics?
-Tools like Google Analytics provide valuable insights into customer behavior and website performance.
Q5: How can I attract customers to my online ordering website?
-Promote your website on social media, local directories, and email marketing, and consider offering limited-time promotions to incentivize orders.