How to Create and Sell Custom Event Tickets in WordPress (Step-by-Step Guide)

Table of Contents
Want to sell event tickets on your WordPress site for free?
In this guide, we’ll show you create and sell custom event tickets in WordPress using a free event ticketing plugin like Eventin.
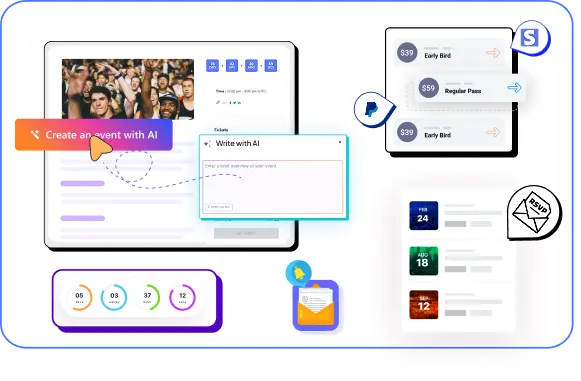
With Eventin, you can create and customize event tickets directly from your WordPress dashboard.
Whether you’re hosting a webinar, workshop, or concert, this step-by-step tutorial will walk you through the entire setup from installing the plugin to publishing your first event ticket.
Let’s dive in and get your event live!
Ready to run smoother events?
Create & manage events easily with Eventin event manager.
- ✅ Sell tickets
- ✅ Track attendees
- ✅ Automate reminders
🎟️ Quick Summary
This guide explains how to create customized event tickets in WordPress using the Eventin plugin. You’ll learn how to design tickets, add ticket types, and manage attendees directly from your WordPress dashboard.
- Why customized tickets improve event organization and branding
- How can I sell event tickets on WordPress for free?
- How to customize ticket templates and attendee details
- How Eventin generates tickets with QR codes for check-in
- How to publish your event and start selling tickets
- Tips for managing attendees and ticket validation

Why Custom Event Tickets Matter
Customized event tickets do more than just allow entry to an event. They help organizers manage attendees, maintain branding, and create a more professional event experience.
When tickets include important details like event name, time, location, and attendee information, it becomes easier to verify guests and manage check-ins. Many event organizers also add logos, colors, and QR codes to make tickets secure and recognizable.
You can sell event tickets on WordPress for free using an event ticketing plugin like Eventin, which lets you create events, manage tickets, and accept bookings all from your dashboard, no coding needed.
How can I sell event tickets on WordPress for free?
Designing customized event tickets in WordPress with the Eventin plugin is easy. It enables you to create tickets that match your event’s branding and offer a smooth experience for event participants, all without any coding or paid tools.
Therefore, whether you’re organizing a webinar, as an educator, teacher, concert manager, or conference organizer, Eventin helps you manage everything from your WordPress dashboard.
Step 1. Install and activate the Eventin plugin
Start installing and activating Eventin from your WordPress dashboard if you haven’t already.
- Go to Plugins > Add New and search for “Eventin.”
- Click Install and then Activate.
Once activated, you can use Eventin to manage your event ticketing needs.
Step 2. Create a new event
To start selling tickets, you must create an event in WordPress.
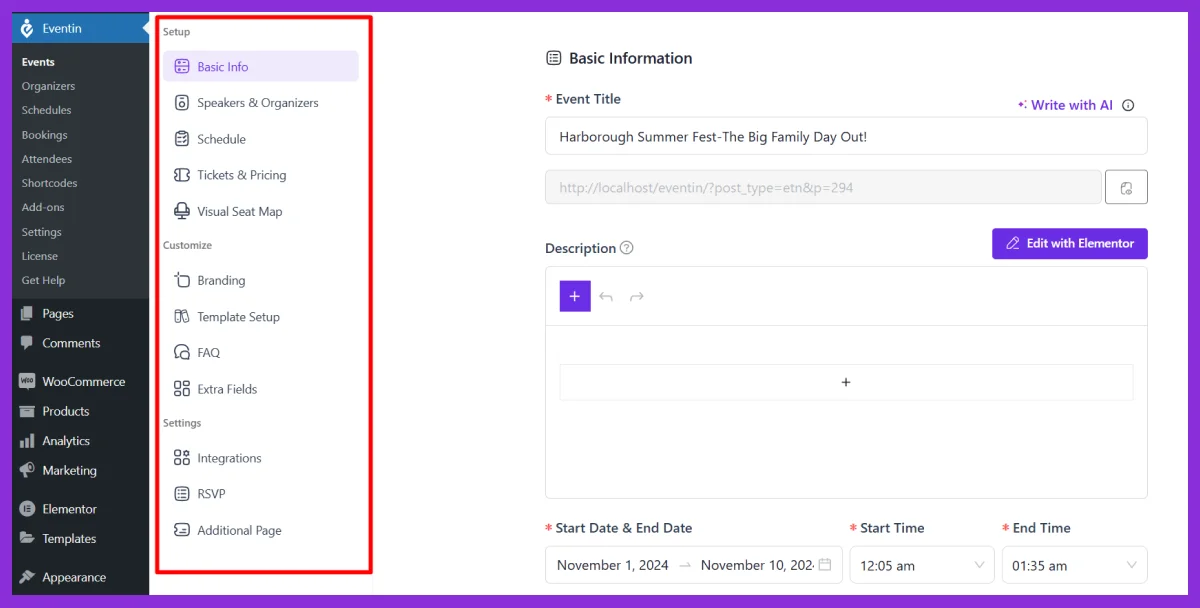
From your WordPress dashboard, go to Eventin → Events and click “Add New.”
- Basic information: Add your event title, description, location, start and end dates, and venue type (online/offline). This is what attendees will see first.
- Speakers & organizers: To build trust and engagement, showcase your event hosts by adding speaker profiles with names, photos, and social links.
- Schedule: Break your event into sessions or time slots. Add speaker names, topics, and times to give attendees a clear agenda.
- Tickets & pricing Use the built-in ticket builder to create free or paid tickets (like VIP, early bird, or general admission). Set price, quantity, and sales start/end times.
- Visual seat map: Use a drag-and-drop seat map to let attendees choose their seats—ideal for in-person or hybrid events with assigned seating.
- Branding Customize the event page with your logo, brand colors, social links, and cover image to match your brand’s identity.
- Template setup: Personalize ticket and certificate templates to create a cohesive event experience.
- FAQ: Add common attendee questions and answers to reduce confusion and support queries.
- Extra fields: Need to collect more information? Add custom fields like company name, dietary needs, or contact number during registration.
Related Reading: Maximize your event success using Eventin’s AI-powered automation to simplify event creation and management.
Step 3. Design and customize your event ticket
With Eventin, you can create custom event tickets that match your branding and offer a smooth booking experience. This includes naming your ticket types, setting prices, limiting availability, etc.
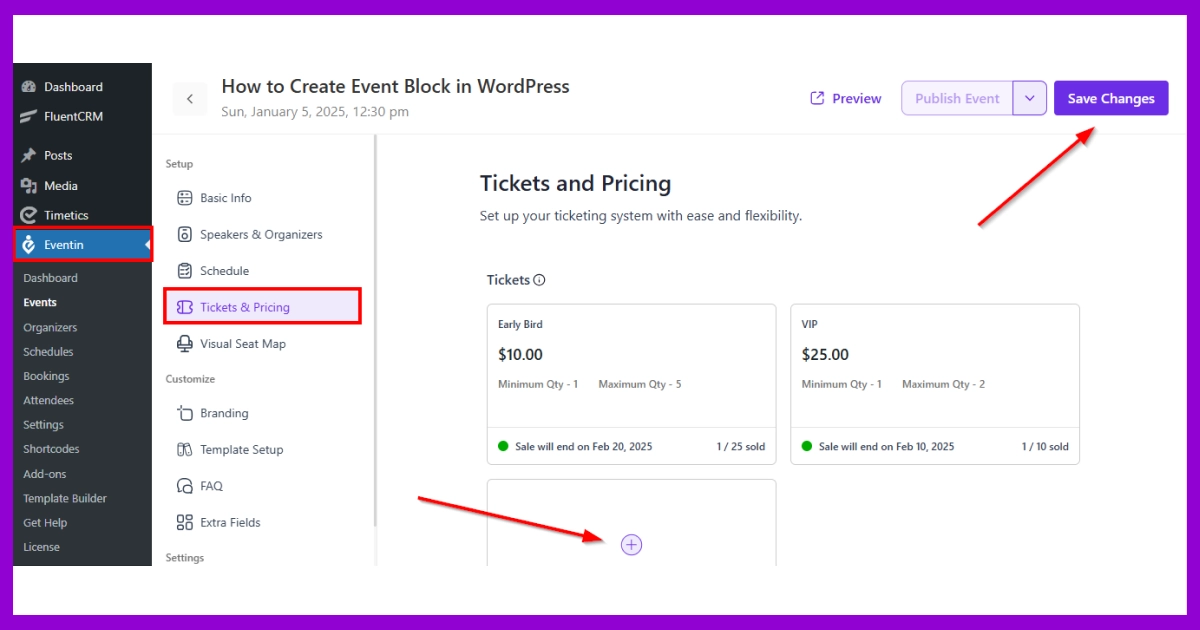
How to set up your ticket options:
- Go to Eventin → Events, then click on your event.
- From the sidebar, select Tickets & Pricing.
- Click the “+” (Add Ticket) button to create a new ticket type.
Here, you can customize:
- Ticket name (e.g., Early Bird, Regular, VIP)
- Ticket price (set it to $0 for free tickets)
- Quantity limits (set minimum and maximum number of tickets per person)
- Sale duration (start and end dates for ticket availability)
- Perks or description (what’s included with the ticket)
Once done, don’t forget to click Save Changes to apply your settings.
You can create multiple ticket types depending on your event needs.
Step 4. Add ticket details (Price, Quantity, Type)
Eventin lets you add custom form fields during ticket creation to make your tickets more personalized and useful. These extra fields help you collect important attendee information.
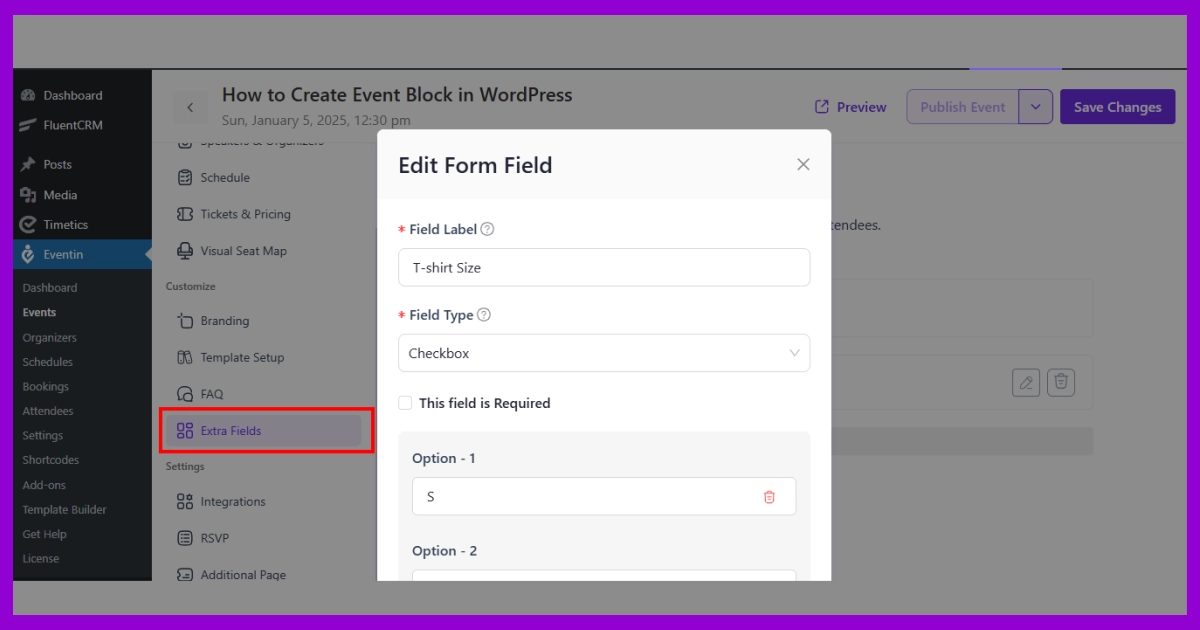
How to add extra ticket fields:
- In your WordPress dashboard, go to Eventin → Events, then select your event.
- From the left menu, click on Extra Fields.
- Click Add Field and set up the following:
- Field Label (e.g., T-shirt size, company name, food preference)
- Field Type (text, dropdown, checkbox, etc.)
- Choose whether the field is required or optional.
- Once done, click Save Changes.
You can use these fields to collect:
- Attendee names
- Shirt sizes
- Dietary preferences
- Custom tags or notes
This makes your event tickets feel tailored and helps you organize the attendee experience better.
Step 5. Customize the event ticket template
Eventin comes with built-in ticket templates that you can easily personalize. These templates allow you to design tickets with your branding, event details, and QR codes for faster attendee check-in.
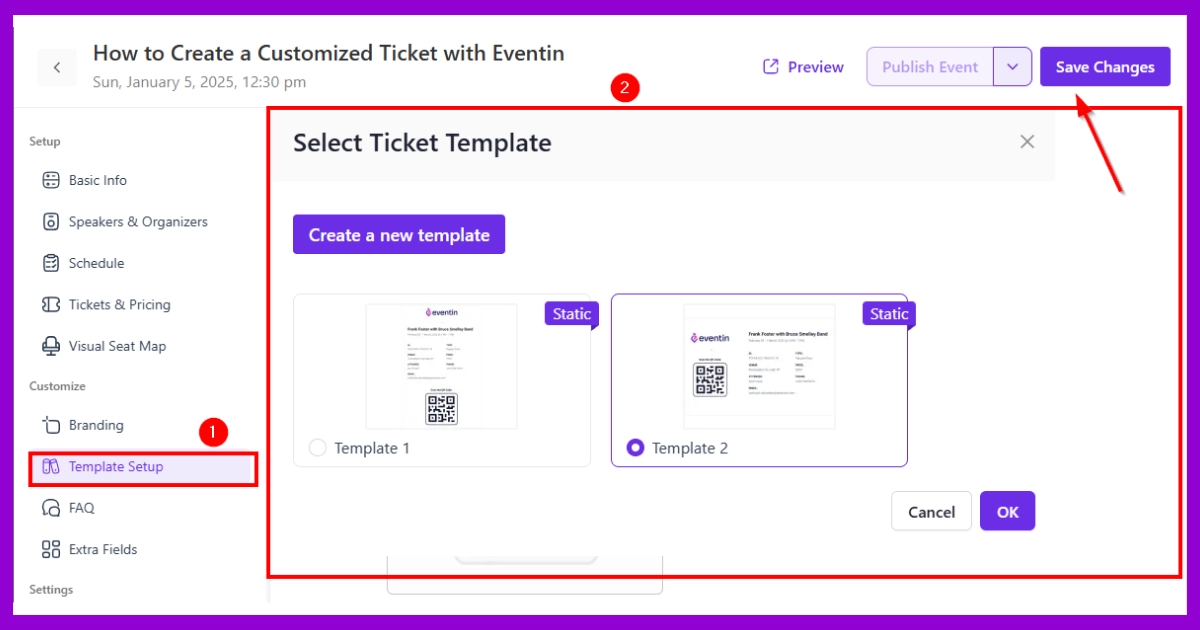
How to customize your ticket design:
- In your WordPress dashboard, go to Eventin → Events → Template Setup.
- Browse and select a pre-designed ticket template.
- Click “Create a new template” if you want a fresh layout.
- Customize the design by adjusting:
- Logo
- Font styles
- Colors
- Ticket fields (event name, ticket type, date, etc.)
- QR codes for attendee check-in
- Custom messages or instructions for guests
- Once you’re happy with the design, click Save Changes.
🚀 Why Use Eventin for Custom Event Tickets
Creating custom event tickets with your branding gives your event a professional look while keeping ticket generation smooth and consistent. It’s a great way to stand out and build trust with attendees.
Eventin lets you create events, generate customized tickets, and manage attendees directly from your WordPress dashboard. You can add multiple ticket types, include QR codes for quick check-in, and connect ticket sales with WooCommerce for secure payments.
Step 6: Publish and share your event page
Once your tickets are ready, it’s time to make your event live on your WordPress site. Eventin makes publishing and promoting your event easy with just a few clicks.
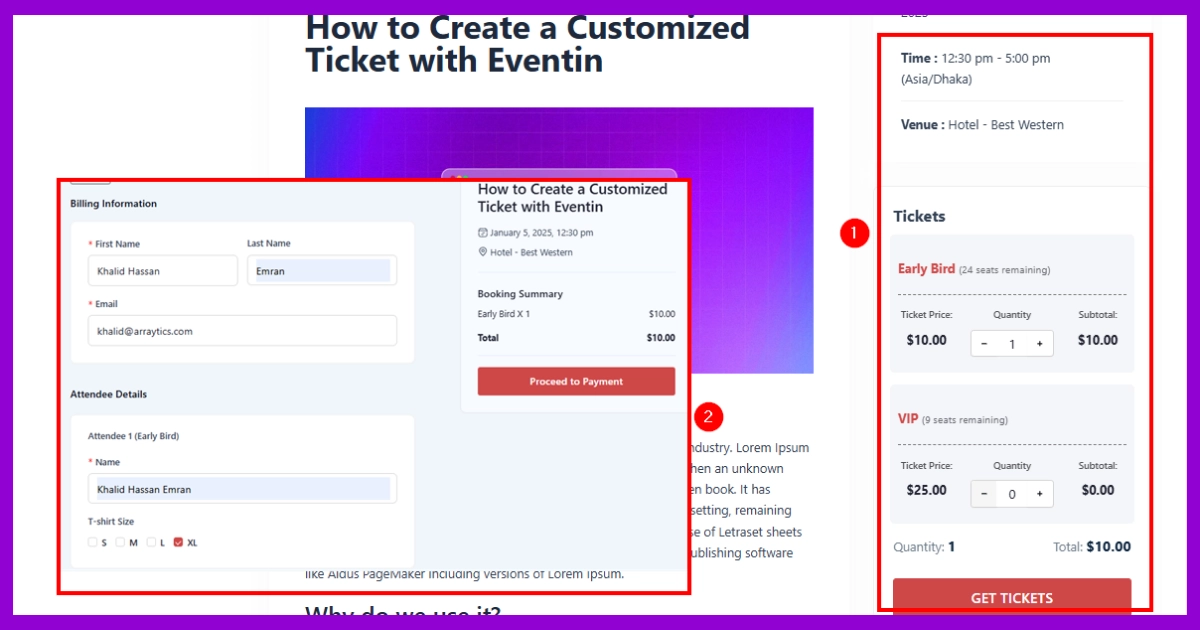
Final Steps to Go Live:
- Review all details. Double-check your event title, time, venue, ticket types, pricing, and custom fields.
- Save your progress. Click the “Save Changes” button at the top or bottom of the screen.
- Publish the event. Hit the “Publish Event” button to make your event page visible to visitors.
- Preview the frontend. View how your event will look to users, including ticket selection, price breakdown, attendee info fields, and checkout.
📢 Promote Your Event After Creating Tickets
After creating your custom event tickets, the next step is promoting your event so people can discover and register. A clear promotion strategy helps increase ticket sales and event visibility.
You can promote your event through social media, email newsletters, event landing pages, and community groups. With Eventin, you can publish your event directly on your WordPress website and share the event page with attendees to simplify registration and ticket management.
👉 Need help getting more visibility? Check out our guide on how to Promote Your Event Online for practical strategies that actually work.
🙌 Want to bring in sponsors to support your event? Don’t miss our tips on how to find sponsors for your event and create win-win partnerships.
🎥 Watch Video Tutorial
Prefer a visual walkthrough? Watch this step-by-step video to learn how to create and sell event tickets using Eventin.
Bonus tip: Add RSVP features for event engagement
Not selling tickets? No problem. With Eventin’s RSVP feature, you can still track who plans to attend your event perfect for free meetups, webinars, or internal events.
Using RSVP, you can:
- Collect simple responses like Going, Not Going, or Maybe
- Display attendee names on the event page (optional)
- Set a guest limit to control attendance
- Gather custom details without needing a ticketing setup
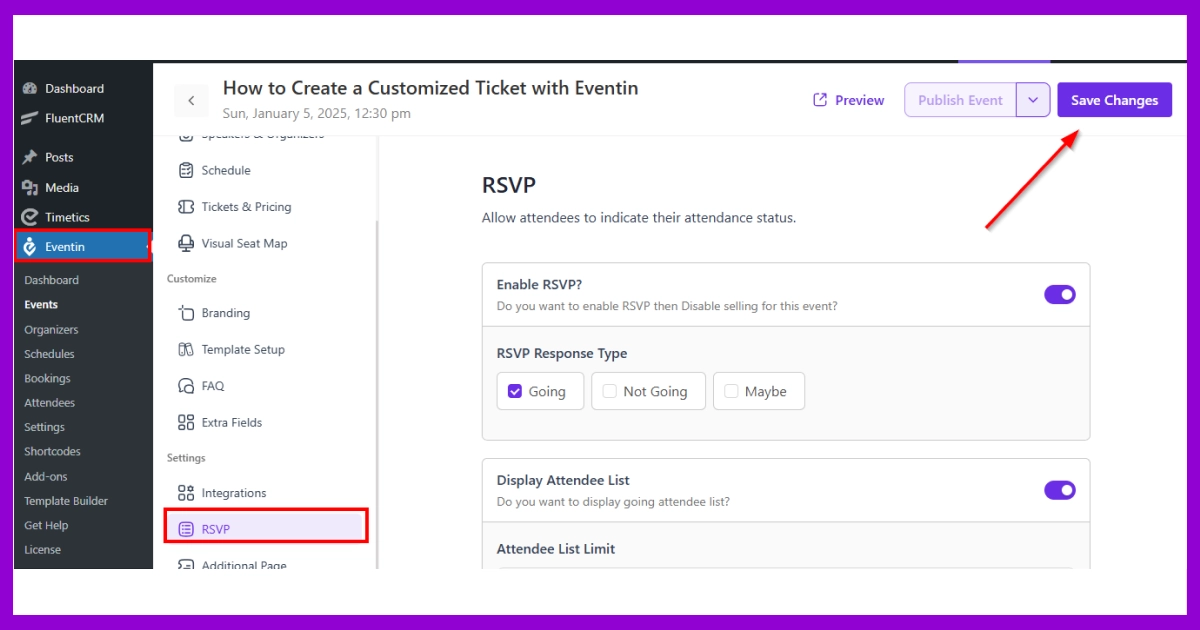
🔧 How to Enable RSVP in Eventin
- Go to Eventin → Events in your WordPress dashboard.
- Create a new event or edit an existing one.
- Scroll down to the RSVP section.
- Toggle on Enable RSVP.
- Choose the allowed response types and whether to show the attendee list.
- Click Save Changes.
Why use Eventin for event ticket sales?
If you’re looking for a flexible and beginner-friendly way to manage event registration with ticketing in WordPress, Eventin makes it simple.
Imagine you’re planning your event in WordPress. Here’s how it helps you every step of the way:
- Start with a custom look: You begin by creating tickets that match your brand. With Eventin’s ticket builder, you can easily add your logo, choose colors, and customize layouts using a simple drag-and-drop editor.
- Add a personal touch: Next, you make each ticket feel more personal. Add attendee names, seat numbers, or even QR codes for easy check-in, all directly on the ticket.
- Manage everything from one place: Since Eventin runs inside your WordPress dashboard, you don’t need extra tools. You can handle ticket sales, registrations, schedules, and RSVPs all in one spot.
- Let Eventin handle delivery: As soon as someone books a ticket, Eventin automatically sends it to their email. No manual work, no delay, just a seamless experience for your attendees.
FAQs about selling event tickets on WordPress
How to Create and Sell Tickets for Events on WordPress
With Eventin, you can easily create events, add ticket tiers, and manage sales—all from your WordPress site. Install Eventin, create an event, add ticket details, and publish it. Visitors can then buy tickets directly from your website.
Does Eventin support WooCommerce ticket sales?
Yes, Eventin integrates with WooCommerce in its free version, enabling ticket sales and payment processing through WooCommerce-supported gateways.
Does Eventin have a QR scanner to verify your attendees on tickets?
Yes, the Eventin event ticketing plugin offers a unique QR scanner solution that allows you to scan all the single/bulk tickets at once, saving you a lot of time during event registration.
Does Eventin support Zoom or Google Meet for event management?
Yes, the Eventin event management plugin for WordPress allows you to create and manage virtual events using the Zoom (free) and Google Meet (pro)integrations.
Does Eventin support QR code ticket verification?
Yes. Eventin automatically generates QR codes for tickets so organizers can quickly verify attendees during event check-in.
Can I sell event tickets directly from my website?
Yes. With Eventin and WooCommerce integration, you can sell event tickets directly from your WordPress website and manage payments securely.
Conclusion
Creating customized event tickets helps make your events look more organized and professional. It also makes it easier to manage attendees, verify registrations, and provide a better experience for participants.
With Eventin, you can create and run events, design custom tickets, and manage registrations directly from your WordPress dashboard. This allows you to run a complete event ticketing system on your own website without relying on external platforms.
🎯 Ready to Create Custom Event Tickets?
If you want to create branded event tickets, manage attendees, and sell tickets directly from your WordPress website, Eventin gives you everything in one place.
Start using Eventin to build a complete event ticketing system with custom ticket templates, QR check-in, and WooCommerce-powered payments.
Get Eventin Now