12 Essential Steps on How to Plan a Conference (Our Expert Picks)

Table of Contents
Eventin is a leading event management plugin with 20k+ active users worldwide. Every day, organizers use it to run conferences, workshops, and virtual events of all sizes.
And while the tool makes management easier, we often see organizers dive into planning with excitement—only to realize halfway through that things are slipping out of control.
The result? Stress for the team and a poor experience for attendees.
So, what usually goes wrong? Goals aren’t defined, budgets aren’t clear, and speakers or schedules get rushed at the last moment.
That’s why we created this guide. Based on real challenges and proven solutions, we will discuss 12 essential steps on how to plan a conference from start to finish.
Let’s get started.
Manage Events Like a Pro
Try the easiest way to create, manage, and promote events with Eventin.
- 🟣 AI event generation
- 🟣 Ticket & Certificate builder
- 🟣 Secure ticket sales
- 🟣 Event analytics & report
📌 Quick Overview
In this guide, you’ll find 12 essential steps to plan a successful conference. We’ll cover:
- How to define goals, audience, and scope
- Budgeting, timelines, and team setup
- Choosing the right venue and event format
- Designing programs and selecting speakers
- Finding sponsors and exhibitors
- Using event management tools like Eventin
- Marketing, logistics, and risk planning
- Post-event analysis and feedback collection
Step 1: Define your goals and audience
Every successful conference starts with a clear purpose. Ask yourself why you are organizing this event. Is it to educate, build community, promote research, generate leads, or create new business opportunities?
Your goal shapes every other decision you make. Once you know the purpose, focus on your audience.
- Who are the people you want to attend?
- Are they industry professionals, researchers, business owners, or students?
Try to outline their profiles in detail. Think about their roles, challenges, and expectations. For example, a tech conference for developers will have different needs than a business leadership summit.
Defining goals and audience early helps you:
- Decide on the right type of sessions (keynotes, workshops, networking).
- Set the proper ticket pricing and format (in-person, virtual, or hybrid).
- Choose topics and speakers that match attendees interests.
- Plan marketing campaigns that reach the right people.
Without this step, planning can drift off course. With it, you have a foundation for every budget choice, program idea, and promotion strategy that follows.

Step 2: Set budget, timeline, & scope
Your budget, event timeline, and scope are the foundation of how to plan a conference event that runs smoothly. These three shape what your event will look like and help you avoid last-minute stress.
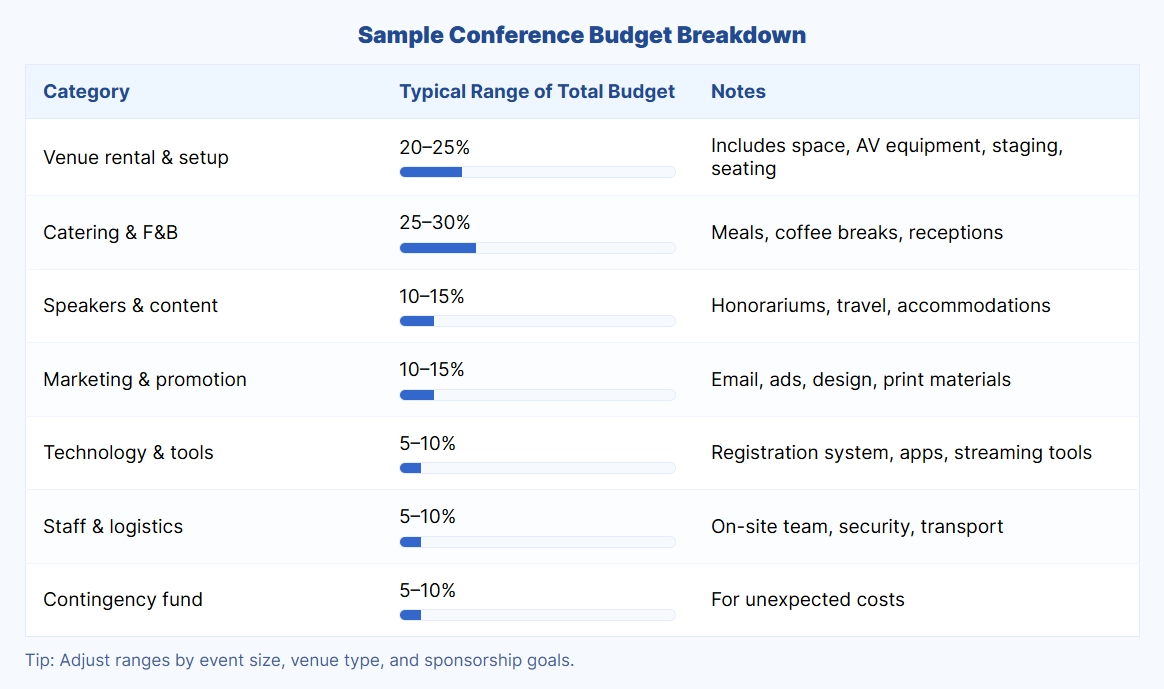
Set your budget
Start by outlining a rough budget. Include both fixed and variable costs. Such as,
- Venue and catering (usually the largest share)
- Speakers and travel
- Marketing and promotion
- Technology and equipment
- Staff and on-site support
Build in a 10–15% buffer for unexpected costs. According to a 2023 survey by EventMB, 57% of planners said that event budget planning is one of the top challenges in event management.
If you plan to generate revenue through ticket sales, sponsorships, or exhibitor fees, estimate how much you expect to bring in. Keep your financial goals realistic and tied to your overall objectives.
Plan for the event timeline
Most conferences take anywhere from 3 to 12 months to plan, depending on the size and complexity. So, create a clear conference planning timeline with milestones for venue booking, promotions, and final checks.
Break down your event schedule into key phases:
- Initial planning and budgeting
- Venue and speaker booking
- Marketing and promotions
- Registration and ticketing
- Final logistics and rehearsal
Work backward from your target event date and assign deadlines to major tasks. A shared planning calendar can help keep everyone on track.
Define the scope
Finally, define the size and reach of your event. Will it be one day or multiple days? Local, national, or global? A single track or multiple tracks?
Deciding the scope early keeps costs under control and prevents the agenda from becoming too crowded.
Together, budget, timeline, and scope form the framework for your conference. They set the limits, but they also give you clarity. When tough choices come up, you can refer back to these three for direction.
Step 3. Build your team & assign roles
A conference involves many moving parts. You cannot handle everything alone, so building the right team makes it easy how to organize a conference. Even a small event needs clear roles so tasks don’t overlap or get missed.
Start by assigning key responsibilities. The roles you need may vary depending on the size of your team, but here are some common ones:
- Event Manager – Oversees the entire planning process and coordinates between teams.
- Marketing Lead – Manages promotional campaigns, email marketing, social media, and ads.
- Sponsorship Coordinator – Reaches out to potential sponsors and manages relationships.
- Speaker Manager – Handles speaker outreach, communication, and logistics.
- Logistics Lead – Manages the venue, catering, transportation, and on-site setup.
- Registration & Tech Support – Sets up the registration process and supports attendees before and during the event.
If you’re working with volunteers or temporary staff, make sure they’re trained and assigned to specific tasks well in advance.
💡 Read also: 7 Effective Ways How to Effectively Communicate with Your Event Team
Step 4: Choose venue & event mode
The venue sets the tone for your conference. It affects attendance, costs, and the overall experience. Before you choose a venue for an event, decide on the format that best fits your goals and audience.
Then, choose a format that fits your audience and goals:
- In-Person: Good for networking-heavy events or when the location adds value.
- Virtual: More affordable and accessible. Ideal if your audience is spread out.
- Hybrid: If you want to plan a hybrid conference, balance both in-person and online experiences without neglecting either audience.
Your choice should depend on your audience and resources. For example, if most of your attendees are international, virtual or hybrid events may be more practical. If local networking is your priority, in-person may be the better fit.
If your audience is spread out, you’ll need to know how to plan a virtual conference with the right streaming platform and engagement tools. Check out our full guide on how to create a virtual conference website for step-by-step instructions.
In 2024, a report by Skift Meetings showed that 38% of event organizers planned hybrid events to increase reach without significantly raising costs.
Step 5. Plan program & select speakers
Once you have your venue and format, the next step is to design the program. The agenda should serve both your goals and your audience’s needs. A well-balanced program keeps people engaged and makes the event worth attending.
Build the Program
- Start with themes: Pick 2–3 main themes that align with your audience’s interests.
- Mix formats: Include keynote speakers, panel discussions, workshops, and networking opportunity breaks to avoid long stretches of passive listening.
- Balance timing: Allow enough breaks for meals and informal chats. Long days with no breaks lower engagement.
- Plan for interaction: Add Q&A sessions, polls, or roundtable discussions to keep attendees active.
Select the right speakers
Your speakers are one of the biggest draws. Attendees often register based on who is presenting. When selecting speakers:
- Choose experts who are relevant to your audience.
- Look for people with clear communication skills, not just knowledge.
- Aim for diversity in backgrounds and perspectives.
- Confirm early and send guidelines about session length, content format, and tech setup.
Provide each speaker with a short brief that explains the event goals, audience profile, session timing, format, technical needs, and deadlines. This makes preparation easier and builds trust.
Once this is done, you can move on to securing sponsors and exhibitors.
💡 Read also: How to Create a Speakers List in WordPress
Step 6. Secure sponsors & exhibitors
Sponsors and exhibitors provide financial support and add value to your conference. They also help you expand reach, as many promote the event through their own networks. Getting sponsorship early will reduce budget pressure and strengthen your program.
Identify potential sponsors
Think about companies, organizations, or brands that align with your audience. For example, a tech conference might approach software firms, device makers, or training providers. A healthcare event may seek support from hospitals, pharma companies, or medical suppliers.
Build sponsorship packages
- Create clear levels with different benefits. Common options include:
- Platinum/Gold/Silver tiers with varying levels of visibility.
- Logo placement on banners, websites, and event apps.
- Sponsored sessions, booths, or speaking slots.
- Access to attendee lists (within privacy rules).
Packages should show clear value. Sponsors want exposure and opportunities to connect with attendees, not just their logo on a flyer.
Plan for exhibitors
Exhibitors add an interactive element by showcasing products or services. Plan booth space, signage, and promotion opportunities. For hybrid or virtual events, exhibitors can use digital booths with chat or video demos.
💡 Read also: How to Write a Professional Event Proposal
Step 7. Choose your event management system
An event management software keeps your conference organized. It handles registrations, ticket sales, schedules, and communication in one place. Without it, you risk juggling multiple tools and losing track of details.
Choose an event planning software that matches the size and type of your event. Important features to consider include:
- Event registration and ticketing
- Attendee management
- Speaker and session scheduling
- Email notifications and reminders
- Payment processing
- Integration with video platforms (for virtual events)
- Reporting and analytics
If you’re running multiple events or tracks, look for support for recurring events or multi-day scheduling.
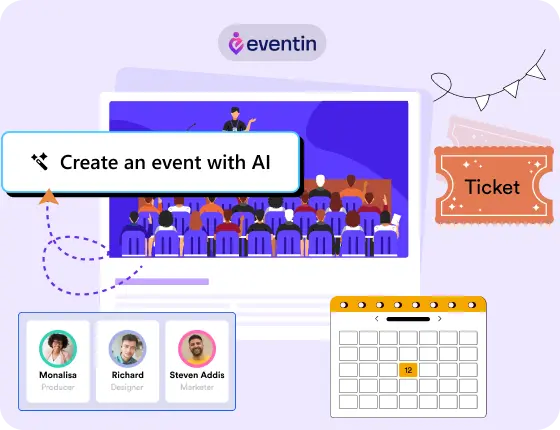
💡 Why Use Eventin
If you’re using WordPress, Eventin is one of the most flexible conference management software tools designed for managing both simple and complex events. With Eventin, you can:
- Create single-day or multi-day conference schedules
- Add unlimited speakers and sessions
- Enable online registration and ticket sales through WooCommerce
- Manage virtual events with Zoom or Google Meet integration
- Display event agendas, speakers, and sponsors on a branded event page
- Track attendee data and view reports after the event
Eventin helps keep everything organized inside your WordPress dashboard—without needing extra software or complicated setups.
💡 Read also: Why Eventin Event Management System Stands Out
Step 8. Set up registration, pricing & early bird strategy
Registration is the first real interaction attendees have with your conference. A simple, smooth process increases sign-ups and leaves a good first impression.
Set Up Registration
Make registration simple with a clear form that collects only essential details like name, contact, company, role, and any preferences or needs. Send confirmation emails right away and schedule automated reminders before the event. With Eventin, you can customize forms and manage the entire process directly from your WordPress site.
Pricing Models
Your ticket strategy depends on your goals and audience:
- Flat rate: One standard ticket price.
- Tiered pricing: Different ticket levels such as standard, VIP, or student discounts.
- Group tickets: Discounted packages for teams or organizations.
- Free + paid model: Basic entry is free, with extra fees for workshops or special sessions.
Early Bird Strategy
Offering early bird pricing motivates people to register sooner. Common practices include:
- Discounted rate: Lower prices for those who book weeks or months in advance.
- Limited time offer: Set a clear deadline to create urgency.
- Limited quantity: Restrict discounts to the first 50 or 100 tickets.
With Eventin, an event registration plugin for WordPress, you can customize forms and manage tickets directly on your site. Want to know more? Check this article to know how to create event registration in WordPress with Eventin.
Step 9. Develop your marketing and promotion strategy
Even the best-planned conference won’t succeed if people don’t know about it. A solid marketing plan helps you reach your target audience and build excitement before the event.
Build a Marketing Timeline
Work backward from your event date and create a timeline for each stage of promotion:
- 3–6 months before: Launch announcement, save-the-date emails, landing page live
- 2–3 months before: Speaker highlights, early bird push, social media campaigns
- 1 month before: Regular email reminders, paid ads, final program release
- 1 week before: Last chance to register, logistics emails
- Post-event: Share recordings, slides, and feedback forms
Use Multiple Marketing Channels
Reach your audience across the platforms they already use. Consider:
- Email marketing: Announcements, reminders, and post-event follow-ups
- Social media platforms: Regular updates, keynote speaker quotes, behind-the-scenes content
- Paid ads: Targeted ads on platforms like LinkedIn, Facebook, or Google
- Partnerships: Ask sponsors, speakers, and industry partners to share the event
- Event directories: List your event on relevant directories and community calendars
Create a dedicated event website (conference website) with the title, date, and location (or virtual link), an overview of what attendees will gain, speaker details, etc. You can read this guide on the best event promotion strategies to drive attendance.
Step 10. Plan logistics, catering & on-site management
This step is where your planning turns into real action. Good logistics ensure that the event runs smoothly, from the moment attendees arrive to the time they leave.
Logistics and Setup
Plan the venue layout to match your program, whether theater, classroom, or round tables. Use clear signage for registration, breakout rooms, and facilities to avoid confusion. Test all technology projectors, microphones, Wi-Fi, and streaming tools before the event day.
Catering
Food and drink are often what attendees remember most after the sessions. Keep it simple but professional:
- Plan menus that cover dietary needs (vegetarian, vegan, gluten-free).
- Schedule coffee breaks and networking lunches to give people time to connect.
- Keep water stations accessible throughout the conference venue.
On-Site Management
- Registration desk: Have staff or volunteers ready with attendee lists, badges, and check-in tools.
- Speaker support: Assign a coordinator to help keynote speakers with slides, AV, or timing.
- Attendee experience: Provide clear schedules, help desks, and a contact point for questions.
- Emergency prep: Know where first aid, exits, and venue staff are in case of issues.
If your event has a virtual or hybrid element, include tech support to manage live streams and help online attendees with access problems.
💡 Read also: Common Event Management Challenges
Step 11. Risk management & contingency planning
No matter how carefully you plan, unexpected problems can come up. A good contingency plan reduces stress and keeps the event running even if something goes wrong.
Identify Possible Risks
Watch for common issues such as
- Venue issues: Double-booked rooms, power outages, or equipment failure.
- Speaker changes: Last-minute cancellations or travel delays.
- Technology problems: Weak internet, failed projectors, or streaming glitches.
- Health and safety: Medical emergencies, fire alarms, or crowd management.
Prepare Backup Options
Have standby speakers or panelists, keep spare AV equipment with technical staff on site, and set up a backup internet connection or platform for hybrid events. Store presentations and schedules in the cloud for quick access.
Communication Plan
If something does happen, make sure your team knows how to respond.
- Assign one person to communicate with attendees.
- Have another person handle venue or vendor contacts.
- Keep messages clear and honest. Attendees are usually understanding if they’re informed quickly.
Insurance and Legal
For larger conferences, consider event insurance to protect against cancellations or liability. Review contracts with venues and vendors so you know exactly what risks are covered.
Step 12. Analyze your event & collect feedback
After the event ends, your job isn’t quite finished. Reviewing how the conference went and gathering feedback helps you understand what worked, what didn’t, and what to improve next time.
- Collect conference Feedback: Send a short post-event survey within 24–48 hours while the event is fresh. Ask about session quality, speaker performance, venue, logistics, and overall satisfaction. Use an online survey tool or the feedback form in your event system.
- Review Key Metrics: Measure what ties to your goals: total registrations vs. attendance, ticket and sponsor revenue, session attendance and engagement (in-person and online), and social or web activity such as mentions, hashtags, and traffic.
- Team Debrief: Meet soon after the event to discuss what worked and what did not. Write down lessons learned and update your planning checklist for next time.
- Share Outcomes: Send thank-you emails to attendees, speakers, and sponsors. Share highlights, recordings, or slide decks to extend the value after the event and strengthen future relationships.
💡 Read also: How to Measure the Success of Your Event
Next step: Simplify conference planning with Eventin
Planning a conference can feel overwhelming when you’re managing registrations, ticketing, schedules, and communication across multiple tools. This is where an event management plugin can make the process easier.
If your website runs on WordPress, Eventin gives you everything you need in one dashboard:
- Create and manage events with single or multi-day schedules
- Add and organize speakers with detailed profiles
- Sell tickets directly from your site with multiple pricing options
- Automate confirmations and reminders to attendees
- Use QR codes for fast on-site check-ins
- Track sales and attendance with built-in reports
By using Eventin, you save time on manual tasks and focus more on improving the attendee experience. Whether you’re running a small workshop or a large conference, having the right system in place makes your planning smoother and your event easier to manage.
Bonus tips: Best practices for successful conference planning?
Beyond the main planning steps, there are a few conference planning tips that can help your conference run more smoothly and leave a stronger impression on attendees. Here is a quick conference planning checklist to follow.
- Create a run-of-show document: Prepare a detailed schedule that shows what happens minute by minute on event day. Include session times, speaker arrivals, tech setup periods, staff duties, and emergency contacts. Share this document with your team and vendors so everyone stays aligned.
- Prepare for no-shows: Not every registered attendee will show up, especially for a free or virtual conference. Track your registration numbers and anticipate a 20–30% drop-off unless you’re charging for tickets.
- Record sessions: Recording sessions gives you content you can repurpose after the event. You can share them with attendees who missed a session, use clips for marketing, or offer them as paid content later.
- Use name badges and signage wisely: At in-person events, clear signage and readable name badges help with networking and navigation. Include the attendee’s name, role, and company if possible.
- Offer on-demand content: For virtual or hybrid events, consider offering recorded sessions for a limited time. This adds value and allows attendees in different time zones to catch up.
- Have a dedicated support channel: Set up a help desk or support email before the event. During the event, make sure someone is monitoring it in real time to help with login issues, directions, or general questions.
- Do a final tech check: A day before the event, test everything AV equipment, presentation files, Wi-Fi connections, and livestream platforms. Make sure backups are ready.
💡 Read also: How to Create an Event Announcement
FAQs about how to plan a conference event
How long does it take to plan a conference?
The timeline depends on the size and scope. A small local event can take around 2–3 months to plan, while large conferences often need 6–12 months. The more sessions, speakers, and attendees you expect, the earlier you should start.
What tools do I need to run a hybrid conference?
At minimum, you’ll need a video streaming platform, engagement tools (like live chat or polls), and a reliable event management system to handle registrations and ticketing. Eventin can manage registrations, schedules, and check-ins, while you connect it with streaming platforms for live sessions.
How do I find sponsors for my conference?
To find sponsors for your conference, start with organizations that share your audience. Create sponsorship packages with clear benefits such as logo placement, speaking slots, or booth space. Approach past partners first, then expand to new companies in your niche.
Can I manage multiple events from one dashboard?
Yes. With a tool like Eventin, you can manage multiple conferences, sessions, and ticket types from a single WordPress dashboard. This saves time and helps keep your data organized.
💡 Read also: How to Plan an Event Successfully
Ready to plan your first conference?
Planning a conference involves many decisions, but when you break it down into steps, it becomes much more manageable. From defining your goals to reviewing post-event feedback, each part of the process plays a role in the overall experience for your attendees, speakers, and sponsors.
The process of the key event planning steps may seem detailed, but following these 12 steps, you can plan a successful conference with confidence. And with the right event management plugin, such as Eventin, many of the most challenging tasks like registration, ticketing, and scheduling become much easier to handle.
Ready to plan with confidence? Try Eventin to manage registrations, ticketing, and schedules—all from WordPress.