How to Create a WordPress Event Details Page Using Elementor + Eventin
Table of Contents
Most WordPress event pages look the same: plain layout, basic info, and zero personality. That’s a problem if you’re trying to attract attendees or stand out from the competition.
A custom event details page can change that.
With Elementor’s drag-and-drop builder and the Eventin plugin, you can design a completely tailored event page that matches your brand, highlights key details, and improves user experience — no coding needed.
In this guide, you’ll learn how to:
- Enable custom event templates with Eventin
- Build a complete event page layout using Elementor
- Assign your design to any event with just a few clicks
Whether you’re organizing webinars, conferences, or meetups, this step-by-step tutorial will help you create a professional event details page that works.
Let’s dive in!
Why use a custom event landing page instead of the default?
The default event page in WordPress (or even most plugins) often looks plain and generic. That’s fine for basic info, but if you want to make your event landing page stand out, customization is key.
Here’s why creating your own event page layout matters:
- Better branding: Match the look and feel of your site by using your own fonts, colors, and layout.
- Improved user experience: Highlight important event info, like speaker details, schedules, and venue, exactly where you want.
- Higher conversions: A well-designed event page with clear CTAs and visuals can lead to more signups and ticket sales.
- Mobile-ready layouts: Elementor gives you control over how your event page appears on mobile, tablet, and desktop.
Instead of working around plugin limitations, you can take control and design precisely what you need using Eventin + Elementor.
Why choose Elementor for creating a landing page?
If you are new to WordPress, then you should look into popular page builder plugins. These plugins make it super simple to create a WordPress event website with the drag-and-drop feature.
Elementor is widely known as one of the best website builder plugins when it comes to designing WordPress websites. The free version of Elementor provides all the basic features for you to get started.
Besides, when combined with the best solution like the event planner software, you can create an event management website precisely the way you want.
Looking to build an event website? Here are the things to consider!
Before designing a free event website, you need to understand what exactly your goals are. Each event will have a unique theme and an agenda for a specific group of audience.
Before you start designing your website, you need to keep in mind these key points.
1. Perform audience research to know about their attributes
Every event will have two things: a purpose and an audience. Let’s consider that you already know the purpose, which is why you want to host an event. The people attending your event are the next thing to consider. Your audience’s response and testimonials will determine your event’s success. When planning your event and deciding on your website design, make sure you understand who your audience is and what they want.
2. Highlight brand voice and message to visitors
As the host, you probably want your visitors to remember you and your brand. Keep a clear idea of what you represent and try to highlight it as much as possible on your website.
The key to creating a great event management website is to provide a premium user experience. You will want to keep your brand image in their mind if you want them to come back in the future.
Make sure to keep your branding in visitors’ minds when designing your Elementor event page.
3. Keep your event agenda clear for visitors
It is common for people to forget important events and dates. If this happens to your visitors, then your event will not be a success. Make sure your event schedules are displayed clearly when you design your Elementor event page.
You can also add sticky content to emphasize your event date and time to your visitors. Additionally, you should mention the agenda of your event. This will help users understand your event and prepare accordingly.
4. Do not forget to add speaker profiles on the event page
A great way to attract users to your event is by highlighting speaker profiles. Inviting prominent speakers will attract visitors who might not have been interested in the first place.
If you plan on getting notable speakers for your event, showcase them when designing your Elementor event page. You can include bio information, speaker session times, and their social media information.
What are the basic requirements for an event management website?
Event management websites have a few basic elements to manage events properly. These requirements can vary from person to person.
However, it is recommended that event management websites have these basic components to get started.
1. An engaging homepage to make a first “awesome” Impression
The homepage will make the first impression of your event. There should be compelling images that help get visitors’ attention. You should keep your design minimal and encourage them to explore more details, such as the speaker lineup, schedule, entertainment, and any other information that enables users to purchase a ticket.
Adding location information is important because people would want to know where the event is to plan on attending. For online events, this may not be necessary.
In addition, the homepage of an event website should contain testimonials from previous attendees, a sponsors list, and links to social media pages associated with the event.
2. A detailed “About Page” to showcase your business
The About page of your Eventin Elementor website should summarize the details of your event. Please include a short bio of the event’s organizers and why they decided to launch the event. You can add images to show what exactly the event is about.
This page should also show the schedule of the event and any other details relevant to the event. It’s also essential to have a contact form for site visitors to get in touch with the event organizers.
3. Previously managed “Event Pages” to build trust and reliability
If your event is recurring, such as annual or monthly events, then create a dedicated page with media from previous events to encourage new users to purchase tickets.
An image gallery with pictures and videos of attendees enjoying the event can greatly motivate them to sign up. You can even add a reviews section from satisfied participants to show the impact of your events.
4. Add Registration and Ticketing Option to Sell Your Event
The purpose of your event is probably not just to invite attendees but also to sell tickets. If you want to earn, then you should consider including a ticketing option for your event. For this, you need to include a registration form with payment options.
Remember to keep your form short but informative to make the process of registration as user-friendly as possible. When designing your Elementor event page, you will need to make sure that the form is accessible to make the registration process smooth and easy to use.
5. Add a social sharing button so visitors can easily share your events
If you want more visitors, then you need to let people know about your event. The quickest way to do that is to share your event on social platforms.
Facebook has over two billion active users, while networks like Twitter and Instagram have millions of users. You should keep in mind social sharing options when creating your Elementor event page.
How to choose an Elementor-compatible event management plugin?
Designing an Elementor event page on WordPress is the easiest way to get started for FREE. However, WordPress has hundreds of event management plugins for you to choose from.
Finding the right plugin will take hours of research. If you are new to the WordPress community, then this will be a difficult task.
We have simplified your work by researching it. Learn about the top event management plugins for your event website. For our purpose, we will choose the Eventin plugin to create an Elementor event page on WordPress.
Eventin Event Manager is the perfect WordPress event management plugin to get started with. It is packed with great features that can help you create and manage a complete WordPress event website.
Plenty of customization options are available for you to design your unique Elementor event page. You can create Multi/Single events, speaker profiles, event landing pages, custom registration forms, and a lot more.
Some key eeatures of Eventin are:
- Attendee self-update details after registration
- Email automation builder
- Write events details with Eventin AI
- Integration with Dokan+Eventin to maximize revenue
- Track & modify attendee ticket usage status by Admin
- Zoom Integration
- Speaker & Schedule Listing
- Speaker Single Page
- Multiple speaker template for speaker profile
- WooCommerce Payment System
- Filter attendees by event, payment status, and ticket usage status
How to create your very first Elementor-powered Event Page
Requirements
Before you dive into the design process, make sure you have everything ready to follow along smoothly.
- ✅ A WordPress website with admin access
- ✅ Elementor (Free or Pro – Pro gives more design flexibility)
- ✅ Eventin plugin installed and activated
- ✅ At least one published event created with Eventin
If you don’t have an event created yet, you can follow this guide to create a WordPress event using Eventin.
Once you have everything set up, you’re ready to start designing your custom event details page.
Now that you know the basic requirements, we can start designing our website. In this section, you will see just how easy it is to create your Elementor event page with Eventin.
Install both plugins from your dashboard and follow the step-by-step process. You can check the documentation for Eventin and the documentation for Elementor setup for both plugins.
It is important that you set up the speaker details, event schedule, and event details before continuing. We will be using drag-and-drop widgets to design our Elementor event page. Read the step-by-step guide on how to set up Eventin for your event management website.
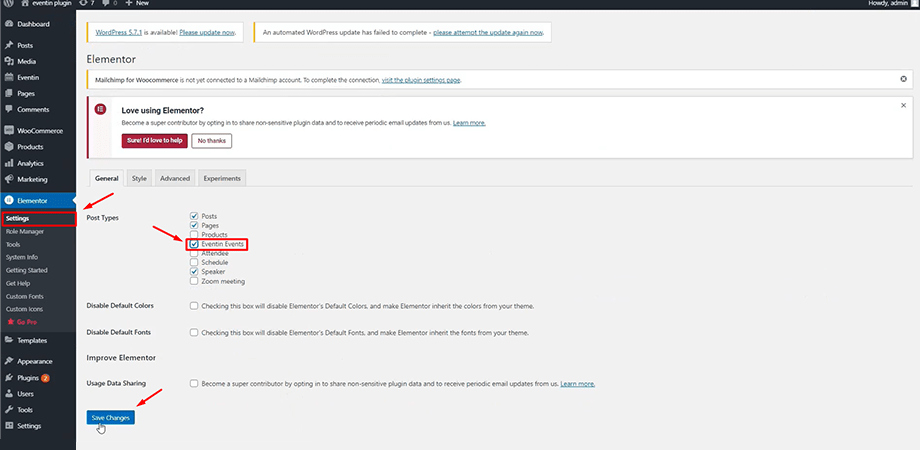
Step 1: Elementor settings for Eventin
After choosing your template, you need to allow Elementor to edit Eventin events. Go to your dashboard and find Elementor -> Settings. Then check the box for Eventin events and save changes. Now you are ready to start designing your Elementor event page.
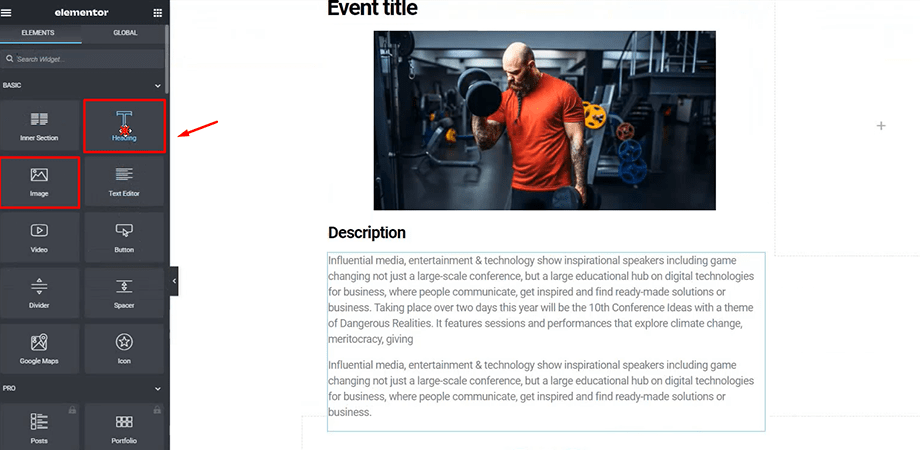
Step 2: Add event details to describe your event
Start off by adding a title and image for your event. Simply drag the Elementor widgets for heading and image and drop them on your page and edit the text and colors.
Elementor makes it easy for you to customize color, font, and more. Also, add a description for your event to show what it’s about. You can add extra text or headings as you like to design your Elementor event page.
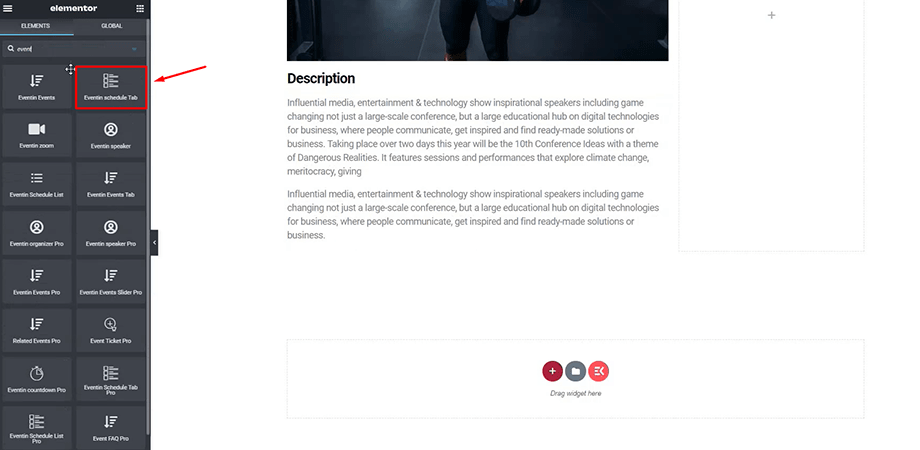
Step 3: Add event schedules
Next, add the event schedules on your website. You can search for the Eventin Event Schedule Tab in the Elementor sidebar and drag-and-drop the widget.
The schedule tab will list all the event schedules with the time, title, location, and a short description. You can add more sections for schedules on your Elementor event page.
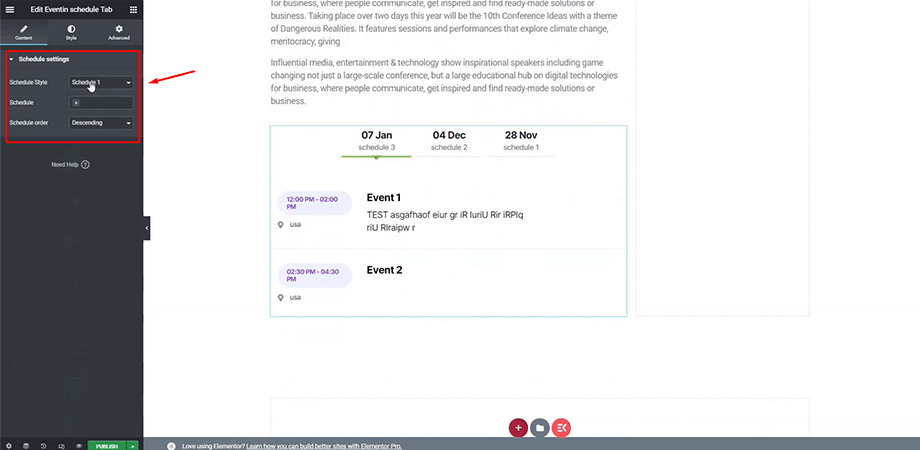
You can edit the schedule style from the Elementor sidebar. Make sure to add the schedules you want to be displayed. These schedules were created from the Eventin plugin. The order of the schedules can also be changed.
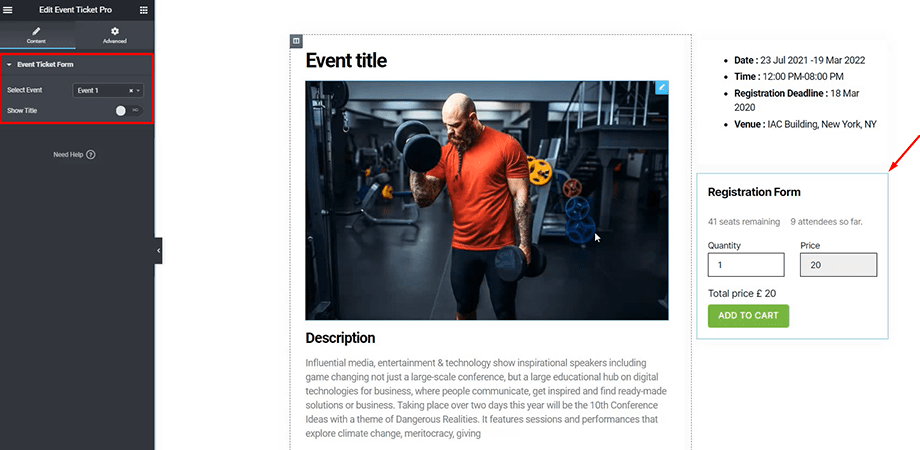
Step 4: Add event ticket
If you want to sell tickets, then you can add a registration form for ticket purchase. With Eventin PRO, you will get the event ticket feature which you can search in the Elementor sidebar.
Select the event name, and the ticket quantity and price will be displayed. This will let visitors buy your tickets straight from your event page. WooCommerce support for Eventin provides flexible purchase options.
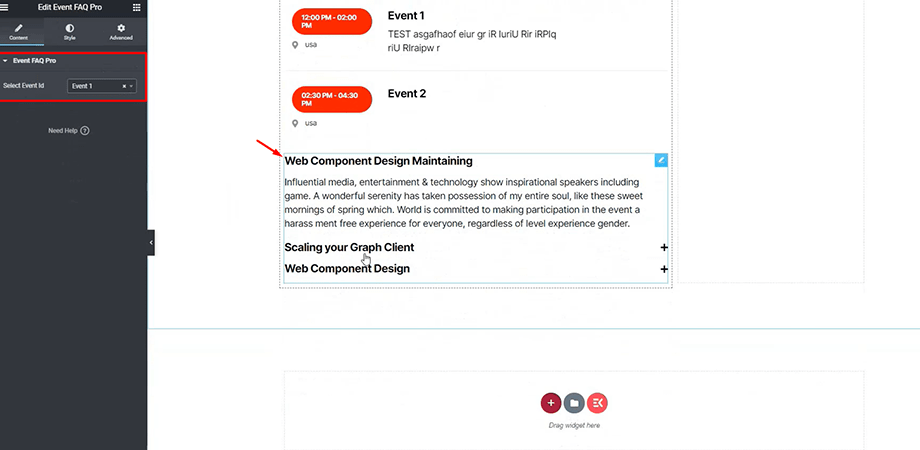
Step 5: Add event FAQ (PRO)
An important part of any event is the FAQ. Add an FAQ section to your page to answer frequently asked questions that your visitors may have.
You need to select the Event ID to show the FAQ for that specific event. The event ID is chosen from the Eventin plugin.
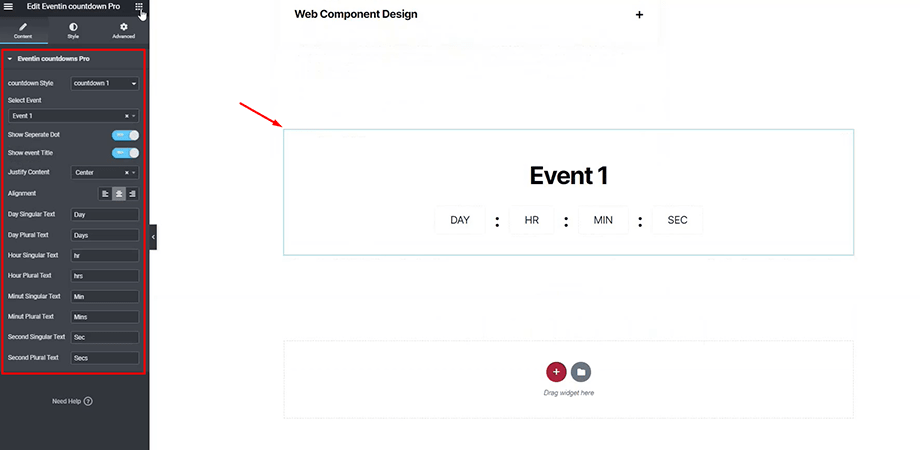
Bonus step: Setup Eventin countdown timer (PRO)
Eventin PRO also offers a countdown timer for your event. Search for Eventin countdown timer and add it to your page. Then you can select the countdown style, event name, timer details, and more. Elementor also lets you edit the style of the countdown timer.
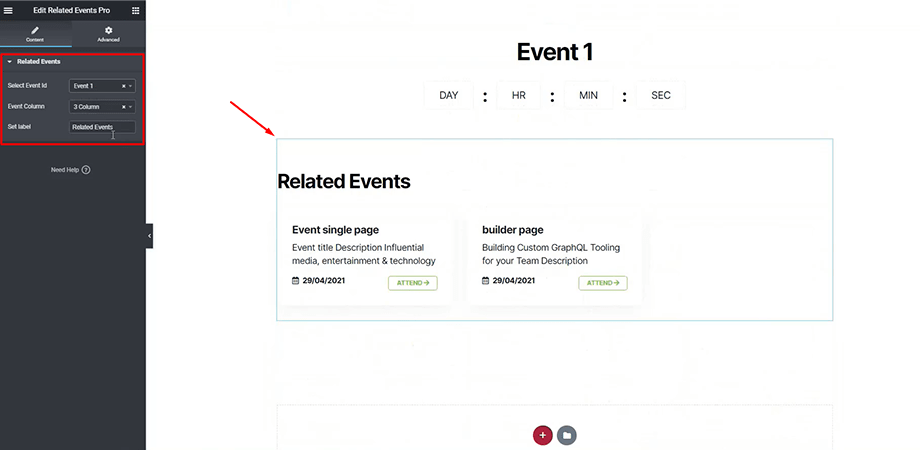
Add related events (PRO)
If you have multiple events on your site, you can choose to display the related events section. This section will show upcoming events from your list of events. You can select the number of columns you want to display and set a label. Then select Event ID for the events you want to display.
Do I need Elementor PRO for creating an event page?
For the most part, you do not need Elementor PRO to get started. The Elementor free version will give you enough features to add headings, details, images, and social icons for your event page. You can even customize these settings to change the typography or color.
Google Maps feature is also available for you to show your event location. However, if you do want to get more features, you can upgrade to PRO. A brief list of features is compared in the following table. You can check out the Elementor support page to find a complete list of features you will get with Elementor PRO.
| Features | Free | Pro |
| Heading | ✓ | ✓ |
| Text Editor | ✓ | ✓ |
| Image | ✓ | ✓ |
| Video | ✓ | ✓ |
| Button | ✓ | ✓ |
| Image Box | ✓ | ✓ |
| Testimonials | ✓ | ✓ |
| Social Icons | ✓ | ✓ |
| Image Gallery | ✓ | ✓ |
| Google Maps | ✓ | ✓ |
| Mobile Editing | ✓ | ✓ |
| Forms | ☓ | ✓ |
| Posts | ☓ | ✓ |
| Customs CSS & Font | ☓ | ✓ |
| Countdown | ☓ | ✓ |
| Header & Footer Builder | ☓ | ✓ |
| Animated Headline | ☓ | ✓ |
Final preview of the Elementor-powered Event Page
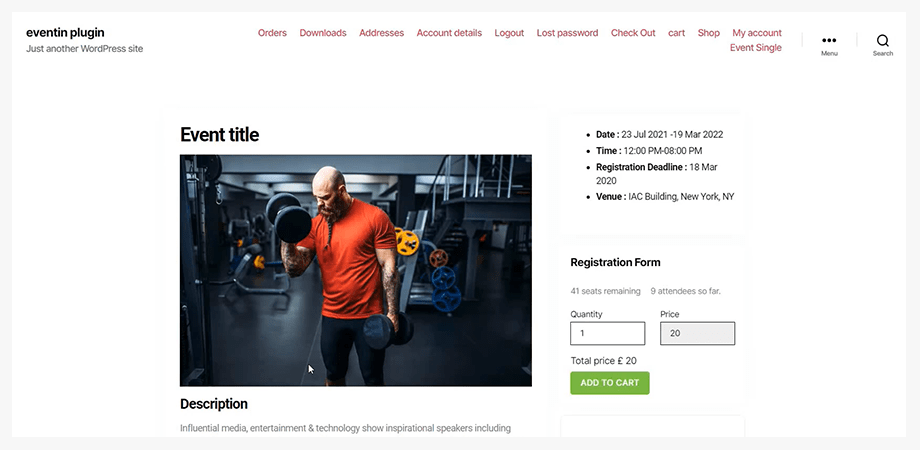
Your final landing page is now complete! Visitors can read about your event, buy tickets, share it on social media, or find similar events to join.
Eventin also allows you to create Zoom events so your attendees can attend from anywhere in the world. Most importantly, compatibility with Elementor makes designing your event website with WPEventin easy.
🎯 Pro tips for your event management business
Designing your event page is just the beginning. Here’s how to turn views into signups and attendees:
-
✅
Place clear CTAs where they matter most
Add a “Register Now” or “Buy Ticket” button at the top of the page to catch attention early. -
⏳
Add a countdown timer
Create urgency by showing how much time is left to register or buy tickets. -
🎤
Showcase key speakers or sessions
Highlight speakers or exciting sessions to boost interest and perceived value. -
💬
Use testimonials and social proof
Share what past attendees said or show partner logos to build trust fast. -
📱
Make it mobile-friendly
Check and fine-tune every section for mobile viewers using Elementor’s responsive settings.
Frequently asked questions
-
Can I create a custom event page using Elementor Free?
Yes. Elementor Free includes basic widgets that are enough to create a clean layout. For advanced styling and dynamic content, Elementor Pro is recommended.
-
Do I need coding skills to build a custom layout?
No. Both Elementor and Eventin use drag-and-drop interfaces. You can build fully custom event layouts without touching any code.
-
Can I use different layouts for different events?
Yes. With Eventin, you can assign different Elementor templates to individual events or use one layout globally.
-
Is Eventin compatible with other page builders?
Eventin works best with Elementor. While some functionality (like shortcodes) may work with others, custom layout support is optimized for Elementor.
-
Will my custom event page work on mobile?
Yes. Elementor gives full control over mobile responsiveness, so you can tweak every section to look great on all devices.
Why Should I Get Eventin PRO?
Setting up an Event Page with basic information may not always be enough. You probably will be able to design a beautiful event page with a ticket-selling option. But to give your visitors a premium experience, it is recommended that you try out Eventin PRO.
The PRO version has more features, like an event-specific banner and logo, unlimited FAQ, a countdown timer, and more features to excite your attendees about your event. Since your goal is to reach a maximum number of people and encourage them to buy tickets, you need to make your event page a little more exciting.
If you are not sure, see the demo or try out Eventin FREE first and see how the PRO version can optimize your Elementor event page.
💡 Want More Customization?
Eventin Pro gives you even more control over how your events are displayed. Unlock advanced layout options, speaker showcases, recurring events, Zoom integration, and more—all without writing a line of code.
Explore Eventin Pro Features