How to Create Free Attendee Registration in WordPress


Table of Contents
To create free attendee registration in WordPress, install Eventin, create an event, enable registration, set the ticket price to zero, and publish the event. Attendees can submit their details without paying, while you manage registrations from your WordPress dashboard.
This guide focuses on free event registration and zero-price tickets. If you need broader information about paid tickets, payments, and general registration features, read our guide to the WordPress event registration plugin.
After reading this guide, you will know how to create free attendee registration in WordPress, configure a zero-price ticket, collect attendee information, test the registration form, and manage registered participants from your dashboard. Attendee export availability depends on your current Eventin plan and configuration.
What is Free Attendee Registration?
Free attendee registration allows people to sign up for an event without paying an admission fee. You can still collect information such as names, email addresses, phone numbers, organization details, and other information needed to manage the event.
A free ticket means the attendee pays nothing for admission. It does not automatically mean that your website hosting, WordPress setup, plugin plan, or other event-management costs are free. Check the current Eventin plan and feature details before making cost-related decisions
Free attendee registration is useful for charity events, community programs, workshops, public lectures, webinars, and other events where participants do not need to pay for admission.
What Do You Need to Create Free Event Registration?
To create free attendee registration, you need a WordPress website, Eventin management plugin, your event details, the attendee information you want to collect, and a ticket configured with a price of zero.
For a free event, attendees should not need to complete a payment. WooCommerce or a payment gateway may be required for paid ticket checkout, depending on your selected configuration. Verify the current Eventin documentation before treating any additional plugin as mandatory.
Before starting, make sure you have:
- A WordPress website
- The Event management plugin
- Your event title, date, time, location, and description
- The attendee fields you want to collect
- A ticket configured with a price of zero
How to Create Free Attendee Registration with Eventin
Let’s go through the setup step by step. Make sure Eventin is installed and activated on your WordPress website. For free registration, configure only the tools required by your current Eventin setup. If you plan to sell paid tickets, you may also need WooCommerce and a payment gateway.
1. Create an Event Page
First, create an event in Eventin. Add the event title, date, time, location, featured image, and description.
Include the information attendees need before registering, such as the event schedule, audience, requirements, and joining instructions. You can optionally add speakers and schedules when they are relevant to your event, but they are not required to create free attendee registration.
Add Speaker Schedule if you need it
You can have a single or multiple schedules for speakers. In order to add a schedule, go to WP Eventin and click on ‘Schedule‘. After that click on ‘Add New’. Give the schedule information and save it. If you want to add multiple times then click the ‘Add’ button from the bottom of the schedule page. If you want to edit/update an earlier schedule, then check the schedule list and click edit from there.
Settings Key:
Add Schedule : Eventin -> Schedule -> Add New -> (Update Info) -> Publish
Add Multi-time schedule-> Eventin -> Schedule -> Add New -> (first schedule Info) -> Add -> (first schedule Info) -> Publish
Add Speaker Profile
In order to add a speaker profile on your free event registration website, go to WP Eventin and click on the speaker. After that click on ‘Add New’. Give the schedule information and save it. If you want to add multiple times then click the ‘Add’ button from the bottom of the schedule page. If you want to edit/update an earlier schedule, then check the schedule list and click edit from there.
Settings Key: Eventin -> Speakers -> Add New
Add Event Landing Page
To create an event landing page, go to eventin, then event and then add new. From the editable panel, add speaker, schedule and event details. Once you are happy with the information, click on the update button.
Settings Key: Eventin -> Events -> Add New
2. Enable Attendee Registration 🛠️
Next, enable attendee registration from the Eventin settings. This allows visitors to submit their information and register for the event.
Depending on your Eventin version, the setting may be available under:
Setting: Eventin → Settings → Attendee → Enable Attendee Registration
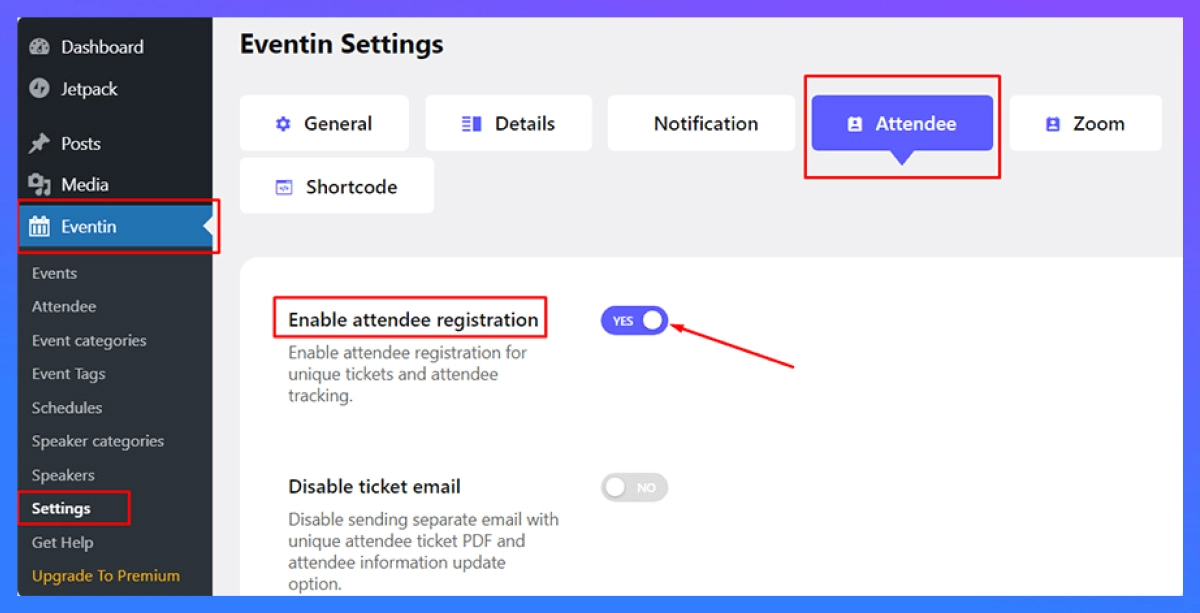
After enabling the option, select the information you want to collect. Common fields include:
- Full name
- Email address
- Phone number
- Organization
- Job title
- Dietary requirements
- Additional questions
Only request information that is necessary for managing the event or communicating with registered attendees.
3. Set the Ticket Price to Zero
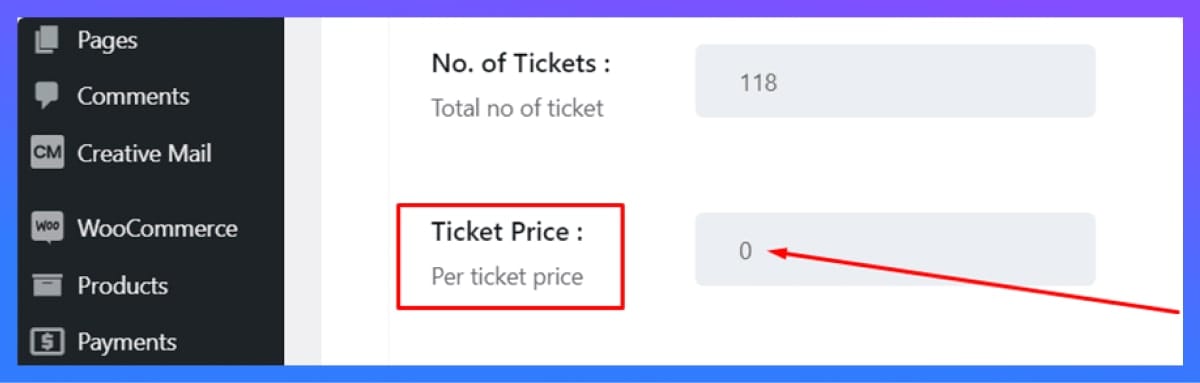
To create a free event, edit the event ticket and set its price to zero.
You can usually find this option under:
Setting: Eventin → Events → Edit Event → Ticket Pricing
Set the ticket price to 0 and save the event. Attendees should then be able to register without entering payment details.
If your Eventin setup displays a WooCommerce option, enable it only when required for the selected checkout configuration. Do not describe WooCommerce as mandatory for every free registration setup unless the current product workflow confirms it.
4. Publish and Test the Registration Form
After configuring the event and ticket, publish the event page. Open the page in an incognito browser window and test the complete registration process.
Check that:
- The registration form appears correctly
- The ticket price shows as free
- No unnecessary payment step appears
- Required fields work properly
- The attendee receives a confirmation message or email
- The registration appears in the Eventin dashboard
Testing the form before promoting the event helps you identify missing fields, incorrect settings, or confirmation issues.
5. View and Download the Attendee List
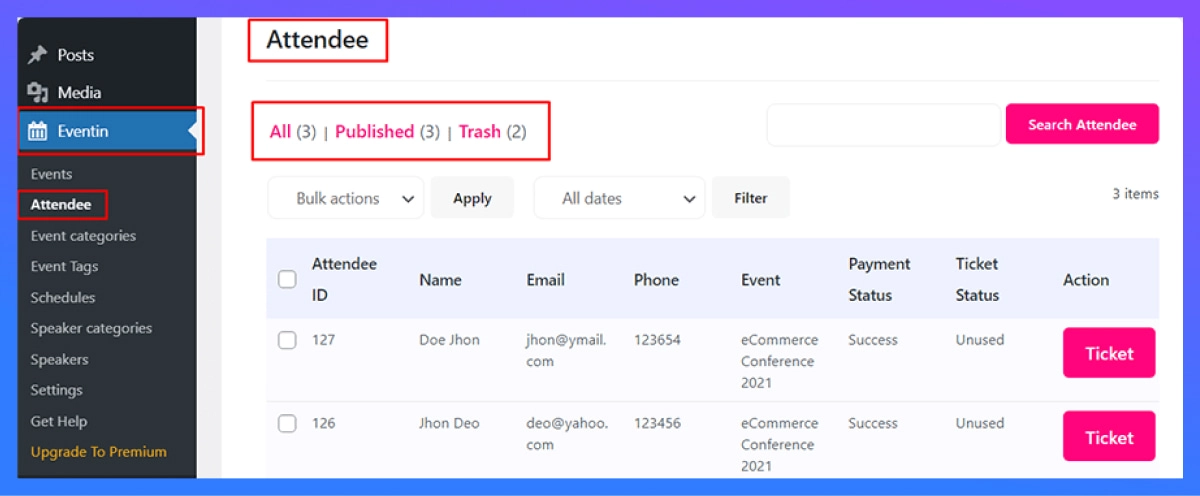
After people register, open the attendee section in your Eventin dashboard. You can view the registered participants and review the information submitted through the form.
Depending on your Eventin plan, you may also be able to export the attendee list as a CSV file. Check the current free and Pro feature limits before publishing specific export-related claims.
Why free event registration is important?
A free event ticketing system lets you organize event attendance without charging participants. It is useful when the main goal is to manage capacity, collect registration details, or provide controlled access to an event.
Here are some common benefits:
Collect Attendee Information
You can collect essential participant details during registration. This helps you understand who is attending and prepare the event more effectively.
Control Event Capacity
You can set a maximum number of attendees for an event. Once the limit is reached, registration can be closed or moved to a waitlist, depending on the available configuration.
Reduce Manual Registration Work
Online registration removes the need to collect participant details manually through spreadsheets, emails, or paper forms. Attendee information remains organized in the WordPress dashboard.
Send Event Confirmations
Registered attendees can receive confirmation details after submitting the form. Depending on the Eventin configuration, the confirmation may include event information, ticket details, or a QR code.
Manage Free and Paid Events Separately
You can use free attendee registration for public or community events and paid ticketing for conferences, workshops, or commercial events. This allows you to choose the appropriate ticket setup for each event.
Free Attendee Registration vs. Paid Event Ticketing
| Free Attendee Registration | Paid Event Ticketing |
|---|---|
| Ticket price is set to zero | Attendees pay for admission |
| No payment is collected from attendees | Payment checkout is required |
| Useful for charity and community events | Useful for commercial events |
| Organizer collects registration details | Organizer manages registration and payment |
| Capacity can still be limited | Ticket inventory and payments can be managed together |
The main difference is whether the attendee pays for access. Both options can use registration forms to collect participant information and manage attendance.
Check Current Eventin Plan Features
Eventin Pro may provide additional features for managing attendee registration, depending on the current plan and product Eventin’s available registration, attendee-management, notification, QR-code, and export features may vary by product version or plan. Before choosing a plan, review the current Eventin pricing plan and official documentation.
Do not assume that every advanced feature is included in the free version. Confirm the exact requirements for attendee fields, email notifications, CSV export, QR-code check-in, and paid-ticket workflows before publishing your event.
Frequently Asked Questions
Can I use free attendee registration for an online event or webinar?
Yes. Free attendee registration works for webinars and online events, provided the event page includes clear joining instructions or access details.
What should I include in a WordPress free event registration form?
Include only the information needed to identify attendees, communicate event details, or prepare for the event. Typical fields may include name, email address, phone number, organization, and event-specific questions.
How can I check whether a free event registration plugin has the features I need?
Review whether the plugin supports your required attendee fields, notifications, capacity controls, attendee management, exports, and any QR-code or check-in features. Feature availability may vary by plan and product version.
Can the same WordPress event website handle both free and paid events?
Yes. You can configure zero-price tickets for free events and paid tickets for events that require admission fees, depending on the plugin’s available configuration.
What should I verify before publishing a free event registration page?
Confirm that the event details, registration fields, ticket status, confirmation process, and attendee records work correctly in a test registration. This helps identify setup problems before visitors register.
Ready to Collect Free Event Registrations?
If your event is free and you need a simple way to collect attendee details without setting up payment, Eventin gives you a focused WordPress workflow. Create your event, set the ticket price to zero, publish the registration form, and manage your attendees from one dashboard.
Explore Eventin works and create your free event registration setup.

