How to Connect Zapier with WordPress: Step-by-Step Guide with Real Example
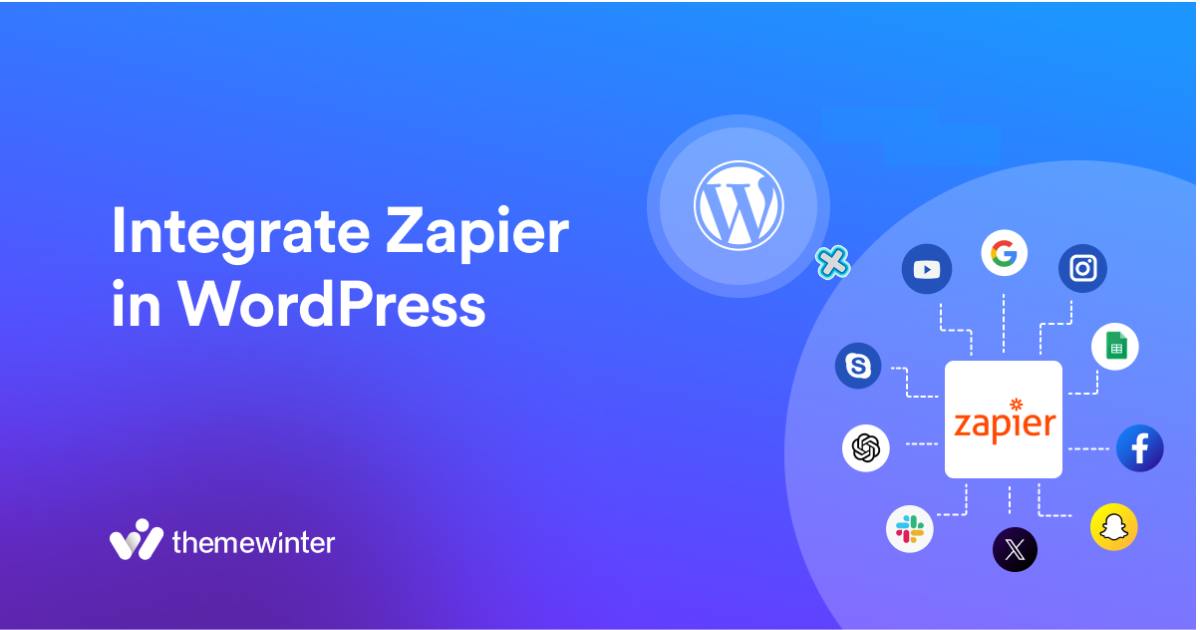
Table of Contents
Tired of doing repetitive tasks on your WordPress site — like updating Google Sheets, sending emails, or notifying your team manually?
With Zapier, you can automate these workflows in minutes — no coding required.
In this step-by-step guide, we’ll show you exactly how to connect Zapier with your WordPress website using a real-world example: the Eventin event management plugin.
Whether you want to send Slack alerts for new registrations or sync attendee data, this tutorial will help you save time and boost productivity.
⚡ Quick Overview
By the end of this blog, you’ll know exactly how to integrate Zapier with your WordPress website to automate tasks and boost productivity — no coding needed.
- The Benefits of Integrating Zapier in WordPress
- How to Get Started with Zapier
- Creating Your First Automation (“Zap”)
- Real-Life Zapier Example with Eventin Plugin
- Tips for Managing Your Zaps
What is Zapier and how does it work?
Zapier is a no-code automation tool that connects your favorite apps and services — like WordPress, Google Sheets, Mailchimp, Slack, and hundreds more.
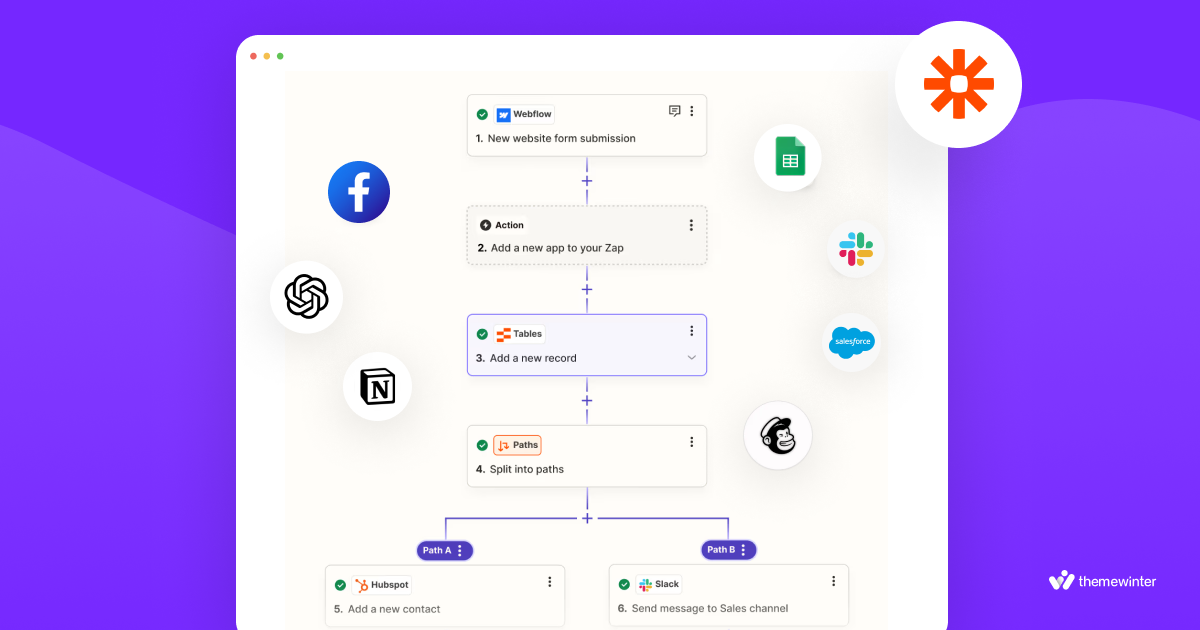
Think of it like a bridge between apps. When something happens in one app (a trigger), Zapier can automatically tell another app to do something (an action). These automations are called “Zaps.”
An example to better understand the workflow:
Imagine someone registers for an event on your WordPress site. With Zapier, you can create a Zap that does this:
Trigger: New registration on your WordPress site (using Eventin plugin)
Action: Automatically send a Slack message to your events team
So instead of checking your dashboard manually, your team gets notified instantly — saving you time and reducing the chance of missing a sign-up.
Why Integrate Zapier with WordPress?
Managing a WordPress site often involves juggling multiple tools — contact forms, email lists, CRM systems, spreadsheets, notifications, and more.
Instead of doing everything manually, you can connect WordPress with Zapier to automate your workflows and save hours of work each week.
- Save time with automation
Repetitive tasks like sending email notifications, updating Google Sheets, or adding form entries to a CRM can all be automated. Zapier works 24/7 in the background, so you can focus on growing your business.
- Reduce human error
Copying and pasting data manually leads to mistakes. With Zapier, data flows automatically between apps — ensuring higher accuracy every time someone registers, submits a form, or makes a purchase.
- Boost team productivity
You can set up Zaps that instantly alert your team on Slack, update project boards, or send follow-up emails — all triggered by activity on your WordPress site. This keeps your team in sync and responsive.
- Works with hundreds of tools
Zapier supports over 6,000+ apps. Whether you use Mailchimp, HubSpot, Notion, Airtable, or Zoom — chances are, Zapier can connect it to your WordPress site with just a few clicks.
- No coding required
You don’t need to be a developer to set it up. Zapier’s user-friendly interface lets you build automations (called “Zaps”) in minutes — no technical skills needed.
By integrating Zapier with your WordPress site, you’re not just automating tasks — you’re streamlining your entire workflow, improving response time, and creating a better experience for both you and your users.
🎉 Power Up Your Events with Eventin
Eventin is an AI-powered WordPress plugin that makes event management easy. Create unlimited events, sell tickets, add speakers, track attendees with QR check-ins, and even let vendors run their own events — all from your WordPress dashboard.
🔗 Try Eventin NowWhat you need before starting the integration
Before you begin integrating Zapier with your WordPress site, make sure you have the following ready. These are the basic tools and access you’ll need to build your first automation.
- A Zapier account: Sign up for a free Zapier account or log in if you already have one.
- Admin access to your WordPress site: Ensure you have admin access to install plugins and make changes.
- Event management plugin: We’ll use the Event Management Plugin – Eventin for managing events, registrations, and selling tickets on WordPress websites.
- Optional: Consider the WP Webhooks or Zapier plugin to enhance connectivity.
How to set up a Zap in Zapier (with WordPress as the trigger)
First off, login to your Zapier account. Follow all the instructions to create your account if you do not have one. And then you’ll land on the dashboard of Zapier. Here is the guide to get started with Zapier.
Here is the look after you create your first Zap to automate tasks between your apps.
Step 1: Log into Zapier and Create a new Zap
Start automating work with Zapier by logging in at zapier.com.
- After logging in to Zapier, click Create a Zap.
- Name your Zap (e.g., “Event Registration Notification”).
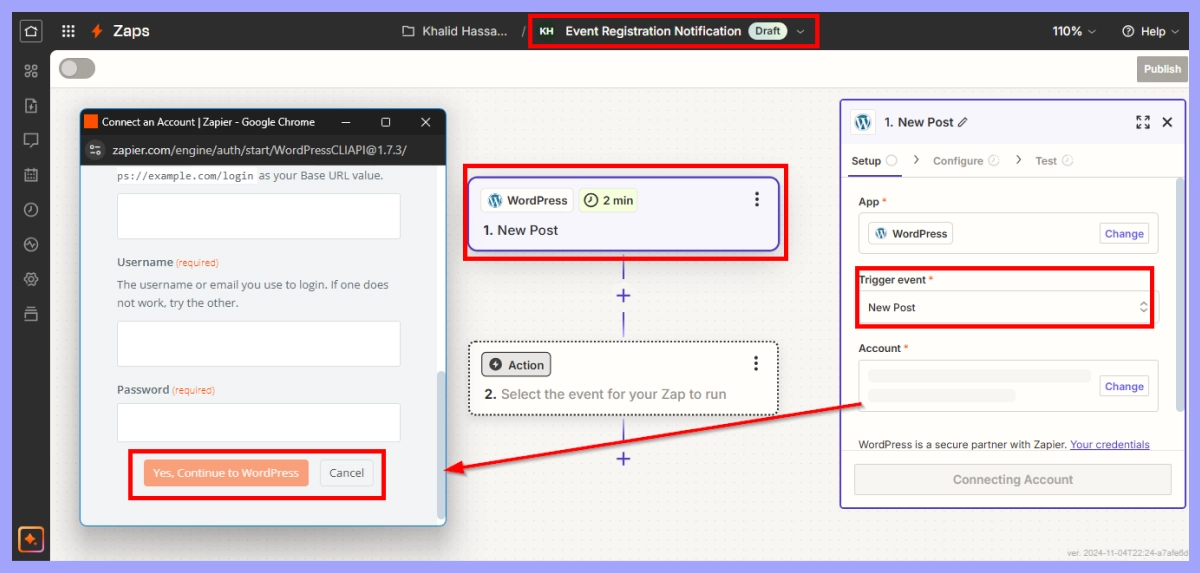
Step 2: Choose a trigger
Zapier triggers are defined as the beginning point for an automated workflow called a Zap. At the start of each Zap, there needs to be a trigger to initiate the automation process.
- Trigger App: Search for WordPress as your trigger app.
- Event trigger: Choose an event relevant to your site. For this example, we’ll use “New Post,” but when using Eventin event manager, you’ll want to look for specific events related to registrations.
- Connect your WordPress site: Enter your WordPress site’s details, including URL, username, and password to connect Zapier.
Step 3: Customize trigger settings
Define settings based on the event type (e.g., “New Event Created” in Eventin). Set filters for event types or categories as needed to specify which events should trigger the Zap.
🛍️ Explore this use case:
Build a Multivendor Event Marketplace with Eventin & Dokan
Choose an action for the Zapier
Once you’ve defined the trigger that will initiate your automation, the next step is to select the action. This is the specific task or process you want Zapier to perform in response to the trigger.
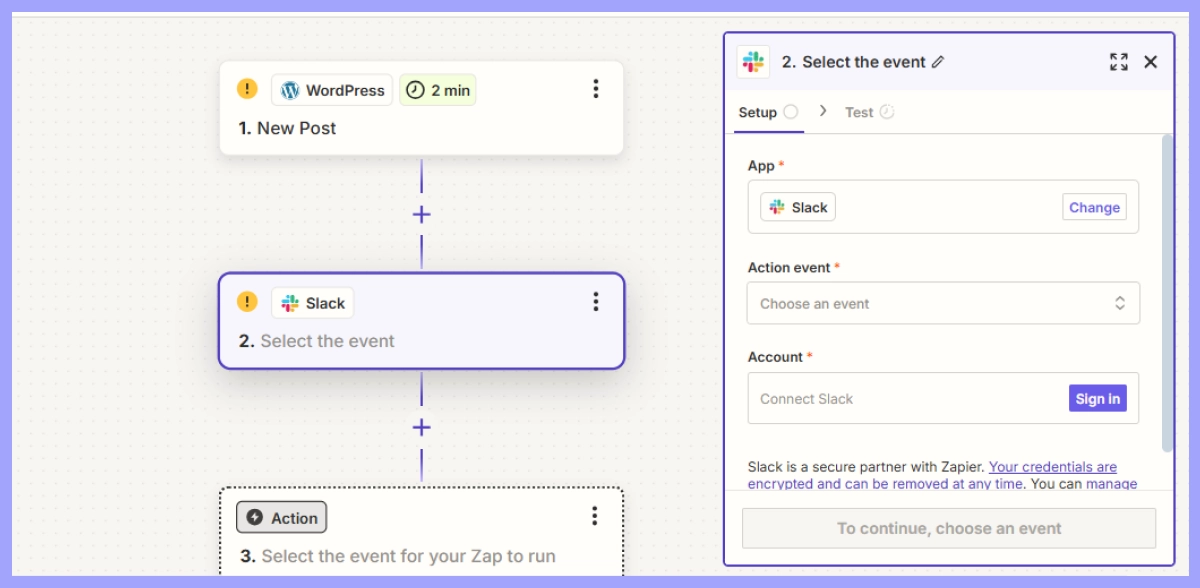
Connect with other applications
Now that the trigger is set, it’s time to select the action Zapier should take. Examples include updating a Google Sheet, sending a notification via Slack, or adding an attendee to a Mailchimp mailing list.
Example action with Eventin
For this guide, we’ll set up an action to send a new event registration notification to Slack:
- Action app: Choose Slack.
- Action event: Select “Send Channel Message.”
- Customize action details: Define the Slack channel, message format, and variables (e.g., attendee name, email) to be included in the message.
Configuring action settings
You may add other customizations to your action, such as defining specific messages or fields Zapier should fill based on the event registration data.
Test and activate your Zap
Testing and activating your Zap ensures it works correctly and automates your workflow without issues. Testing catches errors, and activation starts the automation, saving you time.
Run a test
Zapier allows you to test your new Zap to ensure it’s set up correctly. Trigger an event in Eventin Event Manager, such as creating a test registration, to check if the action (e.g., Slack notification) is triggered.
Troubleshoot common issues
Ensure that all connections are properly authenticated. Check error messages in Zapier to troubleshoot any potential misconfigurations, like incorrect login details or permissions issues.
Activate your Zap
Once tested, activate your Zap to enable the automation. It’s now live and ready to streamline your workflow!
🛍️ Build a Multivendor Event Marketplace with Eventin
Want to let multiple vendors create and manage their own events on your website? With Eventin, you can build a full-featured multivendor event marketplace — complete with ticket sales, vendor dashboards, QR check-ins, and more. Perfect for meetup sites, expo organizers, or multi-host event platforms.
🔗 Explore Eventin FeaturesReal use case: automating Eventin registrations with Zapier
Let’s look at a practical example using the Eventin event management plugin for WordPress to automate registration forms and submitted information through the Zapier webhook.
You can follow the same process to integrate Zapier into your plugin on the WordPress website.
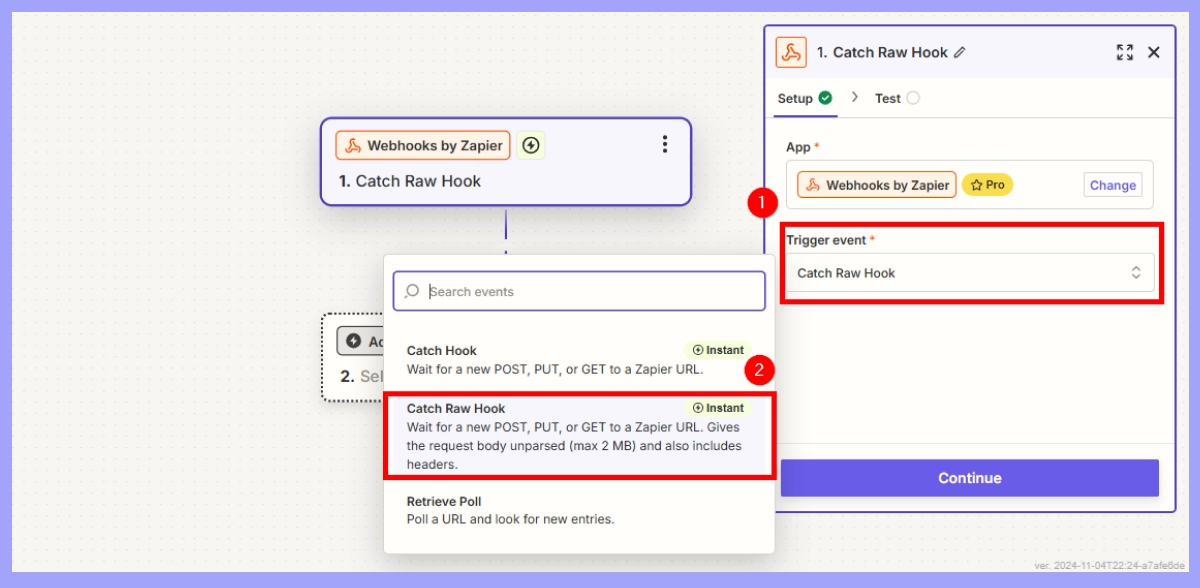
Step 1: Create and connect a webhook

When you set up a Zapier webhook, you can use it to listen for events in one app (such as a new ticketing event app) and automatically send the data to another tool or service, without the need to manually input anything.
- Click on Create > Zaps from the top area on the left side.
- A new screen will appear. Then click “Built-in tools” and select “Webhooks.”
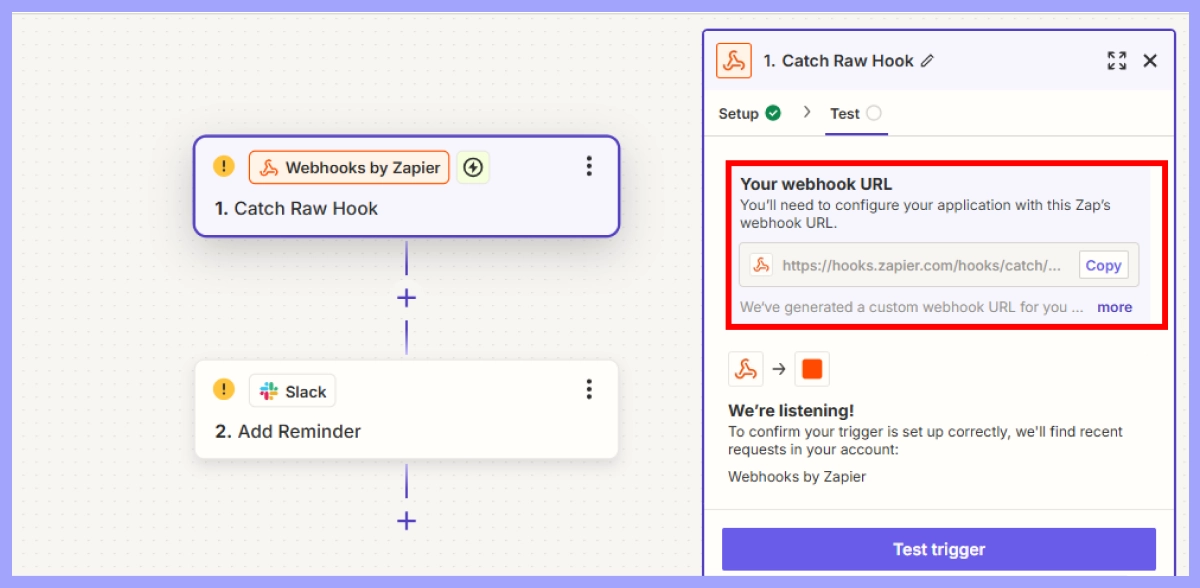
Step 2: Set up Zapier to catch the webhook
- Click on the Trigger event, and the drop-down will appear. Then select the “Catch Row Hook”.
- Click on continue after copying the URL. Complete this section by pasting the URL to the Eventin Event Management Plugin hook section.
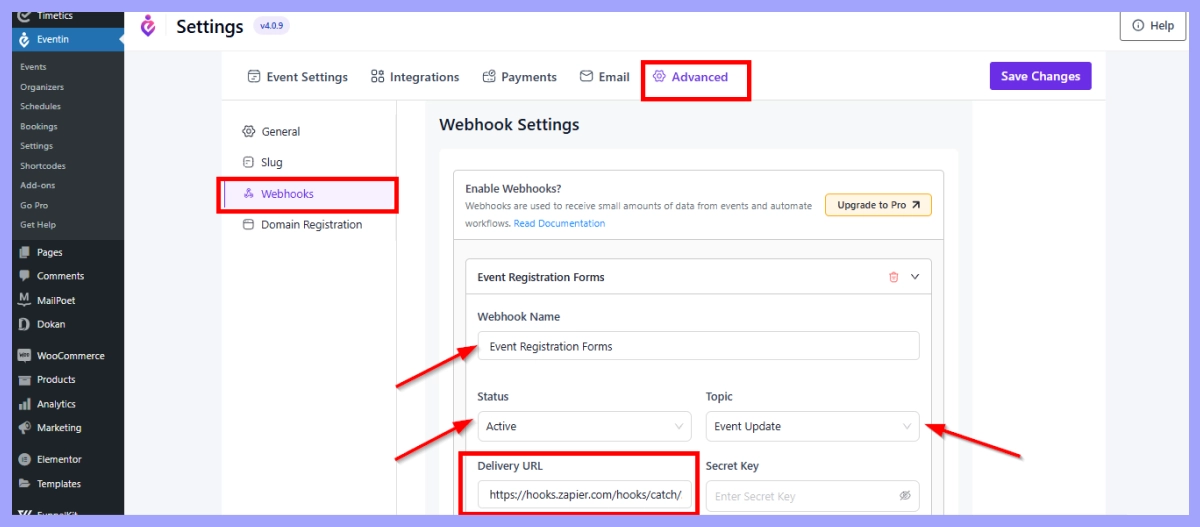
Step 3: Configure Eventin to send data
Depending on the Eventin version, find the settings for adding custom webhooks. Current version contains this setting.
- Navigate to Event Settings > Advanced > Webhook
- Paste the Webhook URL into the “Delivery URL” section.
- Specify the name, status, and topic of the Webhook
- When you are finished configuring the webhook, click Save Changes.
⚙️ Need automation?
Learn how to connect Eventin with 5,000+ apps using Zapier:
Eventin–Zapier Integration Guide
Step 4: Test and activate the Zap
Testing the webhook is essential to confirm it’s set up correctly and data flows as expected. This helps catch any issues early, ensuring smooth and accurate automation when live.
Trigger an Event in Eventin:
- To test the webhook, register or create a test event.
- This action should send data to the Zapier webhook.
Return to Zapier to Test:
- Click Test Trigger to see if Zapier receives the event data from Eventin.
- Zapier should display sample data to confirm that the webhook is working.
7 Tips for managing Zaps effectively
Setting up Zaps is only the first step. To ensure your automations run smoothly over time, it’s important to manage and maintain them properly. Here are practical tips to help you get the most out of Zapier.
1. Use descriptive Zap names
Avoid generic names like “New Zap.” Instead, name your Zaps based on what they do. This makes it easier to track and troubleshoot your workflows, especially when you have multiple Zaps running.
Example: “Eventin – New Registration to Slack Notification”
2. Monitor your task usage
Zapier has monthly task limits depending on your plan. Keep an eye on your task usage to avoid unexpected limits or charges. You can check this anytime under the Task History section in your Zapier dashboard.
3. Test after making changes
Whenever you update a plugin, form, or Zap step, run a quick test to ensure everything still works. A small change in your WordPress setup can break the automation if not reviewed.
4. Review Zaps regularly
As your business evolves, so do your workflows. Schedule a regular review (monthly or quarterly) to update or delete Zaps that are outdated or no longer aligned with your goals.
5. Prioritize secure connections
Always connect your WordPress site and third-party apps over secure HTTPS connections. Make sure your login credentials are safe and never shared unnecessarily. Use strong passwords and enable two-factor authentication where possible.
6. Enable error notifications
Zapier can alert you when a Zap fails. Enable error notifications via email or in-app to catch issues early and resolve them before they disrupt your workflows.
7. Organize Zaps into folders
If you’re running multiple automations for different clients, teams, or processes, use folders inside your Zapier dashboard to keep things organized and easier to manage.
📌 Some good resources for you:
FAQs about using Zapier with WordPress
Q: Do I need any coding knowledge to use Zapier with WordPress?
A: You don’t need any coding skills. With Zapier, you can create automation called “Zaps” using an easy and simple visual interface. There are a few steps involved in setting up Zaps.
Q: Is it possible to use Zapier with any event management plugin on WordPress?
A: Yes, many event plugins, like Eventin Event Management Plugin, can work with Zapier through webhooks. However, it is recommended to always check the plugin documentation.
Q: How can I test if my Zapier integration is working correctly?
A: After creating your Zap, you can use Zapier’s “Test Trigger” feature to verify that it’s set up correctly. You should also perform a real test (such as registering for an event on your WordPress site) to ensure data flows as expected.
Q: Do I need a paid Zapier account to integrate with WordPress?
Zapier offers a free plan that allows you to create single-step Zaps, which can work for basic integrations. However, if you need multi-step Zaps or more complex workflows, you may need to upgrade to a paid plan.
Q: How secure is my data when using Zapier with WordPress?
A: Zapier follows industry-standard security practices to protect your data. However, you should always use secure passwords and enable HTTPS on your WordPress site.
Final thoughts: automate smart, save time
Integrating Zapier with your WordPress site is one of the easiest ways to automate repetitive tasks and boost efficiency.
If you’re running events, Eventin makes it even easier. With built-in webhook support, you can connect Eventin to Zapier and automatically send registrations to Slack, Google Sheets, Mailchimp, and more — no coding required.
Start small, automate what matters most, and let tools like Eventin and Zapier handle the rest.
🎟️ Want to Sell Customized Event Tickets on WordPress?
Learn how to fully personalize your event tickets with attendee details, branding, and QR codes using Eventin’s built-in ticket builder.
📖 Read the Full Guide