How to Create an Event Landing Page in WordPress (Examples + Best Practices)

Table of Contents
Planning an event is one thing, but getting people actually to sign up is the real challenge.
An event landing page helps you do that. A well-built landing page can increase registrations, highlight your agenda, and make ticket buying simple. It also helps you build trust before the event even begins.
In this guide, we will discuss what an event landing page is, what sections it should include, and how to create an event landing page in WordPress with Eventin step-by-step.
Let’s get started!
Manage Events Like a Pro
Try the easiest way to create, manage, and promote events with Eventin.
- 🟣 AI event generation
- 🟣 Ticket & Certificate builder
- 🟣 Secure ticket sales
- 🟣 Event analytics & report
🎯 Quick Summary
This guide shows how to create an event landing page that actually drives registrations, with a clear structure, essential sections, and practical steps you can follow without confusion.
- What an event landing page is and why it matters
- Why your event needs a dedicated landing page
- Step-by-step process to build your landing page
- Real examples of different event page types
- Best practices to increase registrations
- SEO Tips to Get More Traffic to Your Event Landing Page
- FAQs about the event landing page
What is an event landing page?
An event landing page is a dedicated web page designed to promote a specific event and guide visitors to take action, such as registering or selling tickets.
It focuses on one goal, helping people quickly understand the event and decide whether to join. A well-structured event landing page brings all important details into one place so visitors don’t have to search for information.
Here are some more real examples of event landing pages:
- Conference landing page: Multi-day, agenda-driven, with speaker bios and sponsor sections
- Webinar splash page: Minimalist layout, countdown timer, instant registration form
- Concert or showcase page: Visual-heavy with ticketing and artist profiles
Why your event needs a dedicated landing page
An event landing page is a web page to attract people to register, attend, or take action around your event. It’s not a random blog post, nor your homepage; it’s a dedicated place that sells your event tickets without distractions.
Whether you’re promoting a virtual summit, a local concert, or a niche workshop, your event landing page acts as your 24/7 digital salesperson, showcasing the who, what, when, and why it matters.
What do you need for your event landing page?
- A strong headline that grabs attention
- Precise event details (date, time, format)
- Speaker and organizer highlights
- Social proof (testimonials, logos, press)
- A bold call-to-action (register, RSVP, buy tickets)
- Mobile-friendly, fast-loading layout
According to Unbounce, focused landing pages with one clear CTA convert up to 65% better than generic event pages.
And with an Event management solution like Eventin, you don’t need to rely on code or hire a developer. You can build a beautiful event page by yourself in WordPress with drag-and-drop blocks.

How to create an event landing page with the Template Builder Feature
If you’re using WordPress, you don’t need to build everything from scratch. An event management plugin like Eventin lets you create a complete event landing page with built-in templates, ticketing, and registration features.
Do make sure to install and activate the Event Management plugin – Eventin. And the pro version.
Here’s how to do it step by step.
Please note: With the free version of Eventin, you will only be able to customize one single template. But for more templates and features, you have to upgrade to the pro version.
Step one: Install and activate Eventin Free & Pro
Eventin is a robust event management solution with so many cool features to make your event successful. Apart from creating an event, you can automate emails, send RSVP, send & sell tickets, send certificates, and do more.
We assume you have already installed and activated Eventin on your WordPress site. If not, here is a quick guide to get started:
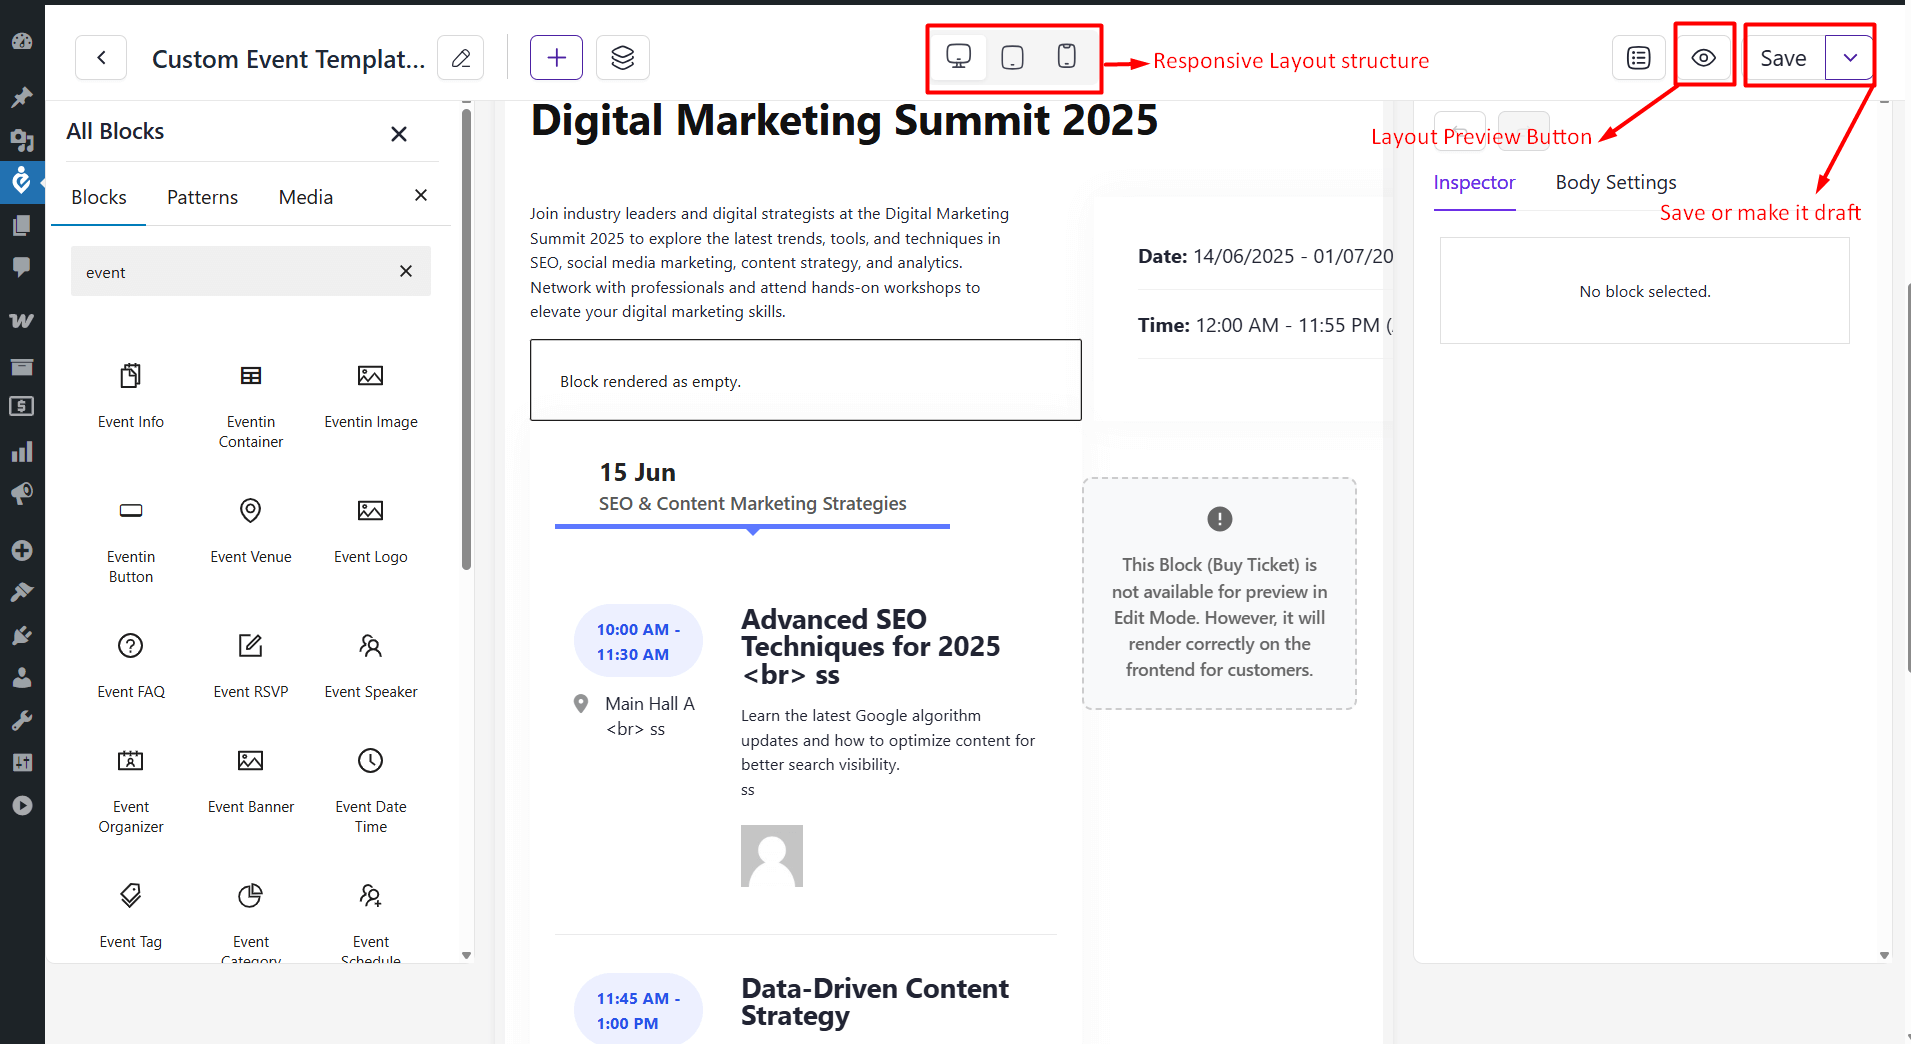
Step two: Overview of the template builder dashboard
After you install and activate Eventin, you will see the “Template Builder” option. Just click on it, and you will see the options below.
- Event landing page
- Event tickets
- Event certificates
On the right top side, you can add “New template“. Also, you can choose which page builder you want to use to customize the event landing page.
Why use a custom event template? Because it helps you:
- Showcase unique event details in your own style
- Improve event page SEO with optimized layouts
- Use different designs for different event types
- Ensure your event pages look great on all devices
- Integrate with popular page builders like Gutenberg and Elementor
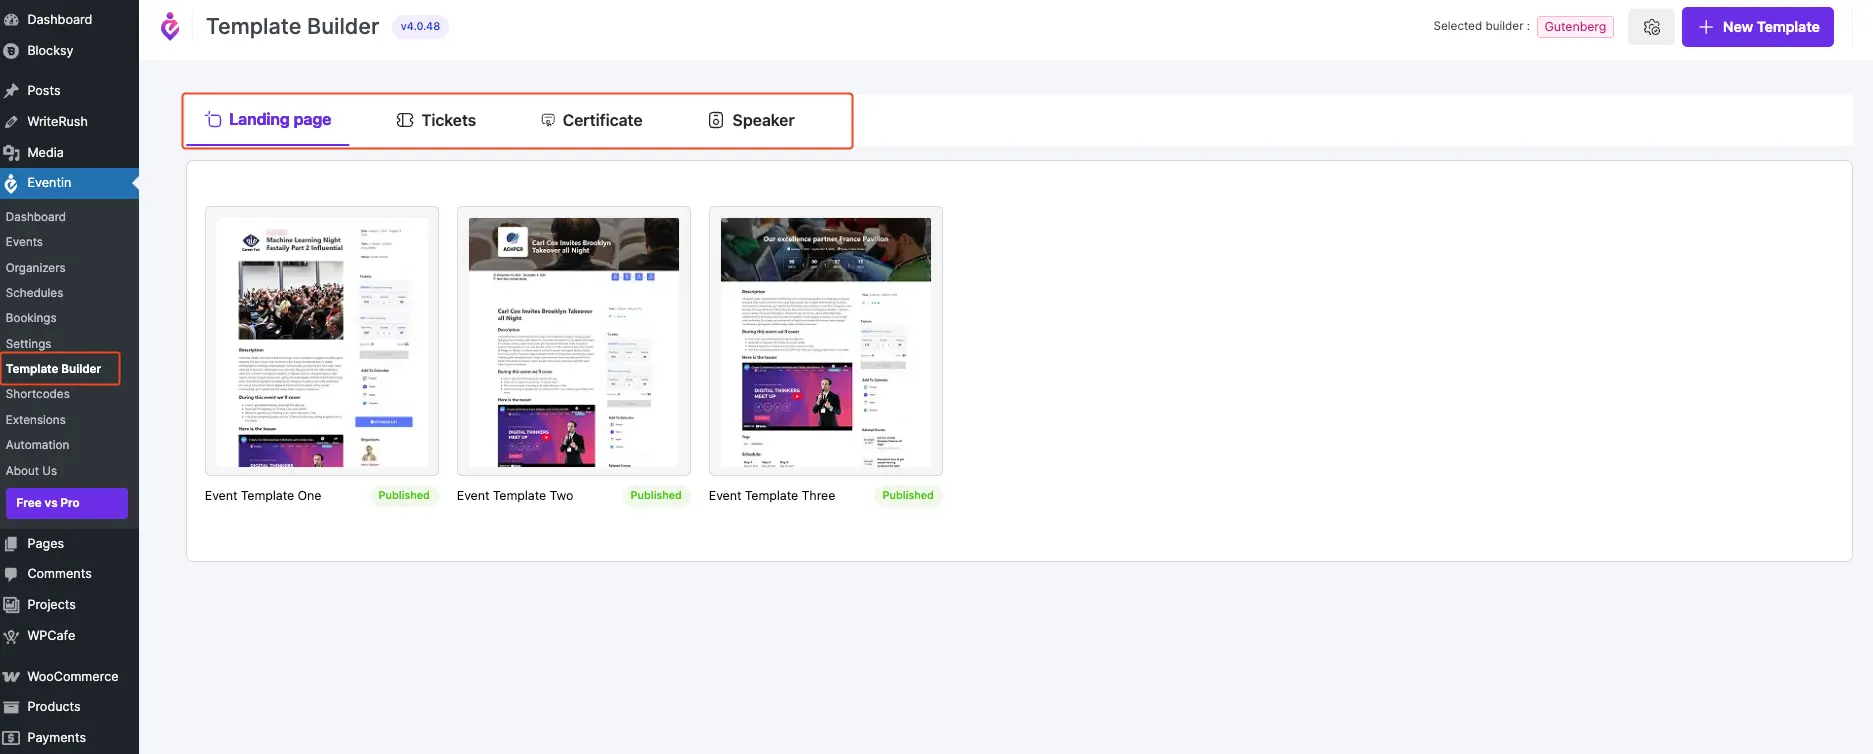
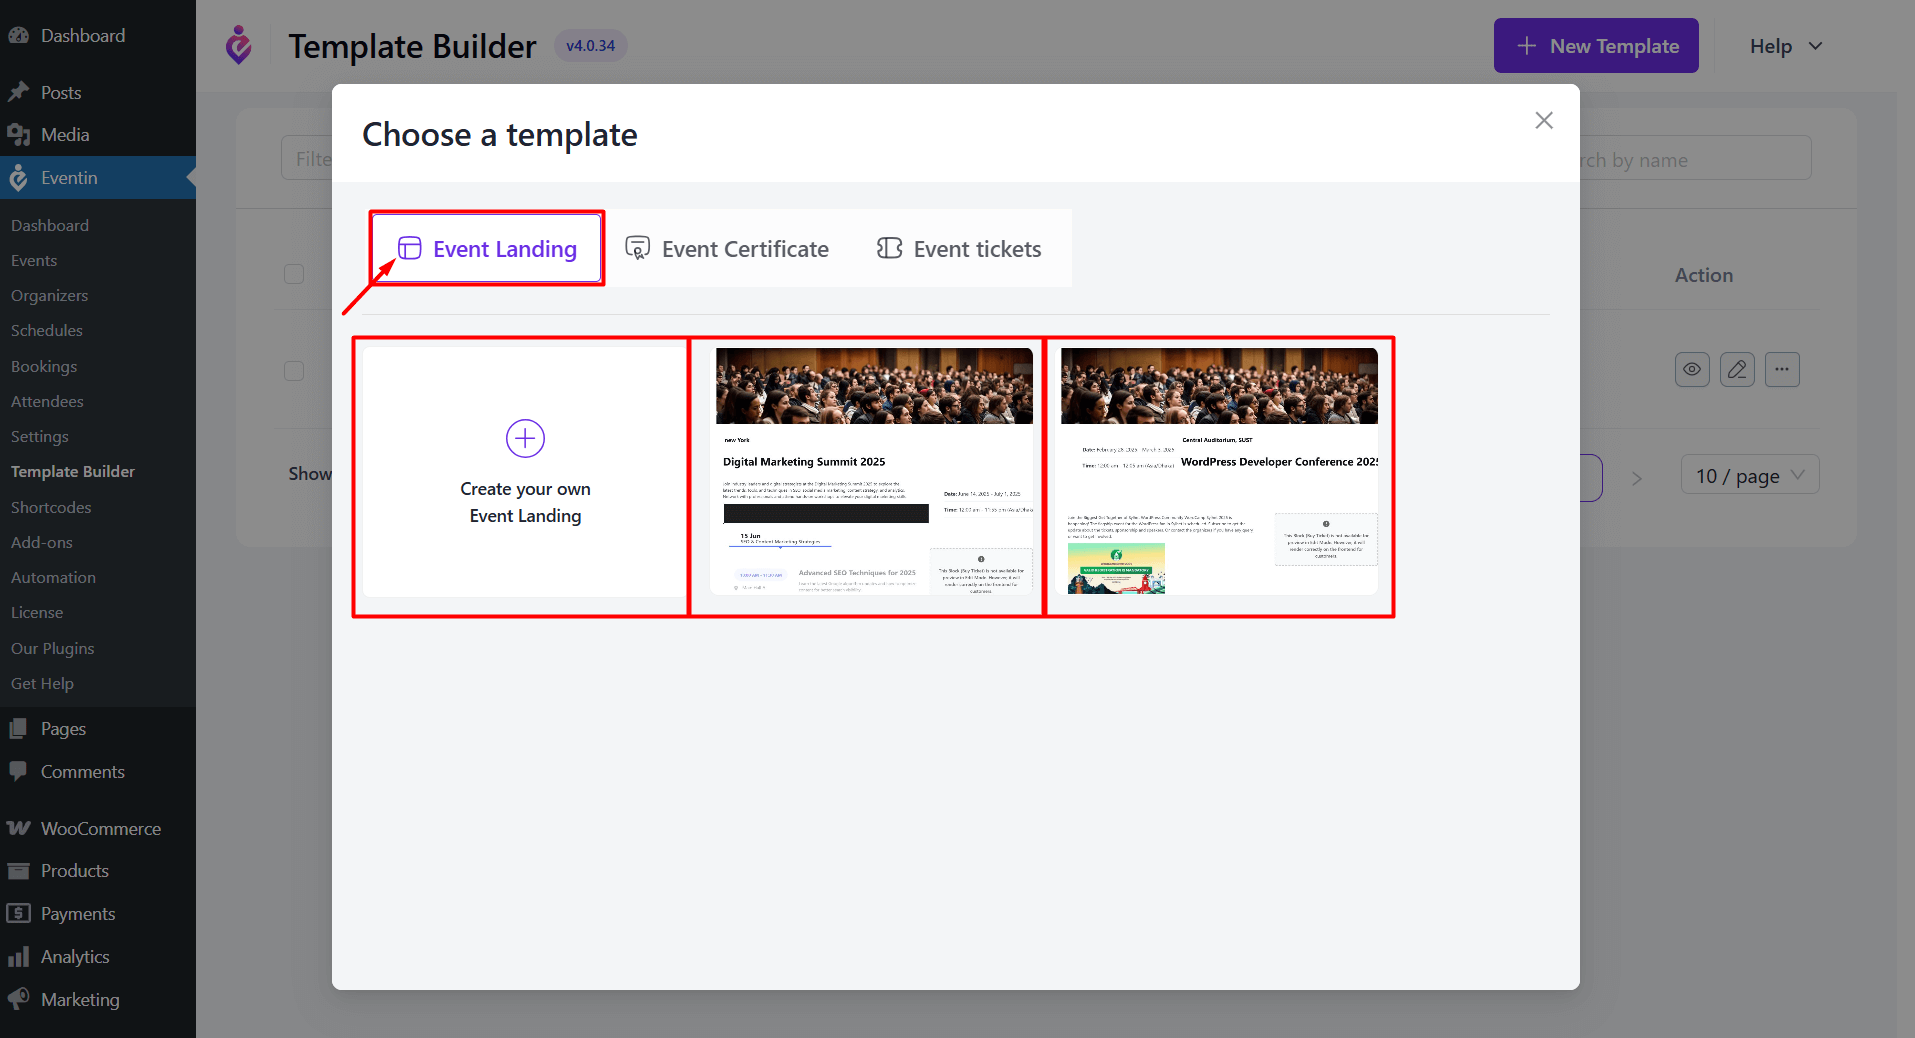
After clicking on the “New Template” button, you can see some pre-made templates. Either you can choose any, or you can create your own landing.
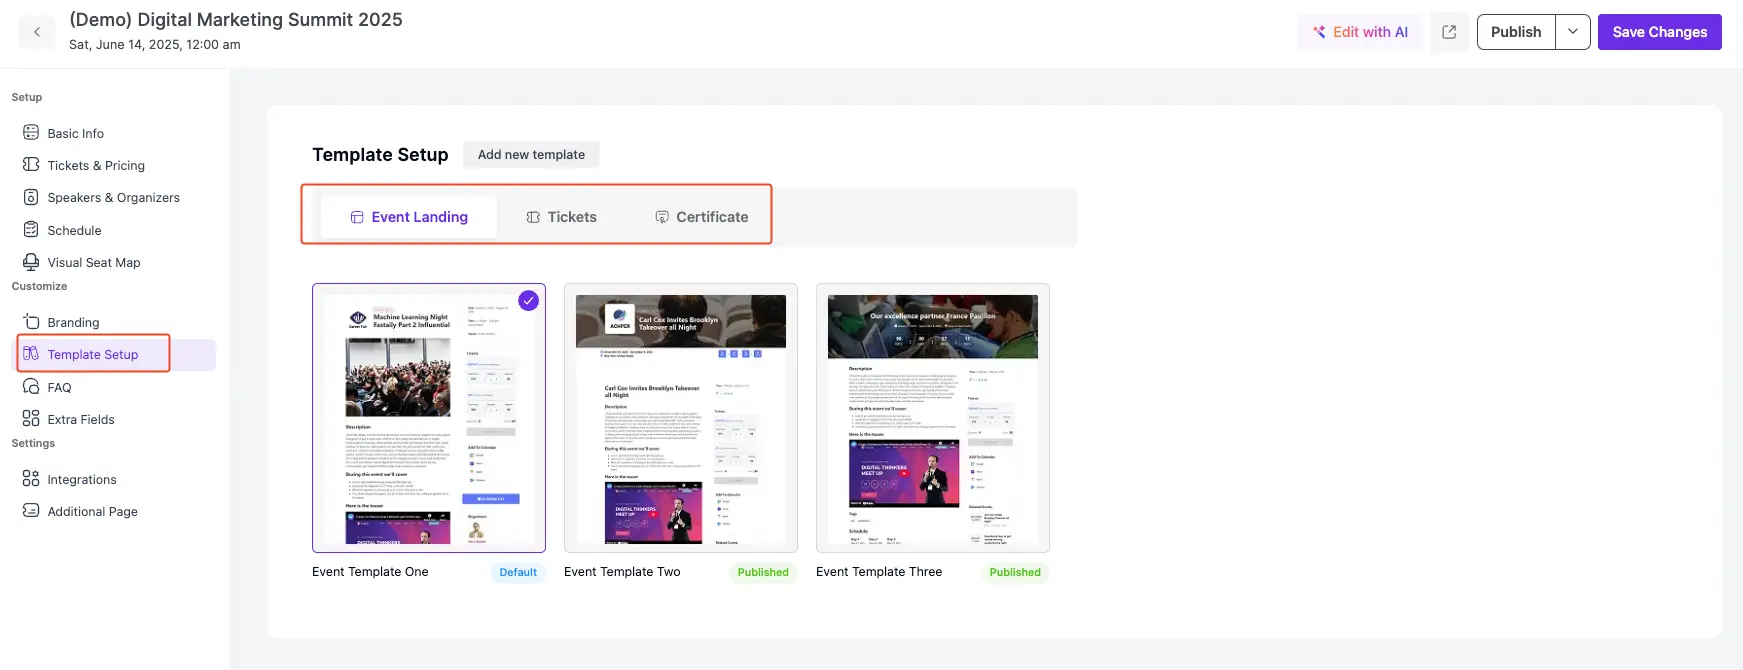
Step three: Customize the template
After you click on the Customize Event Landing, you will get to this page. Here, you can update and customize each portion step by step.
What should you consider while customizing an event page?
- Keep your event title clear and catchy
- Clearly mention everything in the description
- Place your ticket options and calendar on top so users can find them easily
- Focus on the agenda and schedules so users can easily understand
- Don’t forget to highlight your speakers’ and organizers’ page
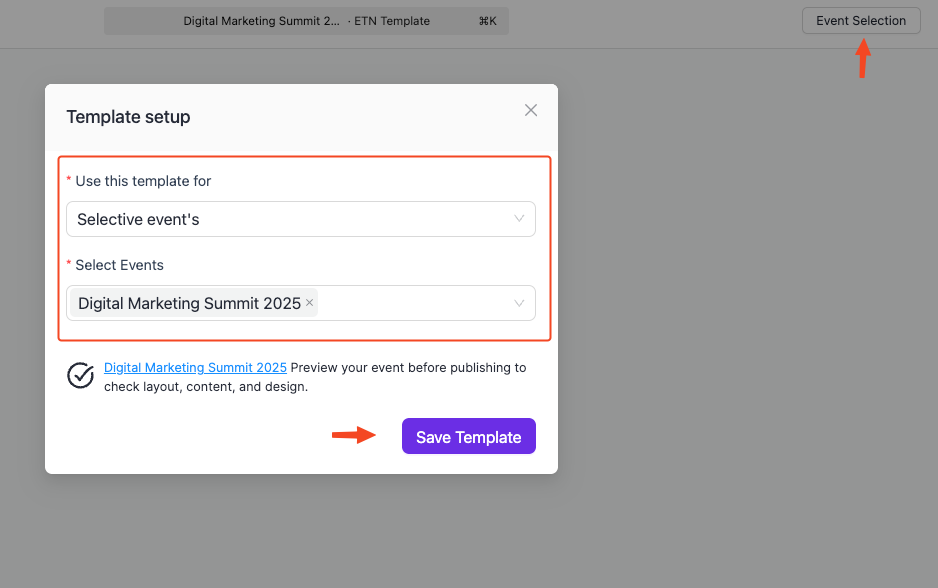
Step four: Assign any template to events
Once you finish the customization, assign the template to the event where you want it to appear on the landing page.
You can do this in two ways: from the customization page or directly from the event page. On the top right side, you’ll see the “Event Selection” option.
Click it, and a window will appear. Choose the events you want this template to apply to, select them from the list, and you’re done.
Next, you can assign the template to individual events. Open the event you want to edit, go to the template setup section, choose the template from the list, and save the changes.
See a live example of an Eventin Template Builder page
Want to see how a real event landing page looks when built with Eventin’s Template Builder? Check this live demo to explore the layout, sections, and overall flow in action.
View the live demoMore use cases of Template Builder that you can’t wait to miss
The Template Builder is not only for event landing pages. You can also use it to shape the full experience for your attendees.
- Create custom event tickets: You can design tickets that match your brand. Add your logo, colors, event details, and layout the way you want. This makes your tickets look clean and professional, which helps build trust.
- Build personalized certificates: If your event includes training, workshops, or achievements, you can create certificates that feel polished. Add names, session details, and your signature in minutes.
- Match every part of your event design: All templates follow the same styling, so your landing page, tickets, and certificates look consistent. This gives your event a more organized and premium feel.
- Save time with reusable layouts: You can save templates and use them again for future events. This cuts down setup time and helps you stay consistent across multiple events.
- Keep everything in one place: No need for extra design tools. You can manage your landing page, tickets, certificates, and event visuals right from Eventin.
What you can do with the event ticket builder
After you tap on the “Tickets” tab, you can see that some templates are available. Also, you can create a new template for your event. It’s useful when you run multiple events and need different ticket layouts.
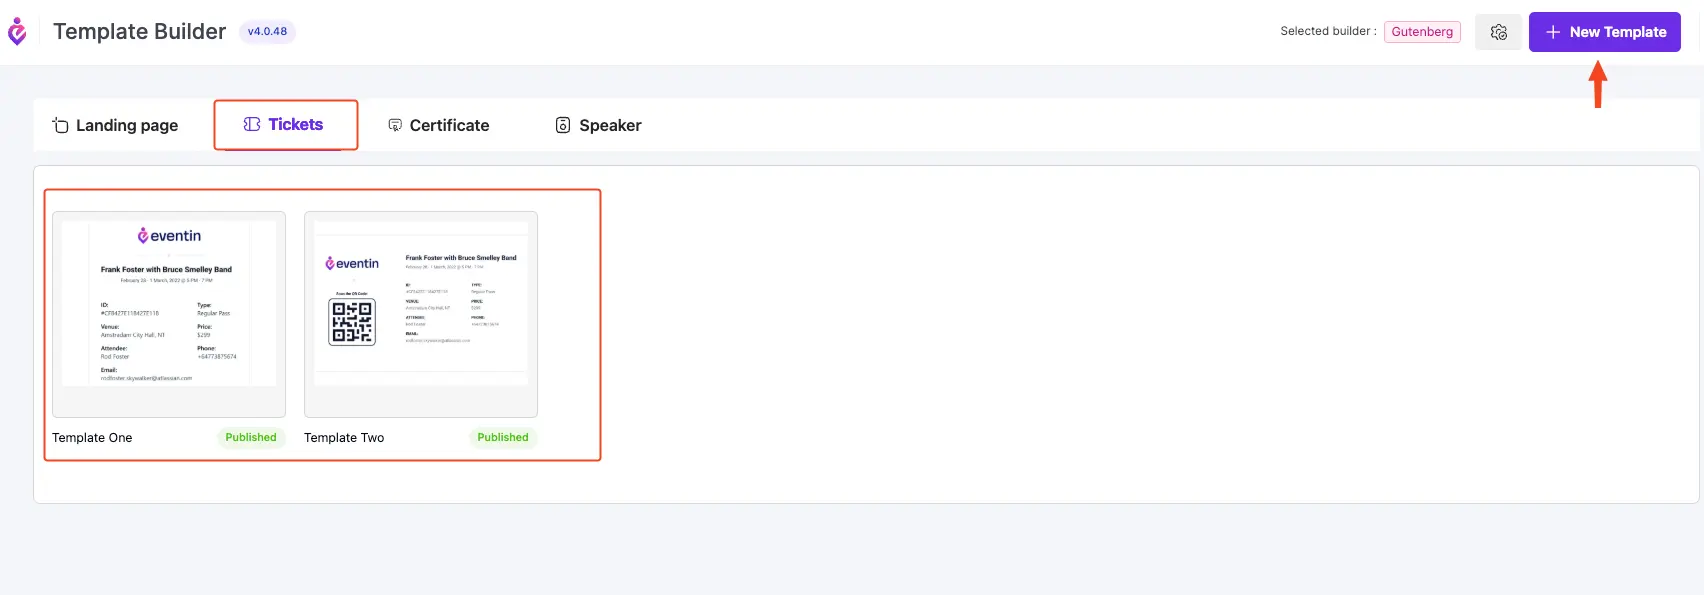
You can set up different ticket layouts, add event details, include QR codes for easy check-ins, and keep each template organized and ready to publish. It makes your tickets look clean, professional, and consistent across every event you run.
You can find the full details here about the event ticket builder.
Design better certificates with the certificate builder
The certificate builder helps event managers save time and deliver a better experience. You can create clean, branded certificates without any design tools, which is ideal for training events, workshops, or any session where attendees earn recognition.
It keeps everything in one place and makes certificate delivery fast, simple, and consistent.
To enable the certificate template feature, please go to Eventin → Add-ons and allow the Builder Certificate option.
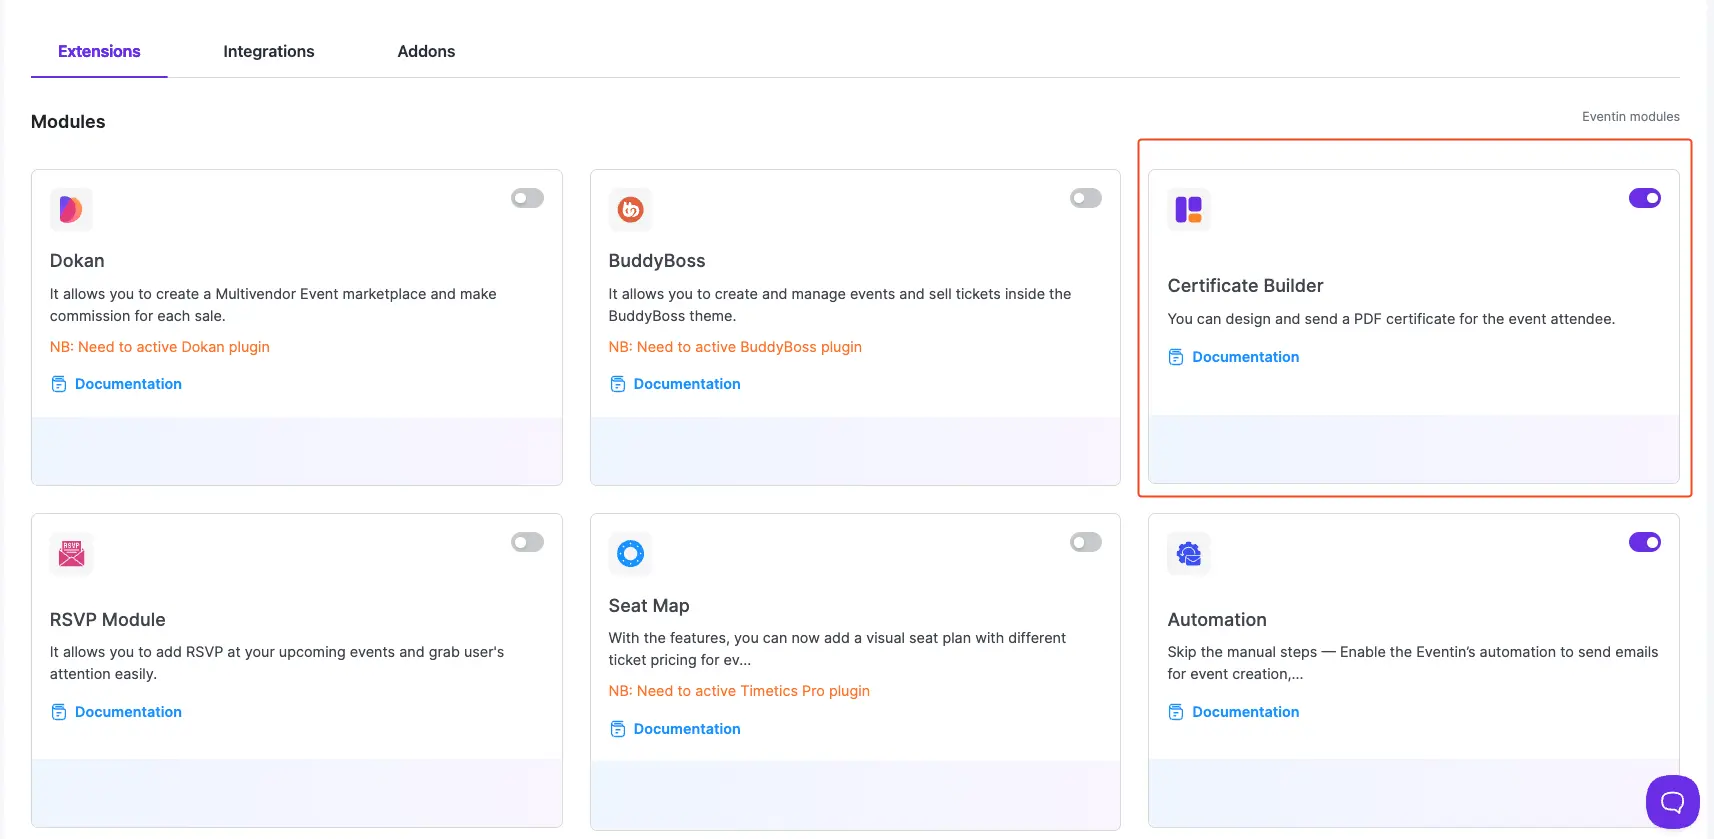
On this screen, you can get the available templates from which you can choose your event certificate. Also, you can create your own certificate.
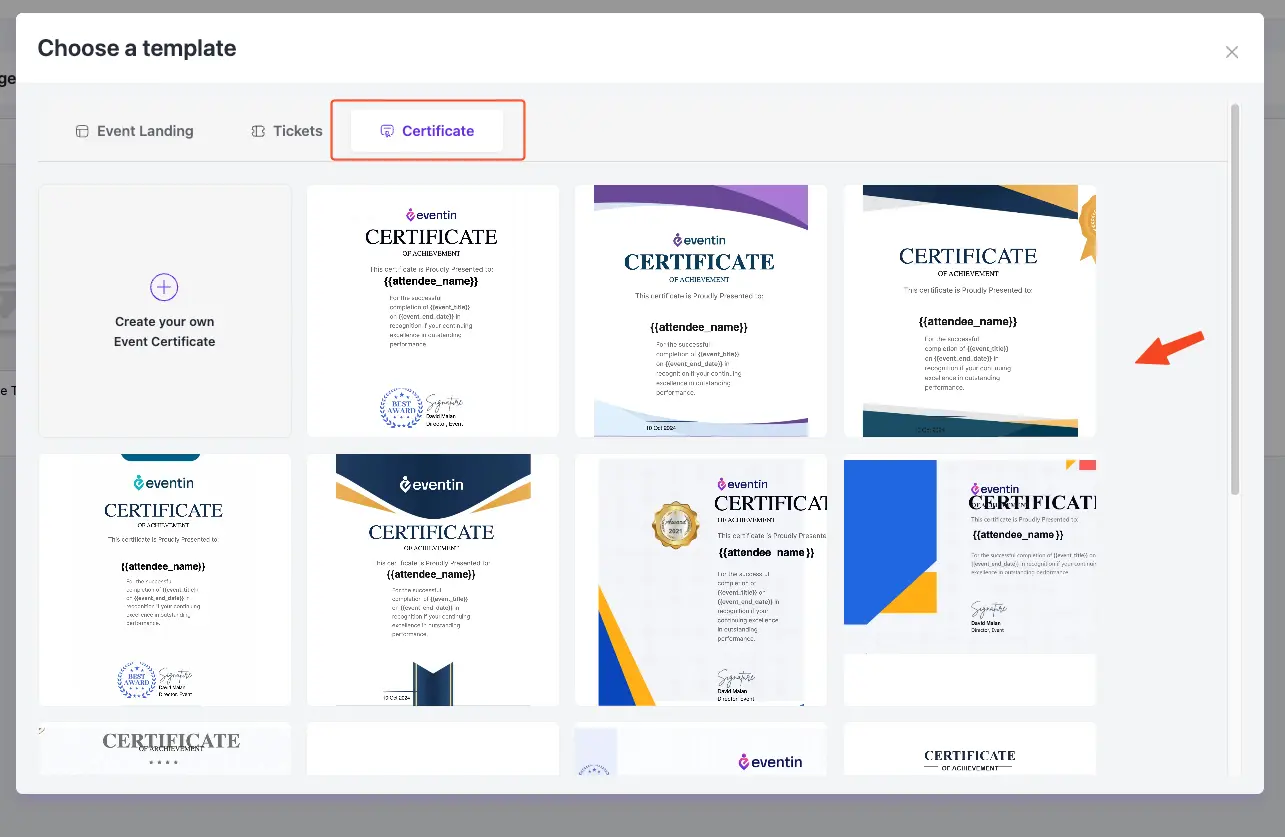
However, for a detailed guide, you can check the documentation on the event certificate builder.
You can also watch this short video to learn more about the Template Builder. It walks you through the features, each section, and how the settings work.
What are the best practices while creating your event landing page?
When you build an event landing page, you need a few things in mind. These points help you make the page clear, trustworthy, and easy to act on.
Even though the list is extensive, we want to mention here 5 of these-
- Show clear speaker authority: Tell visitors why your speakers matter. Add short details about their skills, work, or past talks. This helps people trust the event and feel confident about joining.
- Add social proof that builds trust: Share results, awards, client names, or short quotes from past attendees. Simple proof works well and helps visitors see the value fast.
- Use visuals that explain more than words: Add clean photos, short video clips, or simple graphics. Visuals help visitors understand the event style and get a better sense of the speakers.
- Use simple testimonials: Show short, real comments from people who learned something helpful or had a good experience. Keep them clear and direct.
- Add a clear call to action: Tell users what to do next. Add one clear button for registration or ticket purchase. Make it easy to find and quick to use.
SEO tips to get more traffic to your event landing page
A good event landing page should also rank on search. Here are a few simple things you can do to help people find your event on Google.
Here are a few simple ways to improve your visibility:
- Use your main keyword naturally: Include your main keyword in the title, headings, and first paragraph. Keep it natural and avoid overusing it.
- Write a clear meta title and description: Your title and description should explain what your page offers and encourage users to click.
- Make your page mobile-friendly: Most users will visit from mobile devices. Your layout, buttons, and forms should work smoothly on smaller screens.
- Improve page speed: A slow page can reduce both rankings and registrations. Optimize images and avoid heavy elements.
- Add internal links: Link to related pages like event ticket guides, calendar plugins, or registration setup. This helps search engines understand your content better.
- Use event schema markup: A schema helps search engines display your event details like date, time, and location directly in search results.
Want more unified suggestions? This guide will show you how to run events on WordPress from start to finish.
FAQs about the event landing page
Do I need a landing page for small events?
Yes. Even small meetups or workshops benefit from a clear landing page. It helps people understand the event details fast and gives them a direct link to register.
How do I create an event landing page in WordPress?
You can create an event landing page in WordPress using plugins like Eventin. These tools provide templates, ticketing options, and event management features, so you don’t need to build everything from scratch.
Can I create different sections for speakers and organizers?
Yes. The Template Builder lets you design dedicated speaker and organizer sections within the editor panel. You can show bios, achievements, photos, and contact details in a clean layout.
How do I add tickets to my event landing page?
You can add ticket blocks within the block editor if using Gutenberg. Just choose the ticket type, price, and details. Eventin will display them on your landing page with a built-in checkout button.
What is the best WordPress plugin for event landing pages?
If you need a complete solution with event creation, ticketing, and integrations, Eventin is the best WordPress plugin for event landing pages. It supports online, offline, and hybrid events, along with recurring schedules and attendee management.
Ready to give an elegant look to your event landing page?
A smart-looking event landing page helps people understand your event fast and take action without confusion. With Eventin’s Template Builder, you can design every part in one place, add the sections you need, and keep everything consistent.
You can build your main event page, speaker list, and organizer details without code, and update them anytime. This gives your event a clear look and a smooth flow.
If you are ready to give your event landing page an elegant look, open the Template Builder and start creating your layout. It only takes a few minutes to build a page that feels organized, modern, and easy to use.