How to Integrate Zapier in WordPress Website for Enhanced Automation

Table of Contents
Having difficulty managing your WordPress website and all business activities? Want to automate your workflows and save time? If this is your situation and you are looking for a solution.
Zapier is the answer! From updating social media to email automation, there are countless tasks that can drain your energy. Zapier offers a solution. You can pay attention to all of your work by automating all these tasks in one place.
In this guide, we are preparing a complete tutorial for how to integrate Zapier into your WordPress website. We will also explore a real-time use case example through the Zapier integration in WordPress.
Quick Overview
At the end of this blog, you will learn how to Integrate Zapier in WordPress website. So that you can automate tasks and improve your productivity.
- The Benefits of Integrate Zapier in WordPress
- How to Get Started with Zapier
- Creating Your First Automation (“Zap”)
- Real-Life Zapier example with Eventin Event Management Plugin
- Tips for Managing Your Zaps
What is Zapier and Why Use it in WordPress Website?
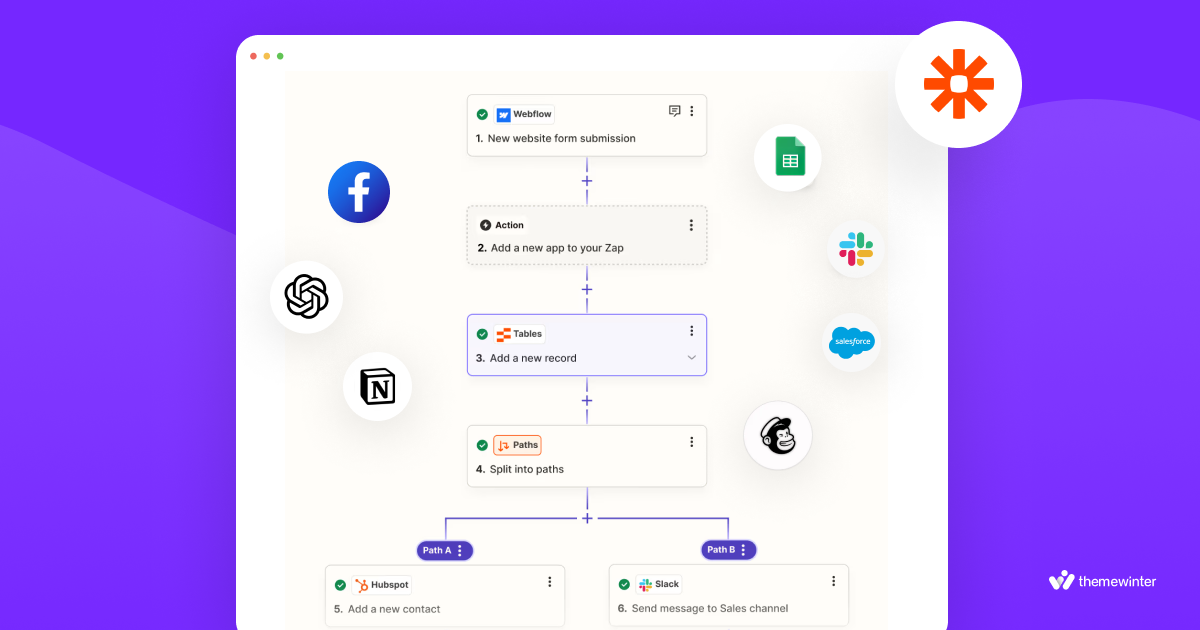
Zapier is a powerful online tool that connects your favorite apps like Google Sheets, Mailchimp, Slack, and CRM tools. It allows other applications to communicate and trigger specific actions automatically. Zapier’s “Zaps” are workflows where a “trigger” in one app executes an “action” in another app. For example, if someone registers for an event, Zapier can instantly send a notification to your team or update a Google Sheet.
Integrate Zapier in WordPress brings several benefits, including:
- Time Savings: Automate routine tasks, such as adding contacts to your CRM.
- Improved Accuracy: Reduces human error by automating data transfers.
- Better Workflow: Allows automated updates across multiple platforms to increase productivity.
Prerequisites for Integrate Zapier in WordPress Website
Before you start, you’ll need:
- A Zapier Account: Sign up for a free Zapier account or log in if you already have one.
- Admin Access to Your WordPress Site: Ensure you have admin access to install plugins and make changes.
- Event Management Plugin: For this guide, we’ll use the Eventin Event Management Plugin, which is popular for managing events, registrations, and tickets on WordPress website sites.
- Optional: Consider the WP Webhooks or Zapier plugin to enhance connectivity.
Setting Up Your First Zap in Zapier
Let’s take a look at how to set up your first Zap with Zapier, a powerful tool that automates tasks between your favourite apps.
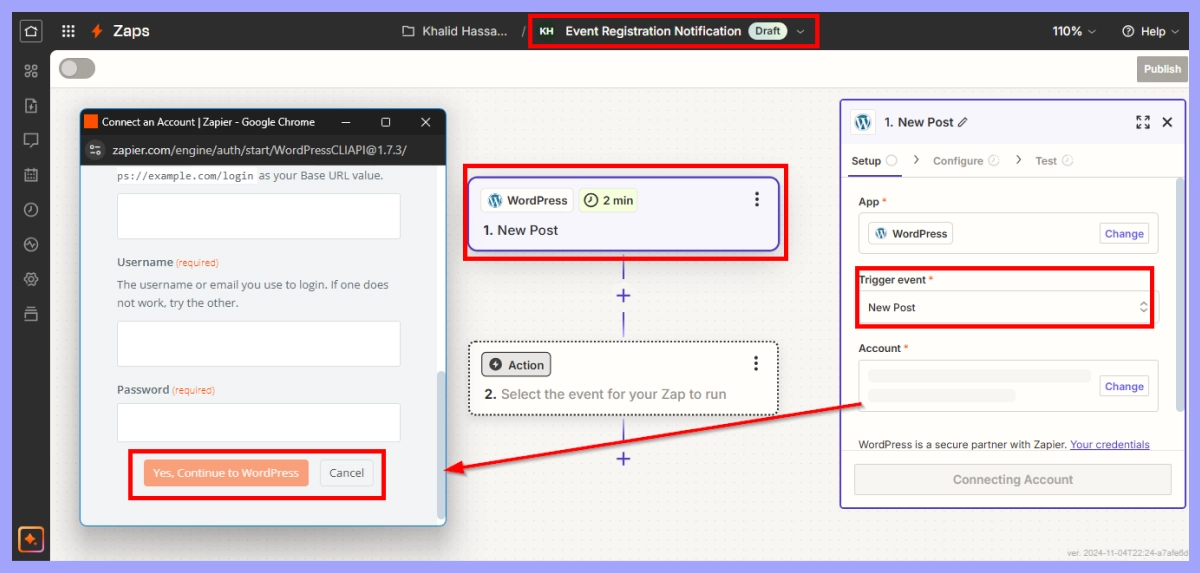
Step 1: Log into Zapier and Create a New Zap
Start automating work with Zapier by logging in at zapier.com.
- After logging in to Zapier, click Create a Zap.
- Name your Zap (e.g., “Event Registration Notification”).
Step 2: Choose a Trigger
Zapier triggers are defined as the beginning point for an automated workflow called a Zap. At the start of each Zap, there needs to be a trigger to initiate the automation process.
- Trigger App: Search for WordPress as your trigger app.
- Event Trigger: Choose an event relevant to your site. For this example, we’ll use “New Post,” but when using Eventin event manager, you’ll want to look for specific events related to registrations.
- Connect WordPress: Enter your WordPress site’s details, including URL, username, and password to connect Zapier.
Step 3: Customize Trigger Settings
Define settings based on the event type (e.g., “New Event Created” in Eventin). Set filters for event types or categories as needed to specify which events should trigger the Zap.
📢 Want to know – How Pop-up Ads Helped to Increase Leads and Sales in Your Website | Read more
Choosing an Action for the Zapier
Once you’ve defined the trigger that will initiate your automation, the next step is to select the action. This is the specific task or process you want Zapier to perform in response to the trigger.
Connecting with Other Applications
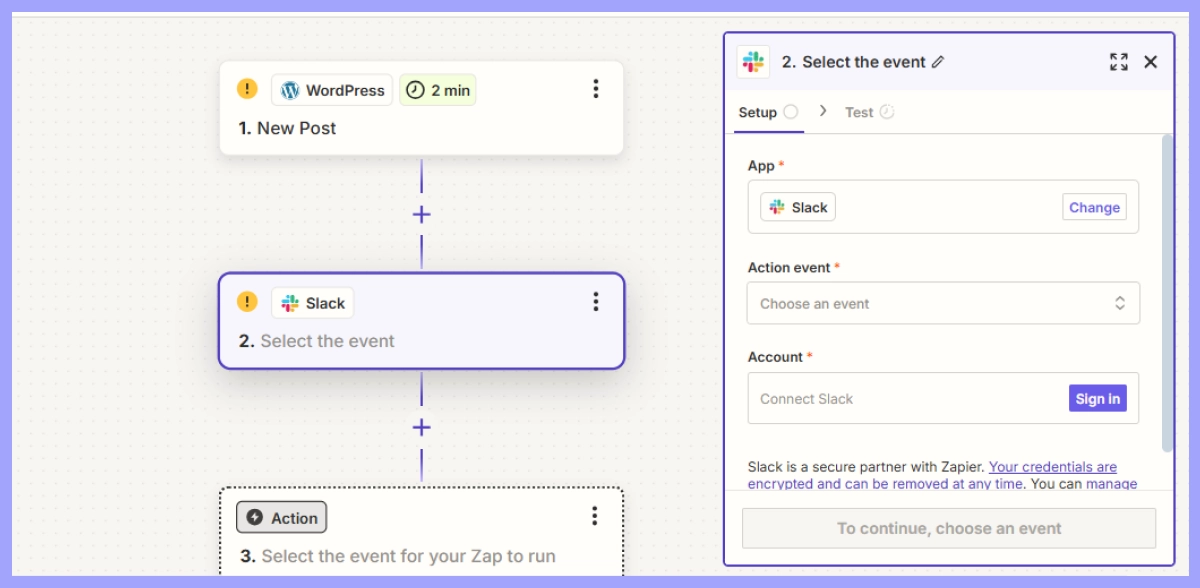
Now that the trigger is set, it’s time to select the action Zapier should take. Examples include updating a Google Sheet, sending a notification via Slack, or adding an attendee to a Mailchimp mailing list.
Example Action with Eventin
For this guide, we’ll set up an action to send a new event registration notification to Slack:
- Action App: Choose Slack.
- Action Event: Select “Send Channel Message.”
- Customize Action Details: Define the Slack channel, message format, and variables (e.g., attendee name, email) to be included in the message.
Configuring Action Settings
You may add other customizations to your action, such as defining specific messages or fields Zapier should fill based on the event registration data.
Testing and Activating Your Zap
Testing and activating your Zap ensures it works correctly and automates your workflow without issues. Testing catches errors, and activation starts the automation to save you time.
Running a Test
Zapier allows you to test your new Zap to ensure it’s set up correctly. Trigger an event in Eventin Event Manager, such as creating a test registration, to check if the action (e.g., Slack notification) is triggered.
Troubleshooting Common Issues
Ensure that all connections are properly authenticated. Check error messages in Zapier to troubleshoot any potential misconfigurations, like incorrect login details or permissions issues.
Activating Your Zap
Once tested, activate your Zap to enable the automation. It’s now live and ready to streamline your workflow!
Use Case Example – Integrate Zapier in WordPress Plugin
Let’s look at a practical example using the Eventin event management plugin for WordPress to automate registration forms and submitted information through the Zapier webhook. You can follow the same process to integrate Zapier into your plugin on the WordPress website.
Step 1: Create Webhook
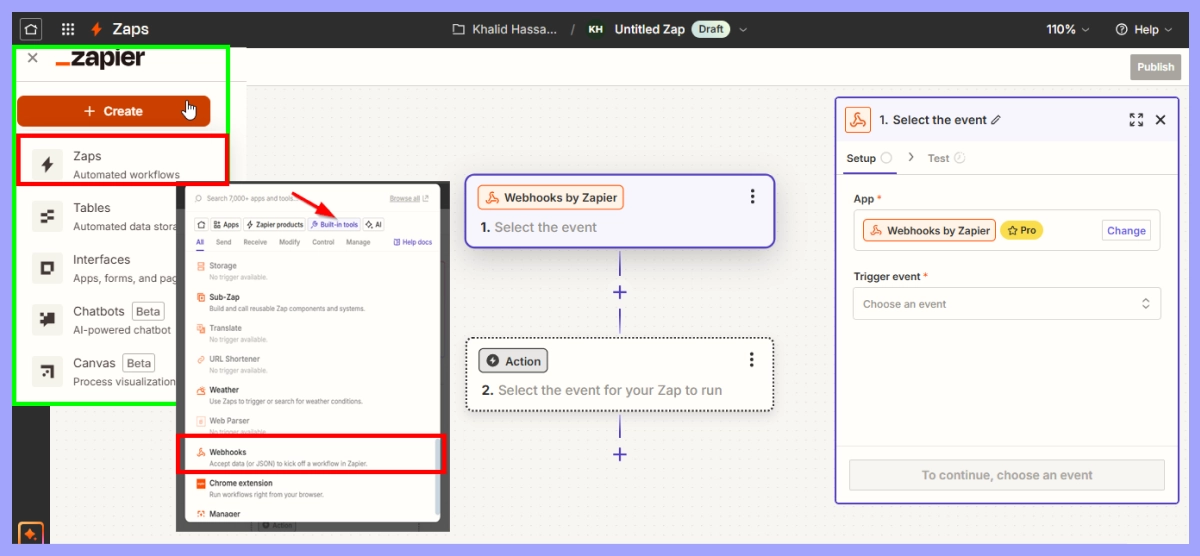
When you set up a Zapier webhook, you can use it to listen for events in one app (such as a new ticketing event app) and automatically send the data to another tool or service, without the need to manually input anything.
- Click on Create > Zaps from the top area on the left side.
- A new screen will appear. Then click “Built-in tools” and select “Webhooks.”
Step 2: Create Zapier Webhook
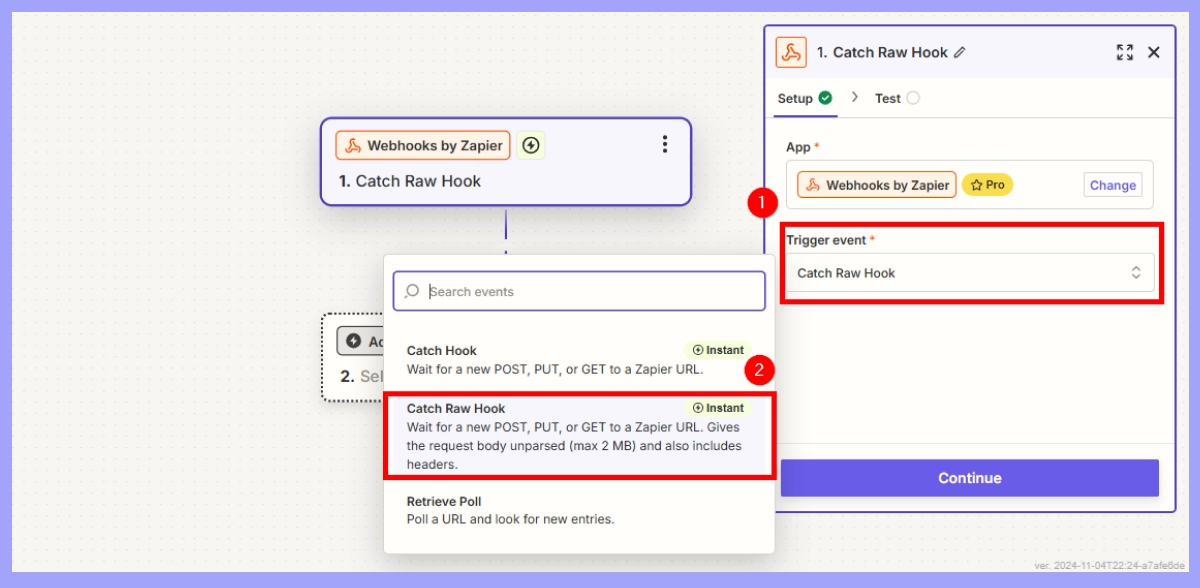
- Click on the Trigger event, and the drop-down will appear. Then select the “Catch Row Hook”.
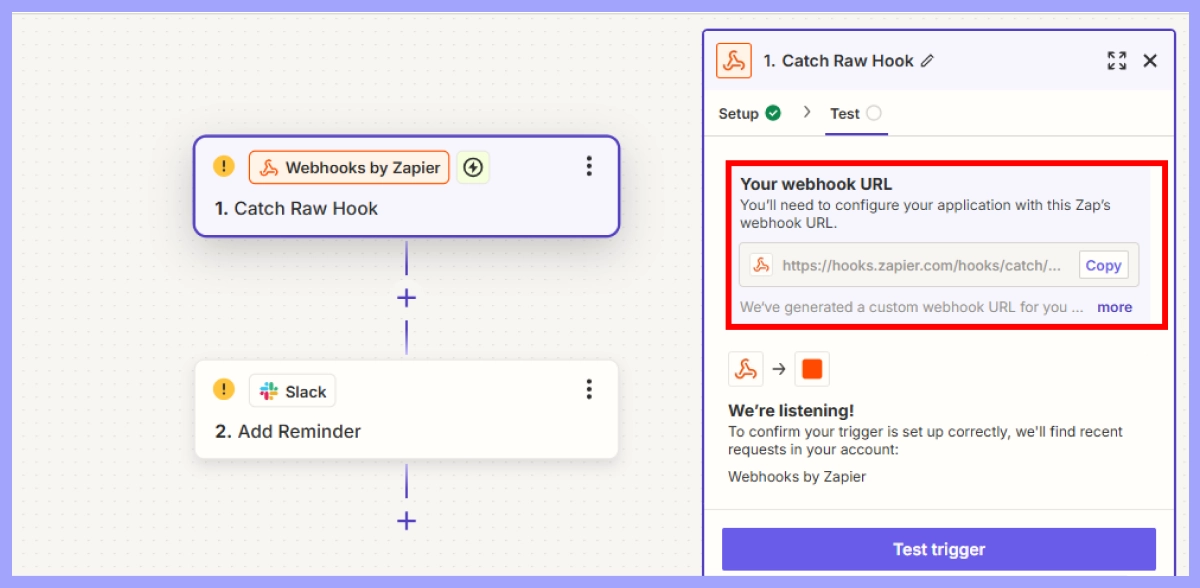
- Click on continue after copying the URL. Complete this section by pasting the URL to the Eventin Event Management Plugin hook section.
Step 3: Configure Zapier Webhook in Eventin Event Management Plugin
Depending on the Eventin version, find the settings for adding custom webhooks. Current version contains this setting.
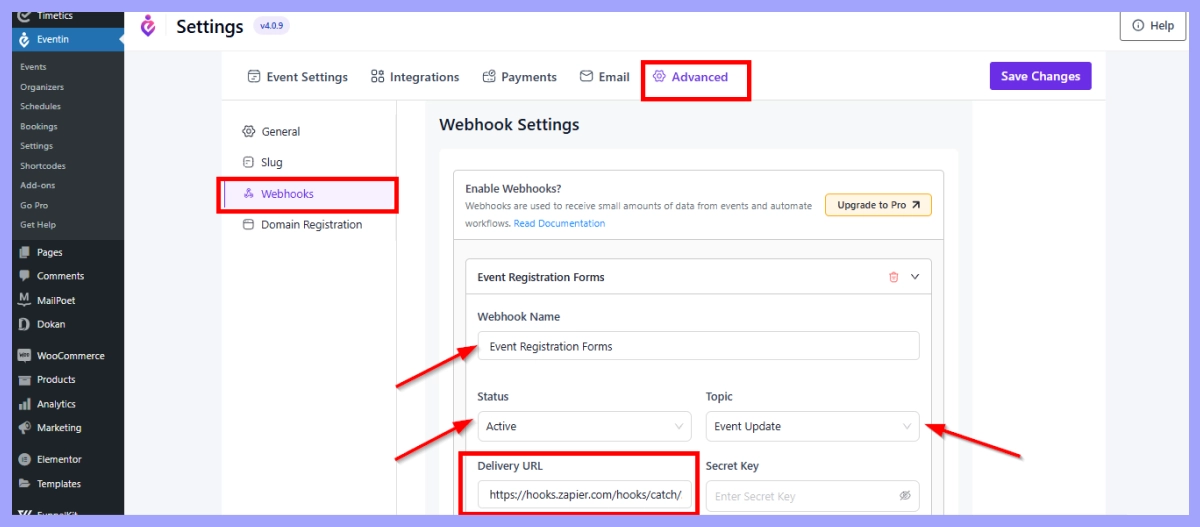
- Navigate to Event Settings > Advanced > Webhook
- Paste the Webhook URL into the “Delivery URL” section.
- Specify the name, status, and topic of the Webhook
- When you are finished configuring the webhook, click Save Changes.
Step 4: Test the Webhook
Testing the webhook is essential to confirm it’s set up correctly and data flows as expected. This helps catch any issues early, ensuring smooth and accurate automation when live.
Trigger an Event in Eventin:
- To test the webhook, register or create a test event.
- This action should send data to the Zapier webhook.
Return to Zapier to Test:
- Click Test Trigger to see if Zapier receives the event data from Eventin.
- Zapier should display sample data to confirm that the webhook is working.
Tips and Best Practices for Zapier Integration in WordPress
Optimize your Zapier WordPress integration with these essential tips. Following these practices will help keep your automation efficient, reliable, and secure.
- Use Descriptive Names for Zaps: If you’re creating multiple Zaps, name them descriptively (e.g., “Event Registration – Slack Notification”) to keep track easily.
- Monitor Zapier Task Usage: Check your Zapier account regularly to avoid crossing its limits, extra limits mean extra charges.
- Regularly Review Zaps: Make sure your Zaps are working properly, especially when you update your WordPress site or plugins.
- Follow Security Best Practices: Always use secure connections, strong passwords, and WordPress security plugins to protect sensitive data.
Frequently Asked Questions (FAQ)

Q: Do I need any coding knowledge to use Zapier with WordPress?
-You don’t need any coding skills. With Zapier, you can create automation called “Zaps” using an easy and simple visual interface. There are a few steps involved in setting up Zaps.
Q: Is it possible to use Zapier with any event management plugin on WordPress?
-Yes, many event plugins, like Eventin Event Management Plugin, can work with Zapier through webhooks. However, it is recommended to always check the plugin documentation.
Q: How can I test if my Zapier integration is working correctly?
-After creating your Zap, you can use Zapier’s “Test Trigger” feature to verify that it’s set up correctly. You should also perform a real test (such as registering for an event on your WordPress site) to ensure data flows as expected.
Do I need a paid Zapier account to integrate with WordPress?
-Zapier offers a free plan that allows you to create single-step Zaps, which can work for basic integrations. However, if you need multi-step Zaps or more complex workflows, you may need to upgrade to a paid plan.
How secure is my data when using Zapier with WordPress?
-Zapier follows industry-standard security practices to protect your data. However, you should always use secure passwords and enable HTTPS on your WordPress site.
