Fix Mixed Content Error in WordPress (3 Simple Methods)

Table of Contents
Ever noticed a “mixed content error” warning on your WordPress site? It’s a common issue and easier to fix than it sounds.
In this guide, we’ll show you how to fix mixed content errors in WordPress in three simple ways to get your site back on track.
Let’s dig in!
What is mixed content in WordPress & why does it happen?
Mixed content occurs when your WordPress site is set to load over HTTPS, but some parts, like images, scripts, or stylesheets, are still being loaded over plain HTTP.
Think of it like this: your website tells the browser, “Hey, I’m secured!” but then asks the browser to pull in a few things from a non-secure source. Browsers don’t like that mix. It’s like locking the front door of your house but leaving a window open.
Hardcoded links in your theme, plugins, or content can cause this. For example, if an image link in a blog post still uses http:// instead of https://, the browser sees that as a mixed signal. That slight difference, the missing “s” in HTTPS, is enough to raise a red flag in modern browsers.
Most modern browsers will show a warning or block these insecure elements altogether, which can break your layout or cause parts of the site to stop working as expected. It can even cause visitors to lose trust in your site.

How to identify mixed content warnings in WordPress
Before you can fix mixed content, you need to find out what’s causing it. Here’s how to identify mixed content warnings in WordPress.
1. Check your browser console
The easiest way to check for mixed content is by looking at your browser. You might see a “Not secure” warning or a broken padlock beside your site’s URL.
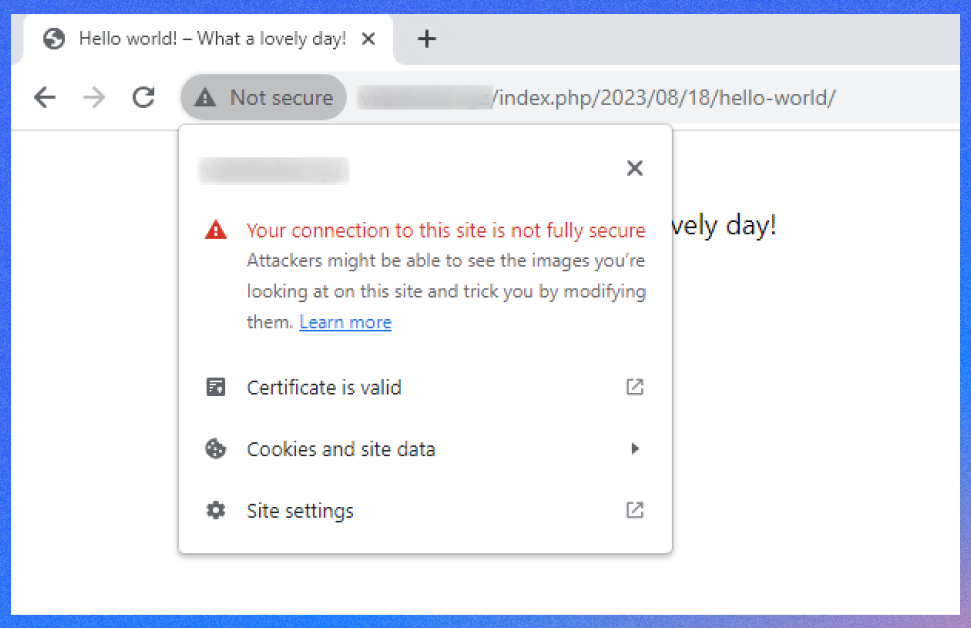
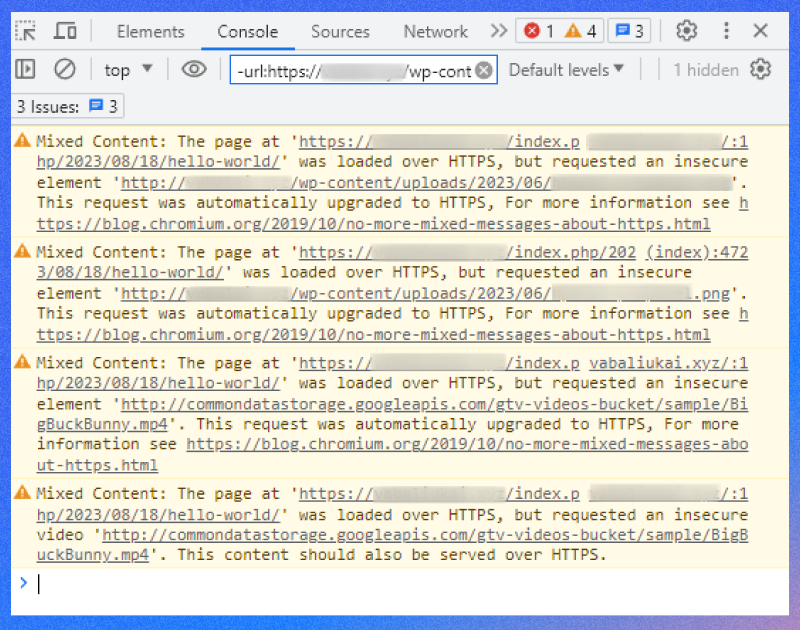
Open your website in a browser like Chrome, right-click anywhere on the page, and select Inspect. Then click the Console tab. Or, press Ctrl + Shift + I on Windows/Linux or Cmd + Option + I on Mac. Here you can find which files are still using HTTP.
These messages tell you exactly which file or link is causing the issue.
2. Use online tools
There are also free online tools that scan your site for mixed content:
- Why No Padlock? – Just enter your URL and it’ll show what’s insecure. You might need to complete a CAPTCHA before testing your site. After that, you’ll see a list of the elements causing mixed content issues.
- SSL Labs – A bit more advanced, but great for checking overall SSL health. This will display your certificate details, including the expiration date and overall rating. Aim for a rating of A or A+ with a valid expiry.
These tools are helpful if you’re not comfortable digging through browser logs.
Fix mixed content in WordPress using a plugin
If you’re uncomfortable editing code or digging through files, plugins can easily fix mixed content issues on your WordPress site.
1. Really Simple SSL
This is one of the most popular plugins for handling SSL certificates and mixed content problems. After installing and activating it, the plugin automatically updates your site settings and forces all content to load over HTTPS.
Here’s the step to follow:
- Go to Plugins > Add New
- Search for Really Simple SSL
- Install and activate it
- Follow the prompts to enable the SSL certificate
That’s it. The plugin handles most of the work behind the scenes. It even redirects all HTTP traffic to HTTPS.
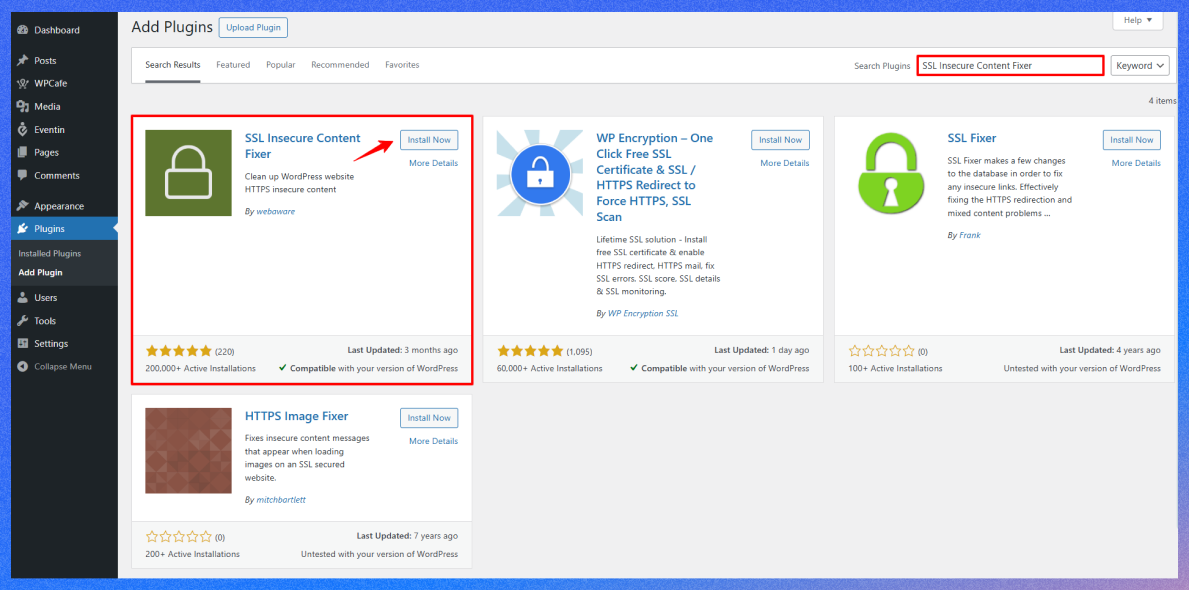
2. SSL Insecure Content Fixer
If you still notice warnings after using Really Simple SSL, this plugin gives you more control.
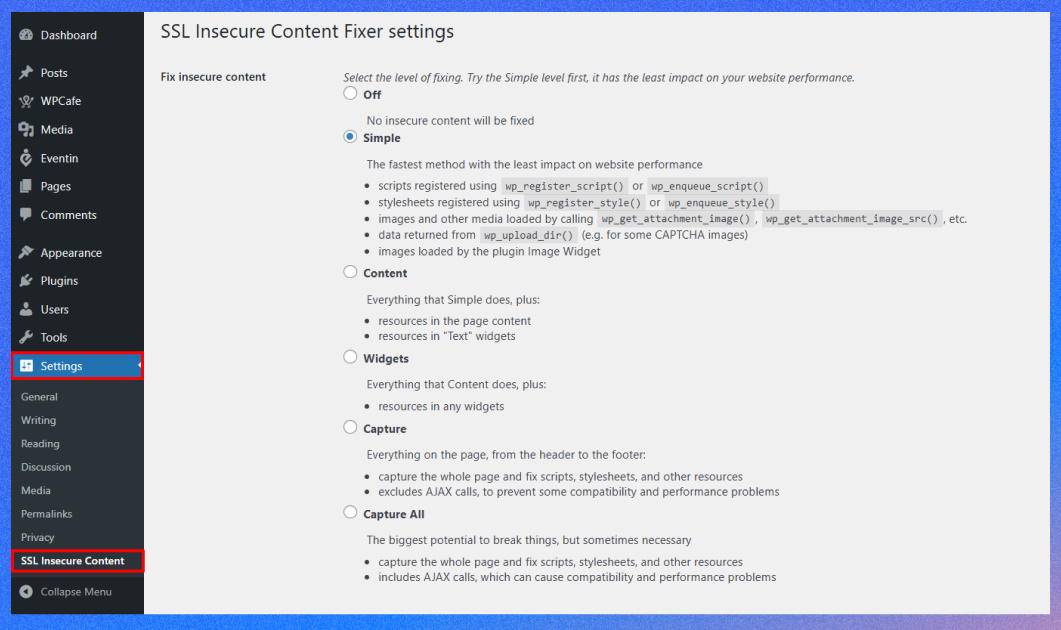
It lets you choose how deeply it scans and fixes your site. The plugin offers different fix levels:
- Simple: For basic sites
- Content: Fixes posts, pages, and widgets
- Widgets: Includes WordPress widgets
- Capture: Deeper scans for scripts and styles
- Capture All: Most aggressive, but may affect performance
Here’s the step to follow:
- Install and activate the SSL Insecure Content Fixer plugin
- Go to Settings > SSL Insecure Content from your admin dashboard to configure the plugin.
- Choose the fix level that suits your site. Start with the Simple option. It fixes scripts, styles, and media links with little impact. If the warning stays, try a stronger fix.
- The HTTPS detection setting tells WordPress how to spot secure pages. Use the default option, or pick another using a reverse proxy like NGINX or Cloudflare.
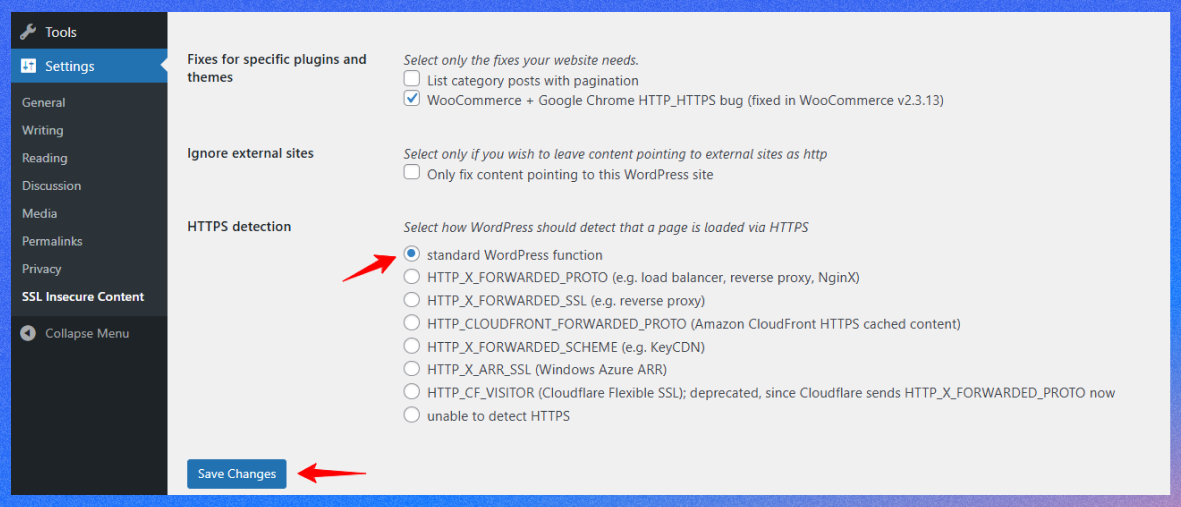
- Save changes and leave other settings as they are. Finally, clear your cache.
Plugins are the fastest way for most users to fix mixed content errors. If they don’t solve everything, you can try a few more manual options if they don’t solve everything.
Fix mixed content in WordPress manually (without a plugin)
Sometimes, the problem starts right in your WordPress settings. If your site URLs still use http:// instead of https://, WordPress will keep loading content the old way even if you have an SSL certificate installed.
Here’s how to fix that:
- From your WordPress dashboard, go to Settings > General.
- Look for the fields labeled WordPress Address (URL), Site Address (URL)
- If either of these still starts with http://, change them to https://.
- Scroll down and click Save Changes.
After that, WordPress might log you out. Just log in again using the updated, secure URL.
This change tells WordPress always to use your site’s HTTPS version, which helps avoid mixed content errors in the future.
If you’re using a caching plugin or a CDN, clearing the cache after making this change is a good idea.
Update HTTP links in content
Even after updating your site URLs, you might still have old http:// links inside posts, pages, or widgets. These can sneak in over time, especially if you added them manually before switching to HTTPS.
You can fix these in two main ways:
1. Use a Plugin to Search and Replace
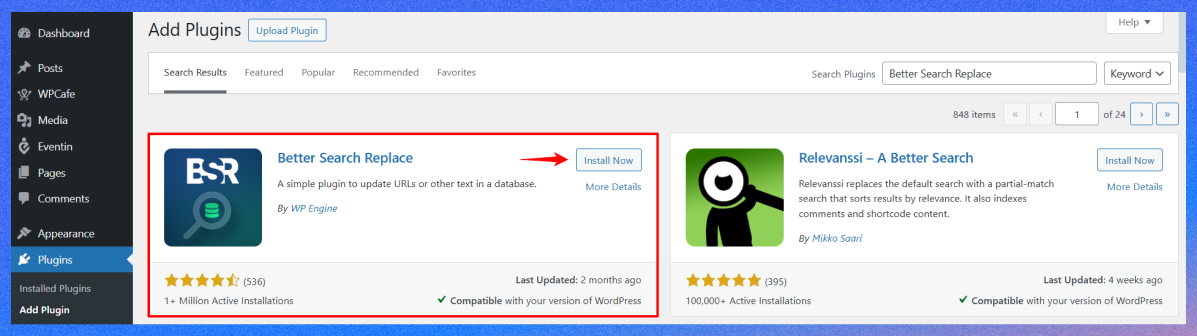
One of the easiest ways to clean up old links is to use a search-and-replace plugin, Better Search Replace.
These plugins let you search for http://yourdomain.com and replace it with https://yourdomain.com.
Here’s the step to follow:
- Install and activate the Better Search Replace plugin.
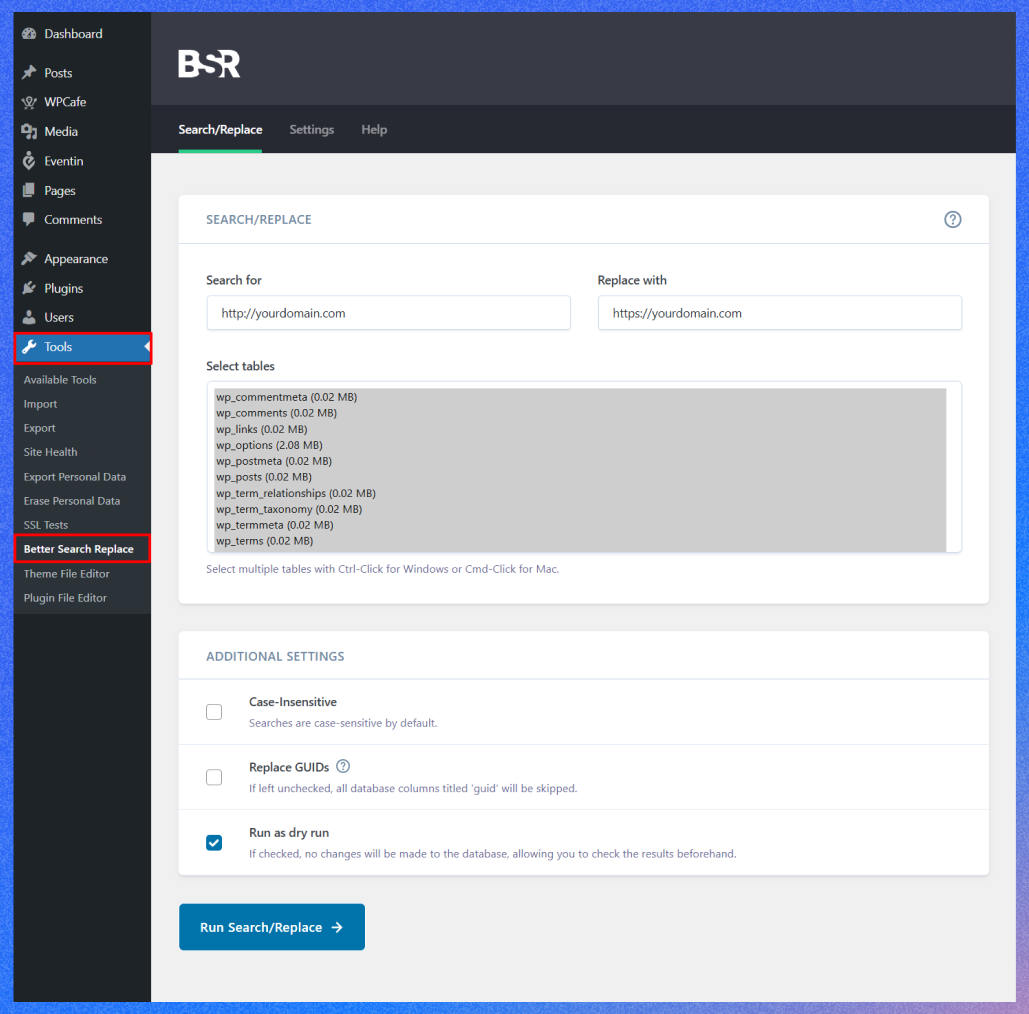
- Go to Tools > Better Search Replace after installing.
- In the field Search for, enter the HTTP website address (http://yourdomain.com). Then, in the Replace with field, enter the HTTPS version (https://yourdomain.com)
- Select the database tables you want to update (usually all). Hold Ctrl (or Command on Mac) and click each one to select.
- Run a dry run first to preview changes, then uncheck that option to apply them.
This method updates links in your posts, pages, and sometimes even settings stored in your database.
2. Edit links manually
If you prefer doing things one at a time, go through your posts and pages using the WordPress editor and change any http: // links by hand. This works best for small sites with only a few pages.
Whether you use a plugin or make manual edits, remember to clear your site cache afterward so the changes immediately appear.
Fix mixed content error in WordPress via the .htaccess file
If you’re using an Apache server (which many WordPress hosts do), the .htaccess file controls how your site handles redirects and other server-level rules. You can add some code to this file to force all traffic to use HTTPS.
Here’s how to do it:
- Log in to your web host’s cPanel or equivalent, then access your site files
- Select File Manager and navigate to the root folder of your WordPress site (often called public_html).
- Find the .htaccess File, right-click, and select edit.
- If you don’t see it, make sure hidden files are visible.
- Before editing, download a backup copy of the file.
- Now, add this code at the top.
<IfModule mod_rewrite.c>
RewriteEngine On
RewriteCond %{HTTPS} off
RewriteRule ^(.*)$ https://%{HTTP_HOST}%{REQUEST_URI} [L,R=301]- Save the file
This code tells the server to redirect all requests from HTTP to force HTTPS. It’s a strong way to reduce mixed content by ensuring visitors and browsers always use the secure version of your site.
How to fix mixed content issues in WordPress for the future
Once you’ve fixed the mixed content warnings, it’s a good idea to ensure they don’t return. A few simple steps can help keep your site fully secure in the future.
- Always use HTTPS links to new content: When adding new content like images, buttons, or links, ensure they start with https://. Most media you upload will automatically use HTTPS if your site is set up correctly, but it’s still worth double-checking, especially with external links.
- Avoid hardcoding URLs in themes or plugins: If you’re building or customizing a theme, try using functions like get_template_directory_uri() or home_url() instead of writing complete URLs by hand. This ensures that links adapt to HTTPS automatically.
- Use a CDN that supports HTTPS: If you use a content delivery network (CDN), ensure it supports and serves your files over HTTPS. Most popular CDNs do, but you must enable it in their settings.
- Run occasional site scans: You don’t have to scan daily, but run a tool like Why No Padlock? Once a month, you can catch issues early. Some WordPress plugins also include content checks as part of their features.
- Keep WordPress updated: Outdated themes, plugins, or WordPress versions can sometimes reintroduce insecure elements. Regular updates help prevent that and improve overall site security.
FAQs about WordPress mixed content error
What causes mixed content in WordPress?
Mixed content happens when your HTTPS site loads images, scripts, or stylesheets over HTTP. This creates security warnings in Chrome and other browsers.
Can I fix mixed content in WordPress without plugins?
Yes. You can manually update internal links in your database and theme files to use HTTPS.
Why does Chrome block mixed content?
Google Chrome blocks mixed content to protect user data from insecure connections. Fixing this ensures your site is secure and trusted.
How to fix blocked mixed content in WordPress?
Use plugins like Really Simple SSL or update your URLs manually to force HTTPS across all elements.
Conclusion
WordPress mixed content issues can be annoying, but they’re easy to fix once you know where to look. After switching your site to HTTPS, it usually comes down to a few leftover HTTP links.
You can use a plugin for a quick fix or go deeper by updating settings, content, and your .htaccess file. Taking care of it helps your site look more trustworthy and secure to search engines.
Once fixed, a few simple habits, like using HTTPS in new content and updating plugins, can prevent the problem from returning.
If you still need help, just contact our support team or comment below. We are always here to help, no matter the issue or the situation.