How to Manage Event Attendees in WordPress in 3 Simple Steps
Table of Contents
Managing event attendees is not just about keeping a list of names.
You need to handle registrations, track attendee details, manage check-ins, and stay in touch before and after the event. If you try to do all this manually, things quickly become confusing and time-consuming.
That’s why having a proper system matters.
If you’re using WordPress, the easiest way to manage everything is with a WordPress event registration plugin. It helps you collect registrations, organize attendee data, and handle check-ins all from one place.
In this guide, we will discuss how to manage event attendees step by step and how to make the entire process simple and organized using the best WordPress event registration plugin, Eventin.
Quick Overview
Managing event attendees becomes difficult without a proper system. A WordPress event registration plugin like Eventin helps you collect registrations, manage attendee data, and handle check-ins from one place.
In this guide, you’ll learn how to manage event attendees in WordPress in 3 simple steps and run your events smoothly without manual work.
- What event attendee management means
- Manual vs automated attendee management
- Step-by-step attendee management process
- How Eventin simplifies everything in one system

What Is Event Attendee Management?
Event attendee management is the process of handling everything related to your event participants—from registration to check-in and follow-up.
It starts when someone signs up for your event and continues until after the event ends. This includes collecting attendee details, organizing data, tracking registrations, managing check-ins, and communicating with attendees.
If you manage this manually, it often leads to confusion, missed registrations, and slow check-ins. That’s why most event organizers now use a system to handle everything in one place.
In WordPress, this is usually done with event registration plugins that help you collect registrations automatically, store and organize attendee data, manage check-ins using digital tools, and send updates or reminders without manual work.
Manual vs Automated Event Attendee Management: What’s Better?
Manual attendee management (spreadsheets, emails, paper lists) may work for small events, but it quickly becomes slow, messy, and error-prone as registrations grow. Tracking attendees, managing check-ins, and sending updates all take extra time and effort.
Automated attendee management solves this by handling everything in one place, from registration to check-in and communication. You get real-time tracking, faster entry with QR codes, and automated emails without manual work.
Here’s a quick comparison:
| Feature | Manual Management | Automated Management |
|---|---|---|
| Registration tracking | Manual entry | Automatic tracking |
| Data organization | Spreadsheets | Central dashboard |
| Check-in process | Paper or list-based | QR / digital check-in |
| Communication | Manual emails | Automated notifications |
| Scalability | Limited | Easily scalable |
How to Prepare for Managing Event Attendees
Before diving into the nitty-gritty of the event attendee management system, it’s crucial to lay down a solid foundation. This step sets the stage for a successful event and ensures that managing attendees becomes a seamless process.
Here’s what you need to do:
- Define Your Event Goals: Start by clearly defining the objectives of your event. Whether it’s to network, educate, or fundraise, understanding your goals will guide all subsequent decisions regarding event attendee management systems.
- Choose the Right Venue: Selecting a suitable venue is paramount to accommodating your expected number of attendees comfortably. Consider factors like location, capacity, amenities, and accessibility to ensure a positive experience for all participants. You can check these venue marketing strategies, too.
- Set Up Your WordPress Event Management System: Install and configure a WordPress event management plugin that aligns with your needs. Popular plugins like Eventin and The Events Calendar offer comprehensive features for attendee registration, ticketing, and communication. You can compare The Events Calendar vs Eventin for a better understanding.
- Customize Registration Forms: Tailor registration forms to collect essential information from attendees, such as name, email, and any specific preferences or requirements. Keep the form concise yet informative to encourage participation.
- Establish Communication Channels: Determine how you’ll communicate with attendees throughout the event lifecycle. Whether it’s through email newsletters, social media updates, or a dedicated event website, consistent communication fosters engagement and keeps attendees informed.
By investing time and effort into these initial preparations, you’ll set the stage for efficient event attendee management and pave the way for a memorable event experience for all involved.
How to Choose the Right WordPress Event Management Plugin
Selecting the appropriate event management plugin for your WordPress website is crucial for ensuring smooth and efficient handling of your events. With numerous options available, it’s essential to consider several factors to make an informed decision.
Here’s what to keep in mind when choosing the right event management plugin:
- Features and Functionality: Assess the features offered by each plugin and ensure they align with your specific event management needs. Look for key functionalities such as attendee registration, ticketing, scheduling, and communication tools.
- Customization Options: Opt for a plugin that allows for customization to reflect your branding and event requirements. The ability to customize registration forms, event pages, and communication templates can enhance the overall attendee experience.
- User Interface and Ease of Use: Consider the user interface of the plugin and ensure it is intuitive and user-friendly for both administrators and attendees. A streamlined interface can simplify event management tasks and encourage attendee engagement.
- Integration Capabilities: Check whether the plugin integrates seamlessly with other tools and platforms you use, such as payment gateways, email marketing software, and CRM systems. Integration capabilities can streamline workflows and enhance overall efficiency.
- Pricing and Licensing: Evaluate the pricing structure and licensing options of the plugin to ensure it fits within your budget and meets your licensing requirements. Consider factors such as one-time fees, subscription plans, and renewal costs.
But the fun part is – the popular WordPress plugin Eventin (that’s us!) meets all the criteria mentioned above. So, we suggest you check out what this event management plugin offers that has made it a complete solution for professional event organizers!
Manage Your Event Attendees the Smart Way
Managing registrations, attendees, and check-ins manually can slow you down. With Eventin, you can handle everything in one place—from collecting registrations to managing attendees and automating your workflow.
Watch this quick video to see how you can set everything up in just a few minutes.
Get Started with Eventin3 Simple Steps on How to Manage Event Attendees with WordPress
In this section, we’ll explain how you can manage your event attendees in three simple steps. But before we proceed, you need to create your event so that your attendees can register. Let’s begin.
Step – 1: Creating Events With Eventin Event Management Plugins for WordPress
For event creation, you’ll need some initial things to consider. Because it will eventually determine which Eventin features you should leverage to make your events effective. Here’s the sequential way you should follow-
a) Determining Your Event Type
Before diving into event creation, it’s essential to determine the type of event you’ll be hosting. Whether it’s a one-time gathering, a series of events, or a hybrid event, understanding your event type will shape how you set up and manage your events.
Consider the following questions:
- Is your event a one-time occasion or part of a recurring series?
- Will attendees need to register for each event individually, or can they sign up for multiple sessions at once?
- Are there specific dates and times for your event, or does it span across multiple days or weeks?
By clarifying your event type, you’ll be better equipped to create a seamless experience for both yourself and your attendees.
b) Creating Single / Multiple / Recurring Events
With the Eventin event management plugin for WordPress, you have the flexibility to create different types of events tailored to your needs. Here are the types of events you can create with Eventin-
- Single Events: For one-time events with a specific date and time, simply create a single event. Provide details such as event title, date, time, venue, description, and ticket options to get started.
- Multiple Events: If you’re hosting a series of related events, such as a workshop series or a conference with multiple sessions, It allows you to create multiple events with ease. Add details for each event individually, or use templates to streamline the process.
- Recurring Events: For events that repeat on a regular schedule, such as weekly meetings or monthly seminars, it offers the option to set up recurring events. Specify the recurrence pattern (daily, weekly, monthly, annually) and additional options for each event to automate event creation and scheduling. For comprehensive guidance, check out our separate content on creating recurring events using Eventin.
Step 2: Managing Event Attendees
As you have already created an event (considering your event type), now it’s time to enable your event attendees to register for your event. To do it, follow the sequence Eventin > Settings > Event Settings > Attendee > Enable attendee registration. If you do it correctly, it will show you the following interface-
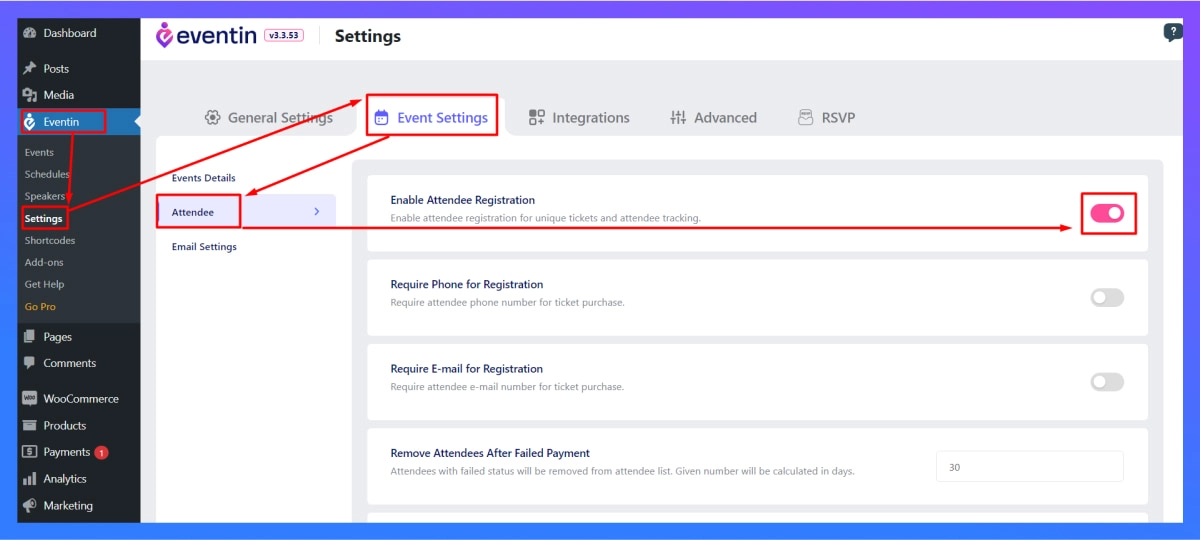
Now, you’ll receive a list of options where you can specify whether your attendees will need to provide a phone number or email for registration.
Additionally, you can make other necessary changes such as enabling Bulk Attendee, setting up the Attendee Verification Process, customizing Attendee Ticket Style, etc. These combined adjustments can help you manage your event attendees more efficiently.
Step 3: Adding Event Attendees Manually
Eventin event management plugin for WordPress, can allow you to add your event attendees manually from the back end. To make it happen, follow the sequence Eventin > Attendee > Click on “Add New”. If you do it correctly, it will show you the following interface-
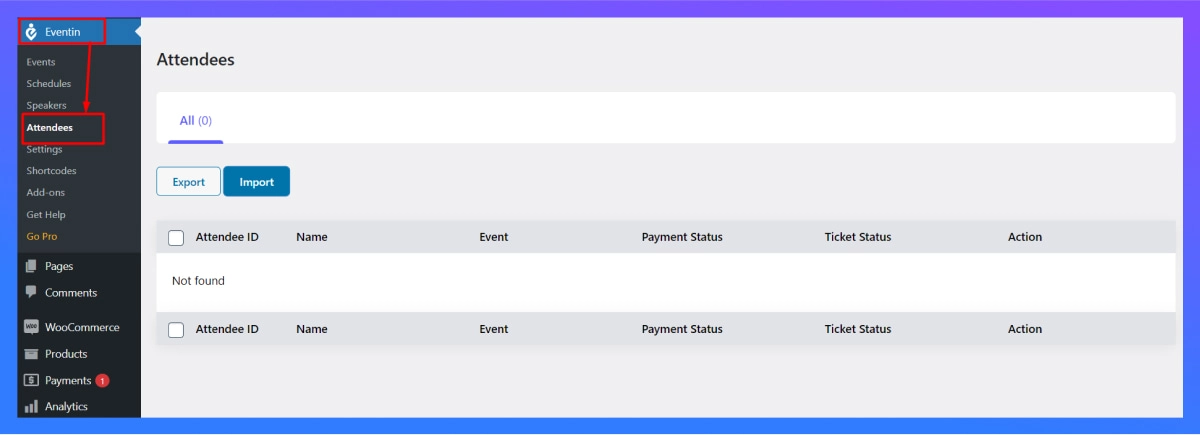
As you can see, you can import event attendees from any CSV or JSON file. However, when you activate the Pro License, you will be able to add attendees with all the relevant details.
Want to see how everything works in real time? This quick video shows how to manage event attendees, registrations, and check-ins using Eventin step by step.
Why Using Eventin Is the Best Way to Manage Event Attendees
Managing event attendees manually sounds simple at first. But once registrations start coming in, things quickly get messy.
This is where Eventin makes a real difference.
Eventin is the best WordPress event registration plugin that lets you manage everything from a single dashboard. From the moment someone registers to the time they check in at your event, the entire process stays organized and easy to control.
Here’s what makes it a better choice:
- All-in-one attendee management → No need for extra tools or plugins
- Real-time attendee tracking → See registrations and updates instantly
- Built-in event registration system → Collect and manage attendee data automatically
- QR code check-in → Verify attendees quickly and avoid long entry lines
- Ticket and attendee control → Manage different ticket types and participant lists easily
Instead of switching between tools or fixing manual errors, you can manage and run events from ticket creation to payments and attendee management.
Manage Your Event Attendees with Eventin
Managing registrations, attendees, and check-ins manually can slow you down. With Eventin, you can handle everything in one place—from collecting registrations to managing attendees and automating your workflow.
FAQs on How to Manage Event Attendees
How do you manage event attendees in WordPress?
You can manage event attendees in WordPress by using an event management plugin that handles registrations, attendee data, and check-ins in one place. Tools like Eventin let you track attendees, manage tickets, and control event entry without manual work.
What is the best way to track event attendees online?
The best way to track event attendees is by using a centralized attendee management system where you can view registrations, monitor ticket sales, and organize participant data in real time. This helps avoid errors and keeps everything updated automatically.
Do I need a plugin to manage event attendees in WordPress?
Yes, managing event attendees without a plugin can become difficult as your event grows. A plugin helps automate registration, attendee tracking, and check-in, making the whole process easier and more reliable.
How do I collect attendee information for events?
You can collect attendee information through event registration forms that ask for details like name, email, and ticket type. Most event management plugins allow you to customize these forms and store all data in one dashboard.
Can I manage large events with WordPress?
Yes, you can manage large events in WordPress if you use the right event management plugin. With tools like Eventin, you can handle large attendee lists, track registrations, and manage check-ins efficiently.
How can I automate event attendee management?
You can automate event attendee management by using an event management system like Eventin that handles registrations, updates attendee data automatically, and provides check-in tools. This reduces manual work and improves accuracy.
Final Thoughts: Manage Event Attendees Without the Hassle
Managing event attendees becomes difficult when you rely on manual methods, as tracking registrations, handling check-ins, and organizing attendee data can quickly get messy. Using a proper system keeps everything in one place and makes the process smooth from start to finish.
With Eventin, you can manage registrations, track attendees, and handle check-ins without extra effort, so your event runs more smoothly and stays fully organized.